Connecting the hdd drive to the motherboard. Connecting a hard drive via a USB adapter
Good day everyone, my dear friends. Today I want to tell you about how to connect a hard drive via USB to a computer or laptop. Personally, I had this question when I replaced it on my laptop, after which the old “hard” remained restless, although fully functional. Therefore, I hasten to please you. If you have such a device, then you can make a great one out of it mobile storage data.
There is, however, one small condition. These methods are only suitable for more or less modern hard drives with an interface of at least SATA.
Cam Box - This is (as you understand) a certain box (plastic or metal), inside of which there is a special slot for a particular disk. Naturally, it is worth noting that there are boxes for both large HDDs (3.5) and small ones (2.5), which go under laptops.
The HDD is simply inserted into the box, and after assembly it will be no different from a regular external one. hard drive. After that, you just need to insert into it USB cable and connect to your computer. This way you get double benefits:
- You bring an old device back to life and use it;
- You practically get an external HDD for free
On such media you can store any backup and archival copies, or use it in everyday life.
All the fun will cost you an average of 300-500 rubles.
Adapter (SATA-USB)
The easiest and least expensive way is to purchase a special SATA-USB adapter. The adapter itself is a cable, at one end of which there is a connector for connecting a disk, and at the other end there is a USB port.

Well, I think you guessed what needs to be done in this case. Yes, it's simple. Connect the hard drive to the connector, and insert the other end into the USB port of your computer or laptop.
But it’s just worth considering that conventional HDDs (3.5) may not have enough power from one USB cable, so purchase a cable with two connectors and use them simultaneously.

Depending on the company and the quality of the product, such cables will cost you approximately 200-600 rubles.
Dock station
The most expensive, but very effective option is to purchase a docking station. These devices are somewhat reminiscent of old consoles like Dendy or Sega. The similarity is that instead of connectors for cartridges, there are connectors for HDDs. All you have to do is simply insert the hard drive into this station, and then connect it via USB to the computer.

There are such devices different types, and in many cases you will be able to work not only with one disk, but with several at once, even of different form factors (2.5 and 3.5).
The cheapest options with one device will cost you no less than 1000 rubles, or even more. More powerful stations cost 3 and 4 thousand rubles each.
As you can see, there are enough ways to connect a hard drive via USB to a computer, for every taste and color. So you no longer have to leave all your devices unattended.
Well, this is where I end my article. I hope you liked it, so don't forget to subscribe to my blog updates and also share blog articles on social networks. Good luck to you. Bye bye!
Best regards, Dmitry Kostin
A hard drive is a computer's storage unit. Bytes of information are recorded in it and do not disappear even when the power is turned off, which cannot be said about RAM. Having an HDD (hard drive) is mandatory for using any PC, but the problem is that the laptop does not have obvious connectors for connecting it, so we will look into the hidden part of it.
First of all, you should find out what kind of HDD you have (if you want to connect an existing one), since they also differ in form factor and size. Desktop computers use 3.5 hard drives, which are 25mm high, while laptops use 2.5 hard drives with a height of 9.5mm or, in older models, 12.5mm.
Accordingly, to find out whether it is possible to connect a hard drive to a laptop in a standard way, that is, when replacing the main HDD, you need to find out what kind of hard drive you have, and based on this, the necessary actions will be taken.
Initially, we will look at how to connect a disk to a laptop with its replacement, then another situation: how to connect second hard disk to a laptop with different interfaces.

Replacing HDD on a laptop
If in a stationary device, in order to remove the hard drive, you need to unscrew the cover, remove the connection cables and unscrew the screws at the fastening points, then here the situation is a little different. Next we will consider simple replacement HDD, provided that you have a 2.5 hard drive.
- Turn the laptop over and you will see a large plastic cover with bolts, sometimes there are several of them, then remove each one until you find the disk, usually under the last part;
- Unscrew the screws holding the device; sometimes special grooves are used instead;
- Pull the disk back, grasping the side where the contacts connect;
- Lifting up you can get the HDD;
- Install another hard drive in the same way.
An elementary situation is considered, which involves replacing identical devices, how to connect a 3.5 SATA HDD to a laptop or install additional devices.
How to connect a SATA hard drive to a laptop?
Situations with different types of devices will be considered here. First, let's consider the option of connecting hard drives SATA drives using an adapter. This method will allow you to connect the hard drive to your laptop via a USB connector, which is very convenient, but slightly slows down the system’s response speed when working in it.
Be sure to make sure that you have a SATA interface, as older models used IDE.
To perform this procedure, you need to purchase an adapter from SATA to USB; it can be found everywhere. affordable price. As well as in SATA connection 2 connectors are used: one is data transfer or control, the other is power supply, which is shorter in length - this information flow, exactly the same with the adapter. See photo.

There are 2 wires from the adapter, one is responsible for power, you need to connect it to the network, the other has USB output, it should be connected to a laptop, preferably to USB 3.0. Thus, regardless of the size, you will have a makeshift external HDD.
There is another connection method, which involves using a box. This box is equipped with a built-in SATA or IDE to USB adapter, completely turning the internal drive into an external one. The advantage of using this method will be protection from external damage to the device. This box can also be used (if SATA 2.5) to connect a second internal drive.

To connect a second internal drive, you will have to sacrifice the drive and replace it with a pocket for an SSD or HDD. Still, in 2016, using a CD-ROM is not relevant for most cases. This kind of pocket does not require great effort in connection: you need to remove the drive and insert the pocket directly in its place. Connecting a CD-ROM and HDD is no different, so adapters are not needed. Of course, you will have to disassemble the laptop a little. Such a pocket costs from 200-300 UAH.

What should I do if my hard drive is not showing up?
An unpleasant situation happens and after connecting, even if it is correct, the HDD still does not appear or does not work. Manipulations to solve the problem are carried out in the system. It takes a little effort to fix the glitch, since Windows must install the hard drive itself.
If the box, adapter or hard drive is not standard, then you may need to manually install the drivers. First you need to find out if this is true:
- Click Start and right-click “Computer”, then “Properties”;
- Now click on the “Device Manager” link;
- In chapter " Disk devices“There should be an item with the name of your disk and there should not be a yellow exclamation mark icon on it.

If everything is in order, then proceed further, but if there is no such item or it is marked as problematic, then the problem is in the driver. You can click right click and select “Update drivers...”, if that doesn’t help, then you can find them on the manufacturer’s website. There should be no problems with installation.
Another case is when the drive letter is not determined, then you should:
- Go to “Control Panel” from Start;
- Click on the “Administration” tile;

- Now select "Computer Management";

- In the left menu, find “Disk Management”;

- You should see the second HDD; to display it, you should initially change the letter. This is done via right click;
- If it doesn’t help, format it by right-clicking and the corresponding item. File system must match, usually NTFS or FAT32.
That's all, we were able to connect the hard drive to different conditions and configure it for further use.
If you still have questions on the topic “How to connect a hard drive to a laptop?”, You can ask them in the comments
if(function_exists("the_ratings")) ( the_ratings(); ) ?>
Every year the amount of information stored on a computer increases. As a result, the computer takes a long time to boot and freezes periodically. And this is natural, because all data is stored on a hard drive, the memory of which is limited.
Users solve this problem in different ways. Someone transfers information to various media, someone turns to a specialist and asks to increase the computer's memory, and someone decides to connect a second hard drive to the computer. Therefore, let’s figure out how to connect a second hard drive to a computer without the help of a specialist – on your own.
To begin with, you need to completely cut off the power system unit : Disconnect all cables and power cable. Now it is necessary unscrew the side covers system specialist Let's expand it back towards you and unscrew the four screws on the sides. Lightly pressing on the side parts, move them in the direction of the arrow and remove.
Hard drives in the system unit are installed in special compartments or cells. Such compartments may be located in the rear of the system unit, at the bottom or in the middle; some hard drives are installed turned on their side. If your system unit has several bays for hard drives, install the second one not adjacent to the first one - this will improve its cooling.

Depending on the method of connection to the motherboard, internal hard drives are divided into two types: with IDE and SATA interface. IDE is an older standard; now all system units are designed to connect hard drives with a SATA interface. It is not difficult to distinguish them: IDE has wide ports for connecting a hard drive and power supply and a wide cable, while SATA has both ports and cable much narrower.
Connecting a hard drive via SATA interface
If your system unit has a hard drive with a SATA interface, then connecting a second one will not be difficult.
Insert the second hard drive into a free slot and attach it to the body with screws.

Now we take a SATA cable through which data will be transferred, and connect it to the hard drive on either side. We connect the second plug of the cable to the SATA connector on the motherboard.

All system units have at least two SATA connectors; they look as shown in the picture below.

To connect to the power supply, a cable is used, the plug of which is slightly wider than that of a SATA cable. If there is only one plug coming from the power supply, you need to buy a splitter. If the power supply does not have a narrow plug, you will need to buy an adapter.

Connect the power cable to the hard drive.

A second hard drive is installed on the computer. Place the side covers of the system unit in place and secure them with screws.
Connecting a hard drive via the IDE interface
Although the IDE standard is outdated, hard drives with an IDE interface are still available. Therefore, next we will look at how to connect a second hard drive via the IDE interface.
First you need install jumper on the hard drive contacts to the desired position. This will allow you to determine in which mode the hard drive will operate: Master or Slave. Typically, a hard drive that is already installed on the computer operates in Master mode. It is the main one and is loaded from it operating system. For second hard disk that we are going to install, you need to select Slave mode. The contacts on the hard drive case are usually labeled, so just place the jumper in the desired position.

The IDE cable through which data is transmitted has three plugs. One is located at the end of a long piece, blue, connected to the motherboard. Another one is in the middle, white, connects to the slave disk (Slave). The third, at the end of a short segment, black, is connected to the master disk.

Insert the hard drive into a free cell. Then secure it with screws.

Choose free plug from the power supply and insert it into the appropriate port on the hard drive.

Now insert the plug that is located in the middle of the train, to the hard drive port for data transfer. In this case, one end of the cable is already connected to the motherboard, the other to the previously installed hard drive.

Connecting the second hard drive via the IDE interface is now complete.
As you can see, we didn’t do anything complicated. Just be careful, and then you will definitely be able to connect a second hard drive to your computer.
We also watch the video
Modern technologies are developing more and more every year. The time has long come when one hard drive in a computer is not enough. Great amount people connects a second HDD to a personal computer. The connection procedure is nothing fancy and even a beginner can figure it out. Let's look at everything more carefully and in detail.
Connecting a second HDD to a laptop or Personal Computer
There are two options for adding an additional hard drive:
- To the PC system unit. This method Great for standard desktop computers;
- Adding in the form of an external drive. This is very easy way, which is suitable for all devices.
Method 1: Adding to the system unit
The process of adding additional media to the system unit can be divided into several small stages. Let's look at each of them in more detail.
Type Definition
At the very first stage, you need to decide on the type of interface with which the hard drive interacts. It is worth noting the important fact that the predominant number of computers have SATA interface, therefore, it is advisable that the second hard drive is of a similar type. The motherboard may not have an IDE bus because it is considered very old, which may cause some problems when installing older hard drives.
The best way to determine the standard is to carefully consider the pins.
Example of a SATA connector

Example of an IDE connector

Adding a second SATA drive to the system unit
Addition additional disk – simplest process which goes like this:

Boot priority for SATA drives
By default, there are four holes on the motherboard for adding SATA drives. It is worth understanding that their numbering starts from zero. Namely, the priority of the hard drive directly depends on the connector number. For independent task priority, you must use the BIOS. Each has a certain BIOS type, its own special controls, as well as a special interface.
In the most early version you need to go to the “Advanced BIOS Features” menu and start working with items such as “First/Second Boot Device”. IN modern versions the path looks like this: “Boot/Boot Sequence – 1st/2nd Boot Priority”.
Adding an additional IDE drive
There are also cases when you need to connect an old IDE drive. Step-by-step instruction The process looks like this:

Connecting the second IDE to the first SATA
If necessary this procedure, then you will need an appropriate IDE-SATA adapter. An example of an adapter can be seen below:

Step-by-step instruction:
- First you need to put the jumper in the Master position.
- The IDE plug is connected to the hard drive.
- Take a red SATA cable and connect one side to the motherboard and the other to the adapter.
- The power cable is connected to the power supply and adapter.
About possible display problems
Sometimes it happens that after an additional hard drive has been connected, the system cannot recognize it. Don't panic, because most likely you did everything right. Just for proper operation the second hard drive needs to be initialized.
Method 2: Connecting an external hard drive
Connection external HDD convenient if the stored files are needed not only at home, but also outside of it. In addition, this method is the only correct one for laptop owners, since they simply do not have a special additional connector for a new hard drive.
In fact, everything is easy here, because external hard drive connects via USB, just like any other devices (mouse, keyboard, flash drive, webcam and much, much more).
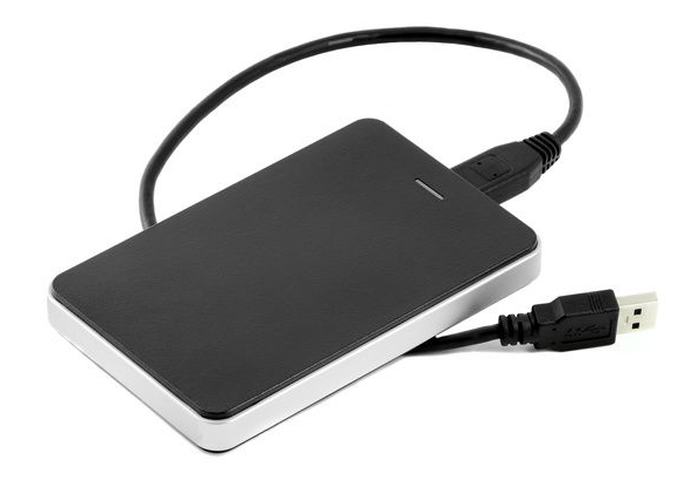
Hard drives that are installed in the system unit can also be connected via a USB connector. Here you will need an external hard drive enclosure or a special adapter. The bottom line is this: the required voltage is supplied to the HDD through the adapter, and communication with the Personal Computer occurs via USB. Different hard drives have their own wires, so you should always check Special attention to the standard that specifies the dimensions.
A hard drive is a simple and small “box” in appearance that stores huge volumes information on the computer of any modern user.
This is exactly what it seems like from the outside: a fairly uncomplicated little thing. Rarely does anyone, when recording, deleting, copying and other actions with files of varying importance, think about the principle of interaction between the hard drive and the computer. And to be even more precise - directly from the motherboard.
How these components are connected into a single uninterrupted operation, how the hard drive itself is designed, what connection connectors it has and what each of them is intended for - this is Key information about a data storage device familiar to everyone.
HDD interface
This is the term that can correctly be used to describe interaction with the motherboard. The word itself has a much broader meaning. For example, the program interface. In this case, we mean the part that provides a way for a person to interact with the software (convenient “friendly” design).
However, the interface is different from the interface. In the case of the HDD and motherboard, it does not present a pleasant graphic design for the user, but a set of special lines and data transfer protocols. These components are connected to each other using a cable - a cable with inputs at both ends. They are designed to connect to ports on the hard drive and motherboard.
In other words, the entire interface on these devices is two cables. One is connected to the power connector of the hard drive at one end and to the computer’s power supply itself at the other. And the second of the cables connects the HDD to the motherboard.
How a hard drive was connected in the old days - the IDE connector and other relics of the past
The very beginning, after which more advanced HDD interfaces appear. Ancient by today's standards, it appeared on the market around the 80s of the last century. IDE literally means “embedded controller”.
Being a parallel data interface, it is also commonly called ATA - However, as soon as the new SATA technology appeared over time and gained enormous popularity in the market, the standard ATA was renamed PATA (Parallel ATA) to avoid confusion.

Extremely slow and completely raw in its technical capabilities, this interface during the years of its popularity could transfer from 100 to 133 megabytes per second. And then only in theory, because in real practice these indicators were even more modest. Of course, newer interfaces and hard drive connectors will show a noticeable lag between the IDE and modern developments.
Do you think we shouldn’t downplay the attractive sides? Older generations probably remember that technical capabilities PATA made it possible to service two HDDs at once using only one cable connected to the motherboard. But throughput the lines in this case were similarly distributed in half. And this is not to mention the width of the wire, which somehow, due to its dimensions, impedes the flow of fresh air from the fans in the system unit.

By now, the IDE is naturally outdated, both physically and morally. And if until recently this connector was found on motherboards in the low and middle price segments, now the manufacturers themselves do not see any prospects in it.
Everyone's favorite SATA
For a long time, IDE became the most popular interface for working with information storage devices. But data transmission and processing technologies did not stagnate for long, soon offering a conceptually new solution. Now it can be found in almost any owner personal computer. And its name is SATA (Serial ATA).

Distinctive features of this interface are parallel low power consumption (compared to IDE), less heating of components. Throughout the history of its popularity, SATA has undergone development in three stages of revisions:
- SATA I - 150 Mb/s.
- SATA II - 300 MB/s.
- SATA III - 600 MB/s.
A couple of updates were also developed for the third revision:
- 3.1 - more advanced throughput, but still limited to a limit of 600 MB/s.
- 3.2 with the SATA Express specification - a successful merger of SATA and PCI-Express devices, which made it possible to increase the read/write speed of the interface to 1969 MB/s. Roughly speaking, technology is an “adapter” that translates the usual SATA mode at a higher speed, which is what the PCI connector lines have.
The real indicators, of course, clearly differed from the officially announced ones. First of all, this is due to the excess bandwidth of the interface - for many modern drives the same 600 MB/s is unnecessary, since they were not originally designed to operate at such read/write speeds. Only over time, when the market gradually becomes filled with high-speed drives with operating speeds that are incredible for today, will the technical potential of SATA be fully utilized.
Finally, many physical aspects have been improved. SATA is designed to use longer cables (1 meter versus 46 centimeters that were used to connect hard drives with an IDE connector) with much compact size and pleasant appearance. Support for “hot-swap” HDDs is provided - you can connect/disconnect them without turning off the computer’s power (however, you still need to first activate the AHCI mode in the BIOS).

The convenience of connecting the cable to the connectors has also increased. Moreover, all versions of the interface are backward compatible with each other (a SATA III hard drive connects without problems to II on the motherboard, SATA I to SATA II, etc.). The only caveat is that the maximum speed of working with data will be limited by the “oldest” link.

Owners of old devices will also not be left out - existing PATA to SATA adapters will often save you from the more expensive purchase of a modern HDD or a new motherboard.
External SATA
But a standard hard drive is not always suitable for the user’s tasks. There is a need to store large volumes of data that require use in different places and, accordingly, transportation. For such cases, when you have to work with one drive not only at home, external hard drives have been developed. Due to the specifics of their device, they require a completely different connection interface.
This is another type of SATA, created for connectors external hard disks with external prefix. Physically, this interface is not compatible with standard SATA ports, but it has similar throughput.

There is support for hot-swap HDD, and the length of the cable itself has been increased to two meters.
In its original version, eSATA only allows the exchange of information, without feeding it into the corresponding connector external hard drive the required electricity. This drawback, which eliminates the need to use two cables at once for connection, was corrected with the advent of the Power eSATA modification, combining eSATA technologies (responsible for data transfer) with USB (responsible for power).
Universal Serial Bus
In fact, becoming the most common serial connection standard digital technology, Universal Serial Bus is a household name these days.
Having transferred long history With constant major changes, USB means high data transfer speeds, power for an unprecedented variety of peripheral devices, and ease and convenience in everyday use.
Developed by companies such as Intel, Microsoft, Phillips and US Robotics, the interface became the embodiment of several technical aspirations:
- Expanding the functionality of computers. Standard peripherals up to the emergence of USB was quite limited in variety and each type required a separate port (PS/2, port for connecting a joystick, SCSI, etc.). With the advent of USB, it was thought that it would become a single universal replacement, significantly simplifying the interaction of devices with a computer. Moreover, this development, new for its time, was also supposed to stimulate the emergence of non-traditional peripheral devices.
- Provide connection of mobile phones to computers. The trend that spread in those years was the transition of mobile networks to digital transmission voice revealed that none of the interfaces developed then could provide data and voice transmission from the phone.
- Inventing a convenient "plug and play" principle, suitable for "hot plugging".
As is the case with the vast majority of digital equipment, the USB connector for a hard drive has become a completely familiar phenomenon for a long time. However, in different years of its development, this interface has always demonstrated new peaks in speed indicators for reading/writing information.
USB version | Description | Bandwidth |
The first release version of the interface after several pre-release versions. Released January 15, 1996. |
|
|
Improvement of version 1.0, correcting many of its problems and errors. Released in September 1998, it first gained mass popularity. | ||
Released in April 2000, the second version of the interface has a new, faster High-Speed operating mode. |
|
|
The latest generation of USB, which has received not only updated bandwidth indicators, but also comes in blue/red colors. Date of appearance: 2008. | Up to 600 MB per second |
|
Further development of the third revision, published on July 31, 2013. Divided into two modifications, which can provide any hard drive with a USB connector maximum speed up to 10 Gbit per second. |
|
Apart from this specification, various USB versions implemented and under different types devices. Among the varieties of cables and connectors of this interface are:
| USB 2.0 | Standard | ||
|
|
|
|
|
|
|


USB 3.0 could already offer one more new type- C. Cables of this type are symmetrical and are inserted into the corresponding device from either side.

On the other hand, the third revision no longer provides for Mini and Micro “subtypes” of cables for type A.

Alternative FireWire
For all their popularity, eSATA and USB are not all options for how to connect an external hard drive connector to a computer.
FireWire is a slightly less known high-speed interface among the masses. Provides daisy chain connection external devices, the supported number of which also includes HDD.
Its property of isochronous data transmission has mainly found its application in multimedia technology (video cameras, DVD players, digital audio equipment). Hard drives are connected to them much less often, giving preference to SATA or a more advanced USB interface.

This technology acquired its modern technical characteristics gradually. Thus, the original version of FireWire 400 (1394a) was faster than its then main competitor USB 1.0 - 400 megabits per second versus 12. The maximum permissible cable length was 4.5 meters.
The arrival of USB 2.0 left its rival behind, allowing data exchange at a speed of 480 megabits per second. However, with the release of the new FireWire 800 (1394b) standard, which allowed transmission of 800 megabits per second with a maximum cable length of 100 meters, USB 2.0 was less in demand on the market. This prompted the development of the third version of the serial universal bus, which expanded the data exchange ceiling to 5 Gbit/s.
Besides, distinctive feature FireWire is decentralized. Transferring information via a USB interface requires a PC. FireWire allows you to exchange data between devices without necessarily involving a computer in the process.
Thunderbolt
Intel, together with Apple, showed its vision of which hard drive connector should become an unconditional standard in the future by introducing the Thunderbolt interface to the world (or, according to its old code name, Light Peak).

Built on PCI-E and DisplayPort architectures, this design allows you to transfer data, video, audio and power through a single port with truly impressive speeds of up to 10 Gb/s. IN real tests this figure was a little more modest and reached a maximum of 8 Gb/s. Nevertheless, even so, Thunderbolt has overtaken its closest analogs FireWire 800 and USB 3.0, not to mention eSATA.
But this promising idea of a single port and connector has not yet received such widespread adoption. Although some manufacturers today successfully integrate connectors for external hard drives, the Thunderbolt interface. On the other hand, the price for the technical capabilities of the technology is also relatively high, which is why this development is found mainly among expensive devices.
Compatibility with USB and FireWire can be achieved using appropriate adapters. This approach will not make them faster in terms of data transfer, since the throughput of both interfaces will still remain the same. There is only one advantage here - Thunderbolt will not be the limiting link with such a connection, allowing you to use all technical USB capabilities and FireWire.
SCSI and SAS - something that not everyone has heard of
Another parallel interface for connecting peripheral devices, which at one point shifted the focus of its development from desktop computers for a wider range of technology.
"Small Computer System Interface" was developed a little earlier than SATA II. By the time the latter was released, both interfaces were almost identical in their properties to each other, capable of providing a hard drive connector stable work from computers. However, SCSI used a common bus, which is why only one of the connected devices could work with the controller.

Further refinement of the technology, which acquired the new name SAS (Serial Attached SCSI), was already devoid of its previous drawback. SAS provides connection of devices with a set of managed SCSI commands via a physical interface, which is similar to SATA. However, broader capabilities allow you to connect not only hard drive connectors, but also many other peripherals (printers, scanners, etc.).
Supports hot-swappable devices, bus extenders with the ability simultaneous connection several SAS devices to one port, and also provides backward compatibility with SATA.
Prospects for NAS
An interesting way to work with large volumes data, which is rapidly gaining popularity among modern users.
Or, abbreviated as NAS, they are a separate computer with some disk array, which is connected to a network (often local) and provides storage and transmission of data among other connected computers.

Acting as a network storage device, this mini-server is connected to other devices via an ordinary Ethernet cable. Further access to its settings is provided through any browser connected to network address NAS The available data on it can be used both via an Ethernet cable and via Wi-Fi.
This technology allows us to provide a fairly reliable level of information storage and provide convenient, easy access to it for trusted persons.
Features of connecting hard drives to laptops
Principle HDD operation with desktop computer is extremely simple and understandable to everyone - in most cases, you need to connect the power connectors of the hard drive to the power supply using the appropriate cable and connect the device to the motherboard in the same way. Using external drives You can generally get by with just one cable (Power eSATA, Thunderbolt).
But how to properly use laptop hard drive connectors? After all, a different design requires taking into account slightly different nuances.
Firstly, to connect information storage devices directly “inside” the device itself, it should be taken into account that the HDD form factor must be designated as 2.5”
Secondly, in laptop hard The drive is connected directly to the motherboard. Without any additional cables. Simply unscrew the HDD cover on the bottom of the previously switched off laptop. It has a rectangular appearance and is usually secured with a pair of bolts. It is in that container that the storage device should be placed.

All laptop hard drive connectors are absolutely identical to their larger “brothers” intended for PCs.
Another connection option is to use an adapter. Eg, SATA drive III can be connected to USB ports installed on a laptop using a SATA-USB adapter device (there are a huge variety of similar devices on the market for a variety of interfaces).
You just need to connect the HDD to the adapter. It, in turn, is connected to a 220V outlet to supply power. And use a USB cable to connect this entire structure to the laptop, after which the hard drive will be displayed as another partition during operation.