You need a good program to partition your hard drive. How to partition a hard drive
So you are faced with the question of how to break HDD into sections. The reasons may be different, for example, you purchased new HDD for increase permanent memory existing computer or bought new laptop, but without a pre-installed system, and you have to install it yourself Windows shell, or you simply don’t have enough volume system partition disk for newly installed programs.
Basic ways to divide hard drive space
Regardless of the reasons that prompted you, you want to partition your hard drive yourself, but have little idea how this is done in practice. This is where we will try to help you by telling you not only about the basic ways to properly partition a hard drive, but also pointing out certain nuances and difficulties that you may encounter during this difficult work.
Let's look at how to divide a hard drive of any type (HDD or SSD) in three ways, namely using:
- standard utilities running installed Windows on your computer;
- special programs for working with various information storage devices;
- Windows PE boot shell.
So, let's get started and try to exactly follow the sequence of actions, otherwise, this may lead to either repeating operations for a new drive, or losing important data when working with existing storage media.
Partitioning a disk using a standard Windows utility
This method of working with drives is not very complicated and, most importantly, does not require third party programs. It is suitable for partitioning both the main "C" drive and for partitioning external HDD into sections. This utility for working with storage media is available in all versions from Windows XP to Windows 10.
So for direct work With hard drives you need to open the standard Windows shell utility, and it can be called to the desktop in two ways:
In the window that opens " Disk management» should be reflected all connected in this moment information storage devices, including flash memory, to your computer.
Move the mouse cursor over required section and call right click context menu For of this disk. And here, depending on what we want to do, we decide on the team we need in the future.
Divide the disk into two
If this is one main drive “C”, then this is a simple way to divide the hard drive into two and not lose it with one hundred percent certainty system information. To do this, perform the following steps:

That's it, the main disk is divided into two partitions.
Partitioning the disk
But how to divide a hard drive into partitions, in the case of a new, just purchased drive, working with this standard utility, is also not difficult, but the algorithm of actions will be slightly changed. The sequence of actions will be as follows:

It's worth remembering here that disk system MBR allows you to create no more than 4 partitions on one hard drive.
Working with disks using special utility programs
The following universal software utilities for working with various information storage devices have found the greatest popularity among users, namely:
- Acronis Disk Suite;
- Paragon Partition Manager Professional;
- AOMEI Partition Assistant Technician Edition.
These utilities are specially adapted to perform almost all basic operations with HDD, SSD and other storage media. They have a fairly clear interface designed to work with both specialists and ordinary users.
Split the disk into partitions using these universal utilities Let's look at an example program AOMEI Partition Assistant, which can be installed on your computer like standard application, or use it from portable mode.
And also for comparison, we will show the operation of the utility in two modes when dividing the main disk into two and partitioning the new one hard drive into several sections.
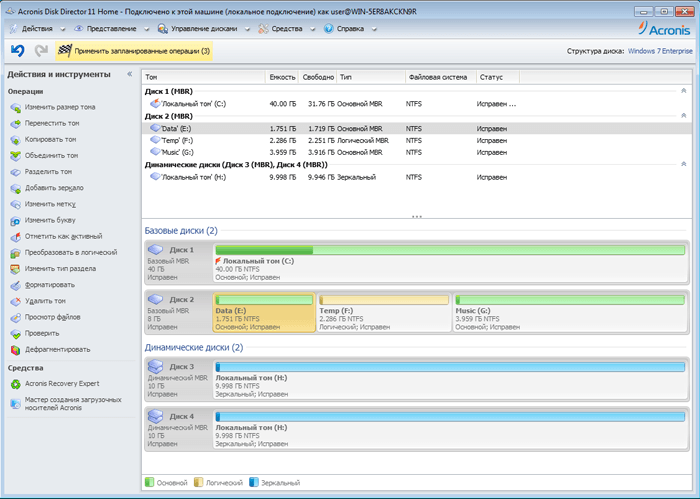
We open the program and see a window with extensive information on all connected storage media and their sections.

Divide by two
The algorithm for partitioning the main hard drive “C” consists of a set of sequential commands:

After the reboot, having completed all the operations, the system will boot, but with the main disk divided into two parts.
Dividing a new disk
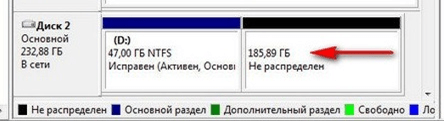
Typically, the new HDD will represent unallocated space and will only be visible in the program window.

First, be sure to clearly indicate the disk with which we will work by hovering the mouse cursor and obtaining the corresponding color gradation of the position. But if you make a mistake, you can lose everything important information on a randomly selected existing storage medium.

The algorithm for working with other universal programs for resizing various storage media is very similar to the example above. The only significant difference will be the program interface and menu layout.
Partitioning the main disk using the Windows PE boot shell
If you decide to install a new operating system or completely update the old one, and the existing partition sizes of the main HDD do not suit you or do not respond necessary requirements, then it is better and easier to reformat by logging into the computer from a special simplified shell.

If desired different versions can be downloaded from the Internet, and they are freely available there and are equipped with a set of all necessary portable programs for working not only with storage media, but also have a whole range of different useful utilities. For example, you can take the distribution kit from the site https://diakov.net/8305-adminpe-30.html, which does not require additional registration from the user.
Having loaded onto a USB or CD/DVD media, we boot the system using the key to call up the menu, in which there is a choice of boot device. Typically this is function key F11, after pressing which, we select our media.
After loading the portable desktop, a desktop will appear that almost completely replicates the familiar Windows shell, but with pre-installed software modules.
Opening universal program to work with various information storage devices and work according to the previously given example in background and without unnecessary reboots.

The main advantage of the shell is that software modules are in no way connected with hard drives, which allows you to perform all possible operations to reformat them using any possible way without any restrictions.
Conclusion
In this article we learned how to partition a disk on a PC or laptop. different ways. Examples were considered: how to divide a hard drive into 2 parts, and how to create partitions on a hard drive. In similar ways you can break external hard disk. Just connect it to your computer and do the same steps.
Video on the topic
Key Features
- resizing hard drive partitions;
- formatting/deleting/creating/copying logical and primary partitions;
- file conversion FAT systems in NTFS;
- hard drive cloning;
- visual viewing of data;
- converting a dynamic disk to a basic one;
- hard drive performance testing;
- hide/show/set active partition;
- changing the assigned letter.
Advantages and disadvantages
Advantages:
- free distribution;
- performing all basic actions with disk volumes;
- internal data security system;
- work with traditional and new types of disks;
- professional testing tools;
- support for working with RAID arrays.
Flaws:
- blocking certain functions;
- lack of support for dynamic disks;
- English menu.
Paragon Partition Manager. Free software For driving hard drive. It can change partition structure, size, defragment and search bad sectors. Supports any media models.
Partition Magic. Free program for breaking down hard disk into partitions, as well as managing their structure. It can perform scheduled backups, create volumes, merge them into one or split them, and resize them.
Work principles
After starting the program, its working window will open with the disk selected by default:
Working window
The sidebar is divided into sections. At the top there are buttons for managing current tasks. Below is the Wizards section with three wizards for copying and restoring. If you select a specific volume, then the list available operations will expand.

Operations on the selected volume
You can format, delete, copy, move, expand volumes, set headers, check the integrity of a partition, view its properties, and much more. etc.
If you need to increase, for example, the size of drive C by reducing other volumes, use the “Extend Partition” tool, which performs expansion.

Changing the disk size
Select the drive, activate the tool and configure the settings in the window that opens. Then click “Ok”, after which new scheduled operations will appear
In order to create new section, select the area with the stripe gray(“Unallocated”), and then activate the “Create Partition” tool.

Saving changes
MiniTool Partition Wizard – convenient program to perform various operations with the hard drive.
To make two local disks one or to increase the disk space of one of the volumes, you need to merge partitions. For this purpose, one of the additional sections, into which the drive was previously divided. This procedure can be done both with saving information and with its deletion.
Perform Merge logical drives you can do one of two options: using special programs for working with drive partitions or the built-in Windows tool. The first method has priority, since such utilities usually transfer information from disk to disk when merging, but standard program Windows deletes everything. However, if the files are unimportant or missing, then you can do without using third party software. The process of how to combine local disks in one on Windows 7 and more modern versions this OS will be the same.
Method 1: AOMEI Partition Assistant Standard
This free manager program disk partitioning helps to merge partitions without losing data. All information will be transferred to separate folder to one of the disks (usually the system one). The convenience of the program lies in the simplicity of the actions performed and the intuitive interface in Russian.

After the merger is complete, you will find all the data from the disk that was joined to the main one in the root folder. It will be called X-drive, Where X- letter of the drive that was attached.
Method 2: MiniTool Partition Wizard
The program is also free, but it has a set of all the necessary functions. The principle of working with it is slightly different from the previous program, and the main differences are the interface and language - MiniTool Partition Wizard does not have Russification. However, to work with it it is enough basic knowledge in English. All files will be transferred during the merge process.

Look for the transferred files in the root folder of the disk with which the merger occurred.
Method 3: Acronis Disk Director
is another program that can merge partitions, even if they have different file systems. By the way, the ones mentioned above cannot boast of this opportunity. free analogues. User data will also be transferred to the main volume, but provided that there are no encrypted files among them - in this case, merging will be impossible.
Acronis Disk Director paid, but convenient and multifunctional program, so if you have it in your arsenal, you can connect volumes through it.

After reboot, look for files in the root folder of the disk that you designated as the primary
Method 4: Windows built-in utility
Windows has a built-in tool called "Disk Management". He knows how to perform basic actions with hard drives, in particular, you can merge volumes in this way.
The main disadvantage of this method is that all information will be deleted. Therefore, it makes sense to use it only when the data on the disk that you are going to attach to the main one is missing or not needed. In rare cases, perform this operation through "Disk Management" fails, and then you have to use other programs, but such a nuisance is rather an exception to the rule.
- Press the key combination Win+R, type diskmgmt.msc and open this utility by pressing "OK".

- Find the section you want to join to another. Right-click on it and select "Delete Volume".

- In the confirmation window, click "Yes".

- Volume remote partition will become an unallocated area. Now it can be added to another disk.

Find the disk whose size you want to increase, right-click on it and select "Extend volume".

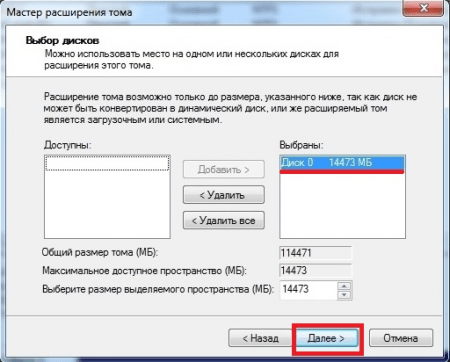
- Will open . Click "Further".

- In the next step, you can choose how many free GB you want to add to the disk. If you need to add all the freed up space, just click "Further".

To add a fixed size to a disk in a field "Select the size of the allocated space" indicate how much you want to add. The number is indicated in megabytes, taking into account that 1 GB = 1024 MB.
- In the settings confirmation window, click "Ready".

Result:
Merging partitions in Windows is a very simple procedure that allows you to effectively manage disk space. Despite the fact that the use of programs promises to combine disks into one without losing files, do not forget to do backup copy important data - this precaution is never superfluous.
When working with a computer, situations may often arise when you need to resize hard sections disk, or even combine them into one. For example, you need to install a new operating system, which is larger in volume than the previous one. Also, if the system has 2 or more logical volumes(not counting the partition with the installed operating system), it is more advisable to combine them into one. To do this, you can use them as standard Windows tools, and third-party software. Let's consider both options.
Method 1: merging disk partitions using standard Windows utilities.
Before starting the procedure in this way, you need to copy all the data from the partition that needs to be attached to another, since the volume is deleted before the operation and, accordingly, all information from it is erased. In Windows OS, there is a disk management console to perform such operations. To open it, right-click on the “Computer” icon and select “Manage”. The computer management console will open, where you need to select “Disk Management” in the left menu.Console displays everything available drives. Now you need to select a section that is combined with some other. After that, right-click on it and select “Delete Volume”. We confirm the operation, after which the unallocated space will appear in the menu. Then open the context menu of the volume to which you want to attach the unallocated space, and select the “Extend partition” item.
Next, the Volume Expansion Wizard opens, in which you will be asked to select a disk through which you want to increase the space on the local partition. In our case, this is just one volume, which was previously a hard disk partition.
Method 2: merging disk partitions in Acronis Disk Director.
This method is more reliable, since it is not necessary to transfer data from one disk to another in Windows: the program will independently merge the partitions. Acronis Disk Director has an intuitive interface that makes it easy for any user to understand.Note: There are 2 versions of this program: for Windows OS and boot version. It is recommended to use the second version to avoid errors that may occur during the procedure. If this is not possible, then first make sure that your operating system is running without errors or failures.
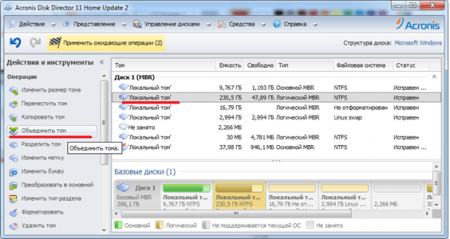
The main window of the program will display information about all partitions of the hard drive. To merge, select the section you want to merge and click “Merge Sections” in the side menu.
A wizard will open in which you need to select the disks to merge, and also indicate which of them will be the main one, that is, which disk will be connected to which.
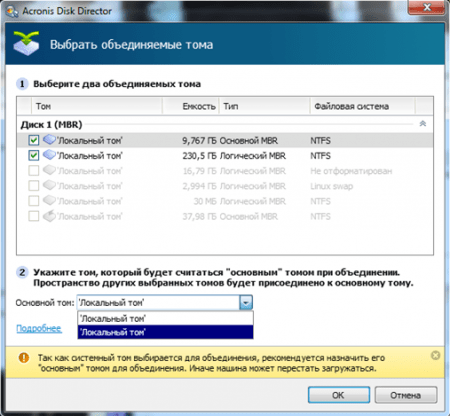
Having completed the necessary manipulations, you need to fix them by clicking the “OK” button. Now a new section will appear in the main window with the same volume as the previous 2. However, this does not mean that it has already been created. Acronis Disk Director uses transaction confirmation to avoid incorrect user actions. After performing the necessary manipulations, in top corner A checkbox will appear with the number of operations to be performed.
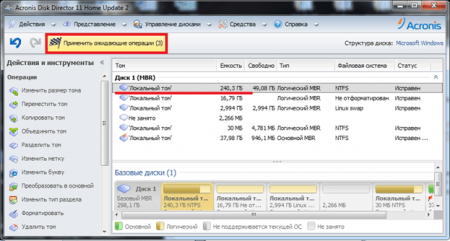
When you click on it, a window with a list of operations will appear. Here the user can once again check the correctness of his actions. If everything is correct, then clicking the “Continue” button will start step-by-step disk partitioning according to the instructions specified by the user.

This process is irreversible. If the program is running under Windows OS, the computer will be rebooted to complete the operation.
You can also use the Partition Magic and Paragon Partition Manager programs to combine hard disk partitions. They are similar in functionality to Acronis Disk Director, so you can use either of them. All of these disk merging programs work well for any version of Windows.
Hard drive partitioning is the process of dividing one drive into several logical drives. In this article we will look at popular programs to partition the hard drive.
operating room Windows system 7 is equipped with a built-in utility for partitioning disks. To launch it, follow the path: Start - Control Panel - System - Administrative Tools - Computer Management - Disk Management.
By launching the Disk Management utility, you will have access to all the necessary functions. For existing disks, you can perform: delete, format, change letter, compress and delete the disk. If connected to a computer new hard disk without partitioning, you can partition the disk.

If the capabilities of the built-in disk partitioning utility are not enough for you, you can use third-party programs.
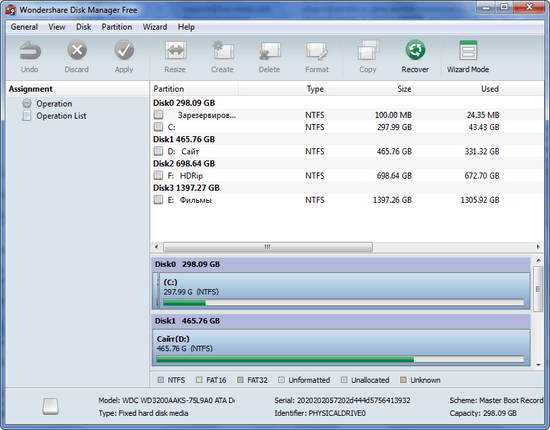
Wondershare Disk Manager Free
Quality free programs there is not much to do with disk partitioning. One such program is Wondershare Disk Manager Free. This program allows you to create, delete, copy, and convert partitions. The program is very simple and intuitive clear interface. Thanks to this, even the absence of the Russian language will not complicate the process of working with the program, even for not very experienced users. To install this program you will have to go through a free and extremely simple registration on the manufacturer's website.
Paid programs for disk partitioning
One of the most popular and well-known programs of this kind is Partition Magic from Symantec. This program can work with boot disk, which greatly simplifies the breakdown before installing the operating system. Partition program Magic supports working with file files NTFS systems and FAT. In addition to basic operations such as creation and formatting, Partition Magic allows you to convert file systems, resizing partitions, merging partitions.

Paragon Partition Manager
Paragon Partition Manager – powerful program to partition the hard drive, Reserve copy, and management operating systems. Unlike the previous program, Paragon Partition Manager has a wider range of features and functions. So, this program one of the few that allows you to work with disks for virtual machines(MS Virtual PC, VMware Workstation, VMware Fusion and Sun VirtualBox).

Acronis Disk Director
Acronis Disk Director is another advanced program for hard disk partitioning and disk management. Acronis Disk Director consists of three parts: the disk management module, the Acronis Recovery Expert module for recovering lost data, and the Acronis OS Selector module for managing multiple operating systems. Acronis Disk Director is equipped with all necessary functions for disk management, while the program supports all modern file operating systems.