Several ways to find out the brand and model of the motherboard on a computer or laptop. How to find out the name of the motherboard Find out the model of the motherboard
Greetings! Friends, sometimes under certain circumstances it is necessary find out the motherboard model installed on the computer. This is necessary, for example, before reinstalling the operating system, in order to download drivers for the chipset in advance. Or, when choosing a new video card, you need to make sure that it is compatible with the motherboard, information about which should be known. An experienced user will be able to quickly and easily find out such information, but there are cases when even he will have to “sweat.”
How to find out which motherboard is installed?
Let's look at the most common ways to find out the brand of motherboard. I’ll say right away that we will use both standard operating system tools and third-party programs.Method 1. Visual inspection inside the computer
If your computer is not under warranty, then you can view the model of the motherboard directly on it. To do this, open the system book and look for large letters with numbers (they usually stand out among other inscriptions),

This is the simplest and most reliable way, because using software it is not always possible to quickly find out the brand of the motherboard. However, if you own a laptop or netbook, then it is better to use standard OS tools or third-party programs to determine the motherboard model.
Method 2. Using the command line to view your motherboard model
To find out the motherboard model, press the key combination ⊞ Win + R and type cmd to open the command line window.

Enter the command wmic baseboard get product and press Enter,

As you can see in the screenshot, information about the model of your motherboard will be displayed.
Method 3. View the motherboard in System Information
So, again, press the button combination ⊞ Win + R, enter msinfo32 and press Enter,

The “System Information” window will open, where you can also see the brand of your motherboard,

However, there are cases when the motherboard model name is missing. Therefore, if methods 2 and 3 did not help, then read on.
Method 4. Determining the motherboard using a service from Intel
In most cases, on the official Intel website you can find out information about your motherboard online, that is, without downloading and installing separate programs. To do this, go to http://www.intel.com/support/ru/siu.htm and click the Software Identification button,


Let's wait until all your components are determined. Personally, this process took me about

As a result, we see all the information about the computer hardware, including the motherboard.

Method 5. Using a third-party program to determine the board model
You can find out which motherboard is installed using an indispensable program AIDA64(formerly Everest). I looked at it in more detail.
Installing it is as easy as shelling pears, so we won’t get bogged down at this stage. So, when the program is already installed, you can proceed to the most important thing - viewing information about the board. To do this, in the program window that opens, select “Computer”
At first glance, it is not difficult to detect the motherboard model - just look at the device box, or find the necessary information on the component itself by opening the system unit panel. Here, right on the front side of the board, its name is located.
But there are also situations when it is not possible to look into the insides of your computer. Then you have to use the tools provided by the operating system and computer software.
The first thing to talk about is the standard methods that are built into the system itself. Here are step-by-step instructions that work on all versions of the Windows operating system, regardless of the features of a particular build. For later updates, some of the steps presented will be easier, as reflected in the notes.
In the system information panel
Let's start with the standard monitoring program laid down by the OS developers. This is the fastest method possible, since the user does not require special knowledge about the operation of the system or installation of additional components.
The sequence of actions looks like this:

Note! In later versions of Windows, such as the eighth or tenth, this tool can be launched through the list of standard programs, searching for files and components, or from the Control Panel.
Using the command line
The second method also involves entering commands, however, the tool in this case is more complex. We recommend this method for more experienced users.
The command line is the main tool for manipulating an already installed system. But the action we need will not change the state of the system in any way if the commands are entered correctly.
This method works like this:

Note! In later versions of the OS, opening the command line has become even easier. The tool can be launched by right-clicking on the Windows icon and selecting it among other standard programs and components. You can also use the system search directly from the main panel.

Special software
You can also use specialized software to diagnose the hardware of your device. These tools will help if the system does not recognize the necessary characteristics on its own, or does not provide all the necessary information.

It should be noted right away that there are a lot of similar programs for reviewing physical and virtual components on the market at the moment. We have chosen the most proven over the years, popular among professionals and ordinary users.
DxDiag
This program could even be considered standard, since it comes with a background tool for playing and processing complex DirectX programs (videos and games). Typically, this component is used for more detailed diagnostic processes and complex tasks, but it is also capable of simply displaying the necessary information. The DxDiag utility is a diagnostic element from this environment.
You can run it like this:
Speccy
This program is one of the easiest ways to check the “ ” model. After all, to display the parameter we need, we just need to install and run it.
- Go to a reliable website and download the utility by clicking the “Download” or “Download” button.

- Click on the downloaded file, thereby starting the installation of the program.

- Change the language to Russian and click “Install”.

- After the installation is complete, click on the “Run Speccy” button.

- Immediately after launching this program, the name of the model and manufacturer can be seen directly among the main characteristics in the viewing area.

If more detailed information is required about the features of the main element of the device, the program allows you to diagnose them by viewing all the characteristics in the special “Motherboard” section. The most comprehensive information about the component among all the presented methods is already presented here. The tool displays all the features of the device, including the current state, and even shows the current temperature of all elements.

If you want to know in more detail, you can read an article about it on our portal.
AIDA64
Older versions of this software are familiar to users as Everest. This program is so popular among the masses that many authors of Windows builds even include it in their OS versions.
In this program, when opened, there is a main directory in which you should look for the desired element. The path to it is as follows:

CPU-Z
The program is designed to monitor processor load, but can also display other main system components. This is another easy way to quickly view all the characteristics of your computer's base.
After installing the program, simply open it and select the “Mainboard” tab to display, in which the first line “Manufacturer” is the name of the manufacturer, the second “Model” is the number or model name of the element.

S.I.W.
Another program for comprehensive diagnostics of both physical and virtual (software) system components.
You can determine the parameters we need here in the following way:

System Spec
This program has a lot of advantages: small amount of memory required (useful for portable devices), no installation required - you just need to unpack the archive, general availability. The only negative is the lack of Russian localization.
Here you can find the desired parameter immediately after launch. The characteristics of the model and manufacturer are located opposite the “Motherboard” parameter.

If you want to find out and also get acquainted with step-by-step instructions, you can read an article about it on our portal.
Conclusion
The motherboard is a basic element of any device. The compatibility of new components that are installed by the user, further upgrade of the computer, and its adaptation to individual needs depend on its features. We have listed all the most reliable ways to identify it on your computer. Which one to choose is up to the user to decide.
Video - How to find out your computer motherboard model
Hi all! Once upon a time, I wrote about what it is. A lot of time has passed since the purchase, so you reinstalled Windows, and now we need to download drivers for the chipset, sound and other equipment soldered to the motherboard. (As a rule, all disks and documents tend to get lost over time)
And then the question arises in many people’s minds: how can I find out what model my motherboard is? Or are you ready to buy a new video card or processor? Again, until you find out the motherboard model, it will be difficult to determine anything. If in the case of drivers you can find them by hardware ID, then in the case of an upgrade this will not work.
Visual identification of the motherboard model and manufacturer
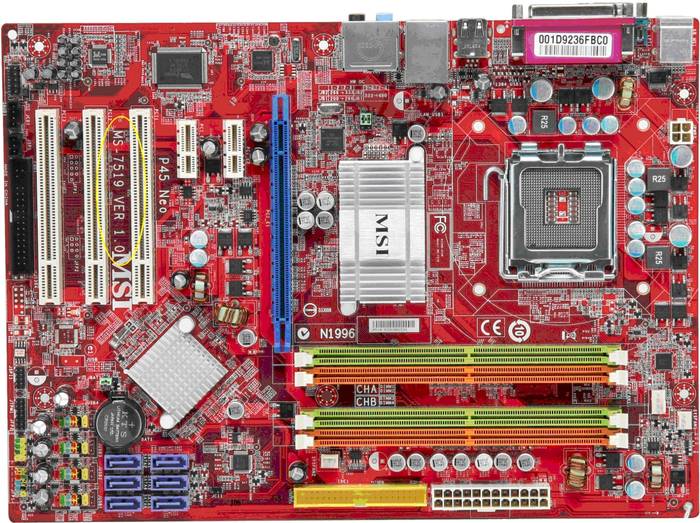
How to find out the motherboard model visually? Very simple, for this we need a screwdriver and good lighting. We unscrew the bolts from the side cover of the system unit and remove it away so that it does not interfere.
Now the most important thing is to carefully examine the motherboard. Unfortunately, some manufacturers manage to write a name where you wouldn’t find it during the day. Typically the marking is placed above the PCI-E slot or next to the processor. For example, in the photo below, the motherboard is labeled GA-790FXTA-UD5. It is this name that we will enter into Google or Yandex to determine the characteristics of the equipment or download drivers
 This method is old-fashioned and has never failed, but I would not recommend it to you. Firstly, you will have to open the system unit (which is not at all good if it is sealed and is under warranty), and finding the name of the motherboard is not always easy (especially if you opened it for the first time, because there will be a bunch of inscriptions and you simply will not understand: what this is where the board model is), and secondly, there are much simpler ways 😉
You can find out the motherboard model programmatically
The software does not stand still. The CPU-Z program is also being developed. An excellent utility is designed to obtain information about the central processor, but it will also help us suggest the motherboard model. You can download it by visiting the official website of the program.
Please kindly report broken links:
Go to the CPU-Z download site[Size: very small]

So, open the program and go to the “Mainboard” tab. Here we can see the manufacturer in the Manufacturer line and the model itself in the Model line.

There should be no questions here, since the method is as simple as three pennies. However, there are other programs to understand what is inside our computer?
Perfect for these purposes AIDA64(in the old days it bore the proud name Everest). The purpose of AIDA is to show us complete information about the equipment installed in our computer. Unfortunately, the program is paid, but has a 30-day trial period (I think this time will be enough to decide on the motherboard model)

In the left window, expand “System board” and select “System board” (I understand that I wrote something crazy, but it is true - look at the screenshot above). In the right window in the line “Motherboard” we see the exact name of our motherboard.
How to determine the motherboard model using Windows
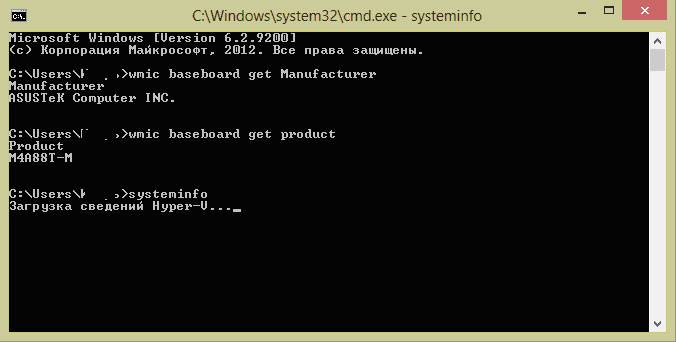
In my opinion, the easiest way to find out what motherboard is installed in your computer is to ask it on the command line. You don’t need to install anything, just open the “Run” menu (if you can’t find this item, then read about it). In the window that appears, type CMD. The command line will open, which means that all that remains is to enter the commands:
- to determine the motherboard manufacturer - wmic baseboard get Manufacturer
- to determine the motherboard model - wmic baseboard get product
The picture below clearly shows what it looks like.

In the article, it makes no sense to consider all the ways to find out the model of the motherboard, and there is no need for this, because the steps given here allow us to answer our question fully. All the best 😉
In contact with
If you are going to upgrade your computer and buy more powerful hardware for it, then you need to understand how to find out the name of the motherboard. And there are several different ways to do this, among which there is sure to be one that suits you, even if you don’t understand computers at all.
The mother holds all the other parts of the computer, everything is connected to it. And there are several. Therefore, when purchasing new hardware, you need to know the name and number of the motherboard and select compatible parts accordingly.
Find out the motherboard number through the command line
Yes, the almighty command line also allows you to see the motherboard number. In my opinion, this is one of the best, most reliable and least labor-intensive ways to get to know your mother. It is available to everyone, on any computer, running any OS and does not depend on the hardware manufacturer.
So, to find out the motherboard in this way, open the command line through the Start menu or with the Win + R keys, and write wmic in the window that opens. In the window that opens, write:
and press the Enter key. And you will see the name of your uterus.

Packaging and disks from the board
This is probably the simplest and most basic way to find out what motherboard is in your computer - find a box for it at home. If your computer was assembled from component parts, then when purchasing it you must have a shipping box. The name of the motherboard will be on it.
This method is not suitable for those who bought their computer already assembled or for laptop owners. They don't have such a box. But maybe there is a disk with all sorts of drivers for the board. Such disks are also usually indicated by the markings of the motherboard. It happens on both a laptop and a computer. But sometimes manufacturers do without it.
Markings on the board itself
Another equally basic way to find out the name of the motherboard is to crawl under the cover of the system unit and read what is written there. All mother manufacturers write the name.
Before you find out the motherboard number of a laptop using this method, think about whether you can then put it back together. It may be easy to disassemble it, but then putting everything back in place is not so easy. Therefore, I recommend this method to owners of stationary machines.
If the board is old, then you may encounter the problem of erased paint, which often happens over time. Then you will not see the markings on the board.
 These are not all the methods that can be used, but these are the simplest and most convenient. Once the name of the motherboard is known, you can find out what parts will fit it. This can be done either on the Internet or in the store where they will be purchased.
After some time, the computer needs an upgrade. Some users prefer to upgrade by purchasing a new computer, others replace old components with new ones.
Before purchasing new PC components (video card, processor, RAM and others), you need to know the characteristics and model of the motherboard. This is necessary to avoid component incompatibility.
Physical examination
To physically inspect the installed motherboard, it is necessary to disassemble the system unit.
In order to disassemble the system unit, you must:
This method is suitable for owners of desktop computers.
Important! Motherboard manufacturers "ASUS" write the model name near the "PCI-E" connector, the manufacturer "GIGABYTE" places information about the board near the RAM slot, the manufacturer "MSI" as well as "ASUS" most often place information near the "PCI-E" connector "


Windows Standard Tools
If the user, due to inexperience, cannot disassemble the system unit and see which motherboard is installed, then you can use standard tools of the Windows operating system, such as BIOS and command line.
You can also use the standard utilities of the operating system.
To use the System Information utility, you must complete the following steps:
- to begin with, you need to use the hot keys “WIN + R” to open the “Run” window;

- then enter the command into the empty line "msinfo32" and click on the “OK” tab;

- Next, the “System Information” window will open, where the computer’s characteristics will be displayed.

Important! The standard “System Information” utility may not display information about the motherboard.

You can also use the standard Windows utility “DirectX Diagnostic Tools” to establish the model.
To use the DirectX Diagnostic Tools utility, you must complete the following steps:

Important! Data may not be displayed. In this case, the “Computer Model” item will contain the “System Product Name” information.
Another standard method for determining a model is PostScreen checking. Post check occurs when the computer starts.
Important! Modern computers pass the Post check almost instantly, so such a screen may not appear when the PC starts.
Video: information about bios, motherboard and processor
Via Bios
You can find out the motherboard model through the BIOS.
In order to find out the motherboard model through the BIOS you need to:

Method two:

Command line
One of the easiest ways to find out what motherboard your computer has is through the command line. The user is not required to install additional software, just call the command line window.
To determine the motherboard model via the command line you need to:

First team "wmic baseboard get Manufacturer". Using this command you can determine the manufacturer of the motherboard;
Second team "wmic baseboard get product". Using the command, you can directly determine the motherboard model;

- then all that remains is to enter the desired command.
The second method looks like this:
- using the key combination “WIN + R” you need to call the “Run” dialog box;

- on an empty line you need to enter the command "cmd" and click on “OK”;
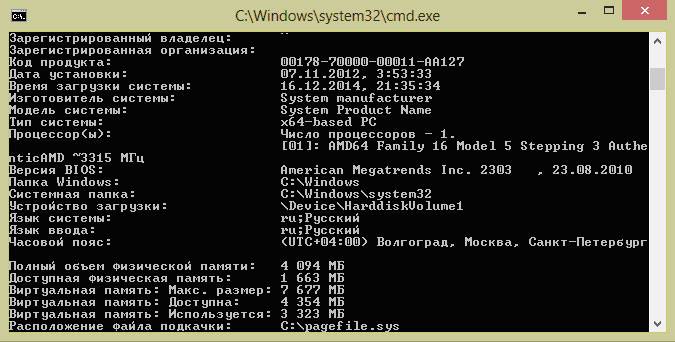
- then in the command line window that opens you need to enter the command "systeminfo" and press the “Enter” key;
- After entering the command, complete technical information about the computer will be displayed.
- using the “WIN + R” keys you need to open the “Run” dialog box;
- "cmd" and click on the “OK” tab;
- then you need to enter the command "wmic baseboard list full" and press the “Enter” key on your keyboard. Team "wmic baseboard list full" allows you to display a complete description of the board with all technical characteristics.

The third way to define using the command line looks like this:
Let's find out what motherboard I have on my computer in Everest
You can find out the motherboard model using specialized software. Everest (today the program is called AIDA64) allows you to perform an in-depth analysis of your personal computer.
With the help of Everest, you can find out about the technical characteristics of your PC, test the processor (CPU), video card (GPU), and RAM. Everest allows you not only to find out the characteristics of your computer, but also to update system drivers, providing download links to the official pages of manufacturers.

Important! The program is distributed free of charge and has a trial period of 30 days.
The trial version of the program has significant functional limitations.
To find out the model and characteristics of the motherboard in the program you need to:
- First you need to download the program and install it on your computer;
- then you need to launch the program from a shortcut on the desktop;

- Next, you need to select the “Computer” tab in the left column;
- after that, the window will display the following tabs: “Summary Information”, “Computer Name”, “DMI”, “IPMI”, “Overclocking”, “Power Options”, “Laptop PC”, “Sensor”. In this list we need the first item “Summary Information”;

- Next, click on this item and the window will display information about the technical characteristics of the PC, where information about the motherboard will be displayed.

You can also determine the Everest board model:
- First you need to click on the “Motherboard” tab;

- after that, the window will display the following items “CPU”, “CPUID”, “System board”, “Memory”, “SPD”, “Chipset” and others. You must select “System board”;
- then information about the motherboard model will be presented at the top of the window.

The everest program is the most effective in determining the model and characteristics of the motherboard.
This article discussed ways to determine the motherboard model. You only need to choose the most convenient method.