The volume button on the iPhone does not work. The volume button on the iPhone does not work. Unscrew the three screws that secure the volume button bracket.
Negligent treatment of the iPhone 6 and iPhone 6 Plus can result in numerous physical damages to the device, including failure of the volume buttons. Replacing them will not cause any particular difficulties even for the most untrained user - for this he will only need a detailed manual. However, officially the iPhone 6 and iPhone 6 Plus are non-separable devices, so to carry out some manipulations you will need to use a set of specialized tools, which can be ordered on numerous trading platforms on the Internet.
So how do you replace the volume buttons on iPhone 6 and iPhone 6 Plus?
1. Unscrew the Pentalobe screws near the Lightining connector:
This procedure can be performed using a specialized set of Pentalobe screwdrivers, which can be ordered online. It is worth noting that all manipulations to disassemble the iPhone and replace certain of its components should be performed only when the phone is turned off.
2. Lift the front panel of the device using a suction cup and a plastic tool with a sharp edge:


This procedure can be performed using the most ordinary suction cup and the most ordinary mediator. Having firmly pressed the suction cup to the front panel of the device, you need to pry it with a pick and open it like the cover of a book.
3. Unscrew the five screws that secure the front panel of the device:

4. Remove the protective metal plate:

5. Disconnect all cables from the front panel of the device and remove it:


6. Unscrew the two screws that secure the battery cable:

These screws, manufactured by Phillips, are of a standard design and can be removed with a few standard screwdrivers from a quality tool kit.
7. Remove the protective metal plate:

The unscrewed plate can be removed using tweezers.
8. Disconnect the device battery cable:

This procedure should be performed as carefully as possible using a plastic tool with a sharp edge.
9. Disconnect the device’s Lightning port cable:


This procedure should be performed as carefully as possible using a plastic tool with a sharp edge.
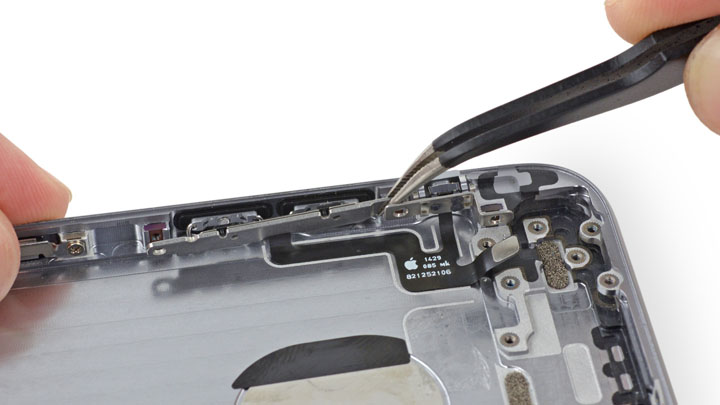
10. Unscrew the two screws that secure the bracket for the upper part of the device’s motherboard cable:

These screws, manufactured by Phillips, are of a standard design and can be removed with a few standard screwdrivers from a quality tool kit.
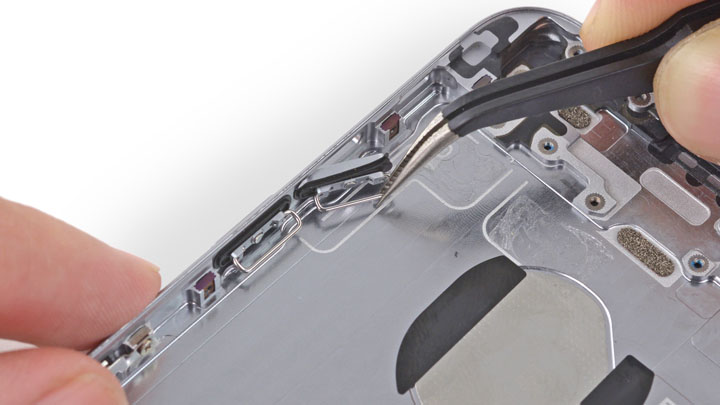
11. Remove the power and volume button bracket:


12. Disconnect the power and volume button cables:


This procedure should be performed as carefully as possible using a plastic tool with a sharp edge.
13. Unscrew the four screws that secure the contact bracket bracket:

These screws, manufactured by Phillips, are of a standard design and can be removed with a few standard screwdrivers from a quality tool kit.
14. Remove the contact bracket bracket:


The unscrewed bracket can be removed using tweezers.
15. Unscrew the two screws that secure the grounding bracket:

These screws, manufactured by Phillips, are of a standard design and can be removed with a few standard screwdrivers from a quality tool kit.
16. Remove the grounding bracket:


The unscrewed bracket can be removed using tweezers.
17. Unscrew the two screws that secure the corner bracket:


These screws, manufactured by Phillips, are of a standard design and can be removed with a few standard screwdrivers from a quality tool kit.
18. Remove the corner bracket:


The unscrewed bracket can be removed using tweezers.
19. Unscrew one screw that secures the antenna cable:

These screws, manufactured by Phillips, are of a standard design and can be removed with a few standard screwdrivers from a quality tool kit.
20. Disconnect the antenna cable and camera cable:


This procedure should be performed as carefully as possible using a plastic tool with a sharp edge.
21. Unscrew the three screws that secure the motherboard:

These screws, manufactured by Phillips, are of a standard design and can be removed with a few standard screwdrivers from a quality tool kit.
22. Remove the motherboard:


23. Peel off the stickers securing the battery:


If problems arise with peeling off, you may need to warm up the device case from the back. This can be done using a household or industrial hair dryer.
24. Remove the battery:


This procedure should be performed as carefully as possible using a plastic tool with a sharp edge.
25. Remove the film covering the camera base mount:


This operation can be performed using tweezers.
26. Unscrew the two screws that secure the main camera:

These screws, manufactured by Phillips, are of a standard design and can be removed with a few standard screwdrivers from a quality tool kit.
27. Remove the main camera of the device:


This operation can be performed using tweezers.
28. Unscrew one screw that secures the flash bracket:

These screws, manufactured by Phillips, are of a standard design and can be removed with a few standard screwdrivers from a quality tool kit.
29. Remove the device flash bracket:


This operation can be performed using tweezers.
30. Unscrew the two screws that secure the power button bracket:

These screws, manufactured by Phillips, are of a standard design and can be removed with a few standard screwdrivers from a quality tool kit.
31. Remove the power button, microphone and flash cable:


This procedure should be performed as carefully as possible using a plastic tool with a sharp edge.
32. Remove the power button:


This operation can be performed using tweezers.
33. Unscrew the three screws that secure the volume button bracket:

These screws, manufactured by Phillips, are of a standard design and can be removed with a few standard screwdrivers from a quality tool kit.
34. Remove the volume buttons:


This operation can be performed using tweezers.
35. Replace the volume buttons and assemble the device:

To reassemble the phone, simply follow these steps in reverse order. Device volume buttons can be ordered from one of the online stores.
Thus, you can replace the volume buttons on iPhone 6 and iPhone 6 Plus in just a few minutes. These steps must be performed as carefully as possible so as not to damage the components of the device, which will require additional expensive repairs. In order to avoid all possible difficulties, you can turn to EtoService specialists for help.
Have the volume buttons stopped working on your iPhone? This type of problem causes a lot of inconvenience when using the device. Below are detailed descriptions of the volume key repair processes.
Possible causes of failure
- Dirty keys are a trivial, but most common reason. Over a long period of use of the phone, fine particles, dust, etc. may get into the holes between the keys and the case. Due to contamination, the keys work, but are pressed only 2-3 times. To clean the buttons, it is better to use an alcohol solution and a cotton swab;
- The button may not work correctly after replacing the top cable of the system board. This is explained by inaccurate connection of the cable (the volume up/down contacts could short out). In this case, only replacing the keys will help;
- Virus software that interferes with the operation of certain functions of the operating system;
- If a malfunction occurs after an iPhone is hit or dropped, this requires replacing the volume increase mechanism;
- Presence of liquid in the body;
- Crash after OS update.
The key is pressed, but the sound is not adjusted
If, after pressing the volume control, a ringer window appears on the screen, but there is no volume level indicator at the bottom, the problem is not a failure of the mechanism, but a failure of the operating system.

First, try to fix the software problem in the simplest way - reboot your phone (soft reset). As a rule, this procedure allows you to eliminate third-party processes that interfere with the operation of standard iPhone components. If nothing has changed after rebooting, try pressing both parts of the volume key at the same time. Repeat the action 3-5 times. This may help restore normal operation.
Check for available updates. A new build of configuration parameters solves the problem in 90% of cases. Also try resetting your phone to factory settings.
While the key mechanism is not replaced, you can use the Assistive Touch function with which the desired button will appear on the desktop screen. To enable the option, go to Settings - General - Assistive Touch and move the slider to the “Enabled” position.

Replacing the volume control keys
Did all the above methods not help? In this case, we can say that the iPhone volume button does not work due to a breakdown of the mechanism or due to shorted contacts. Replacing a key is quite simple and you can do it yourself by following the instructions:
- Prepare tools for disassembling the iPhone (a set of screwdrivers, a plastic spatula, tweezers, a suction cup, a new volume increase mechanism);
- Open your device. Then remove the back cover from the display. Remove the Phillips screws shown in the figure from the battery connector plug. Disconnect the battery cable and remove the battery;

- Find the volume control cable and remove its plug by unscrewing the screws shown in the figure:

- Disconnect the top cable bracket from the phone;
- Unscrew the screws with the bracket contacts;
- Remove the contact holder;

- Lift the volume control cable connector with a flat spudger;
- Remove the following screws:

- Remove the button switch mechanism using tweezers. At this stage, you can try to clean the component; perhaps it is not broken, but simply clogged;
- To replace the keys, carefully remove them with tweezers. This tool prevents damage to the button membrane;

Replace components and reassemble the device to its original condition.
iPhone 6S is a smartphone that can be called a diamond in the collection of Apple gadgets. Stylish, bright, equipped with all innovative technical solutions, convenient and durable, this is the kind of phone that every person dreams of getting these days, regardless of age and income. The 6th generation of Apple smartphones is also distinguished by its remarkable reliability, it works for a long time and does not cause any complaints from the owner.
However, as with any technology, frequently used parts of the iPhone 6S wear out over time. This is quite natural and there is no way to avoid this phenomenon. The volume buttons wear out especially often, since they are the ones the smartphone owner uses most often. In addition, the iPhone 6S volume button may need to be replaced due to careless handling of the gadget.
Reasons why the volume button on an iPhone fails
The need to replace the volume keys on the iPhone 6S smartphone may arise in several basic situations:
- The smartphone fell or was hit hard, and external mechanical pressure was applied to it;
- Moisture got inside the case and the contacts connecting the motherboard, and the volume switching module simply oxidized;
- Sand, dust or small metal particles have gotten into the volume adjustment mechanism;
- The upper cable is damaged due to careless disassembly or repair of the device.
Signs your volume buttons need replacing
As a rule, the smartphone owner can find out about the need to replace the volume buttons on the iPhone 6S based on the following signs:
- The switch buttons do not respond to pressing;
- The keys are stuck in one position, making it impossible to adjust the sound properly;
- The buttons work every other time or they are pressed arbitrarily;
- Volume is adjustable in one direction only.
Replacement at a service center: no to home technicians!
The module on which the iPhone 6S volume buttons are located is designed in such a way that it cannot be repaired. Only complete replacement of the part with a new one can help. The smartphone owner will not be able to do this on his own, or there will be a high probability of damage to the cables and internal parts of the gadget.
Only the specialists of our service center can provide qualified assistance in replacing the volume swing on iPhone 6. As soon as possible, the fault will be detected and corrected using the latest equipment and original parts.
If the volume button on your iPhone does not work (for example, it gets stuck), do not rush to take your phone to a service center. Before finding out the cost of repairs and paying for replacement buttons (switching to silent mode or adjusting the volume), find out the cause of the problem and try to fix it yourself.
Main causes of malfunctions
Initial diagnostics of the device can be done at home. If the volume button on the iPhone does not work - you do not hear a characteristic click, you feel that the mechanism is loose - most likely the reason is mechanical damage. Shocks and falls easily damage cables, screen, system board and other buttons (volume, lock, iPhone on and off, switching to silent mode). Often, the smartphone not only does not switch to silent mode, but even stops turning on altogether after strong mechanical impact.
Often problems with iPhone occur due to liquid spillage. Penetration of moisture into the housing leads to serious consequences. It is important to dry the phone in time, clean the contacts and tracks, and prevent corrosion, otherwise there may be problems not only with the sound.
The “Volume” (decrease and increase volume), “Power” (turn on and off) and “Mute” (mute, switch to silent mode) buttons do not always break. In some cases, they stop working due to software glitches. For example, when you install unlicensed software on your iPhone or the firmware does not work correctly.
Signs of trouble:
- the button is broken and does not respond
- Volume control (decrease, increase) does not work
- the button gets stuck and works irregularly
If you are sure that the buttons do not work due to a manufacturing defect, immediately contact your Apple retailer or an authorized service center. In another situation, try to solve the iPhone problem yourself.
Troubleshooting software and adjusting settings
When diagnosing the device, you should pay attention to the iPhone settings - the phone may be operating in silent mode. There is also a possibility that a recently installed application is causing the blocking. Then you should do a hard reboot:
- press “Power” and “Home” at the same time (on the iPhone 7 this is how the on/off and volume buttons work, if the latter is not broken)
- hold them until the phone turns off and the Apple logo appears
As a last resort, go through the iOS recovery procedure through iTunes.
Where to go for repairs
Contact a specialist immediately if the software is working properly, but the mechanism for adjusting or turning on the silent mode has stopped working due to mechanical damage or flooding. When the warranty period is violated, there is no need to waste time on a trip to the service center - it is much more convenient to call a specialist to your home.