Setting up Yandex mail in thunderbird. Managing saved passwords
In this guide we will describe the steps to set up an email client Mozilla Thunderbird. As an example, we will use a mailbox created on Hostinger.
Using an email client is an effective way to manage multiple mailboxes ( email addresses) simultaneously. This helps a lot in organizing and organizing data. One such client is Mozilla Thunderbird. This free program with open source code, developed by the Mozilla Foundation.Launched mail client was in 2004 and became a popular platform for managing mail along with Gmail (English).
There is nothing more to add, so let's move on to the process of setting up mail in Mozilla Thunder.
Step 1 – Collect IMAP, POP3 and SMTP settings
First of all, you need to collect your mail settings. In the example, we will use IMAP for incoming mail and SMTP for outgoing mail. You can use POP3 instead of IMAP for incoming mail. You can learn about the differences between these three protocols in.
Security also needs to be taken care of. To ensure that your data and emails remain secure, we only allow the use of secure ports. Let's quickly look at how to find this data in the Hostinger Control Panel and cPanel hosting platform. Information we are looking for:
- Port and hostname for incoming mail
- Outgoing host port and name
- Username and password for your Mail account
Step 1.1 – Mail Settings in Hostinger Control Panel
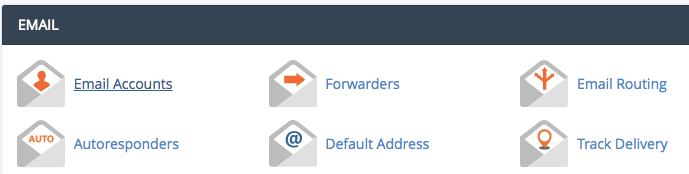
To find your mail settings, go to the section Mail accounts from your hosting control panel.
You can create a new one mail account here and find necessary information to configure the Mozilla Thunderbird email client.

Leave this page open so you can use this information when you need it in Mozilla Thunderbird.
Step 1.2 – Mail Settings in cPanel Control Panel
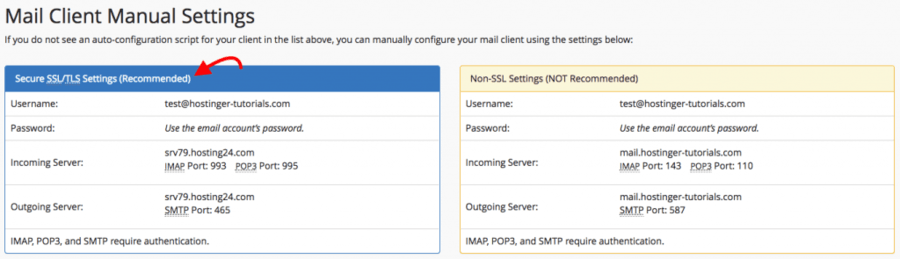
To find the mail port values and hostname, go to Email Account.
Then click on Set Up Mail Client next to the mailbox you want to configure in Thunderbird.
You will be shown the mail settings for Mozilla Thunderbird. To ensure protection and security, we recommend that you use the configuration Secure SSL/TLS.
Now that we have all the necessary data to configure the mail Thunderbird client, let's move directly to this process.
Step 2 – Setting up mail in Mozilla Thunderbird
Open your Mozilla Thunderbird email client. Then click the button Email In chapter Create a new account.

In the window that appears, select Skip this use my existing email.
First you need to enter basic information.

- Your name: The name that will appear in recipients.
- Email address: Address mailbox, created on Hostinger.
- Password: Password for your email account.

- Incoming: Here fill in the coordinates of your outgoing mail server. Since we are using IMAP, the port will be 993.
- Outgoing: Fill in the outgoing mail server information. Secure SMTP port on Hostinger 587.
- Username: Both fields for incoming and for outgoing contain your email address.
Ready! You have successfully configured the Mozilla Thunderbird email client. You can add other mailboxes as needed to keep everything organized and convenient in one place.
Setting up The Bat
What's happened
Mozilla Thunderbird is a free email program developed by Mozilla company(yes, they also made Firefox). You can download it on the official website.
How to configure for receiving, storing and sending mail?
To get started, you will need the following settings:
SMTP server- for example smtp.mysite.com
POP3 server- for example mail.mysite.com
Username- for example This e-mail address protected from spambots, you must have Javascript enabled to view it
Password- it’s the password in Africa too.
Let us remind you once again that the username and password are set by you when creating a mailbox (in the hosting control panel). POP3 and SMTP servers You can find out from the hosting provider, or look in the letter with the settings that comes after ordering hosting.
1. Open Thunderbird and go to Tools -> Account Settings.
2. Select "Account Actions" and click "Add Mail Account".

3. Enter name, address Email and password. You should have found out all this on. Click "Continue".

4. After this, the program will automatically try to select the desired configuration. If you are setting up mail from popular services(mail.ru, gmail, etc.), then Thunderbird will select the correct settings. But if you want to use your site's email, click "Manual setup".

5. The names of SMTP and POP/IMAP servers had to be found out at the preparatory stage. The port depends on the server and whether a secure connection (TLS/SSL) is used.
Sending mail (SMTP): Normal connection - port 25, secure connection (TLS/SSL) - port 465.
Receiving mail (POP3/IMAP): Normal connection - 110, secure (TLS/SSL) - 995 port.
Authentication - Normal password.

6. If you did not select a secure connection (SSL) in the previous step, the program will issue a warning about potential risks. If your mail supports a secure connection, then it is better to go back and configure it. If not (often hosters do not support this service or force you to pay extra for it), then click “Done”.


If you did everything correctly, the box will be created, and you can easily figure out how to manage it. If you have any difficulties or errors, write them in the comments, and we will try to answer you by email.
Bad recipient address syntax error
This error typically appears because the sender's email address is checked for correctness. To fix this, click "Tools" -> "Options" -> "Email Options" -> " Extra options email" and uncheck "Automatically check names".
In this article we will talk about installing and configuring the Mozilla Thunderbird program. This program does not require the user to have much computer knowledge and therefore Mozilla setup Thunderbird is simple, which is a definite plus for every user.
This is a wonderful email program that works great with different email services and is distributed absolutely free of charge. It also has Russian language and is intuitive, even if you have never worked with similar programs.
On a personal note, I would like to say that I, like many users, have not used client programs for mail before, but having installed it once, I can now never give up such efficiency. Of course, it’s up to you to decide whether to install it or not, but I can only advise you to try to temporarily use such a program for at least a couple of weeks.
Mozilla Thunderbird is a secure email program that doesn't require a single line of code Internet browser Explorer. The program also has the ability to store mail, as in separate folders for each box, and in common for everyone. In a word, if you need good program to work with mail, then choosing it, you will not regret it.
Installing Mozilla Thunderbird
To install the program, first download it to your computer using the link. Now you can start installing the program. We launch the downloaded file, a welcome window will open, where you click the “Next” button.

After this, you will need to select “Installation type” and leave a checkmark at the bottom of the program “Use Thunderbird as my mail program default". Click the “Next” button.

Everything is ready for installation, next action, click on the “Install” button and the program will be installed on your computer.

When the program is installed on your computer, a window will appear telling you that the installation of Mozilla Thunderbird is complete. Leave the checkbox selected by default “Launch Mozilla Thunderbird” and click “Finish”.

Settings
To set up email I will use the email service from gmail.com. To add a mail account to the program, go to “Tools” - “Options” account" A window will open in which at the bottom left, click on the “Account Actions” button and select “Add a mail account...”.
Note: when installing the program for the first time, you most likely will not need to go into these settings, since when you first launch the program you will immediately be asked to enter all the necessary mail data.

Now enter the data: your name, email address and password. If you want the program to remember your email password, leave the “Remember password” checkbox. This is done so that you do not enter it every time you open the program. When you enter all the data, click on the “Continue” button.

A search for the email provider configuration will begin, after which you will be asked to select IMAP (remote folder access) or POP3 (store mail on your computer), select IMAP and click on “Create an account”.

That's it, setting up Mozilla Thunderbird for Gmail is complete! As you understand, the program is unpretentious in settings, it does almost all actions automatically, which is also a big plus for users. Now you know how to configure Mozilla Thunderbird.
If you have any difficulties with the settings, then on the official website you can see how to configure the Mozilla Thenderbird program for different postal services, link . If you use other email programs, please tell us about them in the comments.
Postal Mozilla program Thunderbird makes working with correspondence and newsgroups much easier if you configure it correctly. The procedure is simple and will not take much time from the user, but will help optimize the workflow in the future. From this instruction you will learn how to customize Mozilla Thunderbird as efficiently as possible in order to use the full potential of this tool.
What is a Mozilla Thunderbird profile
Profile – information that is generated during the operation of the email client, but does not relate to executable files programs:
- local mail and copies messages Email(depending on settings);
- custom settings (themes, toolbars, etc.).
By default Mozilla Thunderbird immediately after installation creates a profile called default. It will also be used by the program in the future, unless you specifically create a new one using the Profile Manager.
Where is it stored
When creating a profile, a name like xxx.yyy is assigned, where xxx is 8 numbers randomly generated by the program, and yyy is its display name. IN different versions The OS location of the profile files is different. To quickly find a profile,
You should click on the main menu button of the program and follow the path “Help” - “Information for solving problems”. Opposite the “Profile Folder” item there is a “Open Folder” button. By clicking on it, you will be taken to the target directory, where you will see the required files.


Profile Backup and Restore
To create backup files Mozilla profile Thunderbird, you should follow a simple algorithm:
- close the program;
- open the directory with profile files using the method indicated above;
- go to a higher level and copy the profile folder named xxx.yyy;
- save directory to target location on disk.
Keep backup copy possible both on the computer’s hard drive and external media – optical disks, flash drives, file sharing services and cloud servers.
To restore a Mozilla Thunderbird profile, simply copy the folder to the target directory and replace the files. If the procedure is carried out after reinstalling the OS and the default profile after reinstallation If the program is given a different name, you should not copy the folder, but only the files contained in it.
Mozilla Thunderbird Account
During the Mozilla Thunderbird setup process, most settings are set to automatic mode. Manual settings are required only in cases where the Email provider is not included in the program’s automatic configuration databases or non-standard email account parameters are used.
Automatic settings
All that is required from the user in this case is an email address, an account password and a username. All other parameters are security protocols, domain names and ports used, Mozilla Thunderbird will download from the server from the configuration database.
The configuration proposal is issued by the program during the first launch after its installation. If the user for any reason missed this step, the Mozilla Thunderbird mail setup can be called up at any time through the main menu (“Create” - “Receive” new entry mail").

In the dialog box that appears, Mozilla Thunderbird will prompt you to create a new mailbox. You can refuse this by clicking the appropriate button.

In the next window, you must fill in the fields provided and click the “Continue” button.

All that remains to be done is to select the appropriate protocol (IMAP or POP3) and click the “Finish” button.

The program will redirect the request to mail server(in this particular case, it shows how to set up Mozilla Thunderbird for Gmail), where you should log in and give it access to your account.


If the correct data is entered and everything is done correctly, the email client will connect to your account and download all correspondence.
Note! In case of Gmail letters and notifications are not sorted by category (Social Networks and Promotions), as when logging into your mailbox through a browser. In Mozilla Thunderbird they are presented in the form of a list, which is not always convenient to use.

Changing the account protocol
Another aspect that you should know about how to set up Mozilla Thunderbird mail concerns the transition of an account from POP3 to IMAP. POP3, as an older protocol, is no longer used almost anywhere, and all major email providers have long ago switched their servers to IMAP.
If your provider does not support IMAP, but you want to take advantage of all the benefits of this protocol, it is recommended to change your service provider and set up forwarding of correspondence from the old mailbox to the new one.
It is enough to create a new IMAP account, moving all the necessary correspondence from the old one:
- Disable POP3 account. Click right click Click on the account name on the right side of the window and select “Settings” - “Server Settings”. Here you need to uncheck the “Check for new messages every XX minutes” and “Check mail on startup” checkboxes.
- Create a new account using the method described above;
- Drag the necessary letters from the POP3 account to IMAP to upload them to the server;
- Delete old post– click on the “Actions” button in the parameters window and select the appropriate item.

Themes and design
In Mozilla Thunderbird, themes are presented as separate themes that must be downloaded from the Internet. This can be done without visiting third party resources immediately in the program window. To do this, click on the “Add-ons” item in the main window.

Scroll down the contents of the “Get Add-ons” tab and opposite the “Favorite Topics” item, click on the “Show All” link.”

Having found suitable topic, click on its name and on the next page click the “Add to Thunderbird” button. Don't forget to also click the "Allow" button in the pop-up window.

The downloaded theme is applied automatically. If you have downloaded several themes, to switch between them you need to go to the “ Appearance» add-on management menu and click the “Enable” button next to the name of the theme you want to apply.

In the same menu, you can remove Mozilla Thunderbird themes that you no longer like.
Sorting letters
In Mozilla Thunderbird, you can install one or more filters to automate actions with received or sent correspondence. Filters work in the order in which they are located in the user's list. To create new filter, you should go to the main menu of the program and select “Message Filters”. In the window that opens, you need to select the account to which the filter will be applied and click the “Create” button.

The filter settings menu will open. All key parameters filtering is specified by selecting the appropriate option from the drop-down list.

Using this tool, for example, you can filter out spam by a specific word in the body of a letter or set up saving correspondence from a specific counterparty in a separate folder.
How to auto-reply in Mozilla Thunderbird
This feature will be needed if you are on vacation or absent for several days. You can configure it using a simple algorithm:
- Create a new message by pressing Ctrl+N
- Indicate in the body of the letter “Absent from ... to ....” There is no need to specify a recipient.
- In the message creation window menu, select “File” - “Save As” - “Template” and close the current window.
- Create a new filter using the method described above.
- In the filter parameters, move the switch to the “Without any conditions” position and assign the action “Reply using a template”.
- Confirm the changes by clicking the "OK" button.

Setting up an autoresponder in this way is easier and faster than setting parameters for each connected mailbox. The main thing is to remember to turn off or remove the filter when you return from vacation.
In Mozilla Thunderbird Mail settings allows you to customize a response using a template not only for all incoming letters, but also, for example, for specific counterparties or by keywords.
Protection and anti-spam
Setting up filtering for unwanted or fraudulent mail in this program is much easier than filters. To do this, go to the “Settings” item through the main menu.

The following actions are available in the “Protection” tab:
- For antispam. Delete or move spam to the appropriate folder, mark as read. An adaptive learning filter is provided that sorts subsequent correspondence based on user actions.
- For fraudulent emails. Inform whether incoming message suspicious.
- For antivirus. Allow antivirus software to quarantine suspicious attachments.
- For passwords. Remember passwords for all accounts and set a master password.

Sound settings
Options sound notifications can be found through the main menu in the settings in the “General” tab. To signal the receipt of mail, you can use both standard accompaniment from the operating system sound circuit and an audio file that is stored on the computer’s hard drive. If the function is not needed, it can be disabled by unchecking the corresponding box.

Setting up template responses
IN email correspondence in good form It is considered at the end of the letter to indicate all contact information so that the recipient can contact the sender in any way in a convenient way. To avoid entering this data manually each time or copying it from text file, you can create ready-made template, on the basis of which to generate new outgoing messages.
The first step is to make the signature itself. To do this, create a new message using the Ctrl+N key combination and type (or copy) contact information. Then, in the message creation window, select “File” - “Save As” - “File”, select a storage location on your computer and set a name.
Then in your account settings you need to find the “Insert signature from file” option, check the box and set the path to the saved file.

The signature text can also be placed in the appropriate field in the account settings. In addition, you can attach and business card– for example, an image, animation or short video.
Configuring server settings
To edit these values, you need to right-click on the account name, select Settings and in the window that opens, go to the “Server Settings” tab.

Here it is recommended to adjust the mail checking interval and actions with deleted letters, but do not change the key parameters of the program - the port used, security and authentication methods, since incorrect settings there may be problems with Mozilla work Thunderbird.
Export Mozilla Thunderbird and account settings
Since the program is cross-platform, all work data can be moved between different operating systems– for example, Windows and Linux in any direction. The account also belongs to this data, therefore it is stored in the same place as all other profile files (where exactly, see above). Exporting a Mozilla Thunderbird account is similar to transferring settings: just copy these files to the target computer. Can be used not only physical drives, but also move them through remote access– for example, using Team programs Viewer or Radmin.
Program settings for different email services
Parameters required for correct operation With by Gmail, shown in the example above. Conveniently, setting up Mozilla Thunderbird for Mail ru or Yandex is no different: these popular providers have been using the IMAP protocol for a long time, so the configuration is loaded by the application automatically.
Almost all Internet users use electronic mailboxes. This email technology allows you to instantly send and receive letters. For comfortable use of this system, the Mozilla Thunderbird program was created. For it to work fully, it needs to be configured.
You can download Thunderbird from the official website by following the above link and clicking “Download”. Open the downloaded file and follow the installation instructions.


After complete installation open the program.
How to configure Thunderbird using IMAP protocol
First you need to configure Thunderbird with IMAP protocol. Launch the program and click create an account - “Email”.


A window opens and we indicate the name, for example, Ivan Ivanov. Next, enter your current email address and password. Click “Continue”.

Select “Configure manually” and enter the following parameters:

For incoming mail:
Protocol - IMAP;
Server name - imap.yandex.ru;
Port - 993;
SSL - SSL/TLS;
Authentication - Normal.
For outgoing mail:
Server name - smtp.yandex.ru;
Port - 465;
SSL - SSL/TLS;
Authentication - Normal.
Here it is important to indicate the part before the “@” sign since the setting occurs from the sample box “ [email protected]" If you use Yandex. Mail for domain", then the full email address is indicated in this field.
And click “Retest” - “Done”.
Synchronizing your account with the server
To do this, right-click and open “Options”.

In the “Server Settings” section, in the “When deleting a message” item, check the value “Move it to the folder” - “Trash”.

In the “Copies and Folders” section, enter the mailbox value for all folders. Click “Ok” and restart the program. This is necessary to apply the changes.

So we learned how to configure Thunderbird. This is very easy to do. This setting is necessary to send and receive emails.