Setting the screen to turn off in Windows 7. The monitor screen goes blank while the computer is running - why does this happen? Turn off the selected screen
Sometimes it becomes necessary to step away from the computer and turn off the monitor. But what to do if, for example, the power button on the monitor is broken. You can't go unplugging the wires!
In this case, a program that turns off the monitor from the keyboard will help. The program is called - Dekisoft Monitor Off Utility. Let's look at the basic settings and options...
So, download the program and perform the installation. At the first start we accept license agreement(put tick and press Accept).
Unfortunately, the program is only for English language, but there are few parameters in it and all are clear. This is what the program looks like:

Let's go over all the points of the program:
- Turn off Monitor— setting hot keys with which we will turn off the monitor.

If the selected keyboard shortcut is already used by another program, an error will appear. Therefore, we change it to something else!
- Start Screensaver— setting hotkeys for quick start monitor.

- Monitor shut off delay— shutdown timer (triggered after pressing the specified keys). Can be set from 0 (turn off immediately) to 99 seconds.
- Lock Workstation- a parameter that blocks the computer from entering sleep mode (after the time set in the computer settings).
- Close to tray— if you check the box, then when you click on the red cross (shutdown), the program will not turn off, but will be minimized in the tray.
- Minimize to tray on startup— minimize to tray when starting the program.
- Automatically check for updates — automatic check updates (internet access required)
- Save settings in program folder— saving settings in the program folder.
- Start with windows— run the program when Windows boots.
- Turn off monitor(s) on startup— turn off the monitor when you turn on the program.
- Open configuration screen— expand the program from the tray by double clicking on the icon
- Turn off monitor(s)— turn off the monitor when double-clicking on the icon
As you can see, everything is simple. When you need to quickly turn off the monitor, the program will help. But you shouldn’t use it if you leave the computer for a long time (it’s better to simply turn off the computer). After all, in essence, the monitor and system unit turned on, and accordingly consumes electricity and eats up your money!
If the screen periodically turns off while working on a computer, the cause of this problem does not always lie on the display itself. It may be related to the video card, connection cable, RAM operation, etc. There are many reasons, and this article is devoted to the main ones.
Problems with the display constantly turning off are among the most difficult. Carry out diagnostics and identify the cause at home to the average user very problematic. Such violations are associated either with hardware or with software malfunctions. The first ones, as a rule, require contacting service center, and you can learn to identify the latter by studying this article.
Reason 1: Monitor malfunction
If the monitor turns off while the system unit is running, then problems with the main output device cannot be ruled out. Most monitors have protection that is triggered automatically when overheating occurs. But standard means It will not be possible to check the temperature of the device. Therefore, here we can only advise you to check it by touch. If the display case is too hot, it should be placed away from the wall or in another location with better air circulation.

High humidity levels are one of the reasons why the display turns off periodically. Move the monitor to a room where there is no high humidity and let it stand for a while. The monitor should not be connected to the network. And if corrosion has not yet formed, then after all the moisture has evaporated, the device should return to normal operation.
Disconnect the output device from the system unit. You should see something like “No Signal” or “No Connection” on the screen. If there is no such message, then you need to contact the service center.
To remove the monitor from the range of potential causes of the problem, you simply need to connect another output device to your desktop PC or laptop. If there is still no image, then the fault lies with the video card or cable.
Reason 2: Cable defect
The most common reason for an output device to periodically turn off is cable damage. The most common connectors used for screen output are DVI type,HDMI. But the VGA format is still available. Make sure that the inserted cable is held securely and is twisted on both sides (DVI).

- First you need to try connecting the display to another computer using the existing cable. If there is no change, simply replace the cable.
- If changing the cable does not solve the problem, then the problem is in the monitor itself.
- If the problem disappears after connecting to another computer, then the problem has nothing to do with the display or the cable. In this case, you should look for the cause in the depths of the system unit.

Reason 3: Video card malfunction
Another logical reason for the monitor screen to constantly turn off could be hardware failure graphics adapter. The following is typical for such cases:

For information on what to do in such cases, see the link below:
Reason 4: Video card overheating
All modern PCs (including laptops) have two graphics adapters on their motherboards: internal and external. In the default settings, preference is given to the video card that is considered more productive (usually discrete). Therefore, it is necessary to monitor the temperature of the external graphics module.

Normal in most cases operating temperature The graphics adapter is considered to be one that does not exceed 60 degrees Celsius. But it’s almost impossible to achieve this on powerful video cards. The maximum peak (100% load) is usually determined at 85 degrees. For individual GPUs, the peak maximum reaches 95 degrees.
For almost all existing GPUs, the maximum allowed upper limit is 105 degrees. After this, the graphics module of the board reduces the frequency for cooling purposes. But such a measure may not produce results and then the PC reboots.
The first step is to make sure that the video card is not being cooled properly. For this purpose there are, for example, software temperature monitoring. Let's look at two of them.
Method 1: GPU-Z

Method 2: Speccy

Let's look at the main reasons leading to insufficient cooling of the graphics adapter.
Dust
If your PC has not been cleaned of dust for a long time, then it’s time to start doing so. There is a possibility that dust inside the system unit or on the video card cooler itself does not allow the latter to cool properly. Dirt and dust on the card cooler itself can cause it to stop working in particularly severe cases. Cleaning dust does not require special skills: you need to disassemble the system unit or open the laptop case, then use a vacuum cleaner or soft brush. It is recommended to carry out such cleaning at least 2 times a year.

Design features of the laptop
Some laptop manufacturers are already at the design stage a certain model don't think it through reliable system heat sink. In such cases, laptop computers There are, for example, very small grilles on the body, which logically leads to constant overheating of the entire device. Here you should take care to place any stand behind (or in front) under the laptop, lifting it up.

Alternatively, you can use special cooling pads for laptop PCs. They allow air to be forced more intensely through the computer. There are models that run on USB and also have their own battery.

Loss of thermal paste properties
Heat transfer between the GPU and the cooler is carried out through a special intermediary - thermal paste (or thermal interface). Over time, the substance loses its properties, which leads to insufficient cooling of the graphics adapter. In this case, the thermal paste must be replaced urgently.
Note: Disassembling the video adapter will void the warranty if it does not pass. Therefore, you should contact an official service center. If guarantee period already behind us, read the link below for a guide on replacing the thermal interface for a graphics card.
Reason 5: Power Saving Mode
In all versions of the Windows operating system, there is a special service that disables devices that are not currently in use. The purpose of this function is to save energy. By default in the OS the idle time is never below 5 minutes if it is desktop computer or laptop. But various erroneous manipulations by the user himself or third-party programs can change this time to less.
Windows 8-10

Windows 7

Windows XP

Reason 6: Video card driver
Incorrect operation of graphics adapter drivers does not often lead to these problems. But completely exclude the influence of driver conflicts (or lack thereof) on unstable work The display is not worth it.
- We boot the computer into "Safe Mode".
- Click "Win" + "R".
- Next we enter "devmgmt.msc".
- Find the discrete card (if available) in the section "Video adapters". No yellow icons with exclamation mark should not be next to the device name.
- Using RMB, click on the name of the adapter, then select "Properties".
- In field "Device Status" normal operation must be indicated.
- Next, go to the tab "Resources" and make sure there are no conflicts.
Read more: How to log in Safe mode" , on ,


If the device appears with problems (presence of additional icons, resource conflicts, etc.), then the adapter driver should be removed. To do this we do the following:

This method is effective for problems with video adapter drivers. But unfortunately, it does not always bring results. In difficult cases, the user will be required to search and install the driver manually. Read about how to do this using the links below.
Tip: First of all, you should find and install drivers for motherboard(if you don’t have them installed), then all the others. This is especially true for laptop owners.
Reason 7: RAM
One of the most common reasons why a monitor turns itself off is a malfunction random access memory. To detect such problems, there are special tools for checking RAM for errors. Even if a fault occurs in a single module, this is sufficient to periodic shutdown monitor while the PC is running.

RAM modules are not suitable for repair, so if problems are detected in their operation, you should purchase new ones.
Method 2: System remedy RAM checks
Another method for checking RAM does not require additional software. The OS itself has a special tool.
To run RAM diagnostics using the Windows operating system itself, you must:

Thus, to determine the cause of the monitor's inoperability, the user will be required to follow a number of steps. Some of these activities relate to simple and effective diagnosis by exclusion. For example, hardware problems related to the display and cable are easily identified. Software methods require quite a long time, but you cannot do without them to eliminate RAM malfunction.
Hi all! Today we will talk about how to disable sleep mode and turning off the monitor in the Windows 7 operating system. You probably already know that if you leave the computer and do not touch the mouse and keyboard, then after some time the monitor display will go dark, and eventually go into sleep mode. This mode is set by default in the operating system to save electricity.
This is all good, it is necessary to save energy, however automatic shutdown display and going into sleep mode bring some problems. For example, I once had cases when I was watching a movie online, and every 10 minutes the monitor turned off. I think many people have had such cases. To keep it from going out, you need to click on the mouse or keyboard. Or they set the game to download, and after a while the computer switched to sleep mode. To fix this problem, you just need to disable sleep mode and turn off the display. So let's get started.
Go to Start - Control Panel

Here we select Power Options

The system power management window will open. Find the opposite of Balanced mode - Setting up power plan and click on it.
Now we see a window where you can configure the display to turn off and the computer to go into sleep mode.


I select all the time, as shown in the screenshot. That's all, you can watch movies and not worry that the display will turn off and the system will go into sleep mode.
Sometimes a situation arises in which you need to turn off the laptop screen while it must remain in working condition. That is, don’t switch off and don’t go into .
You will learn how to implement this on a particular laptop in this article.
Keyboard shortcut
Pay attention to the very top row of buttons on your keyboard, where the F1-F12 keys are located. As a rule, they contain various images.
For example on Asus laptops The F7 key shows a monitor with a cross. When you click on this button in combination with the Fn key, the laptop monitor turns off. The laptop continues to work. When pressed again, the monitor turns on again.
An example of the location of the display off button on the F7 key
For Acer laptops this combination is different. Fn + F5 or Fn + F6 depending on the model. At the same time, the screen off button also has a corresponding image.

An example of the location of the display off button on the F5 key
Look closely at the top row of the keyboard button on your laptop and find an image that looks like a monitor. Try pressing this button once in combination with the Fn button, as well as without it.

An example of the location of the display off button on the F10 key
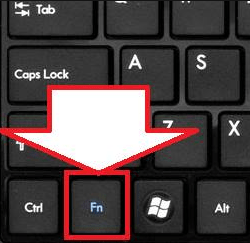
Fn button on the keyboard
If there is no button to turn off the display on the keyboard?
In this case, you can proceed in the following way. Set up your laptop display automatic shutdown in a minute, provided that no key is pressed and the mouse does not move.
For this, regardless of Windows versions press right click Click on the battery level icon in the lower right corner near the clock and select “Power Options” in the menu that opens.

Power supply
A window will open in which you need to select “Setting to turn off the display” at the top left.

Setting the display to turn off
Next, opposite “Turn off display”, set it to 1 minute everywhere. or other required time, after which, in the mode of not pressing keyboard keys and moving/clicking the mouse, the laptop screen will turn off automatically.

Setting the time after which the screen turns itself off
The laptop will work and perform the actions assigned to it.
To turn the display back on, just press any button or move the mouse.
Read, how to turn off a second monitor connected to a PC without disconnecting it from the network. What standard tools or third party programs you can use it. Often you use an additionally connected external monitor to a laptop for solving a wide variety of tasks. And when you need to turn it off, it’s quite easy to do - just pull it out VGA cable or HDMI connected to a laptop and that's it. But if you don't want to constantly yank cords when you unplug your monitor, then you need another simple solution that won't force you to repeatedly plug and unplug cables.
Content:
In fact, this is probably the easiest way that will work every time and will have no side effects. The only thing is, in this case, cables and ports can be damaged if you connect and disconnect them too often, or do it not always carefully. In this case, we can offer two effective solutions to turn off the monitor without unplugging its cables.
Standard Windows tools
Mirror reflection
If you want to turn off your monitor simply because you don't need the extended desktop for a short period of time, you can simply mirror your displays. As a result, you will get a result in which both the internal and external displays will show you the same image. There is no difference which display will be called primary and which will be secondary. All open applications will be reflected equally on both screens.
To mirror your screens, press the keyboard shortcut "Windows + P". In the menu that appears "Project" There will be four options on the right side of the screen sharing two monitors. Select an option "Repetitive" to simultaneously display the same image on two monitors at once. Using repeated keyboard shortcuts "Windows + P" you will be able to switch between the proposed options collaboration monitors or use mouse control to select the desired option. This method will work for operating systems "Windows 7" and higher.

When you decide to expand the image to two screens again, "Windows" will remember which display was the main one and which one was the secondary one.
Turn off the selected screen
If you want to turn off the monitor for a longer period of time or for any other reason, you can use other options standard application for working with monitors "Windows". You have the option to temporarily disable the image feed to any monitor of your choice, and only work on one of them, while the other will be turned off.
To turn off the monitor, press the keyboard shortcut "Windows + P". From the pop-up menu on the right side of the screen, you can select the desired option turn off the monitor:
"Computer screen only"– this option turns off the second monitor and leaves the main screen of your computer;
"Second screen only"– this option accordingly turns off the main screen of your computer and transmits the signal only to the second monitor.
According to your requirements and time need, select the desired option and activate it using the keyboard shortcut "Windows + P" or using the mouse.

When you need to share two monitors again or need an extended desktop, you can use the latter option to display images on two screens. Using a keyboard shortcut "Windows + P" call popup menu "Project" and activate the option "Expand".

The dual monitor display will resume.
Using third party programs
If use standard tool "Windows" is not enough for you, then consider using the program "Multi Monitor Tool". This free utility from company "Nirsoft", which allows you to control multiple displays. It has quite a lot of functions, including the ability to deactivate or complete shutdown any display. This tool only works when you have two or more displays.
Run "Multi Monitor Tool" and from the list of connected displays displayed on it, select your external monitor. Right click on it and select "Disable selected monitors" or "Turn Off Monitors". This option only applies to the monitor you select. To turn your monitor back on, right-click on it again and select Settings "Enable selected monitors" or "Turn On Monitors".

This method has a slight inconvenience: when you turn on or off an external monitor using the tool "Multi Monitor Tool", then the service "Windows" doesn't remember which one was your primary monitor and which one was your secondary monitor. The monitor you connect will always be accepted as a secondary monitor.
To fix this you will have to go to the application "Options" V "Windows 10", and in the section "System" in the tab "Display" Reinstall the primary and secondary monitors. But performing such a procedure every time is not very convenient. Instead, you can save the current monitor configuration and load it after connecting the second monitor. All yours own settings display will return immediately after turning off the external monitor.
Before saving your current monitor configuration, configure your displays exactly how you like them. Then open "Multi Monitor Tool", in the main menu bar, click section "File" and select a tab “Save monitor configuration”. Enter a name in the window configuration file and press the button "Save". To load a saved monitor configuration, go to "File" main menu and select tab "Load monitor configuration".

Select the required boot file and press the button "Open". The saved monitor configuration will be loaded.