Apache setup. Setting up MySQL
Below I have written instructions as on local computer with Windows 7 - set up an Apache server and install PHP, MySql and phpMyAdmin on it.
Installing Apache
Download the distribution kit with the Apache server from the site http://httpd.apache.org/download.cgi. Select version 2.2.22 and download the installer for windows. On your home computer you are unlikely to need SSL, select “ Win32 Binary without crypto (no mod_ssl) ( MSI Installer) «.
Before installation, turn off Skype, or disable the use of port 80 in the Skype settings, as this will interfere with the installation.
Install Apache by running the installation file. All installation steps are standard.
Click Next.

We agree with the license.


Enter data into all three text fields. You can enter a non-existent domain like test.test or example.com. This data is needed to create a basic configuration file. Below the text fields is one of the most important settings- install Apache as a service or as regular program. Select “for All Users, on port 80, as a Service - Recommended” - install as a service.

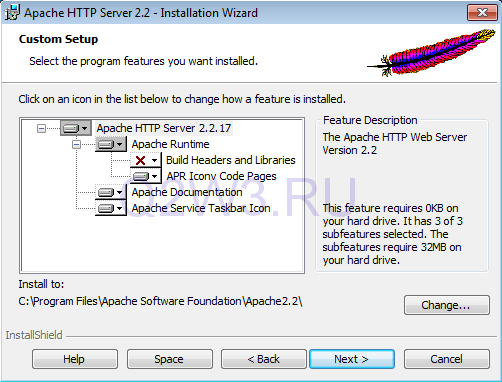
Select Custom (custom installation).

Selecting components and installation location. You can leave all the default values.

Click Install.

We complete the installation.

Installation completed. An Apache icon will appear in the tray, with which you can quickly stop/start.

We check the functionality. Go to your browser at http://localhost/ If everything is done correctly, you will see the inscription “It Works!” Congratulations, the first step has been completed successfully.
Note.
I recommend immediately enabling support for CNC links; to do this, uncomment the line LoadModule rewrite_module modules/mod_rewrite.so in file httpd.conf. It is in the folder conf in the place where you installed Apache.
It was like this:
(codecitation)#LoadModule rewrite_module modules/mod_rewrite.so(/codecitation)
It should look like this:
(codecitation)LoadModule rewrite_module modules/mod_rewrite.so(/codecitation)
Here and henceforth, uncommenting means removing the comment sign - #, which is located at the beginning of the line.
To be continued.
Choose latest version(at the time of writing this article - 2.2.17) and go to the list of distributions. On your home computer you are unlikely to need SSL, so download the version Win32 Binary without crypto (no mod_ssl) (MSI Installer).
Now run the installer (the user must have administrator rights). At the beginning there is nothing interesting - just a welcome screen:
The second stage is to agree to the license terms:

The third stage is a few introductory words from the developers. Immediately click Next:

Fourth stage. Here you need to enter data in all three text fields. You can enter a non-existent domain like test.test or example.com. This data is needed to create a basic configuration file. Under the text fields, one of the most important settings is to install Apache as a service or as a regular program. Select “for All Users, on port 80, as a Service - Recommended” - install as a service:

Type of instalation. Select Custom:

Sixth stage. Selecting components and installation location. I left all the default values:
Seventh stage. Everything is ready for installation. Click Install:

We complete the installation (Finish):

Installation completed. An Apache icon will appear in the tray, with which you can quickly stop/start the service:

We check the functionality. Open the browser and address bar enter http://localhost/. If everything is correct, a page should open that says It works!

In order for the server to be accessible not only on the local computer, but also from outside, you need to open the input TCP port 80 in Windows Firewall.
Opening a port in Windows Firewall
Open Start -> Control Panel -> System and Security -> Windows Firewall. In the left column, click on the link “ Extra options" In the window that opens, also in the left column, click on “Rules for incoming connections” and then in right column“Create a rule...”:

The Create Rule Wizard will open. Select the rule type “For port”:

Protocols and ports. TCP protocol. Below, select the “Specified local ports” option, and enter the port number - 80 - in the text field on the right:

Action. Select “Allow connection”:

Profile. Leave it as default (all three options are checked: domain, private, public):

Finally, enter the name of the created rule. For example Apache Web Server:

That's all. Click Finish. Now you can try connecting from another computer.
I remind you that for connections to the server not only from local network, but also from the Internet, on the router (if you have one) you need to configure forwarding of port 80 (port forwarding or this is often called a virtual server).
PHP installation (manual)
Download the latest PHP version(5.3.5 at the time of writing) from the site: http://windows.php.net/download/. There are several versions available here:
- VC9 x86 Non Thread Safe - for installation on IIS in FastCGI mode.
- VC9 x86 Thread Safe - ???
- VC6 x86 Non Thread Safe - for installation on Apache in CGI/FastCGI mode.
- VC6 x86 Thread Safe- for installation on Apache in module mode - our choice.
Because we started installation in manual mode, download the zip archive.
We unpack the contents of the archive into the installation directory. I selected C:\Program Files\PHP.
Let's go to this directory. In the installation root you will find two files php.ini-development and php.ini-production. These files contain basic settings. The first file is optimized for developers, the second for production systems. The main difference is that the settings for developers allow errors to be displayed on the screen, while for production systems the display of errors is prohibited for security reasons.
So, select the file you need (I chose php.ini-development), open it and save it in the same folder under the name php.ini. This operation can be done in a regular notepad, but it is still better to use a more convenient editor, for example notepad2.
Now you need to make a few changes to php.ini:
- Find the extension_dir option (use CTRL+F search) and change the path to the ext folder in accordance with the PHP installation path. For me it looks like this: extension_dir = “c:\program files\php\ext”
- Find the upload_tmp_dir option. Here you need to specify the path to the temporary folder. I chose c:\windows\temp. All together: upload_tmp_dir = “c:\windows\temp”
- Find the session.save_path option. Here you also need to specify the path to the temporary folder: session.save_path = “c:\windows\temp”
- Go to the Dynamic Extensions section. Here you need to uncomment the lines (remove the semicolon at the beginning) corresponding to PHP modules, which you need for work. Basic set modules may look something like this: ;extension=php_bz2.dll ;extension=php_curl.dll ;extension=php_fileinfo.dll extension=php_gd2.dll ;extension=php_gettext.dll ;extension=php_gmp.dll ;extension=php_intl.dll ;extension= php_imap.dll ;extension=php_interbase.dll ;extension=php_ldap.dll extension=php_mbstring.dll extension=php_exif.dll ; Must be after mbstring as it depends on it extension=php_mysql.dll extension=php_mysqli.dll ;extension=php_oci8.dll ; Use with Oracle 10gR2 Instant Client ;extension=php_oci8_11g.dll ; Use with Oracle 11g Instant Client ;extension=php_openssl.dll ;extension=php_pdo_firebird.dll ;extension=php_pdo_mssql.dll ;extension=php_pdo_mysql.dll ;extension=php_pdo_oci.dll ;extension=php_pdo_odbc.dll ;extension=php_pdo_pgs ql.dll ;extension =php_pdo_sqlite.dll ;extension=php_pgsql.dll ;extension=php_phar.dll ;extension=php_pspell.dll ;extension=php_shmop.dll ;extension=php_snmp.dll ;extension=php_soap.dll extension=php_sockets.dll ;extension=php_sqlite. dll extension=php_sqlite3.dll ;extension=php_sybase_ct.dll ;extension=php_tidy.dll ;extension=php_xmlrpc.dll extension=php_xsl.dll extension=php_zip.dll
Now let's move on to Apache settings.
Open the Apache installation folder (by default C:\Program Files\Apache Software Foundation\Apache2.2\). Open the conf folder. Open the httpd.conf file.
Go to the end of the file and add the following lines there:
# Charset AddDefaultCharset windows-1251 # PHP LoadModule php5_module "c:\program files\php\php5apache2_2.dll" PHPIniDir "c:\program files\php" AddType application/x-httpd-php .php
Way to php folder indicate the one you selected during the installation process.
In the same file we find following lines:
Before index.html we add index.php separated by a space. The result is:
For the changes to take effect, restart the Apache service. If the service restarts, this is a good sign. If not, look for errors in the configuration files. Check all paths especially carefully.
To make sure PHP is working, open the Apache installation directory, then open the htdocs folder (this contains the default website files). Create an index.php file in this folder with the following content:
Now open http://localhost/ in your browser. If everything is fine, you will see a page similar to this:

If you see a page that says "It works!", try refreshing the page using CTRL+F5.
Installing MySQL
Moved into a separate article.
The most popular at the moment is Apache web server. Today I will tell you how quickly and correctly install apache. You will be presented with step by step description the web server installation process, which will be accompanied by screenshots.
Let's get started!
Since the project is designed for beginner web developers, for ease of setting up and installing the software we will program under Windows. As you gain experience, you can easily “move” to the *nix platform.
So, first we need to download the latest version of the Apache distribution (4.6 Mb). At the time of writing this note, this is version 2.2.10. By the time you read this text, your version may be newer, but this does not change the essence. There should not be any fundamental differences.
Find the section “ Apache HTTP Server 2.2.10 is the best available version” (best available version) and there we select the distribution kit for Windows – “ Win32 Binary without crypto (no mod_ssl) (MSI Installer)” (installation file without SSL support, because We don't need SSL for our lessons):
So, we downloaded the installation file apache_2.2.10-win32-x86-no_ssl.msi. Launch the installer:

Just click Next.

We accept license agreement and click Next.

At this stage, fill in the fields as indicated in the picture. This data is written to the configuration file and can be edited later.


I strongly recommend that you install Apache in this folder (it is offered by default). The following lessons will be devoted to installing and configuring PHP and MySQL. I will focus on this Apache installation path. So if after Apache installations you don't need unnecessary problems with PHP and MySQL attached to it, then I advise you to listen to my words. In the future, when you install it yourself a couple of times and can configure apache, you will install it in a directory convenient for you.

Preparations for installation are complete. Click Install and wait until the installation is completed.

Congratulations, Apache installation completed!
If anyone has any difficulties with installation, write in the comments. I will try to help.
This article - step-by-step instruction on creating a local web server. It describes the installation Apache web server 2.4 on the Windows OS platform. The installation was tested on Windows XP SP3.
Web server composition: 
- Apache 2.4 (version 2.4.10);
- PHP 5.4 (version 5.4.34);
- MySQL 5.5 (version 5.5.23).
This working environment suitable:
- experienced webmasters to test their projects;
- for beginning webmasters to create their first websites.
Apache 2.4 and PHP 5.4 distributions are compiled in VC9 ( Visual Studio 2008).
Apache 2.4 VC9 version works with almost all current versions Windows (7/8/Vista/XP SP3).
For VC9 applications to work, you first need to update the Visual C++ libraries.
Installing the Visual C++ library update package
Download the vcredist_x86.exe update distribution from the Microsoft website, run the file and perform the update.

Installing and configuring Apache 2.4 server

The Apache distribution does not have an installation file. Therefore, the installation will be done manually.
Create a folder and unpack the archive httpd-2.4.10-win32-VC9.zip.
In the configuration file httpd. conf default routes are C:\Apache24. Therefore, there will be much fewer edits in the configuration file if you unpack the archive into this folder.
We will unpack the distribution into the C:\TestServer folder.
We make changes to the configuration file C:\TestServer\Apache24\conf\httpd. conf. When writing paths, instead of the "\" (backslash) character, use the "/" (forward slash) character. This is how paths are written in operating rooms Linux systems and Unix. But Apache was originally developed specifically for these operating systems.
We perform a group replacement of the text C:/ Apache24 with C:/ TestServer / Apache24.
Set the value of the ServerName parameter. 
ServerName localhost:80
Set the value of the ServerAdmin parameter (administrator's e-mail).
ServerAdmin [email protected]
Set the value of the DocumentRoot parameter (location of site documents).
DocumentRoot C:/TestServer/Apache24/htdocs
You may want to store site documents separately from the server. For example, in the C:\MySites folder. Then this parameter can be changed.
DocumentRoot C:/ MySites
Executable Apache files are located in the C:\TestServer\Apache24\bin folder. Add this value to environment variable PATHWindows.
PATH = C:\TestServer\Apache24\bin ;
Install Apache as a service.
httpd.exe -k install
 If , then when installing the service a message will appear indicating that the program is blocked from external connections. For the service to work, you must give permission to unlock.
Let's start the Apache server.
httpd.exe -k start
We check the performance of the server. IN command line browser, type the address: http://localhost. If the Apache installation was successful, the text It works! . Otherwise we will see a blank screen.

If the server does not start, you should check whether port 80, which Apache uses by default, is busy.
This is done using the command
netstat –anb
Most often this port is used by Skype or Firefox. In this case, you should either release the port or move Apache to port 8080.
To do this, in the httpd file. conf we change the values of the ServerName and Listen parameters. ServerName localhost:8080
Listen 8080
After this, restart the service with the command
httpd.exe -k re start
and again we try to go to http://localhost
To make it easier to work with the Apache server, you can install a shortcut in the menu pointing to C:\TestServer\Apache24\bin\ ApacheMonitor.exe
Installing PHP 5.4
 We go to the developer’s website http://windows.php.net/download/. Find the PHP 5.4 distribution in the VC9 x86 Thread Safe section and download the php-5.4.34-Win32-VC9-x86.zip archive.
Create a folder on the local computer, let it be C:\TestServer\PHP54, and unpack the archive.
We return to the site with the Apache distribution kit. In the Additional + VC9 section we find the archive php5apache2_4.dll-php-5.4-win32.zip with Apache PHP modules and download it.
In the archive we find the folder with the latest version of the php5apache2_4.dll module and place it in the C:\TestServer\PHP54 folder.
In the httpd configuration file. conf add the lines:
LoadModule php 5_ module « C :/ TestServer / PHP 54/ php 5 apache 2_4. dll"
AddHandler application / x - httpd - php . php
# configure the path to php . ini
PHPIniDir "C:/TestServer/PHP 54/php"
In folder C:\TestServer\Apache54\htdocs create a file test.php.
echo "Hello Apache!";
?>
Restart Apache.
In the address bar of the browser we type http://localhost/test.php. If the text Hello Apache! , That PHP installation completed successfully.
Setting up php.ini
To work with the MySQL database, we need to configure php. ini – PHP configuration file.

In the C:\TestServer\PHP54 folder there are two templates: development and php.ini-production.
Rename the php.ini-production template to .
Libraries for working with the MySQL database are located in the folder C:\TestServer\PHP 54\ext. This path must be specified in the extension_dir directive of the php.ini configuration file.
We find this parameter, remove the comment character at the beginning of the line (this is a semicolon) and write the path.
extension_dir = "C:/TestServer/PHP 54/ext"
There are two libraries for working with the MySQL database in PHP: php_mysqli. dll is newer and is recommended to be used in work; php_mysql. dll is old, but most sites use it.
It is better to include both libraries in the php.ini file.
extension = php_mysql. dll
extension = php_mysqli. dll
After completing the edits, be sure to restart the Apache server.
Installing and configuring MySQL
![]() Go to the page http://www.mysql.ru/download/. Select the version for Win32 or Win64. We will upload installation package mysql-5.5.23-win32.msi .
Go to the page http://www.mysql.ru/download/. Select the version for Win32 or Win64. We will upload installation package mysql-5.5.23-win32.msi .
Run the file mysql-5.5.23-win32.msi.
We agree to the license terms and select the Typical installation type.
Let's move on to setting up the MySQL server.
Select Detailed Configuration – detailed configuration settings.

Select the server type with minimum requirements to memory – Developer Machine.
Now we need to decide which databases (InnoDB, MyISAM) our server will work with.

Multifunctional Database – InnoDB and MyISAM are supported.
Transactional Database Only - InnoDB supported.
Non-Transactional database Only- myISAM is supported.
When choosing InnoDB support, the next step is choosing where to store the InnoDB tables.
Maximum number simultaneous connections It's better to choose Manual Setting ( manual installation) and accept the default value (15 ).

At this step, the Enable TCP/IP Networking parameter enables support for TCP connections and selects the port through which these connections will be made. The Enable Strict Mode parameter is also set – the mode of strict compliance with the MySQL standard.
Now you need to select the default encoding. The best option- UTF-8 encoding. Therefore we choose Best Support For Multilingualism.
In order for MySQL to start as Windows service- install Install as Windows Service. If you need to autostart this service, install Launch the MySQL Server automatically.

Now set the administrator password and turn off the Modify Security Settings option.
After clicking the Next and Execute buttons MySQL installation can be considered completed.
To check the functionality of MySQL, click the Windows Start button, find the utility for working with MySQL (MySql Server 5.5 MySQL Server Command Line) and run it.
After entering the administrator password, we are taken to the MySQL command line.
Enter the command
show databases;

If we see a list of databases, this will mean that the server is working correctly.
Exit command line mode:
exit;
This completes the server installation. Good luck!
A web server is a program that runs on a local or remote machine, and its main purpose is to allow the user to view web documents. When the website address is entered in the address bar, when you press Enter keys the browser generates a request directed remote computer- web server.
Apache HTTP server (short for a patchy server) is one of the most popular and widespread programs created for web developers and Internet resource administrators. According to independent researchers, Apache is installed on 50% of the computers of all HTTP server users.
The main advantages of Apache are stability, speed and flexibility, and they are due to modular organization, as well as the fact that the development is carried out open group programmers, albeit under the official name Apache Software Foundation.
Apache supports great amount operating systems and hardware platforms, and quite often it is used under control operating system Windows. It is also important that this web server distributed completely free of charge.
How to install Apache server for operating system Windows systems 7, will be discussed in this article.
Installing Apache
First of all, you need to download the latest version of the Apache distribution without SSL support and run the installation. In the welcome window, you need to click on “ Next", read the developer’s license agreement and confirm your agreement with it.
Then, in the installation window, you need to fill in the fields as shown in the picture below, and in the “ Administrator's Email Address» indicate your address Email, click “Next” and set the switch to the “Custom” position.


Next, you need to create a www directory on drive C and specify it as the installation folder for Apache, click “Next” in this and “Install” in the next window. When the installation is complete, click on “Finish".
If everything went well, a control icon should appear in the tray Apache web server. You can stop and restart it by left-clicking on the icon.

By clicking on the same icon right click mouse, you can go to different system services operating system or open the Apache monitor.

To check if it works installed server Apache, type http://localhost in your browser's address bar

If a page appears with the encouraging inscription “It works! ", this means that the Apache installation was successful and it is functioning correctly.
Basic web server setup
Although Apache is very convenient and extremely reliable, not everyone is ready to use it as a local server for a number of reasons, and the main one is the absence even in the environment Microsoft Windows any graphical configurator, which is quite unusual for most users.
The server is configured using manual editing httpd.conf configuration file. However, contrary to ideas about the incomprehensibility and complexity this process, there is nothing complicated in this operation for two reasons: firstly, in order to make a server out of the newly installed Apache that is configured for an acceptable and comfortable work, very little data needs to be changed in the configuration file, and secondly, the httpd.conf comments contain a lot useful information, necessary to understand the setup.
What is necessary?
- Run Apache under Windows platform 7;
- Store the files of the future website in a user-friendly directory (for example, C:www);
- Do not experience problems with encoding, and in particular with the display of the Cyrillic alphabet;
- Ability to work with several sites simultaneously.
To successfully resolve these issues, go to the folder with Apache installed, find and open the httpd.conf file in the conf subfolder. Please note that lines starting with “hash” are text comments, and lines that do not have a “hash” icon at the beginning are used as web server settings.
First you need to configure the directory that will be used by the server as the website folder. Find the line in the text that starts with DocumentRoot. This directive determines which folder will be the root.
Correct it to DocumentRoot “C:/www”. It should be clarified that the slashes in this file should be slanted to the right, and not to the left, as you are probably already used to Windows users. After the above manipulations, the problem with the location of your site is solved.
List of parameters used:
Options. The following options are possible:
- Includes – use of SSI allowed;
- IncludesNOEXEC – use of SSI is allowed with restrictions (#include and #exec are not allowed);
- Indexes – the use of index files is allowed, and if the URL points to a site directory (for example, www.domain.ru/dir/) in which there is no index file, the contents of this directory will be shown, and if this option is not present, an alert will be issued that access is prohibited;
- ExecCGI - execution CGI scripts allowed;
- FollowSymLinks – the server follows the existing symbolic links of the directory (used in Unix systems);
- SymLinksIfOwnerMatch – the server follows existing directory symbolic links only if the target file has the same owner as the link;
- All – all of the above together is allowed;
- None – all of the above together is prohibited;
- MultiViews – the ability to select specific content and display it depending on browser preferences (even if Options All is enabled. Specified separately).
AllowOverride. Options:
- AuthConfig – allows you to use directives for authorization;
- FileInfo – allows the use of directives for working with various types documents;
- Indexes – allows the use of directives for working with indexing files;
- Limit – allows the use of directives to determine access to the host;
- Options – allows the use of directives to work with certain specific directory functions;
- All – all of the above together;
- None – none of the above together.
Order. Options:
- Deny, Allow – Deny is defined before the Allow directive, access is allowed by default, except for hosts that are specified in the line following Deny from;
- Allow,Deny – Allow is defined before the Deny directive, access is denied by default, except for hosts that are specified in the line following Allow from;
- Mutual-failure – access is allowed only to those hosts that are absent in Deny and present in Allow.
Based on the above, try setting up your server. In the httpd.conf file, the default Directory directive exists in two copies -
In other words, the following options are selected for the C:/www folder and all its subfolders:
- Among the possible functionality of the existing server, indexes in directories and navigation through symbolic links are allowed;
- The ability to parametrically override using .htaccess files is completely missing, however given what you have full access to the server, it is not relevant - everything can be configured via httpd.conf;
- Access to the web server is allowed from all hosts.
Now, save the httpd.conf file and restart Apache using Apache Monitor or using the apache –k restart command on the command line. Setting up the site's root folder is complete.
You should check if you did everything correctly. Create a simple web page in the C:www folder, open your browser and enter http://127.0.0.1/your_created_page. The page should open. Otherwise, you must carefully check all changes to the httpd.conf file for correctness.
If the page opens successfully, there is a chance that instead of Cyrillic characters you will see unreadable characters. They can be displayed for two reasons. First, the web server provides your browser that requested the page with a default encoding. Secondly, oddly enough, this encoding is not Cyrillic.
If the notorious Internet Explorer in such cases determines the encoding from the page itself, then, for example, Mozilla Firefox and Opera have absolutely no inclination for such actions, and the method of manually setting the encoding in the browser can hardly be called convenient. Therefore, you need to configure Apache to return the required encoding by default.
Find the line in the httpd.conf file that starts with AddDefaultCharset . Most likely, the ISO-8859-1 encoding is indicated there, which does not contain Cyrillic characters. Change ISO-8859-1 to windows-1251, save the file and restart Apache. Now the correct display of the Russian language on your website will work in any browser.
IN Apache server It’s quite easy to set up work with multiple sites. Addresses that can be used for them are 127.0.0.2, 127.0.0.3, etc. In this case, only the default site (127.0.0.1) will be visible on the network, but for local work this is not critical. The section of the httpd.conf file, in which everything necessary for this is configured, is located at the very end and is called VirtualHosts.