The computer turns on but does not see the hard drive. Hard drive is not detected - solving the problem
Hard disk (HDD) is a storage device or the main storage device in most PCs. A large number of people are faced with the fact that their computer (laptop) does not see the hard drive. What to do in this case?
In computer slang it is called a hard drive, and it can be external or internal. On a device that operates on the principle of magnetic recording, not only user information is stored, but also an operating system that processes service data.
How can we still solve the problem of the “invisibility” of the hard drive? Let's step by step understand what a hard drive is and how to make it so that the PC detects it.
If problems occur with the hard drive, then the computer does not display all the recorded information. The PC may not see the hard drive for many reasons. We will try to describe all the causes of malfunctions and available methods for eliminating them.
All these reasons apply to both internal and external hard drives, and the “treatment” in both cases will be the same.

Diagnostic measures
If such a problem occurs, a diagnosis must first be carried out. Its purpose is to identify the source of the problem. After all, the problem may not be in the hard drive, but in the operating system. To find out, the hard drive is connected to another PC.
If the computer boots, it means that it is not the hard drive that is sick, but the operating system itself. And if not, the problem, accordingly, lies in the malfunction of the hard drive. In this case, it is best to take the device to a workshop for repair or exchange it for a new one if the warranty is valid.
In the first case, when the problem lies in the operating system, you can fix it yourself. There are several methods on how to do this yourself, without financial expenses.
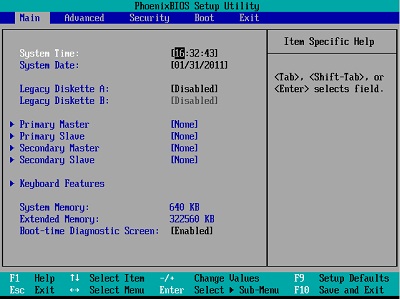
- 1. While the operating system is loading, click Del/F2 several times. If everything is successful, you will see the BIOS settings.
- 2. If you disconnect the internal hard drive from your computer, wrap it in antistatic material to prevent damage due to electrostatic discharge.
- 3. Before any manipulations with the hard drive, thoroughly study how to connect it.
- 4. Antistatic agent is also useful for the bottom part of the hard drive (where the boards are).
Main problems and solutions
There are problems related to hard drives that you can fix yourself. For example, if the contacts come loose, it is not necessary to contact a repair shop.Outgoing contacts
If the contact is loose, the computer will not see the hard drive. To resolve the problem, reconnect all cables in the system unit. Check all connections carefully, and then perhaps the problem will be solved.Incorrect BIOS settings
Even if the BIOS (basic input/output system) does not see the hard drive, the problem may lie in the system date. If the operating system crashed, the date could have been changed, sending your computer back in time. Reset the system date settings by removing the battery on the motherboard for 20-35 minutes and then installing it back.
If the problem lies precisely in incorrect date settings, the computer will recognize the hard drive as a physical storage medium.
There is another problem, which lies in the fact that the devices are not loaded in the correct order. In BIOS, find “Boot” and make the HDD the priority device that will boot first.

Insufficient nutrition
If the hard drive makes suspicious sounds and from time to time it disappears and then “reads” again, the problem is hidden in insufficient power, so periodically the PC does not see the hard drive (HDD). There are two ways to fix the problem: the first is to buy a good power supply, the second is to remove some device from the boot.Device conflict
If your computer has two hard drives of the same model installed at once, they may conflict with each other. In this case, the following will help you:- 1. Run diagnostics on both devices to identify faults.
- 2. Connect both hard drives to the operating system separately.
Bus version
Older versions of Windows OS may not support SATA.The smartest thing to do is to upgrade to a new OS version. If for some reason you cannot do this, you will need to reinstall the operating system and integrate drivers that are supported by SATA.
Problem with operating system settings
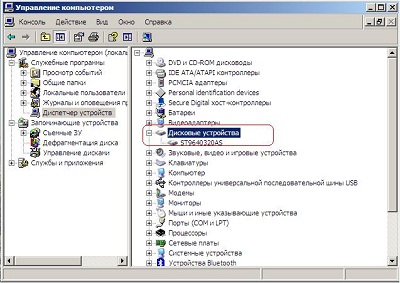
If everything is fine in the BIOS, but the operating system does not recognize the device, it must be configured manually using the capabilities of the OS. Do the following:Step one: Go to the “Control Panel” from the “Start” menu and click on the “Administrative Tools” section.

Step two Click on “Computer Management”.

Step Three Click on "Disk Management". Here you will see all the drives that are connected to the computer. One of the devices will not have a letter. Right-click on the unnamed device and open “Change Drive Letter” and assign your volume letter.

After this, you need to reboot the system.
If all these methods did not help and the computer (laptop) still does not see the hard drive (HDD), then most likely you need to bring it in for repairs. You are unlikely to be able to detect the malfunction on your own, but a computer technician can do it quickly. And there are cases when only professional help is recommended.
This article will help you understand what to do when the computer does not see the disk. Perhaps it will give you an idea of things that you did not know about, but “heard”. The main thing is that it will help you take concrete steps towards solving the problem or protect you from rash actions. To ensure this is the case, please do not try to treat this text as a step-by-step instruction. First, read the entire article, think about it, and only THEN start (or don’t start) acting.
1. How it happens
1.1. Alarm messages
– often this is the message that users see when they decide that their computer “does not see the disk.” Depending on the platform and type of equipment (computer, laptop or some kind of multimedia device), other alarm messages are possible: “ Correct hard disk not found», « WARNING! HARD DISK NOT FOUND! PRESS ANY KEY TO CONTINUE!», « Internal hard disk drive not found», « Hard Disk Drive Failure», « …did not find any hard disk drives installed in your computer" And so on. There is no point in listing everything. Their essence is clear - the computer does not see the disk. In addition to HDD, we can also talk about CD/DVD, flash media or ssd. But in the first part of this article we will dwell in detail on the hard drive, as a more widespread source of problems.
1.2. The hard drive may not be visible in the BIOS
If this is the only disk in this computer from which the operating system must boot, then you will probably see the following message on a black screen: .
Logical. Since the disk is not detected in the BIOS, it is impossible to boot from it.
If you boot from another device (another HDD, CD or flash, it doesn’t matter), then in the Computer Management -> Device Manager menu (depending on the version of the operating system this may look different) among the disks the disk we need is not defined.
In both of these cases, by going to the menu " Standard CMOS Features» BIOS‘And you can make sure that the disk you are looking for is not among the detected devices.
1.3. List of suspects and search for the culprit
So, the following may be suspect: power and data cables, the motherboard and the HDD itself. Connect the hard drive to other free cables to eliminate the first suspects.
Then, if you have another hard drive that you know is good, plug it in in place of the problem one to make sure it's not the motherboard. If there is none, then you can connect the disk itself to another computer and see that the picture is the same.
Naturally, this article is not addressed to specialists in data recovery or computer setup and repair. And if you have read this far, I dare to assume that you are not a specialist of this kind. Therefore, I will not describe possible ways to further study your drive by measuring the resistance on various parts of the electronics board with a tester or connecting the drive to special software and hardware systems, like the PC-3000. But on the other hand, for some reason I want to believe that smoke and a pungent smell, rhythmic tapping, grinding or other extraneous manifestations from the system unit or laptop would have long since seemed suspicious to you, and you immediately turned off the computer’s power. Thus, if any of the above occurred, then all the diagnostic steps described above are irrelevant. Your disk is faulty. And you yourself already understood this. It is worth noting that in this case you are probably dealing with a malfunction of the electronics or mechanics of the disk.
In this case, you should not perform unconscious actions: once again supply power to the disk, try to test it with some programs, disassemble it to find out what’s inside, unscrew and change the board, and so on. Stop and think carefully about your main goal. It is important to understand what scares you most in the current situation: the need to spend money on a new hard drive or the lack of access to important data. If you suddenly had to choose: a working disk, but without data, or data from this disk on another medium (yes, unfortunately, you will have to buy it). Which would you choose? Of course, one may not exclude the other, but you still need to ask yourself this question. The answer to it will help you understand what is important to you and what is secondary. And which part of this article will be more useful to you.
1.4. The system does not see the disk
It happens that the disk is detected in the BIOS, but not in Windows. More precisely, Windows cannot work correctly with this disk (or flash drive). For example, in the device manager you can see quite peaceful:

But if you look at the properties of this flash drive in this case, right-click on it and select the appropriate item in the drop-down menu, you will see:

And in the disk manager there is such a strange picture:

The OS does not see any properties of this disk, including its size. You may have suspected something was wrong when you saw that your E: and F: drives had disappeared from the system, namely these letters were assigned to the partitions of the hard drive that you connected second. Well, if the partitions of such a disk are not assigned letters when it is connected second, then it’s easy to guess what will happen if you try to boot from it. That's right, nothing will happen. The OS will not boot, and you will read one of the inscriptions listed at the very beginning of the article on a black screen. It is likely that this drive has problems with service information - firmware that was hardwired at the factory. Without it, the disk can be considered faulty, even if you saw that it was found in the BIOS. The same diagnosis can be made in almost all cases when the disk outwardly behaves as if it is fully working (that is, it is not silent, but spins up correctly and unparks the heads and does not make any extraneous sounds), but is not detected in the BIOS.
1.5. The system does not boot or slows down
Another situation is also possible. The disk is visible in the BIOS, but the system boots from it extremely slowly or does not boot at all. Moreover, even if such a disk is connected as a second one, even in this case Windows refuses to boot within a reasonable time. Sometimes, if in this case you listen to how the disk behaves, you can understand how it unsuccessfully tries to count the sectors it needs. And if Windows manages to boot, then with any movement it slows down terribly or freezes. The simplest operation of copying a small folder with data can turn into flour or lead to a nervous breakdown. There are probably bad blocks on this disk. And to tell the truth, trying to boot to it, much less from it, is harmful to this drive, especially to the data that is stored on it.
1.6. Logical drive not visible
Sometimes the user says that his computer does not see the disk even in situations where physically there is nothing wrong with the disk. As a device it is completely functional. It’s just that suddenly, when accessing familiar sections, inscriptions like “ The disk is not formatted. Should I format it?»

Or the disk began to be seen as an unallocated area. Sometimes such problems can be the result of bad blocks that have arisen unnoticed (not everything is in order with such a disk), but more often than not, some kind of program malfunction or a virus is to blame. The main thing in such a situation is not to do too much. It’s paradoxical, but it is precisely in such simple cases, when the disk is working, that users are most tempted to do at least something themselves, using available tools. The most common nonsense (Attention: none of the listed operations helps to return data!!!) - initialization, deleting partitions and creating new ones, full or quick formatting. And it’s really strange when this is done to save data. Allegedly, these are some kind of recovery programs that “force you to format the disk before using them.” It is likely that restoration in such cases will go to the same section, which is prohibited by all earthly laws.
2. What to do?
I will try to help you understand this issue. After all, people often don’t quite understand what they want. They were just scared. They pressed some buttons in some windows with some messages. The messages disappeared and were never read. Some processes have gone through. Has it gotten better or worse? How is it better?
2.1. We decide on the goals: repair or restoration
To ensure that your actions are conscious and do not cause you harm, let's first decide what your goal is. You have to choose - data recovery or repair. Yes exactly CHOOSE. And I have to write about this because it has been explained orally thousands of times. However, “Do you repair disks?” - one of the most popular questions. At the same time, people most often want to know something other than what they are asking. You have to “choose” because restoration and repair are not at all the same thing. What is the difference? In order of priorities. I propose that data safety and disk performance be considered two possible goals.
Then data recovery is a sequence of actions aimed at returning access to data from a problem disk by saving it on a known good (easily accessible to the user) medium. In this case, the subsequent operating state of the “problem” disk is a possible, but not necessary, side consequence of these actions.
HDD repair- this is bringing the disk into working condition. Recovering lost access to data is also just possible, But optional, side effect.
We often have to participate in such dialogues:
- Do you repair disks?
- Are you interested in repairs or data recovery?
- The data is fine. My disk is broken. You will help?
- Repair the disk - this means that you receive a working CLEAN, WITHOUT DATA, disk. Are you interested in this option?
- No! I need data too!
- This kind of “repair” of the disk, in which the data is saved, is called data recovery. In this case, the data is transmitted on a known good medium.
- Fine. So I need data recovery.
This is how difficult it can be to figure out your goals. And anyone who, without doing this, starts calling potential saviors risks participating in such nonsense:
- Do you repair hard drives?
- No.
Unbelievable but true! This dialogue, useless for both sides, has already taken place thousands of times. And it will happen many times in the future. (Depends where to call:)
I am sure that now you have clearly figured out what is more important to you.
2.2. If the goal is to repair the hard drive
I think you already understand how I feel about hard drive repair. I don’t care at all. I consider this a pointless exercise, namely a waste of time and money with the risk of subsequent even greater costs. I'm ready to explain. The cost of modern HDDs is so insignificant that repairs are simply unprofitable. Hard drives, unlike a car, are designed from the outset to be more cost-effective to manufacture with no plans for subsequent “maintenance” or repairs. They are riveted on machines in thousands of pieces. In terms of one disk, this is very cheap. And then it will become cheaper and cheaper. As for repairs, this must be the work of a highly qualified specialist with time costs from several minutes to several hours or days, CPU time, loading equipment worth tens or hundreds of thousands of rubles, using expensive or rare spare parts. How much could such work cost? Soooo, we need to think about it... At the same time, you need to fit in 1800 rubles - the cost of a new disk - an analogue of the one being repaired. And be prepared to repeat this work in the event of a warranty claim. No, I don’t even want to think about it. It’s strange that from time to time you have to deal with such “connoisseurs” of other people’s skills and working time, who are surprised that all this work is not done for 1000 rubles, preferably on location. :)
I agree that these are arguments from the repairman. And that the average user - the potential customer of the service - does not care about them at all. Although it would be worth understanding them. I think many specialists in various fields who know the value of themselves and their working time will agree with this.
But there are other, closer to the user, arguments against HDD repair. First, it's always better to get a new drive under warranty. Secondly, your hard drive is the most complex mechanical device in a computer. Suppose it, made at the factory, breaks down, and you cannot claim under warranty. A craftsman was found who repaired it, gave a 2-week guarantee, and verbally promised that “now the disk will work for a long time.” Do you need such a disk? Will you trust him? And now about money. To find out its current value, try advertising the sale of this HDD with a truthful story about its biography. I am sure that you spent more on repairs than you can get for this disk.
But things are not always so bad. After all, not in all the cases described above it can be said that the disk is faulty. And if the problem is purely software, then the problem of choosing between data and repair is not worth it. Sometimes software repair of partitions may be required, but the physical state of the disk does not change. And specialists in data recovery from hard drives can perform such repairs so that you get your data and, for example, do not have to reinstall the system.
2.3. If the goal is data recovery
When the disk is not visible, but data is needed, first of all you should make sure that the HDD is to blame. The first part of the article will help you with this. Let's say it's installed - the problem is in the disk. By the way, later in the article the type of digital media is not of fundamental importance. HDD can be changed to Flash, SSD and so on. Depending on what exactly happened to the media, recovering data from it can be simple or complex. It is clear that such an assessment is very subjective and everyone may have their own criteria. Therefore, I will describe mine.
If the problem can be solved by an advanced PC user (not a data recovery specialist) using the tools available to him, then this is a simple case. As a rule, these are logical problems on FAT and NTFS file systems and problems with the electronics board on some lines of older drives. Logical problems are solved software. Previously, a faulty board could often simply be replaced with the same one, but a working one. Unfortunately, this is not the case on modern drives.
In other cases, expensive specialized software or equipment may be required, as well as knowledge and practical skills that only a data recovery specialist can have. Investing time and money in all of these tools is unlikely to pay off if you don't intend to turn digital data recovery into your craft.
2.4. I want to save money
If your case is simple and you really want to save a little money, you might be able to do it. Methods for solving some simple problems are the topic of a separate article. And in the near future you will be able to familiarize yourself with it. But I would like to draw your attention to the fact that the savings are small, since data recovery specialists also solve such problems for relatively little money. You have to pay more for data recovery in complex cases, but it is almost impossible to deal with them yourself. This reveals another factor that influences the price of restoration in specialized companies, which is usually not talked about: the availability of the means by which the problem is solved. In practice, this can manifest itself in higher prices, for example, for the recovery of disk service information compared to logical problems. Although the working time and effort of a specialist, restoring a HDD service almost always requires much less than a long, tedious scan of a disk with broken logic. It’s just that for this purpose, a specialist, unlike an “advanced user,” has knowledge, skills and a software and hardware system. But you can’t download this on the Internet.
2.5. How much is your data worth?
In many cases, it will be helpful for you to ask yourself this question. Yes, it can be very difficult to value in rubles something that has not been bought or sold. Perhaps, in addition to the cost of an alternative way to obtain this data, such concepts as nerves, time, memories, work done or upcoming work, and so on will be involved in the assessment. But it’s still worth trying and understanding at least the approximate cost of the data. This will help you avoid confusion and take the right steps.
2.6. Diagnostics won't hurt anyone
Even if the problem seems simple to you, and the cost of data is low and you hope to save money by solving it yourself, I strongly recommend using diagnostics from a specialized company. I think everyone will agree with me that two doctors can treat the same disease differently. And often both will achieve positive results. But no matter which method of treating a particular disease the doctor chooses, the chances of a favorable outcome will be negligible if he made a mistake in determining the disease itself. In the case where the disk is not visible, this also works. Yes, perhaps your skills, computer literacy and luck are enough to solve some simple data recovery problems. But isn’t it better to understand for sure that at least the problem is defined correctly? After all, an error in making a diagnosis is dangerous not only because recovery will not give a positive result, but also because further attempts will be complicated and the likelihood of a successful outcome will be reduced. And no matter how optimistic you are about your chances, it will be better to increase them. Moreover, you don’t have to pay for it, since there are enough companies on the market that provide diagnostics for free.
2.7. Making the right decisions
If You have chosen the right data recovery company, then as a result of the diagnosis you will receive answers to the following questions:
- What is the nature of the malfunction?
- Is data recovery possible?
- How much will the restoration cost?
- How soon will you receive your data?
Now you have all the information to make the right decision.
Situation 1. Of course, if the cost of recovery is higher than the cost of the data itself, you will refuse the company’s services. But now you know the correct diagnosis and it’s easier for you to assess your chances when trying on your own. If your assessment is optimistic, then try it. If you understand that you can’t cope, then it may make sense to postpone this problem for several months. Just put the disc away. Suddenly your financial capabilities or market prices, or restoration technologies change. It is possible that the value of lost data will change for you.
Situation 2. If the cost of the service (A) is approximately equal to the value of the data itself (B), then /B-A/ is a very insignificant value. This is the most difficult case for councils. I suggest you deal with it yourself, since logic is powerless here, and your heart can “tell you” what to do best. At the same time, your self-confidence (if you decide to restore the data yourself) will certainly be proportional to the values of A(=B).
Situation 3. If the cost of the service (A) is significantly less than the value of the data itself (B), in other words, B-A is a very large amount for you, then it is worth ordering this service, no matter how highly you value the possibility of self-recovery. After all, for a non-professional, great chances mean “most likely”. And we are not talking about the fact that you will definitely receive your data, but that you at least will not worsen the situation so much that “now nothing can be restored.” Well, how do you like the prospect of “most likely” not losing a very large sum for you?
2.8. Example from life
For those who really like to play roulette or slot machines for money, thinking of making money in this way, it is better to skip this point. The rest probably have an idea about money and probabilities, and this example will be understood correctly.
Making decisions is easier if the problem can be formalized. In addition, this saves time and nerves. Here's a small sample of how this can be done.
For example, A-B = 90,000 rub. This is what happened if you value your data at 100,000 rubles. (which means the financial assessment of the current situation is minus 100,000 rubles), and the company asked for 10,000 rubles for restoring data from a very damaged disk. Then the financial assessment of alternatives for further behavior will be as follows:
Alternative 1. Use the data recovery service - minus 10,000 rubles. (or +90,000 compared to current position)
Alternative 2. Leave everything as is - minus 100,000 rubles. (that is, we remain in the current position).
The benefits of the first alternative are obvious, so we discard the second. Yes, and in this case the result is negative. But the minus is small. After all, the problem still happened, but was solved. It would be strange to end up in the black. But let’s say you want to improve this alternative too: do it at lower costs or even do everything yourself. Even if the optimistic assessment of our own chances obtained above, which we called “most likely,” is taken as 75%, then the financial assessment Alternatives 3– “Do everything yourself” will be equal to minus 25,000 rubles. And this is worse than minus 10,000 rubles. Here some may argue that 75% is too little. Believe me, 75% is an overestimate. A realistic estimate of the probability of not losing data when trying to retrieve it at home from a disk with a large number of bad blocks is no more than 50%. And a score of 90% is absolutely fantastic. But only if the probability of self-recovery is greater than 90% will the financial assessment of the alternative “I’ll do everything myself” be better Alternatives 1.
Yes, this example uses fictitious but concrete numbers. The problem may be different and it will cost differently. This applies to both the value of your information and probability estimates. But I hope this example will help you formalize your task with your data. Who knows, maybe the result will be different.
conclusions
So we looked at what to do if the computer/laptop/camera does not see the disk. Obviously, the purpose of the article is to help you choose the right path to solve the problem and not make mistakes by choosing this path. The article contains links useful both to those who decide to fight for their data on their own, and to those who will look for professionals. Well, in the text itself, I tried to analyze in as much detail as possible all the arguments “for” and “against” certain steps that should be taken into account.
The need for this article is due to my understanding of what confusion is going on in the minds of numerous victims. We are talking about thousands of processed calls from potential and current clients for data recovery, when the person is in a state of confusion and is wondering what to do. The desire to help them with their problem forced me not only to answer their not always conscious questions, but to ask my own. And now these answers that people gave to themselves were almost always much more useful. And it was they who allowed me to write this article, putting in writing those ideas that have already been discussed orally many thousands of times with people who turn to us for help. Since at the moment thousands of people are already grateful to me, I hope that this article will help you too. In turn, I thank everyone who, having found themselves on this page and having read the recommendation at the beginning of the article, read it to the end. Now take action.
When using the materials of this article in full or in part, an active hypertext link to the site is required.
Most users begin to panic when, before loading the operating system, they are greeted with the message “DISK BOOT FAILURE. INSERT SYSTEM DISK AND PRESS ENTER". This message has various variations, such as “Missing Operating System” or “Operating System Not Found”.
Are you familiar with this situation? Wait to tear your hair out. As the company’s specialists say - http://www.paradise-r.ru/nodisk.html, in 90% of cases nothing happened to your data and the problem lies in minor physical problems that you can fix yourself. But first things first.
The most common causes of a “missing” disk
In this article we will look at the 6 most common causes of this error. Let's start with the most popular of them:
1. BIOS settings failure
In this case, the BIOS settings need to be reset. You can do this in several ways:
- Turn off the computer's power. Look for the Clean CMOS inscription on the motherboard. There should be a jumper next to it. Move it from pins 1-2 to pins 2-3. Wait a minute and return the jumper back. Now the settings are reset to default values and the BIOS should recognize your hard drive.
- Turn off the computer's power. Find the coin cell battery on the motherboard. Take it out. Wait 60 seconds - during this time the capacitors will have time to discharge and the BIOS settings will return to factory values. Now you can put the battery back into the slot and turn on the computer. If everything is done correctly, the BIOS will recognize your HDD.
2. Corrosion of cable contacts (SATA)
poor contact with power connector (MOLEX)
To make sure the diagnosis is correct, try connecting the hard drive to another computer. Or, if possible, replace the pair of cables with similar ones.
For example, a loose power cord may be found from the power supply if it concerns a desktop PC system unit. A DATA cable can be purchased at a computer store for a modest price.
3. The jumpers on the IDE hard drive are set incorrectly
The IDE interface made it possible to connect several devices to the motherboard using one cable. For ranking purposes, older IDE hard drives had jumpers (Master and Slave) that allowed you to set the device priority when booting. To correctly recognize devices, it is necessary that they operate in different modes. For example, the hard drive is switched to Master, and the CD/DVD-ROM is switched to Slave. Or vice versa.

4. The computer does not see the external drive (USB, eSATA)
If your external hard drive is not recognized by the computer, try connecting another device to the same connector (USB flash drive or mouse). If a new device is detected, then the problem is in the hard drive itself.
5. Overheating of the southern chipset
This problem is especially common on laptops. The South Bridge is directly responsible for the functioning of SATA/PATA controllers. Due to overheating, the hard drive may not work correctly. Turn off your laptop and let the chipset cool down properly. Also consider cleaning your cooling system to prevent this problem from bothering you in the future.
6. Mechanical damage
If you are even remotely familiar with the structure of a hard drive, you should know how closely the parts are located in it. The reading head is located a few fractions of a millimeter from the surface of the mirror plates. That is why it is highly recommended not to subject the HDD to shocks or shocks. One careless movement and the head will scratch the platter, irreversibly destroying the data stored on it.

Service center imminent?
Did the above methods not help you? It makes sense to resort to extreme measures if you hear:
- Uncharacteristic clicks;
- Strong hum;
- Wookiee friction.
The above symptoms clearly indicate mechanical damage. And here it’s up to you to decide. If you are confident in your abilities, you can try to restore the disk yourself using special utilities such as mHDD or Victoria.
However, remember - at the manufacturer’s factories, hard drives are assembled under sterile conditions, preventing dust from getting on fragile parts and causing fingerprints on them. It is possible that your hard drive can still be saved. And by disassembling its body yourself, you seriously increase the likelihood of a “fatal outcome.”
If the data on the disk is really dear to you, do not take risks and seek help from qualified specialists at the nearest service center. Even if the hard drive itself cannot be repaired, service center workers have special equipment to recover data from its platters.
With the support of: http://www.paradise-r.ru/
In contact with
The problem in which the computer does not see the hard drive is quite common. This happens with new or previously used built-in and external HDDs. Before attempting to fix the problem, you should understand the causes of the problem. Often, users can independently fix difficulties associated with hard drives. To do this, you must use the instructions and act carefully.
There are certain reasons why the hard drive is not detected. This problem may affect not only the disk connected to the computer for the first time. The main hard drive may stop working, and booting the OS will be impossible. The following causes of failure are identified:
- First connection of a new HDD.
- Physical failure of the hard drive.
- Weak cooling system or power supply.
- BIOS failure or incorrect setting.
- Problems with wires or cable.
If the user has little experience, then diagnosing and solving the problem may be difficult, especially if the macbook does not see the hard drive.
Connecting the drive for the first time
When the user makes the first connection to an external hard drive, the system does not see the hard drive. The hard drive you are looking for will not appear in the list of local disks, but physically it will be fully functional. The problem can be fixed in a fairly easy way:
- Press “Win+R”, and in the field that opens, enter “compmgmt.msc” and confirm “OK”.
- In the left column of the new window you need to select “Disk Management”.
- The middle column will display all hard drives connected to the computer. Among them there will be a problematic one. In this case, the computer does not see the hard drive due to an incorrectly assigned letter.
- Now we find the disk that is not displayed. Right-click on it. In the console, select “Change drive letter...”.
- A window will open where you should select “Edit”.
- A window will appear where you can specify the desired letter in the drop-down list. To confirm the action, click “OK”.
Wrong format
If the disk does not have the “…” item, this may be due to a mismatch in the file system. Here, Windows 10 does not see the hard drive, and to solve the problem you need to reformat it to NTFS.
After reformatting, the hard drive will become accessible. This method is suitable for a hard drive that does not contain information or the data on it is not important. All files from such a hard drive will be deleted.
Instructions:
- Repeat steps 1 and 2 from the above instructions.
- Right-click on the HDD and select “Format”.
- In the new window, select the NTFS file system and confirm “OK”.
- After the formatting process, the disk will be displayed.
Initializing the hard drive
One of the reasons why the computer does not see the hard drive when it is first turned on is the absence of a process. This applies to completely new and unused HDDs. This process is carried out manually:
- Repeat steps 1 and 2 from the instructions above.
- Selecting the required disk. Right-click on it and select the “Initialize disk” section.
- Select a new disk, then select GBT or MBR style. For hard drives, MBR is the best option. Then confirm by clicking on “OK”.
- Right-clicking on the initialized disk. Then select the “Create a simple volume” section.
- The Create Simple Volume Wizard will open. You need to click “Next”.
- The next step is to specify the required volume size. By default, the maximum size in a simple volume is selected; it is not recommended to change this figure. Click “Next”.
- In the next window, indicate the letter of the hard drive and click “Next”.
- Then select “Format this volume:”, and in the file system field you need to specify NTFS. The remaining fields should not be changed. Click “Next”.
- In the final window, the wizard will show all the parameters that the user has selected. If everything is correct, then click on “Done”.
If the computer or laptop does not see the hard drive, then after the initialization process it will be ready for use.
Cable and contacts
When connecting the internal and external hard drives, special care should be taken. It is possible that the computer does not see the second hard drive due to a damaged cable. If there are no apparent reasons why the computer or laptop does not see the hard drive, then you need to take the same wire with similar connectors and then connect the hard drive to the computer.
Internal hard drives may also have a similar problem. The cables fail, and for the hard drive to work, they need to be replaced.
The user may incorrectly connect the hard drive inside the system unit due to insufficient experience or carelessness. It is necessary to check the connection and make sure that the contacts will not move away.
BIOS Settings
The system disk is invisible to the computer
If the hdd is not detected, it is important to determine the boot priority. The BIOS may have the wrong boot device priority set. This often happens after changing the settings to start booting from a flash drive. Then, while trying to boot the PC in the usual way, messages related to “hard disk” or “boot disk” appear.
The user needs to set the hard drive to first place in the BIOS settings:
- While your computer is booting, press F2 or Del to open the BIOS.
- Depending on the type of BIOS, the menu in the interface may differ. You should find the Boot section, and you need to use the arrows to control it.
- In the list of boot devices, you must put the hard drive you are looking for first.
- Press F10 to save the setting and exit. The computer will then boot from the specified device.
A common reason why a computer or laptop does not see a new hard drive is an IDE-incompatible operating mode:
- To replace it, you need to go to the BIOS using the above method.
- Next, go to Advanced and find the SATA setting.
- Select IDE or Native IDE from the list. Then press F10 and confirm the changes.
Now you need to check the visibility of the hard drive by the system.
BIOS does not recognize the hard drive
If even the BIOS does not detect the hard drive, then the problem lies in the settings or their failure. Incorrect settings can occur due to user actions, and failures occur for a variety of reasons. An inaccurate system date may indicate a failure. Let's look at how to make the hard drive visible by resetting to factory settings:
- De-energizing the PC.
- Search for the Clear CMOS jumper on the motherboard.
- Changing the jumper from pins 1 and 2 to pins 2 and 3.
- After 20 - 30 seconds, you should return to the original position, and the BIOS settings should be reset.
Lack of cooling or power
When looking for reasons why the computer does not see a new hard drive or one that is already in use, you should listen to the sounds of the system unit. If there is a buzzing sound when cycles change, the power supply is weak for the system. You need to replace it with a more powerful one, or disable secondary devices.
If there is insufficient cooling, the hard drive overheats and is no longer detected by the system. The problem can be solved by purchasing a more powerful cooling system.
Physical breakdown
The hard drive may fail due to a shock, fall, shake, etc. If the methods described above did not help, then you need to connect the HDD to another PC. If it is detected, then the errors are at the software level, and they are corrected in service centers.
We have studied the main reasons why the hard drive does not start. Such problems are quickly resolved depending on the configuration and specific situations.
Users' personal computers often store important information - documents, photos, videos, but data backup is usually not well-established.
A hard drive that stores valuable information can fail at any time, but data that becomes inaccessible can usually be saved. How to recover information from a hard drive that is invisible to the system?
If the hard drive does not load the operating system or displays a read error, you need to find out the cause:
- if the disk shows signs of physical malfunction, or it cannot be connected to the computer’s BIOS, this means a physical failure of the disk;
- If the drive is detected in the BIOS and shows no signs of physical failure, there is most likely a logical hard drive read error.
Reference! BIOS is a computer boot system that controls its internal devices.
Step 1. If the PC does not boot, look at its boot menu. If there is a message in the menu with the words “Disc Boot Failure...”, this indicates a system hard drive error.
Important! Troubleshooting system disk errors is discussed below. Errors in additional drives connected to the PC can be resolved using the same method.
Step 2. Check the disk for noise by bringing your ear close to the PC system unit. If you hear extraneous noise, clicking or buzzing sounds from the unit, this is a clear sign of a physical problem with the drive.
When diagnosing disk noise, it is necessary to distinguish it from the noise of PC coolers (fans), as well as from the quiet, rhythmic noise of the heads in some models of hard drives.
Reference! Booting a PC from a noisy hard drive can put serious stress on the drive and ultimately cause it to fail. In this case, it is better to remove the drive and place it in an external enclosure to copy the data.
If the hard drive does not make any extraneous noise, another reason for its malfunction may be the lack of spindle rotation associated with a disk drive problem or a simple loose power cable.
To check the rotation of the spindle you will need a Phillips screwdriver.

Step 3. Disconnect your computer from the network.

Step 4. Unscrew the fastening screws of the right side panel at the back of the PC system unit (viewed from the side of the connectors) or release the latch at the back of the panel. The screws may be able to be removed by hand.

Step 5. Remove the panel by pulling it along the case towards the back of the PC and then sliding it to the side, moving it out of the connectors.

Step 6. It has a rectangular shape and is placed in a special compartment of the computer. It is usually connected to the PC using two cables - power and data. Gently but forcefully press the cables into the hard drive connectors, eliminating possible lack of contact.

Step 7 Do the same steps on the other side of the cables on the PC motherboard side.

Step 8 Start the PC, and by touching the disk from the sides or top, check if there is a slight vibration on its case, indicating that the disk spindle is rotating.

Step 9 If the hard drive spindle does not rotate, disconnect the PC from the network, connect another power cable to the drive, and start the PC again to check.
Step 10 If the disk still does not start, check the computer documentation to see if the PC's power supply is delivering the power required to start.
Reference! If the listed parameters are in order, but the disk spindle does not rotate, you can try the external case.
Checking BIOS settings
If the hard drive spindle is spinning and the cables connecting to it are in order, you need to check the BIOS settings for connecting the drive.
Step 1. Write down the hard drive data indicated on its label.

Step 2. Restart the PC and repeatedly press the “Del” or “F2” key (“F1” in some laptop models, after holding down “Fn”).

Note! The button responsible for calling the BIOS can be found in the documentation for the PC motherboard.
Step 3. When the BIOS menu appears, press the left-right keyboard arrows to select “Main”. If there is no disk in “SATA1-4” with the data indicated on the label, use the up and down arrows to navigate to the “Not Detected” item and press “Enter” to identify it. If the disk is identified, select it with the arrows and press “Enter”.


Note! In other BIOS versions, the disk connection settings are similar; see the documentation for the PC motherboard.
Step 4. In the disc menu, you can leave the default settings and press the "Esc" key (top left on the keyboard) to exit.

Step 5. Go to the “Boot” menu item, then to the “Boot Device Priority” sub-item, press “Enter”.

Step 6. Scroll to “1st Boot Device” and press “Enter”. Select the desired drive using the arrows and press “Enter”.

Note! For a non-system (additionally connected) hard drive, you need to select it in the “2nd Boot Device” item.
Step 6. Go to the “Advanced” menu, select “SATA Operation” and set the mode to “ATA” or “IDE” (compatibility mode with “ATA” or “IDE” drives).


Step 7 Press “F10” and press “Enter” to exit the BIOS and save the settings.

If the hard drive is not detected, you can try to “hardware” reset the BIOS settings to their original state.
Step 1. Disconnect the PC from the network.
Step 2. Find the “Clear CMOS” switch on the motherboard and move the jumper from pins 1-2 to pins 2-3, wait 30 seconds and return the jumper to its original position.
Note! For more information on hard resetting BIOS settings, see the documentation for your PC motherboard.
Step 3. If the drive is not detected, turn off the PC and replace the hard drive data cable, repeating the steps for connecting it in the BIOS.
Reference! If the drive cannot be connected, you can place it in an external enclosure to read the data.
Hard drive logical error
A logical hard drive read error occurs when the drive is healthy, but it is impossible to boot the operating system from it (with a Windows failed... message) or read files.

This type of failure can be caused by viruses, system driver conflicts, software failure, etc.
The Windows operating system has built-in data recovery utilities. However, if your hard drive fails, you should not run the CHKDSK utility or reinstall Windows, because these measures can only worsen the situation.
In this case, it is best to externally connect the hard drive to extract information from it using data recovery software so as not to lose it.
External hard drive connection
In all cases of disk failure, you can place it in an external case or a special adapter, connect it to a working PC and try to copy data from it using regular copying or using special software.
An external drive enclosure (adapter) is fairly inexpensive and can be used with the drive as an external storage device by connecting the drive to a USB, FireWire, or eSATA port.

External drive enclosures are available in desktop (3.5-inch) or laptop (2.5-inch) sizes. It is also important to make sure that the correct internal interface for connecting the drive to the case is selected - IDE/ATA or SATA, depending on the type of hard drive used.
Reference! The drive enclosure may include an external power supply. It is advisable to choose this option to ensure that a faulty hard drive starts up.

After placing the disk in the case, you must:
Step 1. Connect it to your working PC like a regular external device. Once the drive is connected, Windows will automatically detect and install it.

Step 2. You will be prompted to access the drive from the folder. Click on the “Open folder to view...” option.

Click on the option “Open folder to view...”
Data recovery
After connecting the hard drive, you can view the data on it and copy it to another drive.
When copying, it is important to look at common data storage locations, such as the user's folder "C:" - "Users" and "C:" - "UsersPublic".
In addition, if there is unstructured information on the disk, it can be found at the address: “C:” / “Users” / “User_name” / “AppData” / “Roaming” / “Microsoft” / “Program_name”, copying its data to the appropriate catalog in a new location.
Note! Instead of “Username” in the address bar, you need to substitute the user name in the operating system.

Data recovery with Magic Partition Recovery
Damaged partitions, erased files and folders, incl. data from another file system can be done using the Magic Partition Recovery program.

Note! You can find the program installation file in the browser settings menu by going to its “Downloads”.

Step 2. Left-click to launch the installation file.


Step 4. After installing and launching the program, launch the “Wizard” in its upper left corner.


Step 6. Click on the physical disk to be restored and click “Next”.

Step 7 Leave the “Full analysis” checkbox and click “Next”.

Step 8 The program will find and restore all logical partitions of the disk. Mark files and folders for recovery and click the “Recover” button on the panel. The Save Wizard will open.

Step 9 Select a source for saving data and click “Next”.

Step 10 Select a working disk in the line, check the 3 recovery items and click “Restore”.

Reference! To save data, you will need to purchase a license for the program at: https://www.magicuneraser.com/ru/buy.php.

The data will be saved.
Reference! After extracting all the data from the hard drive, you need to format it.
It must be taken into account that if the disk is physically faulty (has extraneous noise), it cannot be used as a system disk and can only be used to store non-essential user information.
Video - Data recovery from a dead HDD Recoverry data
Video - The computer does not see the hard drive. What to do?