What is the best program to format an external hard drive? Types of disk formatting
Surely many of you have already encountered a format such as FAT32. In fact, this designation is a single type of file system that is used on various options computers. Many professionals choose this format because it has several advantages over other common file systems. Strengths are that FAT32 is able to work with almost any operating system; it also does not have any built-in security features, and this only greatly simplifies the work. However, it is worth noting that the given file markup not currently present on large quantities computers. Windows PCs often use NTFS, while Linux runs on Ext4. If you regularly use a portable hard drive, then you have a question about which system to use - FAT32 or NTFS. However, we recommend that you choose the first option. The fact is that the FAT32 system is very easy and quick to format, and absolutely no action is required from the user throughout the entire process. Today we will talk about this technology in detail, and also analyze some of its nuances.
Preservation
Conclusion
Let's now figure out how to format HDD in FAT32 in Mac OS X. First of all, you need to open special application which is called " Disk Utility" Need to run Finder window and click on the “Applications” tab, which is located on the left side. In order for the program to be launched, you will need to double-click on it with the left mouse button.

Now in a new window you need to select external media, which you plan to clean. As you can see, the answer to the question of how to format a hard drive in FAT32 is very simple, and in order to avoid serious mistakes, we recommend that you follow all the steps given in the instructions. In conclusion, let's say a few more words about the described technology. FAT32 is latest version of this type file system. This decision appeared together with Windows 95 version OSR2. The technology makes it possible to work with disks up to 8 terabytes.
file system FAT32? Can't do it? I see only the option to format the disk using a file in NTFS format? Well, if you answered yes to these questions, then you are in the right place.
I recently tried to format mybook external hard 1TB disk in Windows XP in FAT32, not too forced NTFS format. Why? Well because I need to connect it to a NAS device and the NTFS permissions are causing the NAS to not be able to access the drive. A simple solution is to use the FAT32 file system, no security, no problem. Although sometimes it's useful.
Additionally, formatting the drive to FAT or FAT32 will allow it to be read by other operating systems such as Mac, Linux and previous Windows versions, such as Windows 98.
Unfortunately, Windows XP and Windows Server 2003, will see the Removable Disk Format as FAT32 if it is less than 32 GB! Hmmm...cuts out quite a lot of modern ones external hard disks!
However, Windows can format a drive larger than 32 GB to the FAT32 file system, but you must use the command in the command line DOS line. However, if you have a disk that is 1 TB or larger, you may still receive an error message saying “ volume is too big for FAT32”.
In this case, you can use some 3rd party program which will allow you to format your external hard drive with a larger size. let's consider various methods. In case you are having problems receiving your external hard drive in Windows, read My articles on how.
Format to FAT32 using special tools
Before we move on to using the command line and others third party programs, it is worth noting that some manufacturers hard drives have created their own tools to convert a drive that is larger than 32 GB to the FAT32 file system. Here is the list:
Seagate Discwizard, Used
Tool Western digital format FAT32
Format external hard drive to FAT32 using DOS
Open a command prompt window by going to Start, then execute and enter cmd command.
Now enter next command on the command line:
format / FS : FAT32 x :
Replace the letter "x" with the letter of your external hard drive in Windows. Windows will go ahead and start formatting the drive to FAT32!

Seems to also be a problem when working on the command line in addition to the size limit issue. Namely, it may take forever to format the hard drive for some users. I don't know why, but I've seen this many times and it can be very frustrating to wait 5 hours and then the whole Format fails. If the Format takes more than an hour, just cancel it and try one of the methods below the first one.
Format in FAT32 use Verbatim SmartDisk utility in FAT32
Exists free utility called literally to FAT32 tool that will allow you to convert your hard drive to FAT32. I recommend a program called SwissKnife, which I'll mention below, but it's no longer free and no one should have to spend $10 to convert a hard drive from NTFS to FAT32. There are many other free tools and this is literally one of the best.
Just download it, extract it and run the utility. This is separate exe file, so you don't even have to install it on your system. Select the drive you want to format, give it a Volume name and click the button format disk!

It's easy to use and works very well. If you don't want to bother with the command line, just download this free application and use it.
Format to FAT32 using FAT32Format
FAT32Format is another one free tool which you can use to get a job. Select disk, cluster size, label volume, choose whether you want to do quick formatting or not and then click the button Start.

I would suggest not checking the fast format, so the entire disc is completely overwritten and you start from scratch. I tried this program and it managed to convert a 1TB hard drive to FAT32 without any problem. It took longer, but I didn't choose quick format, which would probably be faster.
Format to FAT32 using FAT32Formatter
Another option is the FAT32Formatter program from Tokiwa. Using this program, you can see the different partitions on your hard drive and format only one partition to FAT32 rather than the entire drive. It's probably best not to have a mixture of NTFS and FAT32 on the same drive, but you can do it if you want or if you need to for some reason. This program will allow you to do this.

Format to FAT32 using SwissKnife
SwissKnife is a great little program that is used to be free, but not much else, which can be used for formatting various types external drives such as USB, FireWire, PCMIA, SATA and SCSI port. The link points to a CNET page that still offers old free downloads. You can also use it to create partitions on your external hard drive and it formats faster than Windows.

With SwissKnife, you may encounter a problem where after converting to FAT32, you are left with only a small percentage of original size disk. For example, if you format a 1Tb drive, you may only end up converting for 500MB of space. This can be fixed by reformatting the hard drive to format by performing a quick format to NTFS.
Once you format the entire drive with using NTFS, make sure to view the available space in File Explorer and that it matches the size of your hard drive. Once you do this, go ahead and use SwissKnife to perform the conversion to FAT32.
So next time if you want to format your hard drive to FAT32 and Windows only gives you NTFS option, follow one of the above methods. Enjoy!
They are no fundamentally different from hard drives that are installed in desktop and laptop computers. Therefore, formatting an external hard drive occurs in the same way as other hard drives. But since users are interested in this point, in this article we will talk about how to format an external hard drive.
How to format an external hard drive using Windows
Connect your external hard drive to your computer and open the My Computer window. After the external drive is detected by the system and appears in the “My Computer” window, open the context menu of the external drive (right click on the drive) and select “Format”.
After this, a window with disk formatting settings will open in front of you.

How to format an external hard drive using the command line
You can also format your external hard drive via . To do this, connect the drive and run the command Windows string(Menu “Run” – command “CMD”).

Formatting disks via the command line is done using FORMAT commands. To find out all the parameters that can be accepted this command, enter "FORMAT /?".
To format an external hard drive, we need to execute the format command with the following parameters:
- /FS:NTFS – formatting using the NTFS file system.
- /V:MyDisk – specifying the disk name. Instead of MyDisk, you can use any other disk name.
- /Q – enable the quick formatting function.
As a result, the command to format an external hard drive using the command line looks like this:
- FORMAT X: /FS:NTFS /V:MyDisk /Q

Where X: is the letter that is assigned to this external drive. When formatting via the command line, it is important not to mix up the drives, otherwise you may format the wrong drive, which can lead to big trouble.
It should also be noted that when formatting a disk via the command line, the system does not display any additional warnings. Therefore you need to be especially careful.
How to format an external hard drive using Disk Management
In the operating room Windows system there is very handy tool called "Disk Management". With it, you can create and delete partitions, format disks, and perform other operations. To access this tool, open the Run menu and enter the command “diskmgmt.msc”.
After the Disk Management window opens, find your external one and open the context menu ( right button mice).

In the context menu you need to select “Format”. After selecting this item context menu you will see a warning that all data on this drive will be deleted.

To start formatting the external hard drive, click on the “Yes” button.
Reformatting to the FAT32 file system may only be necessary to ensure compatibility with a large number of subscriber devices. After all this system has a significant limitation - the size of one file recorded on it cannot exceed 4 GB, and the partition is 8 TB, which current level the development of production of these devices is not so critical.
A portable hard drive may need to be reformatted to the FAT32 file system only to ensure compatibility with a large number of subscriber devices
Thus, if you need to connect with different household appliances like a radio, player, TV, then you need to format the hard drive to fat32. Moreover this operation unfeasible inline Windows utilities. When you try to do this, a message will appear that the partition is too large to convert to the FAT32 format, but as mentioned above, the maximum volume capacity for this file system reaches 8 TB. The simplest method of reformatting external drives to FAT32 will be discussed in the next section of the article.
Using the fat32format utility
Help format your external hard drive to FAT32 free program fat32format. To do this, follow these steps:
- Download the app from official resource developers: http://www.ridgecrop.demon.co.uk/index.htm?guiformat.htm. To start downloading, click on the screenshot of the program screen.
- Connect removable hard disk and run the downloaded utility. After which its working window will open, since fat32format does not require installation.
- In the “Drive” drop-down list, select the letter indicating the connected external hdd.
- Click on the “Start” interface button, wait until formatting is completed and close the program.
Important: do not turn off external hard drive and do not restart your computer while formatting is in progress, as this will damage the .
Using this software You can also reformat the internal hard drive if the need arises. But it is not recommended to do this, because modern file system For Windows NTFS has a number of advantages:
- Automatic.
- Operating system support for large storage drives.
- Security high level security. Here you can configure user access parameters to the data stored on the media.
WATCH THE VIDEO
The only reason to need FAT32 is to install old version Windows. In such cases, remember that to ensure access from earlier modifications operating system to sections internal storage you need to reformat them into this format.
Tip: Don't forget about the size limit separate file up to 4 GB. There is no way to bypass it, and its emergence is due to the fact that FAT32 was created a very long time ago - in Windows times 98 and Windows Millenium Edition, a file size of four gigabytes seemed almost unattainable.
Hard drives (hard drives, hard drives, HDDs) are unusually pampered devices. Just shake it a little, overheat it, look askance - and the disk is already covered with terrible “bad blocks” that threaten both it and all the information on it with inevitable death.
In the event of disk failures, the most important thing is to save valuable data. But what to do then with their carrier? Can it be used in the future? They say that one medicine helps with all such “sores”: low-level formatting of the hard drive. Let's figure out what this “pill” is and when it becomes necessary to prescribe it.
What is it really?
Low level formatting today is called something completely different from what it really is. In fact, this is one of the stages of manufacturing disk drives, and it is carried out at the factory.As you know, all . Each piece of data has a unique address where it can be found. Creating areas for recording data on a clean magnetic surface and assigning addresses to them is low-level formatting.
More precisely, this is the process of physically dividing the disk surface into tracks(circles or tracks along which the read/write heads move), their sectors(track sections are the smallest areas of information storage on disk drive With own address) And intersectoral intervals. And also - application servo tags– service records between sectors and within them, according to which the head control system ( servo system HDD) will be able to position the latter.
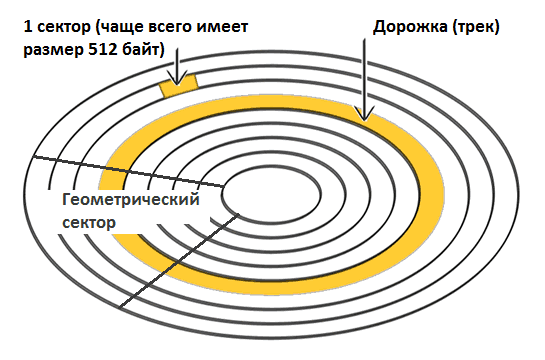
After marking, the disk surface is thoroughly scanned to identify defects in the magnetic layer (physically “broken” sectors), which must be excluded from addressing. Based on the test results, a list of defects and a translator are generated - a table for correlating serviceable ones physical sectors logical (numbered). This is also part of the factory formatting.
A long time ago, this entire procedure could be performed using the BIOS of a home PC. Today there are practically no such computers and storage devices left. Modern HDDs cannot be physically repartitioned without special equipment and software, and low-level formatting is the operation of “filling” the logical space with zeros (without access to the service areas in which the translator is stored).
As a result of this formatting:
- All information (except for service information) is deleted from the hard drive.
- A custom defect list is created with the addresses of bad sectors that will be hidden - excluded from subsequent read and write operations.
- Defective sectors are replaced with “healthy” ones from the reserve area (remap).
What problems does pseudo-low-level formatting help solve?
The operation is used:
- To prepare a computer for transfer into the wrong hands, so that the new owner cannot restore the files of the previous one.
- For corrections that cannot be removed using non-destructive methods.
- For the treatment of certain types of boot viruses.
It is effective:
- If the appearance of “broken” sectors is not associated with a malfunction of the mechanical and electrical components of the hard drive. For example, they formed after a short-term overheating of the disk or sudden shutdown computer power supply, and their number is not growing.
- If there are relatively few defects.
An example of detecting several unstable sectors when scanning a hard drive with the HD Tune utility:

It's useless:
- If the hard drive has suffered from a fall, drowning, or depressurization of the case (hermetic unit).
- If it makes grinding, knocking, grunting and other unnatural sounds when turned on or is poorly detected by the computer (disappears periodically).
The main area of this disk is occupied by unreadable sectors. Treatment with homemade “low-level” formatting will most likely not help him:

What and how to carry out “low-level” formatting at home
Any utility designed for this will be able to fill the surface of the hard drive with zeros and replace the “bad” sectors with normal ones. Even created by a manufacturer of hard drives of a different brand. Rewrite and remapping operations are triggered by a standard algorithm that is understood by all disk controllers (the final decision on remapping bad sectors it is the controller that accepts). These utilities do not have the ability to use highly specific technological commands, so they are not able to cause any harm to the device.Which utility will do the job you need best? It’s not a fact that the native version of your hard drive will work more accurately than the universal one. One didn’t help, try another. There will be no harm from this, but there may be some benefit, since to correct one defective block sometimes you need to make several attempts.
Let's figure out how to conduct a “low-level” HDD formatting using three free utilities.
Universal HDD Low Level Format Tool (HDDLLFT) for Windows
- Let's connect the problem disk to a PC running Windows.
- Download and install the application HDDLLFT. After installation, select “ Continueforfree» (Continue for free).

- In the list of drives, mark the one that we are going to format and click the “ Continue>>>».

- In the next window, go to the section “ LowlevelFormat" and click " Formatthisdevice»

- Let's confirm the operation again and wait for it to finish.
SeaTools for DOS for HDD Seagate
SeaToolsforDOS released in format iso image to sign up for bootable dvds, flash drives and floppy disks. After starting the computer from such media, the main window of the utility immediately opens. For convenience, let’s switch it to Russian, mark the problematic drive in the list, go to the menu “ Additional functions "(Advanced Features) and click " Erase everything"(Erase all).
