How to register a cloud on Yandex. How to log into Yandex.Disk from various devices
Good day!
To quickly transfer files to other people, and even between your PC, laptop and phone, it is very convenient to use Yandex disk (cloud file storage service). I uploaded photos to it once (for example) - and they can be viewed from all devices that have access to the Internet. In addition, you can significantly save space in your phone’s memory (many people often don’t have enough of it) by setting up automatic uploading of videos and photos to the cloud.
Add to this the ability to work with Word, Excel and Power Point documents online (without installing anything on your PC). It is very comfortable!
Not to mention that information on cloud drives is more reliably protected from various misunderstandings (viruses, file system problems, erroneous formatting, etc.) than on a classic HDD. Those. it makes sense to send some of the information to the cloud for backup (by the way, this can be done automatically, more on that later in the article).
Actually, in this article I wanted to show how all this can be quickly configured and used. I think the note will be useful to everyone who is still new to cloud disks.
And so, closer to the topic...
Registration and login to the drive [On Windows and Android]
In general, registration on the service is quite standard for such products. First, follow the link below to the official Yandex disk website and click the “Start disk” button (see screenshot below).

Next, you need to provide your details: first name, last name, login, password and phone number. By the way, if you already have mail from Yandex (or you use other products of this company), then registration is faster (just log into your account, the link will be located above the registration form).

After you register, you can start downloading applications for Windows and Android (to access and work with files on the disk).
For Windows

I won’t show the entire installation process, because... The installation is standard (like other programs) and does not contain anything complicated (interesting).

After installing the application, a characteristic “Yandex disk” icon will appear on your desktop and in the system tray, see the screenshot below. Clicking on it will open a window with all files, folders

The window for working with disk files is no different from the classic Explorer: all actions are the same. As a rule, creating, editing and deleting files and folders does not cause any difficulties even for novice users.

For Android
Installing the application on Android is also standard. Just go to Google Play (link above) and click the install button.

After installation, open the application shortcut, enter your username and password (specified during registration), set a PIN code (this is necessary so that no one except you can access the disk, even if you lose your phone), and woo-a-la - you're in the disk. See screenshots below.

How to increase free space on Yandex disk
In general, the allocated disk space is constantly changing (depending on different promotions, conditions, etc.): for example, several years ago I was given 10 GB during registration (it’s difficult to predict how much they will give you at the time of registration).
They also give extra as a bonus. space for using the mailbox (in my case 9 GB), and for installing the application on the phone (32 GB). In total, it turns out to be about 47 GB (which is quite enough for documents, photos, files).

If you need significantly more space, you can buy it for a small amount per month. In order to see the current rates: just open the Yandex Disk application and at the bottom of the window click on the “Buy more” link (see screenshot below).

For example, today “extra” 100 GB costs only 67 rubles/month. If you need much more, for example, 1 TB, you will have to fork out 167 rubles/month.

How to upload files and photos to disk
On Windows
This question is usually asked by people who have not yet worked with Yandex disk. In general, everything is actually very simple: first you need to open the disk (you can use the tray icon, see screenshot below).

After some time, the files will be downloaded: opposite them you will see small green checkmarks (synchronized). See example below.

By the way, it is not necessary to launch the Yandex Disk application: for example, in Explorer (Windows 10) there is a link to the folder with the disk. Just open the desired directory and copy files into it (if you have synchronization enabled in the application settings, the files will also be sent to the cloud).

To automatically upload photos to Yandex disk:
- launch the application;
- then in the menu open the “Settings” tab;
- enable auto-upload of photos via Wi-Fi (or even select the “Over any network” option if you use unlimited Internet on your phone);
- Now all photos will be automatically uploaded to Yandex disk. Even if something bad happens to your phone, you can quickly restore all your pictures. Reliable and convenient!

How to make files available for download by other users
Option 1
If you use the Yandex Disk application, this is done very quickly - just select a file or folder and click on the “Copy link” button in the menu.


Option #2


Option #3 (if we are talking about Android)
First, open the Disk application and go to the desired directory.


How to set up automatic copying of my documents to a cloud drive (backup!)
Everything is quite simple. I'll look at it step by step.
1) First, open the Yandex disk settings (to do this, you can use the tray icon next to the clock. See the screenshot below).

2) Next, I immediately recommend going to the “Advanced” tab and checking that synchronization is enabled (that is, all created and modified files in your folder on your hard drive will be immediately uploaded to the Yandex disk in auto mode (that is, duplicated) )).

3) In the "Basic" tab, check that the program starts automatically. Then open the folder location settings.

4) Look where the folder that will be synchronized with the cloud is located (if necessary, move it to another HDD partition).

5) Now open Explorer, right-click on the system Documents folder and open its properties. Example below.

Open File Explorer and go to the properties of the Documents folder.
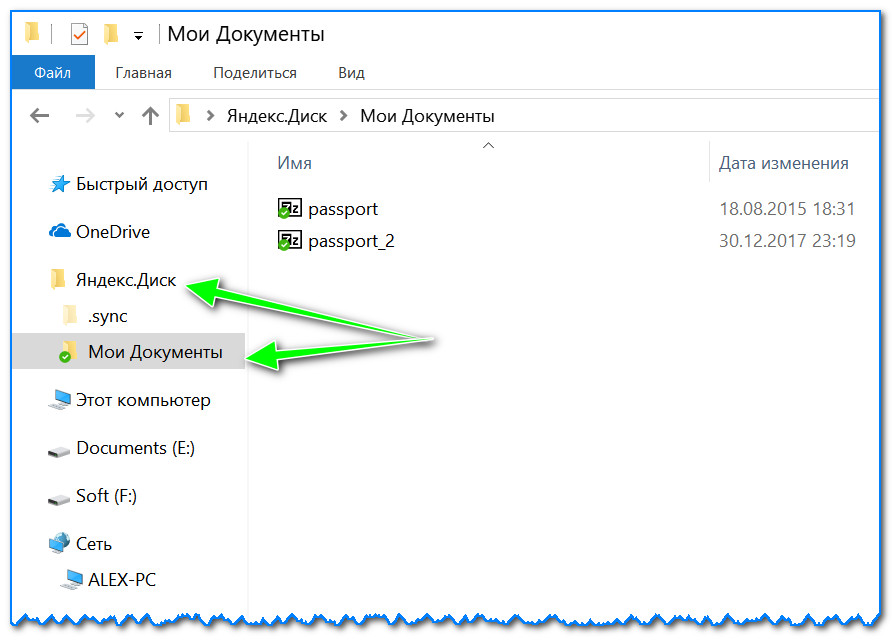
6) In the "Location" tab, click the "Move" button and move it to any of the folders located in "C:\Users\alex\YandexDisk" * (* the path is shown as an example, you will have your own directory - see point 4 just above, where we looked at directories in the application settings) . Those. We are moving our system folder "Documents" to a folder that will be synchronized with Yandex disk.

7) Personally, I named my folder “My Documents”, into which I moved the system “Documents”. Now all files (photos, documents, videos, etc.) that fall into this folder will be automatically duplicated to the cloud drive!

8) You can work with the transferred documents, both in the directory located on the HDD, and by opening the Yandex disk application. Comfortable!

Restoring a modified file
By the way, what else is captivating about Yandex disk: you can view the history of file changes. Just imagine, you edited a document incorrectly and saved it. And then they remembered that they had removed the unnecessary stuff from it... What should I do?

Additions are welcome...
That's all, good luck!
Yandex.Disk is a cloud file storage from a well-known search engine in our country. The service allows you to save various documents in one place, and then opens up the ability to access them from all your devices. Thanks to this service, you can save photos, music files and other documents on your computer, and then access them from your smartphone. And vice versa.
Navigation
Today, Yandex.Disk, along with Google.Drive and [email protected], are the most popular remote file storage systems using cloud computing technology. And if you haven't registered with one of them yet, now is the time to do so.
We have already written, . In this article, you will learn how to log into your account and also share documents with other users.
From computer
In order to log into your page of this service from your computer, you need to log in to your Yandex account. To do this, go to the page www.yandex.ru and fill in your data in the upper right corner: login and password.
IMPORTANT: If you are not registered on Yandex services, you can do this using the form described above.
Login to Yandex mail
After you have filled in the data, click on the “Login” button and go to the “Disk” tab. It is located at the top of the screen.
Yandex menu
You can also access Yandex.Disk from the main page of this service. Hover your cursor over the “More” link, which is located above the search line, and in the drop-down menu, find the word “Disk” and click on it.
If you need to log into your Yandex.Disk from someone else’s computer, then use any of the algorithms described above. Imagine that you want to show your photos to your friends or work colleagues. This is the beauty of cloud storage. You can access them from any equipment. The main thing is not to forget your username and password.
But, in order to subsequently protect the leakage of your data or the use of your account by third parties, be sure to indicate that you are logging into your account from someone else’s computer, and then click on the “Exit” button.

Log out of Yandex services on someone else's computer
From phone
In order to log into your account of this cloud service from your phone, you can use a special application. It can be downloaded from the official directory of your operating system.
After installing the application, you need to enter your account information: login and password. They are identical to those that you use in the desktop version of Yandex.Disk.

Login to the Yandex.Disk application
After you enter them, you need to click the “Login” button.
As you can see, there is nothing complicated about the possibilities of using Yandex.Disk. Applications exist for various mobile operating systems: Android, iOS and Windows Phone. There are also clients for Windows, Linux and Mac.
How to upload files: photos, videos and documents to Yandex.Disk
After you have learned how to access this cloud service from Yandex, you can start using it.
Imagine that you have a 10 GB flash drive. But you don't need to carry it with you. Thanks to your smartphone, it is always with you. And over time (Yandex.Disk managers like to give gifts) this small, by modern standards, external drive can increase in size and turn into a full-fledged external drive. But, like a flash drive, it will not take up space in your pocket, bag or backpack.
In order to use such a data storage, you need to be able to move files into it. This can be done from any device. Moreover, in some cases in automatic mode.
In order to upload photos or other data to Yandex.Disk, install the client of this service on your computer. Of course, you can also use the web version. But, this is not the best choice. Using the client makes it more convenient to use Disk.

Yandex.Disk client
After installing the client (we told you more about how to do this), a folder will appear on your computer. By saving files into it, they will automatically appear on the server.
This can be done in any way, from simple drag and drop to using file managers such as Total Commander.
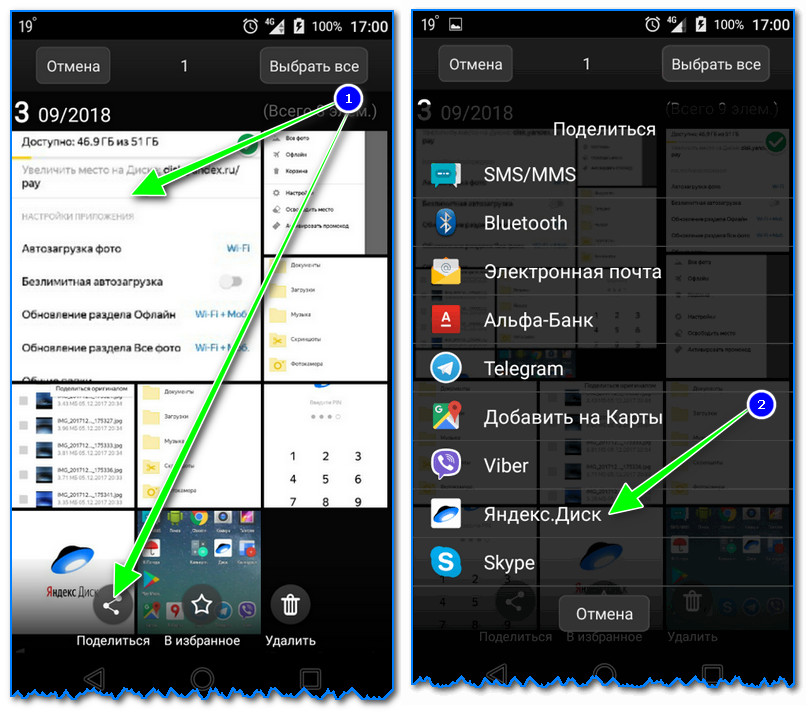
As for the mobile application, in order to upload a file to your Yandex.Disk through it, you need to open the application and click on the button with a cross in a yellow circle.

Adding files in the Yandex.Disk mobile application
In the menu that appears, you need to select the source files. This could be a gallery, files from the device, files from applications, or a photo from the camera.
If you want to upload a file to a specific folder, then before selecting a document, go to the folder in which you want to save the file.
How to open access to your files on Yandex.Disk?
In order to make files public, it is advisable to use a separate folder for this feature.
- Create it and then select it
- In the Properties panel, click “Make folder public”

It should look something like this
- After this, a list of contacts will appear, among which you need to select those to whom you will open the opportunity to use the folder
- There are rights settings for contacts (viewing only or full functionality).
- After selecting a contact and setting rights, you need to click the “Invite” button

Invite a contact
- You can also grant access to a folder to a contact who is not in your address book. To do this, simply enter his address in the appropriate field
IMPORTANT: This can only be done for Yandex mail users.
- When you give a user access to a folder located in your cloud storage, he will receive an invitation letter from Yandex. If the user accepts it, a copy of the folder will appear on his Drive.
In this case, you can assign rights:
- View only. With this right, the user can read and download files. But he will not be able to edit them.
- Full access. The user is allowed not only to read and download files from the public folder, but also to edit them. With this right, the user can delete, change, rename files, and open them to others.
You can close access to files and folders just as easily as you can open them. To do this, select the folder and click the “Configure access” button.

Setting up sharing
The setting is made for each contact who has the right to use the folder.

In order to completely block access to a folder, you need to put “No access” in the field next to the contact.
You can also remove public access to the folder using the “Close access to everyone” button. At the same time, the created copy of the folder on Yandex.Disk of the person who used public access will be deleted.
You can find out which folders in your cloud file storage you have granted access to in the “Shared Folders” main menu item.
Are you ready to entrust your files to aliens? Just a joke, of course. It’s just that the familiar Yandex has provided its new service – Yandex.Disk. The logo of the Yandex.Disk service is stylized as a flying saucer. Interesting and fun presentation. What is the new service?
Yandex.Disk is a cloud service for storing personal files. Its functionality is very similar to the DropBox service. You could even say that Yandex.Disk is its clone. The service is free, and files can be stored for as long as desired. Unlike the service DropBox, Yandex.Disk is completely Russified and also has some nice additions. This includes a good design, integration with email, a shopping cart and other nice little things. One of the great features of Yandex.Disk is that all files uploaded to the storage are scanned by Dr.Web antivirus.
Let's take a look from the inside at what is called Yandex.Disk.
To access Yandex.Disk, first go to the service page - disk.yandex.ru.
If you have an account in any of the Yandex services, you can log in by entering your username and password. As a rule, the login is an email address, and the password is an email password. If you don't have an account, you need to register.

So, enter your username and password and get into the Yandex.Disk interface. To fully use the capabilities of Yandex.Disk, you need to download and install a special program on your computer. The program will create a special folder, the files in which will be synchronized with storage on Yandex servers.
Installing the Yandex.Disk program on your computer.
After authorization, we are logged into our account and are offered to install the Yandex.Disk program on our computer. Since I have the Windows 7 operating system installed, I was asked to download a program for this operating system.

The program can also be installed on operating systems (OS) such as Windows 8, Windows XP, Windows Vista, Mac OS X, Linux, and also supports Android, iPhone and Symbian mobile operating systems. Supported OS versions are kindly reported at the bottom of the beautiful picture. Before installing the program, familiarize yourself with the OS versions that are currently supported by the program, otherwise the question may soon arise, why Yandex.Disk is not installed?
If the operating system on your computer does not meet the requirements of the Yandex.Disk program, then this is not so scary. You can connect to the Yandex.Disk cloud storage using the so-called WebDAV client. You will have to set up the connection manually, using the recommendations outlined on the Yandex.Disk website (in the section "Help"). In this case, the Yandex.Disk storage will be connected to your computer as a regular network drive.
Click on the picture-button with the inscription "Install Yandex.Disk for Windows". After this, the installer program will be downloaded to your computer. This is what the file looks like.

We need to launch it. First, the program will download the necessary files, and then installation on your hard drive will begin.

Upon completion of the installation, several tempting offers will be made (make Yandex the default search, install Yandex elements, etc.). If you need a bunch more unnecessary “trackers” and “peepers”, then leave everything as is, click "Ready". If you don’t need any useless gadgets, uncheck all the checkboxes and press the button "Ready".


As you can see, it indicates that we are not authorized and there is no connection to the network storage yet.
Right-click on the Yandex.Disk icon in the tray and select "Log in". In the window that appears, enter your username and password. After authorization has passed, synchronization of files on the computer and in the network storage will begin. A notification like this will appear in the tray.

That's it, we are at the mercy of aliens! Don't be scared, they are kind...
Let's go through the items in the drop-down menu of the Yandex.Disk program.

The Yandex.Disk folder is quite easy to find on your computer. After installing the program, it appears on the desktop, in the Start menu, in the Favorites column.

And also in the column where the computer’s hard drives are shown.

Yandex.Disk is a virtual disk - it is just a certain amount of hard disk memory allocated for storing information that is copied to a remote Yandex server.
We invite you to further explore the possibilities of this interesting service. If you encounter difficulties when using Yandex.Disk, you can always look at the “Help” page, which is on the service’s website. It describes in detail and clearly all the functions of the service and possible problems when working with the program. At the time of writing this note, the service was in beta testing and its functionality may have changed a lot.
What can you use Yandex.Disk for?
You can use Yandex.Disk in different ways:
You can create a kind of virtual library and store your favorite books in storage. This will protect you from losing your favorite collection of books in the event of possible malfunctions of the computer’s hard drive.
You can use Yandex.Disk to share files with friends and colleagues. The 10 GB of memory provided by the service should be enough for most cases.
It is also possible to use Yandex.Disk as a “local” network for electronic document management in a small enterprise.
It is very tempting to use Yandex.Disk as a backup file storage. In case of any problems with your hardware, you can easily get the necessary files intact and safe. Yandex.Disk is like a flash drive that cannot be lost.
In the future, we can expect that in addition to storing files, the service will provide the ability to use programs directly in the cloud, which will mark a transition from only storing files towards the implementation of cloud computing, which has been talked about so much lately.
Today I turned on cartoons for my daughter that were downloaded to my computer from the Internet...
So, I was sitting and watching her, and imperceptibly somehow “immersed myself” in memories of my childhood...
But as a child, I didn’t even suspect the existence of a computer! My parents turned on the TV and I watched there... Yes, I watched whatever was on TV at that time)))
I even caught a little bit of black and white TV!))
Then color TV appeared. It was already followed by a VCR, and then it was already possible to choose what to watch...
And so, it appeared - my first computer!
ABOUT! What an event this was in my life then!
I remember how much joy and pride there was, as I remember now!) Of course, his memory was minimal; to save information - a floppy disk, which was not always readable.
Remember this “miracle”?)
Just think how time flies...

The Internet has arrived! And it eliminated the need to use conventional disks. What for? When can you watch everything directly on the Internet?
"What do you mean why? To store important information!- you say.
Yes, it’s possible, but at the moment this is no longer entirely relevant.
The fact is that now the largest Internet companies have their own so-called disks for downloading, transmitting and storing information.
So, for example, in Yandex there is such a “cloud disk”. Have you heard of this? But nevertheless it exists! And that’s exactly what I want to talk about. So that you, like me at one time, can understand and appreciate how convenient and easy it is to use.
Yandex - . What is this?
How
?
How?
Yandex disk (cloud): what is it?
Why do you need Yandex disk?
Yandex disk is a free service owned by Yandex. This cloud data storage is free (cloud storage, or can be called CLOUD for short). That is, the place where you can place your files, and they will be stored not on your disk, but on the server’s disk.
Often, in Internet slang, you can come across the following words:
-Hello! Do you have a cloud?
-Download your cloud and use it
etc.
 It was first launched in 2012, but then not everyone could use it, but only the “selected” who received an invitation. But now, it is already available to every Internet user.
In this service you can store all the necessary data and information.
But don't worry about the safety of your data! Since Yandex disk is very securely protected. ONLY YOU CAN ALLOW ACCESS to any data and files!
In addition to the fact that you can store data and information, as described above, you also have the opportunity to share your information with other users on the Internet.
So I brought you up to speed a little.
Now, let's figure out how to start using Yandex disk?
Registration and login to Yandex disk
Before you start using this convenient service, of course, you first need to find out where it is located and how to register with it.
And we begin our familiar procedure. If, of course, you have already become familiar with other useful services such as Ya.money, Ya.mail. Which I told you about in previous articles. And whoever hasn’t read it yet, I highly recommend doing so - it will come in handy.
And if you are interested in the article -
Then, together with Dick, register an electronic wallet and mail. It's necessary!
Here are instructions on how to do it:
So, enter into the search engine: Yandex disk, click “Find”. And the search engine gives us the following link: File storage and sharing (disk.yandex.ru).
 Then click on the link (disk.yandex.ru) and the following window opens:

Click on “Create your own Disk” and get to the registration window. There we need to fill in ALL FIELDS. And we indicate your REAL cell phone number, since this page will be linked to it. And that’s it, click “Register”.
 That's all, you have completed the registration procedure. It's very simple, isn't it?!
Here your disk opens for you:
 And now I’ll show you how to log into your disk for those who have already been registered with Yandex, but have never used the disk.
I already have a Yandex mail account. How to log into your disk?
We go into our Yandex account, and there, in the very top left corner, is that very “Disk” button.
 Click on it and go to your disk.
But that is not all! In order to start using this service in full. You need to synchronize your computer and Yandex disk. And to do this you need to download it and install it on your computer.
How to download and install Yandex disk on your computer
So, go to the disk and find on the right this button “Download Disk for Windows”.
 Click on it and the following window will open:

PLEASE NOTE: can be installed not only on a computer, but also on a tablet, smartphone and Smart TV. Now we are interested in the computer, so we click on “Computer”. Then click “Disk for Windows” and download.

The other one is at the bottom, where all the windows and the Start button are located (in Windows 10 - also):
So we figured out how to download and install the cloud program on your computer)).
Now let's talk about how to use it.
How to use Yandex disk
It is quite simple to use and very entertaining, you will see this when you start mastering this service.
We will now look at some of the most common questions.
 Where we see the icon of our disk, click “Save” and the picture is saved in the Y.Pictures package (by default). We can move this picture from this album to another. To do this, click on the picture and on the right we see the following window:
How do I upload a download file?

Yandex.Disk is a cloud file storage from a well-known search engine in our country. The service allows you to save various documents in one place, and then opens up the possibility of using them for...
Important work files and projects should be kept in a safe place, that is, where the possibility of their loss for one reason or another will be minimized. Since it’s a stretch to classify a home computer as a reliable storage device, you should turn to other means. One of them is cloud services, in particular Yandex Disk, and in this article we will talk about how to create it on our PC.
Yandex took into account the interests of not only desktop PC owners, but also mobile devices with different operating systems. Today we’ll talk about how to create and install Yandex.Disk on your computer to store photos, documents and other purposes.
Step 1: Registration
The disk is one of the Yandex services and is linked to an email address. In order to get space to store files, you need to have a mailbox. You can skip this step if you already have one.

After registering Yandex.Disk, we only have access to the web interface (website page), and this is not always convenient. To make life easier for users, an application was developed that allows you to interact with the storage. Using the program, you can copy and delete files, create public links for sharing with other users. Let's proceed directly to creating Yandex.Disk on the computer. First of all, you need to download the installer from the official website.

Step 3: Installation
The application installation process is extremely simple:
- Run the downloaded file with the name YandexDiskSetupRu.exe and wait for the operation to complete.

- Once the installation is complete, we see a window asking you to install and configure the start page. It's up to you to decide.

- After pressing the button "Ready" The following page will open in the browser:

The application window will open at the same time as the browser. Here we enter the username and password for your Yandex account and click "To come in".

- And finally, the Yandex Disk application opens.

Interaction is carried out as with a regular folder on the computer, but there is one feature: in the context menu of Explorer, called by right-clicking the mouse, an item has appeared "Copy link".


https://yadi.sk/i/l5TMgn4TO4wUbg
In addition, after installing the application, a folder is created on the computer for storing files locally. By default it is located at
C:\Users\Your account name\Yandex.Disk

You can quickly open it by right-clicking on the Disk icon in the notification area and selecting the appropriate item.

That's all, actually. We have created Yandex.Disk on the computer, now we can get to work.
Developed by Yandex. This service allows users to store their personal data in the cloud. At the moment, you can upload 10 GB of photos, videos or documents to the storage completely free of charge. If more space is required, it can be purchased for a small subscription fee, for example, an additional 10 GB can be purchased for 30 rubles per month or 300 rubles per year. A huge advantage of the service is that you can save photos not only from your computer, but also from social networks - VKontakte, Odnoklassniki and Instagram.
It should be noted that several years ago it was possible to use the Yandex.Disk cloud storage only by invitation. Now anyone can do this by registering a Yandex email. I know that many users are interested in various questions about using Yandex.Disk. Login to your page, how is it done? Or how to upload new files to the cloud (read about how to work with Yandex.Disk)? In this article I will talk about how you can log into your cloud storage profile from various devices.
From your computer
To log into Yandex.Disk from your computer, you will need:

Important! You can also log into your Yandex.Disk profile from the main page. To do this, you need to hover over your login in the upper left corner and click “My Drive”.

In order to log into Yandex.Disk from another computer, you need to do all the same steps. However, when you're done, you should log out of your email to prevent others from using your personal files. In order to log out of your personal account, you need to click on your login in the upper left corner, and then click on the “Log out” button. 
Password recovery
Many users are interested in the question of whether it is possible to log into Yandex.Disk using a login if they have forgotten their password. Unfortunately, this is not possible, and you will need to reset your password to log in. To do this you will need:

If you don’t have a computer at hand at the moment, but you need to use files that are in cloud storage, you can log into Yandex.Disk from your phone using the official application. This requires:
- Install the official application on your smartphone, which can be downloaded from the store absolutely free.
- Wait for the installation to complete.
- Enter your username and password in the appropriate fields and click on the “Login” button.

Important! Using the application, you can also register for the service or recover a lost password. You can install the application on smartphones with Windows, Android and iOS.
This concludes my article on how to log into Yandex.Disk from a computer or phone. I hope that you have found the answers to all your questions and that you do not have any difficulties.
Hello again, our dear readers!
All Internet users know what Yandex is. Everyone has heard of the numerous services that this search engine provides to the modern user.
- This is the YA browser (which we already mentioned),
- "I.money"
- "I.direct",
- “I.metrics”, etc.
Many people have known about Yandex music and Yandex mail for a long time.
More recently, “Ya. line".
And today we will get acquainted with the Yandex Disk service, find out what it is for and how to install it on your computer. Let's learn about its capabilities and advantages. This article turned out to be a short overview of this service; I hope you find this interesting.
So, what is the Yandex Disk cloud?
This is a type of “cloud” technology; designed for storing and accessing user data. All well-known brands have had this type of “cloud” technology for a long time - Drop box, Google drive, One Drive, Mail.ru are the most popular. And their number is growing year by year. They all offer us to store our data with them... Only physically, the servers are located in America.
The name itself, “cloud,” suggests that the user stores his data not only on his computer, but also on the Internet (“cloud”). Access to data is possible from anywhere in the world where there is Internet. And if your device breaks down, “it’s no problem, all the photos you saved in the cloud will not be lost,” the creators of the service assure us.
Moreover, services from Google and Microsoft “know how” to make copies of operating systems. Not so long ago, a similar “cloud” service appeared on our Yandex. Which was a completely logical and timely step, since Yandex is one of the flagship search engines of the Russian Internet.
Indeed, “I. Disk" allows you to save the files you want without the risk of losing them, have access to them anywhere in the world, and if you need to, you can give access to the file or folder with files to your friends and acquaintances. In this case, you do not need to send them anywhere. You simply give the right person the right link. Once on it, a person downloads the file to his computer. In this case, the size of the file does not matter.
Use Yandex cloud storage for free
Read also:
So, let's look at how we can access this wonderful service. First of all, we need a computer and the Internet. Let's start in order. Type in the search bar download Yandex disk. The disk will be accessed through a special application.
Select the appropriate one and click:

After downloading, click on the installer icon...:
 ...install the application:

A window indicating successful installation appears. Check the boxes (optional):

And in the taskbar we now see a disk icon

...but since the app hasn't been configured yet, it has an orange exclamation mark.
In order to use the disk, click on the icon with the mouse and you will see the following window:


If you already have Yandex mail, then enter your email address and password in the fields and click “Login”
How to create an email?
If you don't have an email address yet, you need to register. To do this, click the “Register” link:
The registration procedure is not complicated. Enter the required data in the appropriate fields.

I advise you to write down your login, password, and control information in a special notebook.
We come up with a login or choose from those that the system offers. If you wish, you can specify your mobile phone number - it will be faster to restore access if you lose your password. If we do not specify a telephone number, then you will need to select a security question and answer to it:
 After you have indicated everything correctly and entered the captcha, we register! The registration procedure is free - at the exit we receive a mailbox, as well as a Yandex passport, which contains all the data. The passport can be saved - printed or as a file.
Congratulations! You have just created your own mailbox.
Mailbox is the identifier of your Yandex account. This account is used to work with Yandex Disk and also provides access to all other Yandex services. And if desired, this account can be linked to Microsoft, Skype and others.
Yandex disk, how to log in:
After you have set up your mail, we can log in to Yandex Disk. Click on the disk icon in the taskbar until the window appears:
We enter our username and password into the fields and finally get to our disk.
 In addition to others, Yandex.Disk appeared on the computer...
 And another sign, the appearance of an icon on the desktop:

How to upload a disk to Yandex?
By going to Disk, we can create and delete folders on it as usual, copy any files (by dragging or copying):

In this case, the disk icon in the taskbar will begin to display the file synchronization process:
When you connect memory cards, flash drives, cameras, the application will prompt you to immediately copy the photos and videos on them to Yandex Disk. You can agree or refuse:
 After copying and synchronizing files, we can, if necessary, give our friends access to them. To do this, select the desired folder (file):

We right-click, select as in the photo, the system will notify us that..

After that, you can send it by mail to the right person. If you need to allow access to a file or folder only to specific people, you need to use a different method. Using the browser, go to “Ya.Disk” and select the desired folder:

Click “Sharing”; then fill in the list of required postal addresses. We invite you.
Mailing addresses must be from Yandex; if your friend also installs Disk, this folder will appear on his disk too:

It's that simple!
If access needs to be closed, open your cloud again with a browser, find the desired folder or file, select it, then turn the sharing switch to the “Off” position:

That's it, access to the folder is closed.
Advantages and disadvantages
When installing - "disk" You are allocated free of charge "on the cloud" 10 GB of disk space. When this is not enough for you, you will need to pay a little for additional space. Or take part in promotions held by Yandex.
Yandex Disk is good for everyone. You can store files, you can publish folders. But there is also a drawback. If you store copies of your files on a “disk” without deleting the originals from your computer, then if there is a large amount of data, the free space on your computer’s hard drive may quickly run out. And if you delete a file from the Yandex Disk folder on your computer, it will also be deleted from the Yandex server. It turns out that to save space, we must completely trust the storage of our “important” “personal” files to Yandex. Whether to do this or not is up to you.
The second drawback, which cannot be avoided, is that if you installed Yandex Disk on a new computer, you will have to wait until the data is synchronized. If the volume of Disk data is large, then you have to wait quite a long time. In this case, you may not be able to quickly access files. You can do selective synchronization in the settings - mark only the most necessary folders at first, and then all the rest:

But, overall, the application is pleasant, discreet, unobtrusive. It has gotten me out of trouble many times. My overall impression of him is good. By installing it on your computer, you yourself will be able to fully appreciate all its advantages. After all, you have just completed a theoretical acquaintance.
That's all for today; choose the service you like; keep your data safe. Good luck to our readers and all the best!