How to install windows 7 professional from a flash drive. Installing the Windows operating system on a computer via a USB flash drive
Now you can independently install Windows 7 recorded on a USB flash drive. Just follow the step by step instructions. From the procedure Windows installations 7, professional work with a computer begins. It is assumed that the installation will be carried out with flash drive. Flash drive or HDD, to install a boot image of Windows 7, must be at least 8Gb in size.
Steps to install Windows 7 from a USB flash drive
Download the latest version of the Windows 7 operating system maximum
On this moment Windows 7 Ultimate x64 is one of the successful Microsoft developments, along with the almost retired XP, and the increasingly popular Windows 10. It is stable and ready to fulfill user requests of any complexity. On this moment Windows 7 holds first place in terms of the number of downloads and users.
To create a flash drive with a Windows Seven image, we recommend using official utility from a corporation engaged in the production and maintenance of Windows OS.
Advantages Windows Utilities 7 USB DVDs
1. Simple and intuitive clear interface programs
2. Designed specifically for creating boot images Windows Seven operating systems
3. Completely free utility only 2.6 Mb in size.
How to create a bootable USB flash drive with Windows utility 7 USB DVD:
Download the utility from the official website using the link above. Install Windows 7 USB DVD on your computer following the installation wizard. And we launch the utility about Microsoft. In the main program window that launches, you need to select an iso image, we see two buttons for creating bootable Windows 7.
- The first button is “Browse” for browsing and selecting an iso image of Windows 7 x64.
- Second and last button“Next” to go to the next menu.
And so we select the downloaded system image and press the button number two (Next) 
In the next window you need to select the media type for the image and there are already three buttons:
- "Start over" to go (return) to the previous menu, to select an image installation image Windows Seven.
- « USB Device» to go to selecting a flash drive or portable hard disk where the image will be installed.
- "DVD" to go to select clean DVD disc, where the system image will be installed.
We are interested in button number two "USB Device" click and move on to the next step. 
Insert a portable hard drive or flash drive into USB input on the computer. All information from the USB drive during Windows boot to the flash drive, it will be permanently deleted!
Choose defined by the system drive and press the button "Begin Copying" to start copying Windows files to a flash drive. 
In the next window, the Windows 7 USB program asks for permission to format a flash drive or portable hard drive. We agree and click “Erase USB Device” to delete all information from the flash drive. Having formatted the flash drive, the installation of the bootable Windows Seven OS will automatically begin. After successful completion of copying Windows files, the program will remind you of this in the next window with the message Bootable USB device created successfully
Close the program with the “Close” button in the upper right corner. Bootable USB flash drive with Windows 7 is ready.
Changing BIOS settings to select boot from a flash drive
In order for the system to boot from a flash drive, you need to set it to BIOS parameter priority launch from external storage. To do this, when you restart the PC, at the moment when lines with information about technical characteristics ah computer, press repeatedly Delete key and F2. Other options for key operation are also possible, for example on different laptops you need to press the Win+F12, F10 buttons. The result of pressing the correct key will be the appearance of a window. 
After that, in the menu that appears, you need to look for the “Boot” option, which changes the boot priority operating system. The word can serve as a guide "Boot". Choice boot device carried out using the Up/Down arrows on the keyboard. The first position is placed on the Flash drive with the name of the flash drive on which you installed Windows Seven, and by pressing the F10 key you must exit the BIOS, answering “OK” (“YES”) to the question about saving all changes “save configuration and exit?”  At this point, work with the BIOS is completed, and if everything was done correctly, and the flash drive with the operating system to be installed is inserted into the USB drive, then after rebooting the PC the following window will appear.
Installing Windows 7 from a USB flash drive with boot via BIOS

Here you need to press an arbitrary key, which will start the installation process.
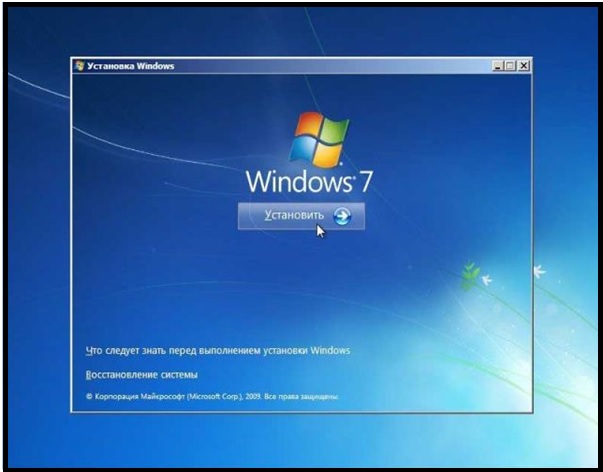
In the next dialog box, select the system language. By clicking the “Next” button, select “Install” in the next window.

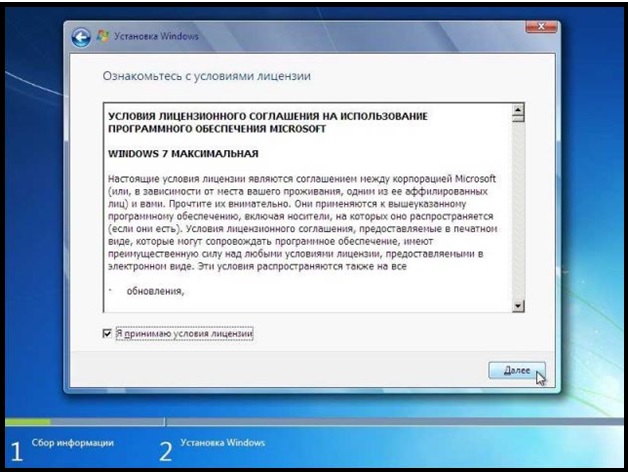
Then you should check the box next to the line indicating acceptance of the terms of the agreement, and click on the “Next” button. In the next interface window, make a choice - “full installation”.

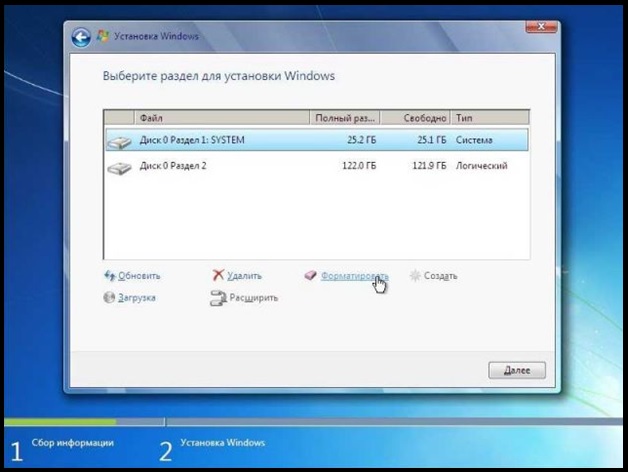
Then you will need to select the partition in which to install the system. By clicking the mouse it is highlighted required section, and then - the “Settings” link, clicking on which will bring up a window with disk partitioning tools, where you should click the “Format” link. This action will result in a warning.


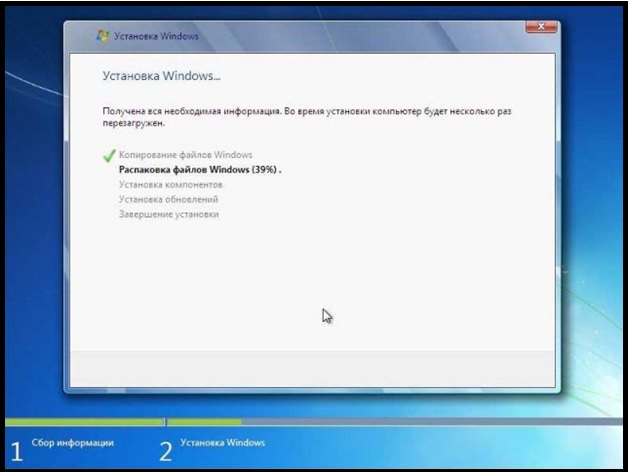
After confirming your choice by clicking the “OK” button, the process of formatting the logical partition will begin, upon completion of which you will return to the last window. Clicking on the "Next" button initiates the unpacking process installation files, followed by their installation. The progress of the installation can be observed by the filling of the green bar at the bottom of the window, as well as by the green checkmarks appearing next to each line at the top of the window. After installation is complete, a message will appear indicating a reboot, which can be done immediately by pressing the corresponding button or waiting for the automatic reboot after 15 seconds.
IMPORTANT POINT!
When you restart the PC, you need to enter the BIOS again and change the initial boot from the flash drive to “Hard Disc”. And save the changes, otherwise the installation will start from the very beginning.

At the end of the installation, the system will ask:
Enter your username and PC (you can come up with anything you like)

Generating a password for an account

Operating system activations

Selecting a security mode

Date/Time Settings

Select an option network connection. The last window will only appear if there is an active network connection.

After which a user profile is created and the desktop is loaded

Activating Windows 7 using an activator
If you don't have a key windows activation 7 download the activator (archive password: 1111)
Step-by-step installation of Windows 7 from a flash drive!
Are you planning to install Windows 7, but your DVD drive refuses to work? Or do you not have one at all, since you use a netbook? Indeed, the situation is not pleasant, but there is no need to despair. Great way way out of this situation - installing Windows 7 from a USB flash drive.
Please note that for the installation process you will need:
- Flash drive, the volume of which must be more than 4GB.
- ISO image with Windows 7.
- Windows 7 USB/DVD Download Tool 1.0.
For simplicity, we will conditionally divide the entire process of installing Windows 7 into several stages:
- Creating a bootable USB flash drive.
- Installation of the operating system.
Go to the “Start” menu, select “Control Panel”, then click on the item “ Accounts Users and Family Safety”, and lastly, select “User Accounts”. Here we click “Change User Account Control settings”.

Move the slider to the very bottom, then click OK.
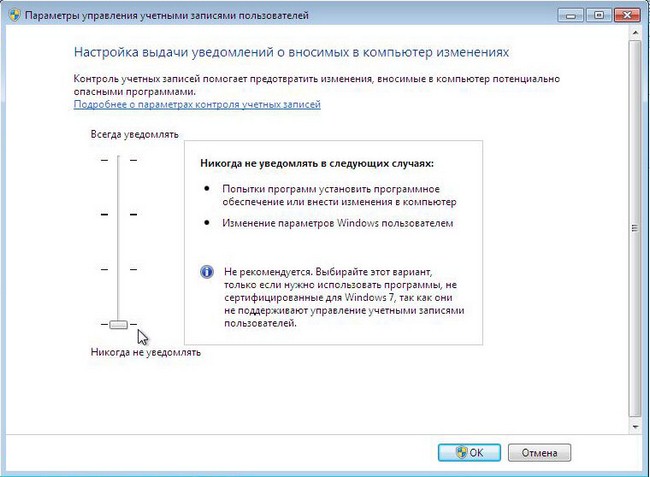
We confirm our decision by clicking Yes.

Congratulations, you have completed the first stage - disabling User Account Control.
2. Creating a bootable USB flash drive
There are several ways to install the Windows 7 operating system. Installation from a flash drive using the Windows 7 USB/DVD Download Tool 1.0 is the easiest and fastest. Connect the flash drive to the computer, having first copied all important information from it. Next, launch the USB/DVD Download Tool and click Browse.

Select the operating system ISO image and click Open.

After you have specified the ISO image on your computer, click Next.

Click USB device.

In this window, select the connected flash drive and click Begin copying, which will start the copying process.

Click Erase USB Device to format the flash drive.

Click Yes to confirm your decision.
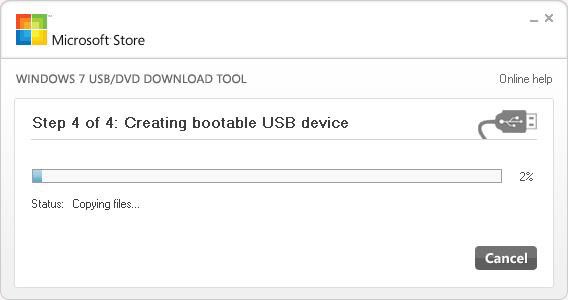
The process of writing the image to the flash drive has begun.
Once recording is complete, Backup completed will appear. You can safely close the program.

That's all. You created a bootable USB flash drive yourself. As you can see, installing Windows 7 from a flash drive is not at all difficult if you follow these steps.
Before you start installing Windows 7, you need to set the flash drive to first place in the boot priority in the BIOS. To get to the BIOS menu, you need to start a specific key when you boot your computer. This could be Del or F2. When loading, you may see this prompt at the bottom of the screen:

In Bios, look for the Boot tab. Here, in the boot order, you need to put the bootable USB flash drive first. To do this, use the arrow keys, as well as F5 and F6. Use the arrow keys to select the flash drive, and use the F6 key to bring it to the first position. Next, save your changes and exit this menu by pressing F10.

A window will appear where you need to click Yes, confirming your intentions to put the flash drive first in the boot order. If you did everything as described here, then after restarting the computer, the installation of Windows 7 from the USB flash drive will begin.

Select the basic installation options and click Next.

Click Install.

We agree with license agreement by checking the appropriate box. Click Next.

At this point, you will be offered several installation types. We recommend choosing the full installation.

Here you need to specify the partition (disk) on which Windows 7 will be installed. Please note! Do not install the operating system on hidden partitions, if there are any.

After selecting the partition where you plan to install the OS, click Disk Setup.

Click Format. Note! Formatting will permanently delete all data on this drive.

If there is no important information in this section, feel free to click ok.


The installation of Windows 7 from the USB flash drive will begin.

If all files are copied, the computer will reboot for the first time. If you don't want to wait for the 10 seconds to pass and the computer to restart itself, click “Restart now.” During the reboot, be sure to return the hard drive to first place in boot priority, otherwise you will start installing the OS again.


Here you need to enter your Username and Computername. Let's move on.

If you wish, you can set a password for your account.

Enter license key in field. Please note that you can enter the key after installing the system. Click Next.

Here we specify the security settings.

Enter the Date and Time.

Specify network settings.

If you followed these steps, then you will see this image, which indicates that the installation of Windows 7 is complete, with which we congratulate you!

Video tutorial on installing Windows 7 from a flash drive
Write in the comments below if something doesn’t work out for you or if you have any difficulties - we’ll figure it out together!
This installation method is suitable if you own a netbook or your CD/DVD drive has failed and you need to install Windows 7. This method is also good because the process of installing Windows 7 from a flash card is several times faster than from a CD or DVD disk.
Before you start Windows entries 7 to a flash drive, copy all important data from the flash drive to other storage media (hard drive where Windows will not be installed, another flash card, disk, etc.), since during the process of formatting and writing the Windows 7 image to the flash drive, all data on she will be destroyed.
First way
If you are creating a bootable USB flash drive while in the Windows 7 operating system, then you will need a program Windows 7 USB/DVD Download Tool, which can be downloaded from Of. Microsoft website following the link.
If you are creating a bootable USB flash drive under the Windows XP operating system, you will need to install Microsoft.NET Framework 2.0 And Microsoft Image Mastering API 2.0. Of course, if you already have them installed (usually the first program), then you do not need to install them again.
1) Insert the USB flash drive into the laptop.
2) Launch the program. Click the button Browse.
3) Select ISO Windows image 7 and press the button Open.

4) After you have specified the Windows 7 ISO image, click the button Next.

5) Click the button USB device.

6) Your flash drive should appear in this window. Click the button Begin copying

7) Click on the button Erase USB Device

8) Click Yes.
9) The process of writing the Windows 7 image to the USB flash drive will begin

10) When recording is complete, the status will change to Backup completed. Close the program

Second way
For the second method you will need a program Ultra ISO.
1) Insert the USB flash drive into the laptop.
2) Launch the program. In Windows 7 and Windows Vista It is recommended to run the program as an administrator.
The UltraISO program is paid, but you can use trial period, let's consider this option. Click the "Trial period..." button

3) Select a menu item File ->Open...

4) Select the Windows 7 ISO image and click the button Open.


6) In the field Recording method: select USB-HDD. Click the button Format.

7) The formatting utility will launch. Click the button Begin.

8) Click OK.

9) After formatting, a success window will appear. Click OK.

10) Close the program.

11) Press the button Write down.

12) Click Yes.

13) The process of writing the Windows 7 image to the USB flash drive will begin.

14) Upon completion of recording in the column Event The message “Recording complete!” will appear. Close the program.

Third way
For the third method, we need the WinSetupFromUSB 1.0 Beta 7 - program.
Note: the link has a newer version, but the principle remains the same.
1) Insert the USB flash drive into the laptop.
2) Launch the program. In Windows 7 and Windows Vista, the program must be run as an administrator.

In field USB disk selection and format your flash drive should be listed.
Note: If the flash drive is not detected, then format it using the PeToUSB or HPUSBFW utility.
Also, the flash drive may not be detected if it is inserted into the laptop after the Winsetupfromusb 1.0 Beta7 program has been launched and for it to be detected, just press the button Refresh.
3) Click the button RMPrepUSB.

4) Mark the following lines: WinPEv2/WinPEv3/Vista/Win7 bootable (CC4), NTFS. Place a check mark next to it Boot as HDD (C: 2PTNS). Click the button 6 Prepare Drive.

5) Click the button OK.

6) Click the button OK.

7) After this, something like this will appear Dos window.
Warning: Do not close this window. It should close automatically.

8) After Dos the window will close click the button Exit.

9) Check the box next to it Vista/7/Server 2008 - Setup/PE/RecoveryISO. Click on the square on the right.

10) A window will appear Browse folders in which you need to choose virtual drive in which the ISO image of Windows 7 is mounted.
After you have done this, press the button OK.

11) Press the button GO. The process of writing Windows 7 to the USB flash drive will begin.

12) At the end of recording, a small window will appear. Click OK.

13) Close the program.

Fourth method
The installation method is quite simple, so anyone can do it! For this we need:
1) Windows 7 image
2) Flash drive with a capacity of at least 4GB
3) A program for creating and editing ISO images, ultraISO from the above method or free MagicDisk
You can take any media from regular flash drive up to an SD card, but not less than 4GB!
4) Launch command line(in Windows XP this is standard->command line. In Windows Vista/Windows 7, open Start, at the very bottom there is a search, enter cmd and open with administrator rights).
5) Next on the command line enter diskpart, the disk management utility will open.

6) Next, in the diskpart utility itself, enter: list disk, this will display all the physical disks of the PC, namely disks and not partitions.
Among them we are looking for our flash drive.

7) Then we execute the command select disk #, Where # This is the number of our flash drive.
IN in this case The flash drive on the screen is number 1, therefore s elect disk 1. All further manipulations will be carried out only with this disk.
8) Execute the command clean, clean the drive, then the command create partition primary- create a new partition on the disk.
9) After creating a new section, write select partition 1, select this section for manipulation, enter active, thereby making the section active.
10) Now for the flash drive to be visible in bios, you need to format it in NTFS format, which is what we do as a team format fs=NTFS.
11) Next, you need to activate the process of connecting the device and assigning letters to it, we do this with the command assign.
That's it, the preparation process is complete.

Installing Windows 7
You can record the distribution using any file manager or a free one.
In this case, you need to somehow open the image installation disk with the OS, you can do this with any disk emulator, Alcohol or MagicDisk, create an image and copy everything from it with a file manager to our prepared flash drive.
Everything, the creation process installation flash drive completed, now we try to install the OS by first setting it in bios.
Well, that’s all, which of the four methods of creating a bootable flash drive to use is up to you.
Inclusion in BIOS boot from a flash drive
Before you start installing Windows 7 from a flash drive, you need to go into the BIOS and enable booting from the flash drive.
To enter the BIOS you need to press a certain key when the computer boots. On desktop computers This is the Del key. On laptops, the F2 key is most often used.
Usually, when you turn on the laptop, a screen appears on which at the very bottom there is a line that says which key you need to press in order to enter the BIOS.
If you do not have such a line, then you need to look at the information on how to enter the BIOS User Manual walking with a laptop.
1) Insert the flash drive into the laptop if it is not inserted.
2) Turn on the laptop, if it is on, then reboot.
3) Go to BIOS.
Using an example, the whole process will look as shown below; if your BIOS is different, then the principle will remain the same. If you have questions, write in the comments.

4) Go to the tab Boot. In it, in boot order, you need to put our flash drive in first place, using the arrow keys and keys F5 And F6. That is, we use the arrow keys to select our flash drive, and use the key F6 we take her to the very top.
To find out which keys you need to use to set the boot order, see the tips on the right.
The name of the flash drive should appear in the line USB HDD.
Also, the flash drive may appear in the line USB KEY.
To save changes and exit the BIOS, press the key F10. (Depending on the BIOS manufacturer, the key may be different. See tips on the right or below).

5) A window will appear asking in English whether to Save changes and Exit? You are taking Yes.

6) After this, a reboot will occur and the Windows 7 installation process will begin.
Installing Windows 7 from a USB flash drive
If bootable flash drive with Windows 7 was created using programs WinSetupFromUSB 1.0 Beta 7, it will appear first green screen. Select Start Vista/Win7/Server 2008 Setup or PE/Recovery ISO from partition 0.

Next, the Windows 7 setup program will launch.
Write in the comments what is not clear and what questions you have.
Make a bootable USB flash drive with Windows 7
Where to download the Windows 7 image - watch the video below
Very often when reinstalling windows A bootable USB flash drive with Windows 7 is required. How to do it? The process itself is not complicated, but let's try to figure it out.
2 very different ways method in order to create a bootable USB flash drive from an iso image.
We will analyze everything from beginning to end, we will try to clarify all the details of creating a bootable installation flash drive with Windows 7
We also recommend reading the article on how to properly install Windows from a flash drive; sooner or later it may come in handy. All programs used here work perfectly under Windows 7, 8, 10.
The 2nd method is also very noteworthy; with it we will make a bootable Windows 7 flash drive without any programs, using the Windows command line, although it is noticeably more complicated.
It's important to keep in mind that usb ports should be fine (or at least one of them we need). The fact is that if we use a faulty USB, then there may simply be a loss of contact and nothing may work out. Plus, of course, the flash drive should also be in order, in general, keep this in mind.

Original Windows 7 images for flash drive here: http://nnm-club.me/forum/viewforum.php?f=504
Let us clarify the following points when creating a bootable USB flash drive with Windows 7:
- First we need to find a windows iso image(to do this, in any search engine we write - download Windows 7 torrent, download one of the proposed options using the free torrent program. However, do not forget that you have a good antivirus, plus you can download only from trusted sites, ask your friends and acquaintances about such ). We will assume that we have found
- Let's move on to the flash drive, we will completely clear it, so copy all important data from it in advance
- Also, don’t forget about the size of the flash drive.. You need at least four GB, although this is not more correct smaller size iso image
How to make a bootable Windows flash drive 7-10? Step-by-step instruction
Now let's prepare the flash drive, for this we need to format it. We do it like this:
- We go to “My Computer”, find the flash drive we need there
- Click on it right click mice
- Select "Format"
- In the window that appears, you can also check the box for “Quick, clearing only the table of contents” - this will be quite enough in most cases
- That’s it, click “Start”, an additional warning may appear, we agree
- We wait for the process to complete (usually no more than a minute)
- When finished, the flash drive is ready for further actions, it's completely empty

If you have any questions with formatting or would like to know more about this important and useful process for storage devices, we recommend that you view the corresponding section. In which, by the way, you can also select a program for formatting a flash drive if it does not want to succumb to this process in a standard way(as described above), plus using additional programs formatting a flash drive, you can improve its technical condition.
Now we are almost close to the process of creating a bootable USB flash drive with Windows 7, for this we will consider a very interesting and simple program .
Download the original ISO image of Windows 7
The simplest, most convenient and free program to solve our problem is Windows 7 USB/DVD Download Tool
Very convenient, bootable fleshka is done in just 4 clicks, and it can also be made into a boot disk.
Or you can do it from the official website using this direct link http://wudt.codeplex.com/ (copy, paste into address bar browser and press enter).
The system also requires Microsoft .NET Framework_Online_Setup (completely free, online downloader, which means the Internet must be turned on), usually this utility is already installed in different windows builds. Actually it's official application from Microsoft, it is also important for the operation of other programs and games.
And so, you downloaded Windows 7 USB/DVD Download Tool. Now install it.
Open the program. We see this window.

Click on “Browse” and look for the Windows iso image we need on the computer.

Now if you specified an iso image, click “Next”. Now click on “USB device”.

Here we click on “Begin copying”.

And so the recording process began Windows iso image 7 per flash drive. We are waiting for the end.
The Windows 7 bootable USB flash drive is ready.
We recommend that you read the article on how to properly install Windows 7 on a netbook. So you will know what to do if the question arises of reinstalling Winows 7 on a netbook, laptop or computer without disk drive.
The second method is not simple. It is interesting for those who do not want to install any additional programs on their computer
This method uses the Windows command line, through which, by the way, you can do many more interesting things.
And so, let's go. We connect the flash drive to the USB port. Please note that a 4 GB flash drive will be used here. Open the command line like this, “Start” - “Run”:

Enter the command “cmd” and press “Enter”:

This is what should appear:

The first command we enter is “diskpart”, a special editor that gives us the ability to manage disks, press “Enter”:

Now we write “list disk” and press “Enter”, thereby getting a list of devices:

Now you need to determine without errors where your flash drive is located, in our case it is “Disk 3”. It most likely will not match yours, just make sure that you have found your flash drive correctly. If you have, for example, a flash drive “Disk 1”, then write it in the line and press “Enter”.
Attention! If you do not correctly identify the flash drive, you can format one of your hard drives and lose all the information on it.
- So, enter “select disk 3″, press “enter”
- The program detects our flash drive
- Now enter “clean”, which will delete files on the flash drive, press “enter”
- Next, enter “create partition primary”, press “enter”
- With this command we created a section
- Now enter “select partition 1”, press “enter”
- Now enter “active”, again “enter”
- Now we need to make the format file system at NTFS flash drives formatting it using “format fs=NTFS” or for quick formatting enter “format fs=NTFS QUICK”, press “enter”
- We are waiting for the completion of the formatting process
- All is ready
- We write “assign” and the flash drive will automatically receive a letter, for us it is J
- Upon completion, a window with the flash drive will automatically open
- Now we need to exit using the “Exit” command
- That's it, the bootable USB flash drive has been created, now you need to copy all the files from the installation operating system to it
It’s just important to understand that it’s not the iso image that should be copied in one file, but all the folders that are included in this iso image. To do this, you just need to mount it with some program, for example DAEMON Tools.
That's all, we have looked at the question of how to create a bootable USB flash drive with the Windows 7 operating system.