How to remove the keyboard on a laptop. How to disassemble and wash a Mitsumi keyboard
Surely, every owner of a laptop or netbook has encountered such a problem as a clogged keyboard. Someone constantly eats over it, someone even manages to spill coffee or tea on the keyboard. And it’s good if, as a result of these barbaric actions, the equipment remains alive and does not short out anywhere. But in any case, sooner or later a dirty keyboard will make itself known: some buttons will stop being pressed, or, on the contrary, they will be pressed spontaneously. What to do in this case? How to clean a laptop keyboard?
Let me say right away that there are two ways to clean a laptop keyboard. The first – long and painstaking – is to clean the keyboard yourself. The second - quick and expensive - contact customer service (or me). But not all computer and office equipment repair service centers will bother with your stained keyboard; the minimum they will offer you is to disable it as a device and offer you to use a plug-in external keyboard. The maximum that the service center can offer you is to replace the entire keyboard, which is not cheap considering the labor and waiting time until the ordered keyboard is delivered.
Disassemble for cleaning
So, the first thing you need to do is, of course, turn off the device and disconnect it from the network. Then you should disconnect the keyboard from the laptop (netbook). As a rule, manufacturers try to simplify the procedure for replacing keyboards on laptops, so it is attached on top with several latches that need to be pulled off with something flat. But sometimes there are keyboards that are “soldered” into top cover along with the touchpad and other buttons. In this case, you will have to poke around without disconnecting the keyboard from the device.
To remove the keyboard from the Toshiba NB520 netbook, you need to disconnect the battery from it. Underneath there are five screws that need to be unscrewed.

Then you need to disconnect the small semicircular panel with the power button.

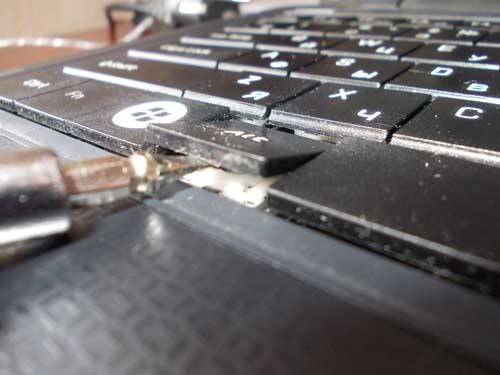
To do this, use a flat, thin screwdriver to pry it off from the side of the keyboard and snap it off. After removal, we can access the top edge of the keyboard

and it can now be removed from the housing. Pull up the sides of the keyboard and release them from the mounts. Carefully turn it over and remove the connecting cable from its socket.

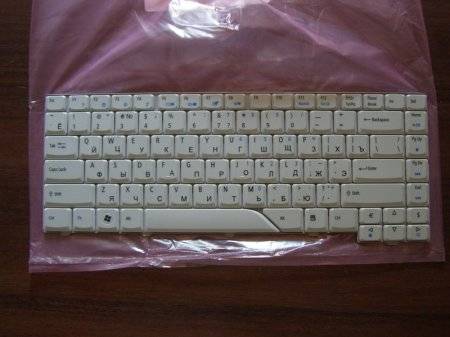
That's it, now we have access to a keyboard separate from the netbook. I came across a not very clean owner of this device:
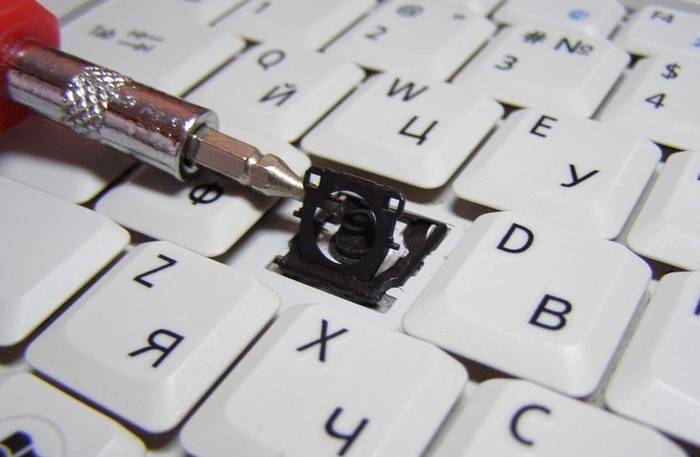
Let's start analyzing the keyboard. This description will be relevant for owners of all keyboards with a scissor mechanism. First you need to unfasten the keys from the keyboard body. They are mounted on the scissor mechanism itself, which, as a rule, has two types of fastening simultaneously for each key. The first is antennae shaped like an “G” that fit into the corresponding grooves on the key or in the keyboard body. The second is the crossbars, which are inserted into the sockets of the key or housing.

The L-shaped antennae are very, very fragile, so extreme care should be taken when detaching the key. The key must be disconnected from the side of the fastening-crossbar and in no case from the side of the antennae with the letter “G”! Therefore, first you need to slightly lift the key and look under it to find out the side that is attached with the crossbars.

This is the one that needs to be pulled off first. There will be two clicks - the crossbars will come out of their sockets.

Now all that remains is to disconnect the antennae. To do this, pull the key towards one of them, and it will be released.

The principle has been mastered, now you can remove the remaining keys. For convenience, I laid them out on the table in the same order in which they were on the keyboard. Before this, armed with wet wipes, I took an individual approach to each key and wiped it.
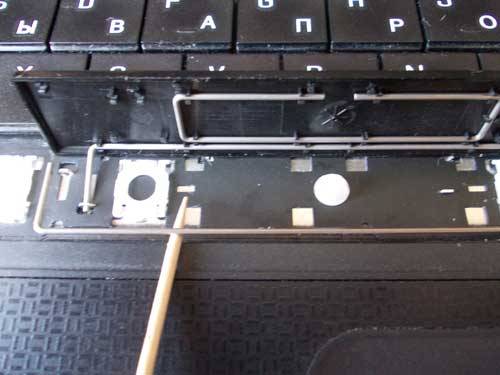
When all the keys are unfastened, you can begin to remove the scissor mechanism itself. On different keyboards it is attached to the body with slight differences, but the principle is the same - with its legs it holds on to the small antennae of the body. We find the most movable corner and pull it, releasing it from the tendril. Next, we free another nearby corner in the same way; the remaining two legs of the mechanism will not be difficult to remove from their places. If the mechanism is dirty, it must also be wiped with a damp cloth.
After all the manipulations I got the following picture:

And here’s a “chic” view of a dirty keyboard case:

It should be said that under the keys in the center of the scissor mechanism there are rubber caps, which close the contacts of the pressed key. I was lucky, on this keyboard they were glued to the case, but previously there were removable ones. Special care should also be taken with them, because they are very light and can “fly away” from the slightest exhalation.

You can start cleaning the keyboard case itself. The same wet wipes are used for initial rough cleaning of the surface. Then, armed with cotton swabs and an alcohol-containing solution, cleaning is carried out more thoroughly. After completing the “water procedures”, you can assemble the keyboard in the reverse order. First, we insert the scissor mechanisms into place.


And then carefully snap the keys themselves into place. And this is what I ended up with:

Installing the keyboard on a netbook is done in the reverse order.
I would like to note the fact that on some laptop keyboards one of the contacts is rear end keyboard housing, made in the form of a stretched foil film. Be extremely careful with it when cleaning the case, do not crush or tear it. Any deformation of this contact may lead to sticking of any of the keys during operation of the device.
I hope this article will help you figure out how to clean your netbook keyboard.
Have you noticed that balls of dust have literally accumulated under the keyboard buttons, not to mention crumbs and other debris? Are you planning to clean up all this mess? It sounds pretty simple, if you've looked at it before, of course. Didn't you understand? Then you may encounter some difficulties here if you do not have an idea of the process. How to remove a button from a laptop keyboard? Let's find the answer to this question together.
What remains to be done?
First you need to prepare a small set of tools: a stationery knife, a nail file or something similar.
Important! For a comfortable process, the keyboard must be removed from the laptop case.
Before getting down to business, let's talk about some features of the key structure. The buttons have fastenings on which they are fixed, and the fastening itself consists of two parts. These parts are connected by small “whiskers” that extend from the back of the mount and are inserted into a groove. This connection allows the buttons to move freely, otherwise pressing would be problematic.
The optimal solution would be to first remove the vertical fasteners, but before that you need to determine the location of the side of the button on which these fasteners are located. For this:
- We just bend the key slightly on one side and try to look under it.
- If it doesn’t look like much, then we simply proceed to bend the key on each of its sides until it loosens and comes unfastened.
Often the grooves are located at the top of the button, so we will consider this option:
- Take a utility knife and insert it under the button (on the right side).
- Next, we make rotational movements in a clockwise direction.
- These steps should help you unfasten the key; all you have to do is pull the component a little to the side, and it seems to have been removed.
Important! Do not overdo it with efforts, otherwise you risk damaging the fastening element.
Fastenings
We figured out how to remove the keys from the keyboard, but how to remove the mounts themselves? We continue to consider the option in which the fasteners are located at the top of the key.
You have to do the following:
- We take the same knife and insert it between two components fastening element. It is better to place the blade slightly below or above the “mustache”.
- We bend the inner part of the component inward and slightly downward so that the “mustache” comes out of the groove and is lower than the part of the fastening that is external.
- The fasteners are disconnected, which means they can be pulled out.
If everything is clear about how to remove the keys from a laptop keyboard, then how to put them back in place?
Returning the mounts to the keyboard
If you followed the method described above, then assembly occurs in the reverse order. It may, of course, happen that the parts of the fastenings are mixed up with each other, then it is best to assemble the “constructor” in your hands, and only after that (with the help of a good old stationery knife) mount the finished “rockers” into the metal fastenings that are located on keyboard surface.
If both parts fully fit into each other in a closed state, then you are on the right track.

Returning the keys to their place
We hope that during disassembly of the device no fastening elements were damaged, since we will need them in the same condition:
- Take the key and place it on it seat. Align the path and press lightly on the component until you hear a click.
Important! Most often, there should be four clicks if the part is attached to four grooves. Carefully inspect the button from all sides.
- If the button does not budge or refuses to snap into place, then there is a possibility that you have assembled the fastening parts incorrectly. Double-check your work.
Something broke? Do not rush to send the device to a workshop, because you can try to fix the problem on your own.
Keyboard repair at home
To carry out restoration work you will need the following tools:
- Insulin syringe needle.
- Soldering iron, preferably thin.
- Simple wire cutters.
- Small sized vise.
- Knife for installation.
You can also get by with a more modest set of accessories:
- Pile from a brush comb.
- Sewing needle.
- Lighter.
- Pliers or strong tweezers.
- Technical superglue.

Let's start the repair:
- Take the fastening element with the broken metal leg and install it on the workplace.
- We take a needle in one hand, and a thin soldering iron in the other.
- The needle must be applied to the damaged area. It is desirable that it extends about 2 millimeters onto that part of the part that was not damaged.
- We heat the needle with a soldering iron and carefully fuse it into the plastic surface.
- Use wire cutters to remove excess plastic. The most important thing is not to overdo it.
Alternative way
If you do not have the tools that are used in previous method, then you can safely use alternative repair instructions:
- Take the needle and heat it with a lighter.
- Next, you need to make a groove into which the lint from the comb can be easily inserted (you can use something similar).
- We thread the lint through and fix it with a small amount of superglue.
- We wait from forty minutes to an hour and check the part for functionality.
If the keyboard on the laptop does not work, and guarantee period its use has already ended, then it is not necessary to immediately carry it to service center. Some problems can be corrected on your own. True, in order to do this, you will first have to figure out how to remove the keyboard from the laptop.
First thing
First of all, when carrying out any repair work on your laptop, you must disconnect it from the power supply. This also applies to batteries, which must be removed before removing the keyboard.
Types of fastenings
Most keyboards of modern laptops and netbooks are attached to the panel using special latches. There may be several of them, depending on the model of equipment - from six to eight. They are hardly noticeable; to find them you will need to look closely at the recesses around the perimeter of the keyboard. If you have this particular mount, then in order to pull out the keyboard you will have to sweat a little. You should start with the latch located in the upper left corner. You will need to press it with a thin screwdriver. When the latch opens, the corner of the keyboard can be carefully pryed up. After this, you can move on to the second latch and so on. It is important to take your time here so as not to break the thin keyboard. Therefore, when opening the first latches, it is better to place not your fingers under the corner of the keyboard, but some thin object, for example, a ruler or a plastic card.
Less common are keyboards that are attached to the case with screws. Typically, such mounts are hidden either under a decorative panel next to the computer monitor, or under rechargeable batteries. Often this type of fastening can be found on old technology. In principle, how to change the keyboard on a laptop that was released many years ago will not be so difficult to understand. First you have to carefully unscrew the screws securing it to the body. Then the top edge of the keyboard lifts up and it is easily pulled out of the grooves.
Let's move on to the train
WITH internal devices The computer keyboard is connected using a thin cable. It can be seen directly under the keyboard plate when you lift it up. This train is very fragile and can be easily damaged. If you don’t want the keyboard to not work on your laptop even after you remove it and clean it, then try to disconnect the cable as carefully as possible. It is attached to the socket using a special lock. The locks are different, but they all open quite simply - usually it is enough to lift the ears or open the clasps.
Disconnecting the cable is the last stage of our work. So removing or replacing the keyboard is not that difficult. More difficulties may arise when repairing it, for example, if you have to reinstall all the keys. The main thing is that after you change the keyboard on your laptop, pay attention to whether all the buttons work and whether the keys are stuck. If you didn’t manage to do everything correctly the first time, it’s better to take the equipment to a specialist so as not to completely break it.
Like everyone else computer technology, laptops require maintenance and good cooling. This is especially true for devices with a plastic body and passive system cooling the graphics and central processors.
If you don't follow temperature conditions of your device, sooner or later this will lead to critical consequences, such as breakdown or complete failure. Besides, computer keyboards of all types are often tested by all kinds of drinks, such as coffee, tea, juices or beer.
They also accumulate dust, crumbs and hair. All this not only interferes with ventilation and disrupts heat exchange, but also leads to breakage and “sticking” of the keys.
Why film
Anyone who has ever tried to clean a laptop keyboard on their own understands perfectly well that doing this is not as easy as with personal computer. Because of small sizes device and saving space, as well as due to different types fastening problems may arise.
Removing the keyboard in a laptop, disassembling the device completely and disconnecting the cable from the screen may be necessary in cases where it is necessary to perform one of the following operations:
- Solving problems with elevated temperature, including:
- disassembling the laptop to vent the cooling radiator;
- cleaning the fan from dust, hair and debris;
- replacing thermal paste, which promotes better heat transfer between the processor and radiator;
- checking the presence of oil to lubricate fan bearings;
- repair or replacement of a damaged system configuration element;
- solving keyboard problems such as:
- cleaning the keyboard from spilled liquids, dust, debris and hair;
- checking, replacing or repairing a damaged board or button.
Types of keyboard mounts
There are two types of fixing the keyboard in the device:
- modern netbook and laptop keyboards are mounted on a special panel using plastic latches. Depending on the model and manufacturer of the fastening device, there can be from 4 to 8. In order to see them, you need to look very carefully, since they are well hidden so as not to disturb the design and appearance device, and not disturb the user. Fasteners are usually marked with small notches. And this type of securing the keyboard in the device is the most common and complex;
- Less known, but more easily removed, are keyboards secured with screws. This applies mainly to old and rare laptop models.
As a rule, 1-2 screws are used for fixation. After unscrewing them, you just need to pry the keyboard panel with a sharp object.

Withdrawal procedure
After de-energizing your laptop, do not forget that its basis uninterruptible power supply, is the battery, so you need to take it out. Only then can you begin to study the type of fastening and other operations.
You can remove the keyboard in a laptop yourself. The main thing is to exercise maximum caution. The fasteners are very fragile and break easily. To get started, you'll need a pair of small, thin socket head screwdrivers.
If you have a common type of fastening, you need to follow these steps:

When opening the first latches, hold them with a second screwdriver or other thin object. Do not use your fingers or rush, as the plastic of the device is not very thick and can easily crack.
Disabling the loop
After disconnecting the keyboard, do not forget that it is connected. You can't tug or pull it. She connects with motherboard using a cable, which is very easy to damage. Therefore, this must be done carefully and correctly.

The cable is located directly under the keyboard and is attached to it using a special lock. These fasteners can be different types and require actions such as pinching the lugs, lifting the fastener, or lifting the spring latch to release.
If your goal was to replace the keyboard as a device, then the job is done.
If cleaning is needed
If the laptop is left open for a long time, it may become dusty. During operation, a lot of hair, household debris and food crumbs get into the keyboard. If you need to clean up such debris, you can easily do it yourself by carefully vacuuming the device.
At the same time, the main thing to consider is that it is best to use a specialized vacuum cleaner with professional attachments and brushes; if you have to use a regular one, then you cannot use high power.
The laptop does not connect to wifi, it says limited access. Read on for what to do.
The keyboard is the main data input device. Most users like to drink tea or coffee while sitting at a computer or laptop, without interrupting work or entertainment. As a result, it suffers from damage from all kinds of liquids.
In this case, you cannot do without disassembling the device. It is necessary to dry and thoroughly rinse the keyboard, otherwise over time this will lead to “sticking” of the keys or complete inoperability of the device.
Video: remove the keyboard from a laptop
Tools
For work related to cleaning the keyboard and removing it, you may need:
- thin screwdrivers;
- crosshead screwdriver;
- brush;
- lint-free cloth;
- cotton swab;
- toothpicks;
- vacuum cleaner;
- a special screwdriver or an attachment for it to remove the keys (can be replaced with a bent paper clip or an awl).
The process of removing a key from a laptop keyboard
If used carelessly or roughly, the key securing mechanism may break. To fix it, you need to remove the key from the laptop keyboard. In addition, you may need to remove the buttons if the layout does not match, or if necessary, wash or replace them.

There are two types of key attachments to the keyboard:
- using two latching antennae;
- rocker clamps with a hinge.
In order to remove the key, you need to pry it off with a screwdriver with a thin or curved tip or a bent paper clip; you can also use a crochet hook.
The lower part of the button needs to be firmly fixed with your finger, and carefully insert the tool you decided to use under the upper part; there are fastening antennae there; you can also pull the button up and slightly to the side.

The button may come off along with the rocker that holds it in place. It's not scary. Once the necessary repairs or cleaning have been completed, the retainer can be replaced in place.
For fastening, as a rule, three ears are used. If they are slightly raised and bent, they can be straightened using a screwdriver. Next you need to insert the rocker, and put the button cover on top, inserting it into the grooves.

If the fastening is carried out with latches, the button can be removed even easier. You just need to pull it up.
Removing the "space"
Wide and large buttons such as “space”, “Shift”, “Enter” are removed a little differently and often cause problems because of this. To avoid distortions large keys, special metal clamps and plastic guides are used to distribute the force when pressed. All large buttons are clamped with two latches.

In order to remove the “space”, you need to take into account the length of the button:
- lift it a little and bend it top part using one screwdriver;
- and the second one at this time unclick the upper bracket fixing the button;
- repeat the same steps with the bottom bracket.
After the button has been snapped off from the top and bottom, you can slowly begin to lift it, making sure that it has snapped off.
Installation after cleaning
When all the buttons are removed, they can be washed in a soapy solution or use a special liquid. If necessary, the panel can be wiped with wet cotton wool or a cloth, cleaning inaccessible areas with a needle or toothpick. You can use alcohol. After cleaning, you should start installing the buttons in place: just put on a regular small key, gently pressing on it and waiting for a light click.

But the gap is installed in three stages:
- it is necessary to install the button stiffener into the grooves on the panel;
- press the bottom of the key and connect it to the elevator;
- snap the button into the grooves.

If something goes wrong with your device and you spill a drink on it or just want to clean the dirty keyboard yourself, then don’t rush to contact a service center and pay a lot of money.
You can remove the keyboard from the laptop and clean it yourself, replace a worn button or a broken mount, at home and without a specialized tool.
>Like desktop computers, the laptop keyboard may fail. Keys can also stick, fall out or break. Even a simple attempt to clean the keyboard can lead to loss of keys, not to mention spilled tea, coffee or other liquids. If there are pets or small children living at home, this adds two more reasons for the keyboard to malfunction. Below we will consider a method for removing the keys for cleaning, as well as returning the keys to their place and several ways to fix a minor breakdown.
- swipe;
- trying to clean the keyboard;
- strong pressure on the keys;
- liquid ingress;
- too much high power vacuum cleaner;
- Pets.
Types of damage
- loose or stuck keys;
- damage to fasteners or fasteners;
- disruption of the pathway due to fluid or other interference;
- damaged cable.
Note! The first two cases can be eliminated on their own. The second two require the work of a specialist (especially the last one).
Types of fastenings

- membrane - the cheapest and most common;
- switches are a more stable, reliable, and at the same time expensive type of key. Much less common than membrane;
- capacitive - transmit a signal by closing contacts. The second most common type after membrane. Not the most reliable type of keyboard;
- touch is the most expensive type. In addition, to repair it you will need to remove all touchpad, but it is impossible to do this at home.
Removing regular keys

Extracting the “Shift”, “Ctrl” and similar keys

Removing the "Space" from the mounts

Installing regular keys
Important! Record the order in which the keys were located. Otherwise, they will have to be rearranged again.

find out detailed instructions, and also familiarize yourself with best methods cleaning, from our new article.
Installing Large Keys

Setting "space"

Installing small keys, which can also be on the keyboard, is no different from installing regular ones. The only difficulty is that smaller parts require more care.
Important! The number of clicks when fastening corresponds to the number of grooves. If there are fewer clicks or there may be an error in the fastening and it is better to double-check everything.
Video - How to remove and install laptop keyboard buttons
Keyboard repair

There are two ways.
First way
If any fastening is broken, you can try to restore it using a needle from an insulin syringe:
- the needle is applied to the damaged part. It is better if it extends two to three millimeters beyond the edge of the breakage;
- Use a soldering iron to heat the needle and carefully fuse it into the plastic;
- Carefully bite off the excess plastic using side cutters.
Second way
If you don't have any tools, you can use superglue:
- heat the needle with a lighter;
- make a groove using lint from a comb or similar objects. The main thing is that the size of the groove allows the lint to enter;
- fix the lint with superglue;
On a note! The result can be checked in about an hour. Typically, the process takes about forty minutes to an hour.
Video - How to repair and insert laptop keyboard buttons
Warning
- A malfunction caused by liquid ingress requires self-repair high coordination, accuracy and attentiveness. Too much force or the wrong cleaning agent can completely destroy the conductive path. If you are not confident in your abilities, it is better to entrust this work to a specialist.
- Removing and installing keys does not cost much (around 500 rubles), independent removal requires great skill, care and accuracy. Excessively sudden and careless movements can damage the fastenings. Carry out the procedures only if you have the necessary skills and are unable to take the laptop to a service center
- The fastenings in small keys are also small. If you are not confident in your vision and the necessary dexterity, it is better to entrust the work to a service center
- Working with a soldering iron requires not only care, but also knowledge, skills and experience. Careless movement can lead to damage to the entire device.
- Superglue can get on the conductive path, rendering it inoperative. Work very carefully.
Cleaning the laptop keyboard

Deep cleaning can be done in the following ways:

For surface cleaning It will be enough to use a napkin or brush.
Video - How to disassemble and clean a laptop keyboard