How to make a horizontal menu with a slope? How to turn over a separate sheet in Word, instructions.
When working with text documents Often there is a need to change the page orientation from vertical (portrait) to horizontal (landscape). In this material we will talk about how to make a horizontal page in text editor Word. The material will be relevant to everyone modern versions Word, including Word 2007, 2010, 2013 and 2016.
If you want to make all pages horizontal at once Word document, then this is done very simply. All you need to do is go to the “Page Layout” tab, click on the “Orientation” button and select “Landscape”. After this, all pages of your document will become horizontally oriented.
But, very often, this option is not suitable and you need to make only one horizontal page and leave the rest in vertical orientation. There are two ways to do this, and we will look at both of these methods below.
Method number 1. Use “Page Options”.
In order to make one page horizontal you need to place the cursor on the page that comes before the one that should be horizontal. After this, you need to go to the “Page Layout” tab and click on the “Page Options” button.

As a result, the “Page Settings” window will appear in front of you. In this window, you need to select “Landscape Orientation”, apply this setting “to the end of the document” and save the changes using the “Ok” button.

As a result, all pages below the one on which the cursor was placed will become horizontal. Now you need to move the cursor down one page and open Page Setup again. Now in the Page Options you need to select “Portrait Orientation” and apply this setting “to the end of the document.”
If everything was done correctly, the result will be one page in horizontal orientation, and the rest in vertical orientation.
Method number 2. Use page breaks.
The second way is to use page breaks. In order to make one page with a horizontal orientation, you need to put one break before this page and one after the page. Thanks to these breaks, you can change the orientation of this page without affecting the orientation of all other pages in the document.
In order to be able to see page breaks, you need to enable the display of all symbols. To do this, go to the “Home” tab and click on the “Display all signs” button.

Next, you need to place the cursor on the page that comes before the one that should be horizontal. After placing the cursor on desired page, go to the “Page Layout” tab, click on the “Breaks” button there and select “Next Page”.

After this, you need to move the cursor to the end of the page that should become horizontal, and again set the break from the next page. After setting the breaks, you simply need to change the page orientation to landscape using the Orientation button on the Page Layout tab.

If everything was done correctly, then you should get something like the screenshot above. First a page break, then one horizontal page, then a break again and the remaining pages in the usual vertical orientation.
Task
Do horizontal menu, the points of which have an arbitrary slope (Fig. 1).
Rice. 1. Menu view with slanted items
Solution
The style property transform is responsible for transforming the element; the skewX function is used as its value, which sets the desired slope. It is easier to set the tilt angle in degrees, for example, 30deg is 30º from the vertical. Transformation affects everything child elements, so the text inside the element will also be slanted, which is not in the best possible way reflected in its readability and beauty. Therefore, it is important to apply the tilt to the text again, but in the other direction; to do this, simply change the sign in front of the degrees value.
Browsers support the transform property mainly with their own prefixes, so for universality in styles you should repeat it several times with the same value, adding -moz- for Firefox, -webkit- for Safari and Chrome, -o- for Opera and -ms - for browser Internet Explorer as shown in example 1.
Example 1: Menu Item Tilt
HTML5 CSS3 IE Cr Op Sa Fx
- Joker
- Pazuzu
- Palpatine
- Doctor Doom
IN in this example a horizontal menu is created using bulleted list. To ensure that the list is horizontal, a display property with the value inline-block is added to the li element in the styles. For the skew, use the transform property with the skewX function and the value -30º. This property is also applied to links inside the list, but with a positive value of 30º, this ensures that the letters are displayed correctly rather than slanted.
Chrome, Safari, and Firefox browsers use the transform property on block or inline elements, so links have their display property set to block .
It is impossible to imagine carrying out any construction and repair work without using a level. A good level is the key to the quality of work performed. It is thanks to the construction level, of course, combined with the conscientiousness of the builders themselves, that we get perfectly rectangular corners in the rooms, smooth walls, smooth horizontal floors, correctly installed door and window openings. It is impossible to imagine repairs, even basic cosmetic ones, without using a level. The level is used when gluing wallpaper, while laying tiles. However, it is not at all necessary to buy it. The building level is easy to make with your own hands.
Types of building levels
The building level is a device by which the vertical and horizontal position planes. It is thanks to the use of a level that building materials used in finishing and repairs are installed as accurately, evenly and correctly as possible.

Modern industry offers users building levels for every taste. Various lengths, from different materials. When selecting a device for a particular type of work, it is necessary to pay attention to Special attention on the ease of use and, of course, accuracy.
The following main types of building levels are distinguished:
- Water level.
- Bubble level.
- Laser level.
- Pipe level.
- Magnetic level.
Let's consider each of the listed types of levels, their disadvantages and advantages in more detail.
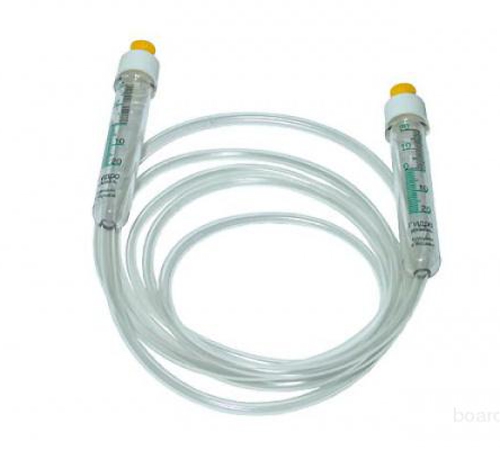
Water level
The water level allows you to determine whether the surface deviates from a horizontal position. It consists of two flasks connected to each other by a tube. The length of the tube ranges from 5 to 25 m. A scale is applied to the flasks. The weight of the water level depends on the model and ranges from 300 to 1100 g.
Main advantages of a water level:
- Lightweight and convenient to use.
- Long hose length.
- Low cost.
During the operation of the water level, a number of problems arise:
- When filling the tube with water, do not allow air bubbles to get into it. Air in the tube will cause significant measurement errors.
- Do not use the device near heat sources. Place the measuring device at least 1.5 m from heating devices.
- The device is designed to work exclusively with horizontal surfaces.
- Using a long hose in a small room is not very convenient.
Bubble level
One of the most popular types of building levels is the bubble level. It consists of a solid body with one or more ampoules built into it. The maximum number of ampoules is 3. They are filled with liquid, usually alcohol. The liquid must contain an air bubble.
The purpose of the device, equipped with one ampoule, is to work with horizontal surfaces.

But with the help of a device equipped with two ampoules, it becomes possible to work with vertical surfaces.
Thanks to the third ampoule, it became possible to display rotary levels.
Most often, bubble levels are made in a rectangular shape. The range of sizes is very large. The length of the device ranges from 0.2 to 2.5 m. There are models reaching 4 m in length.
The materials for the production of the housing of these measuring instruments are aluminum, wood, impact-resistant polystyrene and many others. The main filler for ampoules is alcohol.
Among the main advantages of the bubble level I would like to highlight:
- High accuracy.
- Ease of use.
- Acceptable price.
- Huge variety of models.
The price range for such measuring instruments is very wide. The cost of the device depends on its size, manufacturer and many other factors. It is not advisable to purchase the cheapest devices. They are neither accurate nor durable. Even if you plan to use the level very irregularly, a professional construction device will become best choice. It is made from more durable material, withstands impacts better, and has the highest accuracy.
When purchasing a bubble level, pay attention to the following points:
- The flasks must stand very firmly. Wobbling is unacceptable. You should not choose a model with fastening the flasks with screws. The possibility of self-adjustment only brings unnecessary worries and problems to the consumer. The adjustment goes wrong almost immediately. You have to configure it again. The best option- tightly mounted flasks.
- The divisions on the flask should be clear, the bubble should be clearly visible. The smaller the gap between adjacent divisions, the more convenient it is to work with the device.
- It has long been noted that the heavier the bubble level, the more accurate it is. When choosing a tool, pay attention to models whose body is made of aluminum.
- The most popular among consumers are models made in the shape of the letter “X” and equipped with rubber handles. Their ease of use has been repeatedly noted.
Magnetic building level
One type of bubble level is a magnetic building level. Its main difference is the presence of special magnetic fastenings. Thanks to them, the level can be easily attached to metal surfaces. It doesn't fall or slide.

Pipe construction levels
Another type of bubble level is the pipe level. Distinctive feature pipe construction levels - small sizes and weight. As a rule, they are made in the form of a rectangle. A less common option is folding pipe levels. The main area of use is working with profiles and pipes.
In order to securely attach it to the pipe, this type of measuring device is equipped with additional accessories:
- Magnets.
- Perforated tape.
- With a cord.

Laser level
Laser level - small device with the ability to attach to any surface. Among the most popular types of fastening I would like to highlight:
- Magnets.
- Tripod.
- Fastening with straps.
There are laser levels used for the purpose of constructing a direction and constructing a plane. The level designed to build a direction simply picks off points. But the device for constructing a plane is equipped with an optical system that turns the beam into a plane.
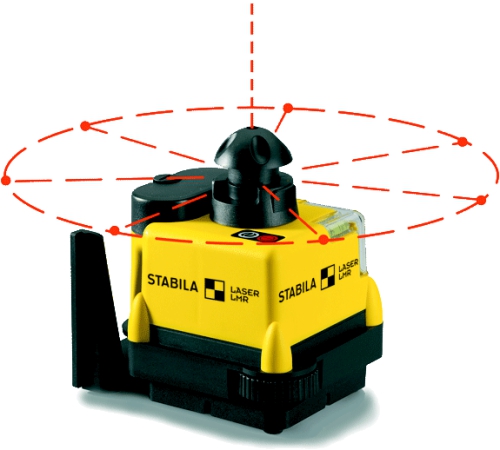
There are several types of laser levels:
- Rotary. This device rotates around an axis. This creates a line. It features a very durable body, good protection from external influences. Perfectly suitable for many repair work, for example, for installing suspended ceilings.
- Positional. Two radiation sources allow the formation of visible planes. The main application is finishing work.
- Self-leveling. The laser level is equipped with an internal pendulum that emits five beams and a cross-shaped sight.
Main advantages laser level:
- High range. Some models operate at a distance of 100 m.
- Highest precision.
- A number of models are equipped with cross lines.
The main disadvantage of laser levels is their very high cost. The price of the most ordinary and very unpretentious laser level is the same as the cost of a professional bubble device.
How to make a water level with your own hands
The simplest type of level is a water level. And it’s very easy to do it yourself:
- Take two 20 ml syringes without needles and a thin hose of arbitrary length. An ordinary dropper is perfect as a hose.
- Remove the plunger from one syringe and connect it to one end of the hose.
- Prepare liquid to fill the level. As a liquid, use ordinary tap water, slightly tinted with tea leaves.

- Using a second syringe, fill the system with liquid. Not only the hose must be completely filled, but also the first syringe.
- Remove the plunger from the second syringe, having previously connected it to the hose. The water level is ready. This is a liquid-filled design of two syringes connected to each other by a hose.
The device operates on the principle of connecting vessels. To mark a horizontal surface you must:
- Measure and mark the desired height on one of the walls.
- Apply one of the syringes to the mark so that the water level coincides with the mark. Secure the syringe to the wall with tape. When working together, there is no need to attach the syringe; a partner will hold it.
- Apply the second syringe to the walls and note the water level. All received marks will correspond to the same level above the sea surface. When they are connected, you will get an ideal horizontal surface.
When storing a homemade water level, the syringes are closed with pistons.
The main advantages of using a homemade water level are:
- Low cost of the device.
- Ease of manufacture.
- Ease of operation of the device.
How to make a laser level with your own hands
The purpose of using a laser level is to mark a plane, both vertical and horizontal. They are indispensable in the process of pouring floors, installing interior partitions, laying tiles, gluing wallpaper and many other works. Even for evenly arranging furniture, a laser level will come in handy.
There are two ways to make a laser level with your own hands.
First manufacturing method:
- Take laser pointer. Seal the hole in the nozzle with a piece of cardboard. It is better to take a nozzle without a pattern. Punch a small hole in the middle of the nozzle. Attach the attachment to the laser pointer. Turn on the pointer and point at a vertical surface. If a small bright dot appears on the surface, everything is done correctly.
- Take a wooden block. Its length is about 130 cm. Using an ax, trim one end. The result is a stake pointed on one side.
- Take a flat piece of plywood or board. The shape of the piece is square. Side size 10 cm. Attach to the flat end of the peg.
- Use a screw or nail to attach the strip to the center of the plywood. The length of the bar should match the length of the bubble level. The bar should be able to rotate in a circle.
- Attach a bubble level to the bar.
- Place a piece of thick rubber on the level. Attach the laser pointer to the rubber using a clamp.
- The device is ready.
The method of using such a laser level is as follows:
- Place a stake on the site. Level it using bubble level. At correct installation The level bubble is in the center and does not move when the bar rotates.
- Turn on the laser pointer. Mark where the beam is reflected on the wall.
- Rotate the bar and mark other points where the beam hits the walls. All received marks lie on the same horizontal surface.
Let's look at how to make a level using the second method:
- Take a small container and fill it to the brim with water. This can be a basin, a bucket or a regular pan.
- Attach a laser pointer to a piece of foam. Use a nozzle without a pattern, in the form of a dot. Try to keep the pointer lying flat on the foam. You can attach it using an elastic band or a clamp.
- Place a container of water at the height required for marking.
- Dip the foam into the water.
- Turn on the laser pointer.
- Rotating the foam around its axis, mark the points of intersection of the laser beam with the surfaces. The resulting marks are on the same horizontal surface.
Of course, the homemade levels considered are far from ideal. However, they are quite functional.
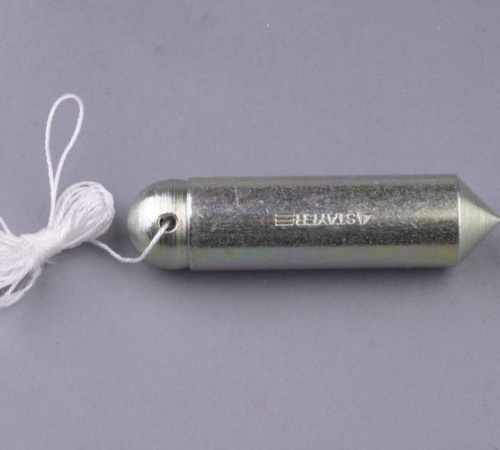
How to make basic instruments for determining horizontal and vertical
- The most basic device for checking verticality is a plumb line. It is widely used during renovation, for example, in the process of wallpapering: Take a small, heavy object. A fishing weight is perfect. In a pinch, even scissors will do.
- Tie a thick thread or fishing line about 2 m long to the weight. The length of the thread depends on the height of the room.
- Place the end of the string against the top of the wall, releasing the weight. The load must not touch the floor.
- Use a pencil or marker to make marks on the wall along the stretched thread. As a result of connecting the marks, a perfectly vertical line is obtained.
Checking the horizontal surface is also very easy:
- Take the most ordinary wooden isosceles triangle.
- Drill a small hole in the top opposite the base.
- Attach a thread or fishing line with a weight to the hole. A lead fishing weight is ideal as a weight.
- Mark the middle of the base of the triangle with a line.
- Place the base of the triangle on the surface to be tested so that the load falls freely down. The coincidence of the thread with the line on the base means that the surface is horizontal.
A good website should have an easy navigation system. The menu is one of the options for selecting the desired action. The orientation of menu elements in space is not so important as the ease of their use. Good design control logic and its continuity across all dialogue elements makes the site a compact and convenient provider of the necessary functionality.
Menu: familiar and comfortable
How to navigate a web resource is a theoretical question. How to make a menu for a website? HTML in horizontal or vertical format? How to manage visitor behavior on each page and provide real functionality to him?
A familiar and comfortable menu is relevant and in demand. The visitor is not interested in theory. The visitor needs a solution to his real problems.
As usual, HTML document and a horizontal menu are located on the first page of the site and guide the visitor to a systematic view of services, products or sections of the site, owner, news, contacts.
Orientation in space is not the main thing, but horizontal systematization of the proposed functionality is more common. Reading from left to right and top to bottom is generally accepted not only on Russian-language sites.
Definitely the right sites and their menus
The figure shows clearly correct sites. Their menus can be considered examples of design, logic and functionality. However, the opinion of leaders is not so unshakable, and sometimes there are exceptions.
The following sites can be considered as an example:
- international Forex exchange;
- World Health Organization;
- financial system of Russia;
- oil and gas company.
But the amount of money or social significance are not criteria for the quality of web development.
Every menu is the work of a specific developer and the opinion of the development team popular system website management system (CMS) used in the development of the web resource.
You can never force people into patterns real life. The use of Internet technologies always determines in each specific case the need to perform theoretical and practical work to create a comfortable menu.

Classic feature-rich example
As you can see in the image under number 1, there are four different menus. Home page: First the video, then the HTML document. Everything is horizontal, but each menu is made with a different ratio of HTML tags, CSS load and JavaScript usage.
The most Top Menu(1.1) refers to the visitor (private or entity, financial institution or investor). The lowest one (1.4) depends on all the others, and here it is not HTML that reigns, but JavaScript and AJAX, which dynamically form the right option HTML tags.
Medium menus contain company functionality depending on the visitor, the owner’s opinion and his interests.
Simple, dynamic navigation
The example with Google (pictured under number 2) is a classic of the simplicity of the toggle menu. At the beginning of the search it is one thing, but during the search process it is completely different. There is no horizontal dropdown here HTML menu, and CSS has a minimal role. The moment of switching the final selection option is important here, and the menu is adjusted to this task.
Google's competitor, Yandex (number 3), builds its menu right away. Moreover, the search page here is immediately filled with additional functionality and offers the visitor not only a search function.
Yandex immediately offers:
- search;
- money;
- mail, etc.
All functions are in pure HTML. Horizontal menus for each functionality. Feature Google and Yandex - settings that are performed automatically, but can be changed by the visitor through horizontally oriented functions.
Real static and general practice
The last example (numbered 4) is for developers on the platform Office XML. Documents in the *.*x format are in demand, popular, and the site offering a description of the standard uses pure HTML. The horizontal menu contains links to the main sections:
- docx;
- xlsx;
- pptx.
You can find many other, less popular sites on the Internet. One can always detect a modern, confident desire for maximum simplicity and functionality.
The era when the developer and designer spent time on fancy buttons, drop-down subsections, animations and other effects is over.

Today, a beautiful horizontal menu: HTML and CSS or JavaScript - comfort and functionality for the visitor.
Menu: left to right and top to bottom or...
IN different countries read differently. A variant of movement from left to right and from top to bottom is a book, article, slogan or advertising brochure, but not a website. It is reasonable to focus on such an organization of dialogue, but we're talking about about the web presentation of information that determines the logic of dialogue with the visitor.

Traditional HTML document: horizontal menu with drop-down sub-items for each item. Not only a list of links (points), but lists of lists can drop out. When a site provides dozens of services (products), and each position can have more than a dozen lines, both the menu itself and its subitems become a problem.
Usually the problem large quantity items and sub-items in the menu are resolved by scrolling. However, each application area allows for systematization of information. It is doubtful that there is a web programming task that would not allow a limitation from three to four to seven to nine points.
This amount fits in HTML page, the horizontal menu is compact and convenient.
If you combine the idea of systematizing information and scrolling through a hierarchy of categories, you can implement the great idea of moving not through menu items, but through the categories of the created information presentation system.

In fact, a website is a systematic presentation of information, and the structure of this presentation is categories, that is, a menu.
Menu organization: lists, tables and divs
HTML does not provide any special syntax for a horizontal menu. You can use regular divs (div, span), tables (table, tr, td) and lists (ul, li). The latter is considered the most correct, but there are often designs in which everything is mixed into one whole: one menu item can be a table, each cell has several divs and a list to describe subsections.

When creating a menu item, if it is based on multiple divs (i.e. design images), it becomes rigid. It is impossible to use a vector in a menu or its item: there is no connection between the meaning of the menu and the logic of the vector (stretching, shrinking, or other proportional resizing). All that remains is to use a raster, which is some HTML. Horizontal menu (main), as well as:
- for a smartphone - yours;
- enlarged - for big screen;
- contrast - when the monitor is already old;
- for the visually impaired and other options.
What is important in this explanation is that the orientation in the space of HTML constructs through CSS rules is not as important as the expression of the meaning of the menu item through JavaScript functionality.
The meaning is always important, not the rigid design. The meaning can always be delegated from the server via AJAX to the browser, where JavaScript function will format it in the required HTML tag and attach it to it CSS rule, which will determine the location, size and color scheme of the menu (menu item).
Virtual horizontal menu (HTML, CSS, JS)
Google is the undisputed leader in search and more. The idea of dynamically changing menus has been around for a long time, but Google's implementation is the easiest to visually interpret.
There is no extensive CSS here, no JavaScript involvement is expressed, but the search through the classic “Google” is determined not only by the laurels of the leader, but also by the actual execution.

Move horizontal menu to HTML tags from one meaning to the meaning determined by the search results is a good solution.
More likely, Google developers they meant something completely different, but the average visitor is accustomed to his understanding of the search logic, the concept of comfort and control search engine. The habit has developed into a custom, and it is not the first generation of information seekers who uses it.
Instilling habits in visitors is a labor-intensive process, but when it is successful, they take advantage of it, rather than offer radically new doctrines. You cannot break the rules and established skills.

If an HTML/CSS/JS developer changes the technique of creating a horizontal menu to the logic of a meaningful menu, endowed with elements of reality, perhaps his site will receive a different audience of visitors and a completely different rating among similar ones.
By default, all sheets are in new Word file located vertically, that is, in portrait orientation. This format is suitable for most documents, but sometimes there is a need to make all the pages in a document horizontal, that is, landscape. You may also want to make only one sheet in a document landscape. I will tell you how to do this in this short article.
How to Make All Pages Horizontal in Word
In this case, everything is simple, go to the “Layout” tab (in older versions of Word– “Page Layout” tab), click the “Orientation” button and select the “Landscape” item:
All pages of your document will become landscape.
This is a little more complicated than the first case. Word still does not provide a mechanism that allows you to make a specific page of a document in a different orientation. But there is a workaround. You need to go to the desired page and on the same “Layout” tab, click on the small arrow in the “Page Options” block:

A window with page parameters settings will open. Select landscape orientation and at the very bottom of the window select “Apply: to the end of the document.”

All pages of the document starting with the selected one will become landscape. To leave only one sheet in this orientation, select the next sheet and repeat the operation, only selecting portrait orientation.
Set the default orientation
If, for example, you often create documents entirely in landscape orientation, you can set this format as default. Go to “Page Options”, select the desired orientation and click the “Default” button at the bottom of the page.
If you have any questions or need clarification, ask a question, we will be happy to help you!