How to change the Windows 10 start icon. What to do if the Start menu does not open
Questions about how you can return everyone to the familiar Windows 10 start menu as in Windows 7 are quite relevant when the computer icon does not appear on the desktop of a freshly installed OS after installation, and the changed Start menu, to put it mildly, is “not very good”!
Returning the Windows 10 start menu to the same as in Windows 7
It is not possible to return the full start menu to Windows 10 using the operating system, but you can change the appearance of the start menu, so that it becomes similar to the usual version. For this:
Programs for creating a start menu
Classic Shell
This program is completely free and has Russian language. Its parameters can be customized to your taste and different design themes can be used. 
Start 10
This is a product of Stardock, which specializes in developing applications for Windows design changes. You can use Start10 free 30 days. Its installation takes place in English, but the interface itself has support for the Russian language. The application can set not only the color, but also the texture for the start menu. 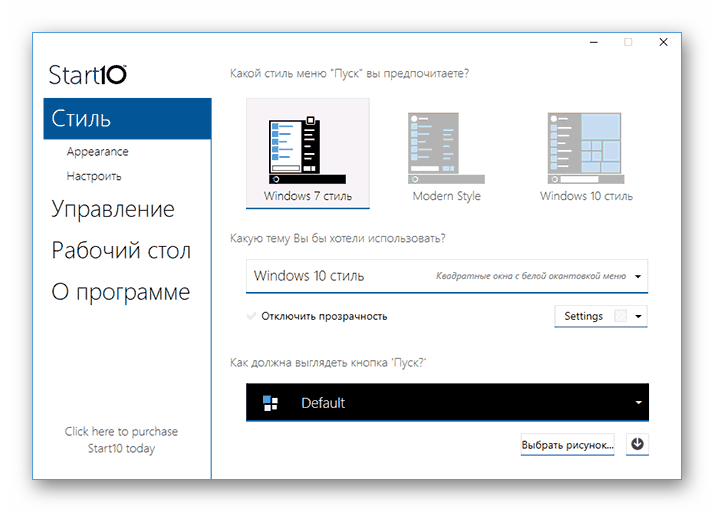
StartIsBack++
This program also has a Russian-language interface, and it is provided free use for 30 days. StartIsBack++ changes not only the menu itself, but also the taskbar. 
How to get the My Computer icon back on the Windows 10 desktop
To enable the computer icon on the new system, you will need to right-click on the desktop and click Personalization
.
Then:


Now the icon My computer will be placed on the Windows 10 desktop, only it will be called This computer, but the name can be changed.
With this quick guide, you can get the MY COMPUTER icon and Windows 10 start menu back like they were in Windows 7
If you're used to the look of the Start menu or the old Start button on Windows 7 or Windows Vista, then you'll probably want to get that look back on Windows 10. There are several ways you can do this. The first method does not require you to install additional software. You can simply customize the appearance of the Start menu on Windows 10. But this will not lead to a 100% return to the classic version of the menu. The second option will require you to install additional software. This option is somewhat more complicated, but it will allow you to return 100% to the previous version of the Start menu, as well as return the usual appearance of the Start button.
How to return the classic look of the Start button and menu on Windows 10
Microsoft took into account the errors of Windows 8, so on Windows 10 the Start button and menu are present by default. But the appearance of the button and menu is different. If you want to return to your usual appearance, then choose one of two methods:- Use standard Windows 10 features;
- Install additional software;
Start Menu on Windows 10
The Start button on Windows 10 is located in the same place as in previous versions of the OS. This means you won't have to struggle with moving it. But the appearance of the Start menu on Windows 10 is different from the appearance of the Start menu on Windows 10. Microsoft has made the Start menu as flexible as possible, so it looks different for each user, for example, as follows:
As you can see, on the left side of the menu are programs that have been recently used. On the right side there are so-called tiles that provide quick access to information or resources. Widgets are also displayed in this menu. Everything is very bright, flashes and distracts attention. This variety of information is the reason why many want to switch from the standard Start menu to the classic view.
How to bring back the classic Start on Windows 10
Everyone has their own understanding of the term “Classical”. Surveys have shown that most users consider the classic menu from Windows 7. Therefore, let’s look at this menu as an example. The first way is to customize the Start menu in the image and likeness of the previous version. To do this, you need to expand the menu and right-click on those elements that you do not need, for example, on tiles:
Next, you need to select “Unpin from Start Screen” and this element will disappear. Once you unpin all the elements, you will only be left with the left column. Overall, it will be similar to the classic Start menu look. But in standard settings the menu area is very wide. Therefore, we use the mouse to tighten the menu area. You can make the menu of any width, but to make the menu convenient, we recommend making it at least 4 icons below it. As a result, you will get the following menu appearance:

This is all you can do without resorting to third-party programs. Agree, it looks like a classic look, but it isn't. Of course, this will suit some people, but for those who decide to go all the way, there is another way - installing additional software. This method does not require the preparatory steps described above. You need to download and install one of the programs, for example: There are other programs to return the classic menu on Windows 10. But these two are free and the best. Firstly, they only take up a few MB of space, and secondly, they allow you to return the appearance in just a couple of clicks. As a result, you should be able to get a Start menu look like this:

Agree, this is much more like the truth. But that is not all. So you returned only the Start menu. But you can also use programs to return the Start button, that is, the familiar round icon. All this can be done by the same programs. And as a result, you will get the same appearance, familiar from the days of Windows 7. But do not forget that all system decorations affect the performance of Windows 10, as well as battery life.
How to return back to the standard Windows 10 Start view
If the classic appearance does not suit you, then you can always return to the previous menu view. If you were using programs, simply disable them or delete them. After this, the standard Start menu will return. After all, if there is no program, then there is no appearance that she made. And if you used the manual method and removed all the extra tiles yourself, then you just need to return the necessary tiles in the same way. Just right-click and select the widgets and blocks that you would like to see in your Start menu on Windows 10.In the instructions on how to return the classic appearance of the Start menu, we used Windows 10 in Russian. If you have a version in English, we recommend that before you start working with the Start menu,
The main menu of the computer is the Start menu. In Windows 10, you can change it to suit yourself: edit the interface, list of applications, icon placement and the presence of certain parameters. Let's look at this in more detail.
What is the Start Menu
In Windows 10, the Start menu contains a list of all and frequently used applications, a block with programs for quick access, news and advertising. Through “Start” you can turn off the computer and go to system and account settings.
You can open the menu in two ways: by clicking on the Windows icon in the lower left corner of the screen or by clicking on the Win key in the lower left corner of the keyboard.
Customizing the Start Menu
Some settings can be made directly from the menu, some from the computer settings.
Grouping and deleting icons
- When you open the menu, you will see two blocks: “Events and messages” and “Entertainment and relaxation”. Both columns contain tiles with applications, useful information and advertising.
The left and right blocks of the Start menu can be edited separately
- By dragging one tile onto another, you will create a folder containing the combined tiles. By dragging and dropping icons, you can achieve their optimal arrangement.
Create a folder from two tiles
- By right-clicking on any icon, you can remove it from the menu, unpin it, or change its size. In additional settings, you can unpin the icon from the taskbar, and also disable the display of animated pictures to reduce the load when displaying the menu.
Right-click on the icons and adjust their size
- To add a tile, find the shortcut for the desired application, right-click on it and select the “Pin to Start Screen” option.
Select the “Pin to Home Screen” option to add a tile
- By moving the borders of the menu, you can change its size. If you first remove all unnecessary elements, you can achieve a fairly small window.
Changing the borders of the Start menu
Setting which programs are displayed
- Expand system settings.
Open computer settings
- Go to the Personalization section.
Open the “Personalization” section
- Select the “Start” subsection. In it you can enable and disable menu items: a list of frequently used, recently added and other applications. You can also enable the menu to display in full screen mode.
We specify which applications to display in the Start menu
- Go to the display folder settings.
Open the section “Choose which folders appear in the Start menu”
- Specify which of the suggested folders should be shown in the Start menu.
Selecting the folders that should be displayed
Changing the interface
You can choose a color for the Start menu in the Personalization section under Color. Activate the “Show color in menu” function, which is located under the palette. If necessary, you can enable menu transparency here.
Choosing a color for the Start menu
A menu with a changed color will differ from the standard one.
Changing the menu color
Activating and deactivating full screen mode
- You can activate the display of the menu in full screen mode in the personalization settings.
Enable display of the Start menu in full screen mode
- If you enable this feature, the open Start menu will take up the entire screen space. On weaker computers, launching in widescreen mode may freeze. This mode has the same content as the standard one: there is a list of applications, two blocks of tiles and access to some system programs. Sections are opened using icons in the upper left corner of the screen. You can exit full-screen mode by pressing the Win icon, Win or Esc key again.

Disable the Start menu from using full screen mode
Video: Setting up the Start menu
In the Start menu, you can edit tiles by moving and arranging them into folders, customize the list of applications displayed and the size of the menu itself. There are functions in the system settings that allow you to change the color of the menu and enable transparency for it.
After upgrading to Windows 10, many users were disappointed with the redesigned Start menu. In Windows 7, it consisted of two parts: the left - previously used programs, the right - My Computer, Control Panel, and other elements for setting up and managing the system. To return the classic look of the Start menu in Windows 10, just follow some tips.
Ways to return the classic Start menu in Windows 10
In order to make the Start menu in Windows 10 look like the classic Windows 7 menu, you should remove all Metro tiles. To do this, perform the following steps.
- Right-click on the element and select “Delete”.
- In this way, we remove all the tiles until we get the classic menu look.

You can return the classic view of the Start menu in Windows 10 using the ClassicShell program, which runs in compatibility mode.
- Download and install the program. Selecting components to install. In this case, we need “Classic Start Menu” and “Classic Explorer”. The latter modifies the Explorer. You can also return the old look of the Control Panel, which in Windows 10 is not too different from the IE browser. Select the storage location for the program folder and click “Next”.

- Follow the prompts of the installation wizard. After completion, click on the Start button. A new settings window will appear. Select the element model.

- The Start menu will look like this.

- All elements on such a menu can be swapped, size and other parameters can be adjusted.
- The explorer will appear as follows.

- The control panel will not be too different from previous versions of Windows.

You can also use the Settings menu to make the Start button and menu look classic. To do this, we do the following.
The Start menu is an essential component of Windows 10, so users may want to customize it to their liking. There are many ways to do this. You can change the size of tiles, color, and select the folders to be shown. Below we will talk about the settings options.
How to resize the Start menu

How to enable full screen start menu

How to Pin an App to the Start Menu
If you want to see a specific app on the Start menu, you can pin it from anywhere. In this case, the application will be attached from the desktop, but it can also be attached from any other place in the system.
How to Unpin an App from the Start Menu

How to change the size of tiles

How to move tiles in the menu

How to disable live tiles
Live tiles contain updated information. They resemble slide shows; If you don't like this look, you can turn it off.
How to change the color of the Start menu

How to add folders to the Start menu
On the left side of the non-tiled menu, you can add specific Windows 10 folders for quick access. By default, the Explorer and Settings folders are located here.
How to rename a group of tiles
In the Start menu, you can see headings next to groups of tiles. By default, there are “Entertainment and Recreation” and “Events and Communication” groups. These headers can be changed.