How to change usb mode on android. How to enable a USB drive on Android - turn a regular smartphone into a mobile data storage
It would seem that connecting an Android device to a computer is not difficult at all. I connected it with a USB to mini USB cable and everything should work. But this doesn't always happen. Sometimes required additional actions. Let's talk about them further.
Let's begin with different versions Android differs slightly in the way they connect the device to a computer as storage. Don't know your version? Go to settings, look for the menu item “About phone”, “About tablet” or “About device”. The version of your gadget is listed there. Next, proceed according to the instructions prescribed for your version of Android.

Android 2.1 – 2.3.7
- Connect your device to your computer using a USB cable
- Wait until the computer detects the device. If the computer detected your phone or tablet, skip the next step. Otherwise, follow the next step of the instructions
- Disconnect your device from your PC. Go to Settings -> Applications -> For Developer -> USB Debugging. Press the button to enable USB debugging mode. Connect your device to your PC.
- Once the device has been recognized by the computer, a USB icon will appear in the status bar. Pull the status bar down with your finger, tap “USB Connection”
- If you are given a choice between the options “Connect as a media device (MTP)” and “Connect as a camera (PTP)”, select the first option
- Ready! Green icon Android turns orange, and on PC your device appears as a data storage ( removable drive with assigned letter)
Android 4.0 – 4.2
As a rule, in these versions of Android, the device is recognized automatically after connection. If this does not happen, follow these steps:
- Connect your gadget to your PC via USB
- Select Settings -> Storage -> USB Connection Settings
- Of the two options offered (connect as a media device/as a camera), select the first one. Ready! Device connected as storage
Now you know how to enable usb drive on Android any version.
How to Clean Android Internal Storage
Clogging internal memory phone or tablet is a problem that any user faces sooner or later. Once you have connected to your PC via USB, you will see convenient way solve it. Here is a short list of steps you can take to clean up internal storage Android devices by connecting to a PC.
- Transfer your photos and videos to your PC. Just drag them into the desired folder PC and delete from phone
- Check your Download folder. As a rule, a lot of unnecessary downloaded files accumulate there. Delete them and transfer the ones you need to your PC
- You can also save some data directly from applications to your PC. For example, you can archive all your SMS and save them on your computer
By connecting your Android device to your PC as storage, you can easily exchange information between devices, and also comfortably clear the internal memory of your gadget.
It's easy to connect a flash drive to your smartphone. To do this, you just need support for a special protocol and several programs.
Definition of OTG support
Read also: TOP 12 Best USB flash drives for all occasions: for music, movies and backup data storage
To connect an external drive to a mobile device, you must first make sure that your smartphone supports OTG (On-The-Go) technology, which allows you to external device power supply via USB port.
It is worth noting, this function implemented only in Android systems starting from version 3.1.
In order to make sure whether your mobile device supports the OTG function or not, you can use small program which is called USB OTG Checker.

After the program tests your smartphone, it will display one of two messages.
First- in case of a positive result, implying that the device supports OTG technology.
In this case, you will see the following message on the monitor screen:

If your mobile device does not support the OTG function, you will see the following information window:

In version with positive result you need to purchase a special adapter from the retail chain that allows you to connect external storage(flash drive) into the Micro USB socket of your mobile device.
Some manufacturers took care of this in advance and equipped their smartphones with a proprietary OTG cable.
If you want to connect several external drives or other devices to your smartphone at once, you will have to use a USB HUB.

Currently, it is quite possible to find a flash drive on sale that has both USB and Micro USB plug. It is quite convenient, as it allows you to avoid using an OTG cable.

Connecting a flash drive in OTG mode
Read also: TOP 12 Best memory cards for smartphones, cameras and DVRs | Review of popular models + Reviews
It’s impossible not to talk about such a useful technology as connecting a flash drive to OTG mode. Among its advantages is the fact that it is supported by most devices.
So the user does not have to suffer for a long time trying to connect an external flash drive to the gadget.
With one small cable, you can easily synchronize your existing devices for fast transfer data.
Such an adapter is inexpensive, so anyone can easily purchase it and try it. Here are two ways to check for OTG mode:
- Check out technical characteristics specified by the manufacturer.
- Having purchased suitable device, check its performance in practice.
If the gadget is not able to see the flash drive, we can say that the manufacturer, for his own reasons, deprived the device of such an ability.
VIDEO: How to connect a flash drive (disk) to NTFS via OTG on Android
How to connect a flash drive (disk) to NTFS via OTG on Android
Connecting a flash drive to a smartphone: Four ways (plus bonus)
Connecting a flash drive using USB
Read also:SIM card and memory card - How to install in one slot?
For many modern devices running Android OS, there is a standard micro-USB connector. So connecting a flash drive to a smartphone is very simple.
The flash drive will work on the device if On-The-Go technology is loaded. Manufacturers have been introducing a similar function into the gadget since the latest version.
Usually installed in modern mobile devices micro USB connector, so the user cannot do without USB cable and an adapter for a flash drive.
Most manufacturers include adapters for flash drives. If you don't have it, you'll have to purchase it from a digital store.
If you cannot find a micro connector on the device, then most likely you will need to purchase not only a cable, but also a special adapter.
Of course, this will be quite inconvenient, since for a successful connection additional device you will have to use several cables. However, this is the only option possible in in this case connect the flash drive.
It is also worth mentioning the opening of an additional device. You can cope with this task by downloading one of the file managers.
Often it is already installed by the manufacturer along with a certain set of programs. If file manager missing, you will have to install it.
Concerning Android smartphones- the most common are Total Commander and FX File Explorer. The user can choose the application he likes.

Connecting a USB flash drive to an Android device using StickMount
Read also:Formatting MicroSD, write protection and how to remove it - All methods
If the user has access to a mobile device, then he can automatically install a flash drive with access to it from any file manager.
For this you can use free application StickMount(if you wish, you can use a paid Pro version, which is also available on Google Play).
DownloadAfter connecting the gadget, open StickMount and give this application superuser rights.

After these steps, the user will have access to the files downloaded to the flash drive, which will be located in the corresponding folder in the file manager.
Support for a variety of file systems is affected by the device and its firmware. Most often this is fat or etxt2.
Various file systems from Linux. Be sure to take this into account when connecting a flash drive.
You don't need them to work with them. root rights on the device. It's just that downloading them is paid. Further, they will be discussed in more detail.
USB Media Explorer
Read also:How to remove write protection from a USB flash drive - Solving basic problems
Among the main features USB Media Explorer (formerly Nexus Media Importer) is worth highlighting the fact that free memory for user information is limited.
But it is capable of quickly streaming the contents of any flash drives that are connected to a USB cable to the device used in the form of conductors.
Please note that this may cause possible problems in the process of applying the add-on on Android 3.x.
For this device to work correctly, you need the following:
- Gadget controlled Android system O. Corrupted lists of similar devices include Google Nexus 5 and Moto X. It also consists of Galaxy Nexus and Motorola Xoom. Try the free Nexus Motorolla Xoom first if your device is not on this list and is not supported due to hardware limitations.
- You can't do without a USB cable, which costs about $10.
- You will also need a card reader with a built-in memory card. Before connecting an external hard drive or another device, be sure to go to the official website and read the instructions.
Before using NMI without an Internet connection, activate the license.
To do this when the Internet is connected, you just need to launch the installed application.

Read also:How to connect a modem to a tablet on Android (Android) The easiest ways in 2018
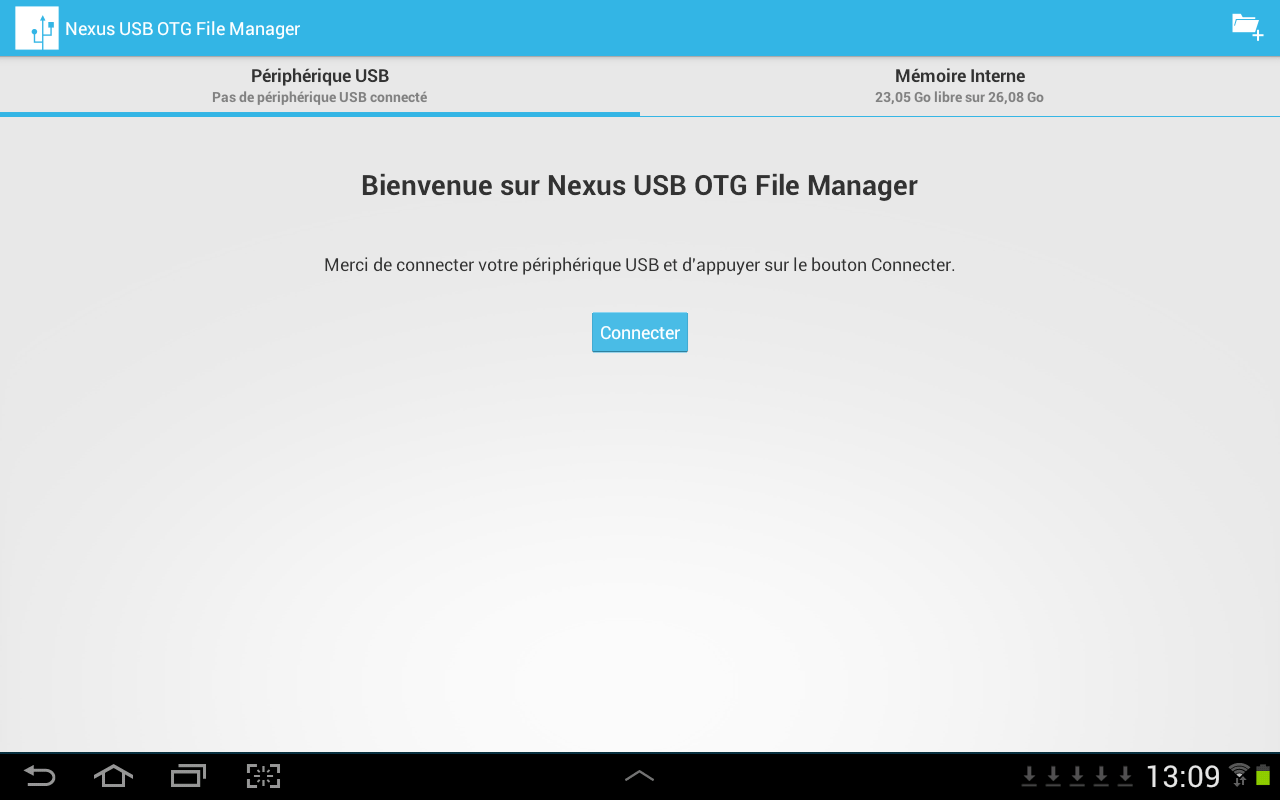
With the Nexus USB OTG File Manager app, you can easily copy files to a storage device that has a file FAT system 32. To do this you need to use a USB port.
As a result, the user will be able to work with documents not only in the internal memory, but also on a USB gadget.
He will be able to edit names various files, and also add and remove necessary folders.
Similar application developed by the creators of Nexus products equipped with an On-The-Go port. As an example, we can cite Nexus 5 and 7.
However, this program can work with any other devices, including different versions of Android.
This add-on also has a large number of new opportunities. Yes, it can open necessary files directly from USB and does not transmit data to the Internet.
Thanks to Advanced More, the user has access to all documents from his device.
Advanced users will certainly appreciate this feature. Such an application is the property of Google.
Also, using this application, the user can easily download various modern games for Android. They can be downloaded from websites that specialize in games.
Working with this program is a real pleasure and satisfies the user's needs.
Greetings. Now many people do not know how to connect a flash drive to their phone. Because it simply doesn’t fit or there are other reasons why it can’t be done. In today's article I want to take this issue apart. You will learn how to connect a flash drive to an Android phone (smartphone) and how to view files on it.
I don’t think there’s any need to explain why you need to connect a flash drive to a smartphone. The reasons can be completely different and the most unusual. Maybe there are simply no other devices nearby for reading information from a flash drive, or maybe you decided to transfer music to your phone this way.
How to connect a flash drive to an Android smartphone?
If you are holding an ordinary USB flash drive and your favorite smartphone, you see that there is nowhere to insert it. Because the flash drive has a type USB Type-A, and the smartphone has a micro USB Type-B connector. That's bad luck. (Read more about)
Fortunately, many modern smartphones have technology support USB On-The-Go, allowing them to use most peripherals directly without the help of a computer or laptop. You can connect a mouse or keyboard, work with flash drives and much more. But for this you will need.
An OTG cable usually has a full USB Type-A on one side, and a micro USB Type-B on the other side. Therefore, if your smartphone does not have a micro USB connector, then you should take care of an additional adapter to connect a flash drive. Although the likelihood of this is negligible, now almost all smartphones and tablets have a micro USB Type-B connector.
Eventually, to connect a flash drive to your phone, need to:
- so that your The smartphone supported USB On-The-Go technology. Although almost all smartphones now support it, there are nevertheless exceptions. Carefully read the phone's specifications before purchasing if this parameter is important to you.
- to have in stock. It is inexpensive, so it would be nice if you still have it. You never know when it will come in handy.
Adapter cables for different types of devices
OTG cables need to be selected depending on what connector is available on your smartphone or tablet. It could be microUSB, appleLightning or the most modern USBTYPE-C. The table shows some representatives of these cables.
How to open a flash drive on Android (tablet or phone)?
« How to open a flash drive on a phone, there is no shortcut “ My computer "and nothing similar?- you will be surprised. Naturally, for this we will need some kind of file manager. You most likely have some kind of simple pre-installed file manager. But if it is not there, then you need to install it.
Today, popular file managers on Android OS are: “File Manager”, “ES Explorer”, “ Total Commander", "X-plore File Manager", "File Commander", "ASTRO" and others. There are actually a lot of them. For example, I have been using for a very long time X-plore. I have loved it since the days when the Symbian OS operating system was popular on smartphones. X-plore is a convenient, functional and free manager. What else is needed?

X-plore - file manager
Then simply connect the flash drive to the phone and go to the file manager. There it will be displayed with all the contents. Of course, a completely different question is whether a smartphone can work with all files? It's still not a computer. But he can work with the main ones. There are even special programs for working with Excel tables, but it’s so inconvenient that I don’t even know who these programs were written for.
Why can't my smartphone see the flash drive via an OTG cable?
There may be many reasons why your smartphone does not see the flash drive. Let's look at the most common ones.

The flash drive is also often not visible on the computer, why? Read.
Micro USB flash drives
You may not know this, but there are flash drives that fit into a micro USB connector. This information may be useful to you if you plan to often connect a flash drive to your smartphone, then it makes sense to think about such a purchase.

Micro-USB flash drive
There are also combined flash drives that have a USB Type-A output on one side and a micro USB output on the other. You can connect such a flash drive to both a computer and a smartphone. Think this might be just what you need.
If you still decide to buy a micro USB flash drive, we recommend that you pay attention to the following models with a large amount of memory. Plus, they can connect to absolutely anyone. USB type connector
Conclusion on connecting a flash drive to the phone
In most cases, you will be able to use a USB flash drive on your phone without any problems. Which is good news. However, if you encounter difficulties connecting a flash drive, do not despair. Many of the problems are resolved fairly quickly. I hope you have learned enough about how to connect a flash drive to your phone. If you have any questions, please ask, we will try to help you.
Do you like new technologies? Subscribe to our channel on Zen!
We always have something to read and something to surprise you with. Read us on Zene
Did you read to the very end?
Was this article helpful?
Not really
What exactly did you not like? Was the article incomplete or false?
Write in comments and we promise to improve!
Modern flash drives can hold great amount information whose weight will reach 256 GB and even more. That's just due to the lack of the required connector, it is problematic to “sync” with a smartphone, and they come to help adapters. Today we will find out how to connect a USB flash drive to Android via OTG and what you will need for this.
What is OTG
The OTG cable is a special adapter, allowing you to connect devices with a standard USB connector to phones and tablets. In short, this is an adapter, one end of which is connected to the smartphone, and an accessory is inserted into the second.
You can connect to both mice and keyboards, and any external drive.
You can purchase an adapter at any store, which specializes in electronics and gadgets for them. We also note that Some phones already come with OTG. For example, this detail was noticed in Samsung smartphones and Sony.
How to check Android and OTG compatibility
Unfortunately, not all smartphones can boast of supporting the OTG protocol. But how can you find out in advance whether the device can recognize additional gadget? The easiest - this is a visual definition. If the phone has standard microUSB, Most likely, in this case it will connect to the adapter without problems.
But for a better test, we recommend using special program, namely USB OTG Checker. This is very useful application with a minimum of functions, which perfectly performs the main option - recognizing OTG support or lack thereof in an Android smartphone.
USB OTG Checker app
The utility can be easily downloaded from . After installation, we launch it and after a few seconds we see either a green square or a red one on the main screen. Everything is very clear here : green means successful further synchronization, red – inability to connect to the adapter.
Below is a table with a little information about the device, which shows the phone model, its name and ID. This, in principle, is where all the functionality of the application ends.
If the result is negative – There are two options to solve this problem. Perhaps the flash drive is simply not recognized by the built-in Explorer. For this there are special utilities, which we will discuss below. Or the OTG protocol is completely blocked in the device. Then, unfortunately, you won’t be able to do anything except purchase new phone running Android.

The procedure for connecting directly is very simple: we insert the accessory into the adapter, and connect the adapter to the smartphone. If the flash drive is successfully recognized operating system, a corresponding notification should appear on the screen, on which you should click "Allow". The external flash drive is recognized by the device, but how can we now read information from it?
File managers will help here, they are also called explorers. These are applications that allow you to view all the information stored in the memory of your mobile device and the storage devices attached to it.
On some phones, e.g. Xiaomi company, there is already a built-in “Explorer”.
But you can also install any third-party manager, most best option– ES Explorer, which we talked about in detail in the article. We launch the program, go to the root menu and the external drive should be displayed there. Click on it and a list of materials appears. This way you can view images, videos, read documents and work with archives. All information stored on the flash drive is accessible from the smartphone.
But what to do if the drive is not recognized? The only way out – specialized utilities. For example, great program is Media Explorer, available for download from Google Play. Unfortunately, it is paid and there is no beta trial.
StickMount (Root)
Don't want to spend money? Don't despair, there is free alternative – StickMout app, requesting . If you are already a “Superuser”, you can easily adapt to the program, but otherwise you will have to either buy the tool or get root, otherwise you will not be able to work with the flash drive.
Possible problems why the phone/tablet does not see the flash drive via OTG
You bought an adapter, downloaded the necessary file manager, are happy to connect the flash drive, but it is not readable by the device - what is the reason? Let's discuss the most common factors that prevent successful synchronization:
- Incorrect flash drive format. Android doesn't read file systems NTFS and ExFat. Only suitable FAT32.
- Inappropriate software or operating system. The issue may be in the firmware, or in special drivers, or in the Android version. To avoid such troubles - Check your phone in advance via USB OTG Charge.
- Dirty connectors, due to which no contact occurs. This also includes faulty flash drive or adapter.
- The flash drive contains too much information. For example, if you connect a 256 GB drive to a smartphone, which only has 4-8 GB permanent memory– problems are possible. Likewise with RAM less than 1 GB.
Video instruction: how to connect USB to a smartphone without OTG support
As you can see, it’s quite easy to connect a USB flash drive to Android via OTG; for this you just need to strictly follow the instructions and have it on hand necessary tools. Good luck!
If the USB ports on your PC are not working and Windows settings and driver updates do not help, perhaps the controller was disabled in the BIOS. In this case, you will need to go to the configuration menu and turn everything back on.
There are many different versions BIOS with its own interfaces and subtleties of operation. Also, a more modern complex can work on your computer - UEFI, which supports a full GUI interface. This article discusses the distributions that are most often installed on motherboards.
Entering BIOS settings
To start changing the configuration, you need to go to the corresponding menu. It can be opened during power on personal computer- before it started Windows boot from the hard drive.
Turn on your PC. In case it is already running: reboot. Wait sound signal speaker: a short single beep indicates that everything is internal components, necessary for the computer to operate, have been detected.
Now you need to click hotkey to call the configuration. This must be done before changing the screen. If you don't have time and Windows starts loading, reboot. The keys depend on the installed motherboard model and version BIOS firmware. You can find it in the user manual that came with the motherboard, on the manufacturer’s official website, or view on your PC screen when loading it:

If you don't know the board model, it's okay. Just try pressing the following keys: Tab, Delete, Esc, F1, F2, F8, F10, F11, F12. One of them will definitely do.
You don't have to try just 1 option at a time. You can quickly press all the buttons from the list without any problems. One of them will come up and launch the BIOS settings, and the rest will be ignored.
Entering the BIOS/UEFI settings of the latest PCs
Many modern computers boot up so quickly that you won't be able to access the keystrokes when you turn them on. This is also true for laptops. That's why latest versions Windows OS has a new launch feature. Let's show it using Windows 8.1 as an example.


Your computer or laptop will reboot into setup mode. After restarting your PC, you will also be able to select option to run from a USB drive or DVD.
Menu navigation
Almost all BIOS versions are devoid of GUI. This means that you will have to work only using the keyboard, as in, for example, Windows console. Navigation is carried out using the up-down and right-left arrows. To open any section, use Enter key to go back – “Escape”. A small reminder of the keys used is always shown on the screen.

Firmware complex UEFI installed on the most expensive and powerful motherboards. It supports more drivers and can use a mouse. Its interface will be familiar Windows users and other modern operating systems.

Each version has its own interface and sets of options. Even the names of the same parameters may differ. The following article describes several popular BIOS releases.
AMI BIOS
A very common option that can be found on many modern computers. The main menu is divided into 2 parts: a list of categories and various actions, like exit or save. You will be working on the left side.

You need to go to the section called “ Integrated Peripherals». Russian version There is no interface, so all commands are only in English. Use the Down arrow to highlight this item and press Enter.
Here you need to enable ( Enabled) 4 options:
- USB EHCI controller– main controller. If on motherboard there are ports of version 3.0, this item will be divided into 2 parts: “Controller” and “Controller 2.0”;
- USB Keyboard Support– keyboard support;
- USB Mouse Support– mouse support;
- – work with external data storage: flash drives, disk drives, disks of smartphones and digital cameras.

In some older versions there are only 2 points " USB controller" And " Legacy USB storage support».
When you are done with the settings, press the F10 key to save changes made and restart your computer.
Phoenix AwardBIOS
Another popular version that can often be found on modern laptops. Doesn't have home page, like AMI, but with convenient thematic tabs at the top. You can move between sections using the left and right arrows, and between items using the up and down arrows.

Go to the section " Advanced» using the Right arrow. In it, find the category “ USB configuration" All items in this section must be moved to the position “ Enabled" In some versions the category " USB configuration" may be located in the " tab Peripherals" and not in "Advanced".
To exit the menu, press F10 and confirm exit.

AMI BIOS for Asus
AMI version used on Asus laptops. Externally it is very similar to Phoenix - a similar bookmarks bar. Settings USB are in the section " Advanced" Go there, enable all options and exit using the F10 button.
UEFI
Contrary to popular belief, UEFI is not part of the BIOS. It can rather be called a more advanced, but less popular competitor. There are a large number of different versions, each with their own interfaces. However, here the controls are similar to the usual Windows, so you can easily find the options you need.

Windows Settings
If at the BIOS level all ports and controllers are enabled, but USB ports still don't work, there may be a problem with your Windows system settings.
First, just try disconnect and reconnect the device. This will check if the drivers are correct. If there's something wrong with them, Windows will try to reinstall them.
If nothing happens when you reconnect, try turn on the controller V Windows registry. To do this you need to do the following:

Video: how to configure any BIOS to boot from a USB flash drive