How to connect two hard drives. How to connect a second hard drive? How to find out what hard drive is in your computer
Buy an internal SATA hard drive. Do this if you don't already have such a disk.
- It's better to buy a hard drive made by the same company as the computer (such as HP).
- Some hard drives are not compatible with some computers. Before purchasing a hard drive, find your computer model and hard drive model (for example, search for "HP Pavilion L3M56AA SATA Compatible") to see if they will work together.
Turn off your computer and unplug it from the electrical outlet. Do not work inside your computer while it is turned on, as you may damage the components or cause injury.
- Some desktop computers turn off within a couple of minutes. In this case, wait until the computer fans stop working.
Open the computer case. This process depends on the computer model, so read the instructions for the computer or find the relevant information on the Internet.
- In most cases, you will need a Phillips screwdriver.
Ground yourself . This will prevent you from accidentally damaging sensitive internal components of your computer (such as the motherboard).
Find an empty hard drive bay. The main hard drive is installed in a special compartment of the computer case; Next to this bay there should be a similar empty bay into which you will install the second hard drive.
Insert the second hard drive into the bay. The bay is located below or above the main hard drive bay. The disk must be inserted so that its side with connectors for connecting cables is directed into the computer case.
- In some cases, the disk must be secured with screws.
EXPERT ADVICE
Spike Baron is the owner of Spike's Computer Repair. His company has over 25 years of experience in the technology industry and specializes in PC and Mac computer repair, used computer sales, virus removal, data recovery and hardware and software upgrades. CompTIA A+ certified and Microsoft Certified Solutions Expert.
Network Engineer and User Support Specialist
Our expert agrees:“Once you open the case, install the hard drive in the dedicated bay and secure it with screws. Then connect the power cable to the hard drive, and then the SATA cable (connect one end to the hard drive, and the other to a free connector on the motherboard).”
Find the hard drive connector. Follow the main hard drive cable to find out where the hard drive connectors are on the motherboard. (The motherboard is a large board that other boards and devices connect to.)
- If the main hard drive cable looks like a wide, thin ribbon, it is an IDE hard drive. In this case, you will need an adapter to connect the second hard drive to the motherboard.
Connect a second hard drive. Connect one end of the cable to the second hard drive, and the other to the connector on the motherboard (this connector is located next to the connector to which the main hard drive is connected).
- If your computer's motherboard only has IDE connectors (connectors a few centimeters long), buy a SATA to IDE adapter. In this case, connect the adapter to the motherboard, and the cable of the second hard drive to the adapter.
Connect the second hard drive to the power supply. Connect one end of the power cable to the power supply and the other to the second hard drive.
- Typically, the power supply is located at the top of the computer case.
- The power cable plug looks like a wider SATA cable plug.
Make sure all cables are connected securely and correctly. Otherwise, the computer's operating system will not recognize the second disk.
Connect your computer to power and turn it on. Now you need to make Windows recognize the second hard drive.
Open the Disk Management window. Right click on the Start menu
In the lower left corner of the screen and then from the menu, select Disk Management.
- You can also click ⊞ Win + X to open the menu.
The quality of content is increasing inexorably, which means that file sizes are also increasing. In this regard, you may need additional space on your computer to ensure reliable storage of your extensive library of audio and video files, heavy programs and much more. In order not to change the current hard drive, it is enough to connect an additional one to it, which will act as an auxiliary source of space.
So, you have a system unit and a clear decision to install a second hard drive. This procedure is not so complicated that it requires contacting a service center, and, in principle, even a novice user can cope on his own.
Connecting a second hard drive to your computer
Connecting an additional hard drive will differ depending on which interface connector you have on your computer: SATA or IDE. SATA is a modern interface, so in almost 100% of cases it is found in more or less recent computers. IDE, on the contrary, is outdated, it can be found in older computers, but, fortunately, hard drives with an IDE interface can still be found on sale.
If you do not know what interface your computer is equipped with, before purchasing, you will need to look under the system unit case to obtain the necessary information.
Opening the system unit case
1. The structure of the system unit cases may be different. For example, in one case it is enough to unscrew (snap off) and remove the side cover, in some cases you will need to unscrew 4 screws from the back of the case and pull off the case.

2. Hard drives are installed in specially designated cells, which can be located differently in different variations of computers: they can be located at the bottom, central or side. The picture below shows what they roughly look like.

3. It is not difficult to distinguish between SATA and IDE connectors: since IDE is an old interface, it has wide ports and fairly large cables. It looks like this:

SATA, on the contrary, is a modern solution, which means it has a narrow port and a small cable.

Knowing what interface you have, you can purchase a hard drive and then connect it.
Connecting a hard drive to SATA
Let's start by analyzing the connection of a more modern interface, since it is found in most cases.
Before you begin, be sure to turn off your computer and disconnect it from the outlet.
1. Insert the hard drive into the free slot and secure it with screws.
2. Now you should connect the SATA cable that came with the kit to the hard drive. To do this, connect one end to the hard drive on either side, and connect the other end to the motherboard.

3. All that remains is to connect the hard drive to the power supply. To do this, as a rule, a coupler comes from the power supply, which must be connected to the hard drive. If the power supply does not have free cables, you will need to buy a splitter that turns one connector into two.

4. Build your computer and then connect it to the network. This completes the connection of the second hard drive.
Connecting a hard drive to IDE
Connecting a hard drive to a legacy interface is not much different, but the procedure is still slightly different.
1. First of all, you will need to set the jumper on the contacts of the connected hard drive to one of the positions: Master or Slave. As a rule, the Master mode is the main one when operating a hard drive and, most often, it is used for hard drives from which the operating system is loaded. Slave is an additional mode used for auxiliary hard drives on which, for example, media files will be stored. Most often, a second hard drive is connected for this very purpose, so set the jumper to Slave mode.

2. The IDE cable, unlike SATA, has not two, but three plugs for connection. The blue plug located at one end indicates that it needs to be connected to the motherboard. At the other end, as a rule, there is a black plug, which belongs to the Master mode, and a white one, located approximately in the middle of the cable, is responsible for the Slave mode.

3. Insert the hard drive into the bay, and then secure it with screws.
4. You will need to connect the free plug from the power supply to the hard drive, thereby providing it with power.
5. Insert the required cable connector into the hard drive, depending on the hard drive mode you have chosen. The blue end of the hard drive is connected to the motherboard.
This completes the connection of the hard drive to the IDE interface.
Actually, there is nothing complicated about connecting a hard drive yourself. And after completing this procedure, after turning on, your computer will detect the hard drive, and you will be able to fill it with the necessary information.
Articles in the same category
I’ll share with you how I solved a problem related to my hardware. I worked and worked... and there wasn’t enough space. Have you thought about how to install a hard drive on your Acer AX3910 computer? There are not enough connectors for it.
I’ve been using this computer for several years now and I’ll tell you honestly, it’s never let me down, it works super reliably, quickly, and the most important thing I like about it is its noiselessness. Works like a laptop. It's on the table and you can't even hear it.
Engineers looking for a cost-effective alternative to serial connections began using parallel connections. Over the years the standard has changed significantly. This is not a controller: it is properly called a "host adapter". Social media continues to grow rapidly. Every year we learn new things about what works and what doesn't.
Your computer has two main types of memory: hard disk memory and RAM, and they perform separate functions. Technicians call non-volatile hard drive storage because data remains when the computer is turned off. Traditional hard drives constantly write data in tiny magnetic fields on spinning metal platters; Newer SSD technology has no moving parts and instead uses flash memory to store files.
Installing a second hard drive on an Acer AX3910 computer.
Before this model, I used the same desktop computers, of the same brand, only less powerful and with a smaller hard drive. As they were used, the need for a faster processor and a larger hard drive arose. I have been using this model for more than two years and have no plans to change yet. Except that there wasn't enough space on the hard drive.
Random access memory is a high-speed temporary storage area where your computer stores running programs, open documents, and intermediate results of calculations and file processing. This is useful if your programs require a large amount of memory. He also contributed to the book Nanotechnology: Molecular Reflections on Global Abundance. It also allows you to create redundancy to protect against data loss if your primary hard drive fails. Hard drives come in two versions: external and internal.
Computer settings:
For additional storage space, I have been using an external hard drive “WD Elements” for a year now. The brand is not known to me, it is made in Thailand.
This HDD has a USB3 connector, the data transfer speed is very high that I didn’t even need to increase the built-in hard drive.
And I wouldn’t worry if at one point he didn’t start working slowly. The time it takes to load files into my programs from this external drive has increased dramatically. And the programs are energy-intensive - Adobe Premier Pro, Adobe Muse. The brake became concrete.
And there was concern. When checking the disk, Windows declares a system error on the disk, but cannot fix it. And “my whole life” is on it! Archival photos, work over many, many months. It became creepy to even think, if suddenly... I don’t even want to say this word! I handle it very carefully, blowing off the dust.
First, determine if the computer system has room for an additional hard drive. Following the instructions in your computer's manual, open the computer case and locate the hard drive. If there is space above or below this hard drive for another device of the same size, you likely have room for a second hard drive.
Next, look at the cables connected to the existing drive. One will be the power connector and the other will be the data connector. The power connector goes to the computer's power supply, and the data connector goes to the motherboard. Also check if there is free space to connect a second drive on the same ribbon cable. If not, you will need to install a second ribbon cable in the second controller socket on the motherboard, assuming it is accessible.
How to install a second hard drive
What to do? I decide to urgently install an additional 1 TB hard drive, leaving the original drive of the same manufacturer under the system, without reinstalling the system or changing anything. Bought for 3820 rubles. And knowing that this compact case does not have one for it, I decide to install it instead of a CD/ROM, and use an external CD/ROM, connected via a USB connector. It's not needed that often these days. And on the motherboard there are only two SATA connectors for disks.
Installing software on an external drive
- Make sure your original drive and your new drive are connected at the same time.
- The automatic installation will now begin.
- Run all available software updates.
How to determine the thickness of the device
I know of two types of optical drives used on laptops, which differ in thickness. "Thick" has a height of 12.7 mm, and "thin" - 9.5 mm. You can determine the thickness of the device you have installed without disassembling the laptop. To do this, first look at the device manager and look at the product model.
All you do is look for the location option during the installation process. At this point, it's too late to install them on another hard drive unless you want to go through and uninstall and reinstall the programs individually. However, you can't simply drag and drop program folders onto another drive. What you should do is create what is called a symbolic link. These are a bit like the shortcuts to programs, folders, and websites that litter your desktop, but they're more powerful.
There is no need to resort to complex commands, although there is a simple and free utility that does everything for you. Select "Custom Setting" and release all advanced features. When you install any software, it always asks where you want to save it. It has two halves and divides them in the middle - a column of icons.

I have this Optiarc AD-7580S. Now let’s visit any popular Internet resource that sells similar products or Yandex.market and look at the characteristics of the device.

As you can see, the thickness of the device, according to the description, is 13 mm (taking into account rounding, in reality 12.7 mm).
We need to select the source folders and destination. Make sure they are all checked. Now programs run from the hard drive. At some point, hard drive space becomes scarce and it is time to transfer data to an external hard drive. Or maybe you need an external hard drive for backups?
Connecting an external hard drive
Before purchasing a drive, please contact your computer to connect external media. When purchasing, pay attention to what connections the plate has. Depending on the application, you need a wafer with a higher or lower transfer speed.
Unpack and prepare the plate
When the drive arrives at your home, unpack it and check what's on the drive. In most cases, external drives come with a desktop or plug-in power supply and a connection cable for the computer.If in doubt, you can measure it yourself using an ordinary ruler. You can tell the difference between 12.7 and 9.5 drives with the naked eye.
Where to buy an adapter for HDD to ODD bay

It is a plastic box with a small board with connectors and a microcircuit, also included is a USB cord for connection and a decorative strip on the front side. For some reason, the package included a mini-CD with drivers, but Windows 7 saw the device without installing additional software. Moreover, the device is detected from the BIOS, so it can be used as a bootable CD-ROM.
Connect the power supply and plug it in. Then connect the hard drive to your computer. If you want to be safe, turn off your computer beforehand. If the drive is connected, turn it on and, if necessary, turn on the computer. Now
Not all personal computer users purchase a device for productive video games, video rendering, or processing 3D models. Quite a lot of people use PCs exclusively for watching videos, storing photos and surfing the Internet.
For such users, the main parameter in the computer will be the amount of internal memory. The more disk space, the more data you can store, which is especially important if you watch videos in 1080p resolution and listen to uncompressed music. Thus, the average size of a film can be about 20 gigabytes, and the size of one music file can be at least 15 megabytes. What can we say about video games, which can reach 60 gigabytes in an uninstalled form and more than 100 when installed.
A modern computer simply must have at least one terabyte of memory, otherwise a person will constantly experience inconvenience associated with a lack of memory. Let's figure out how to install multiple hard drives in a computer.
What parameters should the motherboard support?
Of course, no one will buy a new one (MP) for the sake of a hard drive; however, if the MP is significantly outdated, then you will still have to change it.
Previously, hard drives were connected to the MP using the so-called IDE connector.
It is quite simple to distinguish an IDE connector from a modern SATA connector. An outdated connector is connected using a cable made of many wires, while the SATA connector is connected to 2 thin wires, one for power and the other for data transfer. If the motherboard does not have a SATA connector, the person will have to replace the motherboard.

When purchasing a motherboard, the buyer should pay attention to the availability of SATA 3 standards and the number of SATA connectors. In addition, a person must pay attention to ensure that the power supply has enough connectors to connect power to SATA components.

Selecting a hard drive
Depending on how many SATA connectors are on the motherboard, a person can purchase as many hard drives. There are motherboards with 12 connectors for connecting hard drives, but for such a computer you will have to purchase an appropriate power supply. Firstly, it must have enough power connectors, and secondly, the power supply must have enough power to operate so many components.
If the computer motherboard only supports SATA 2, then a SATA 3 hard drive connected to this interface will operate at a slightly lower speed, limited by the SATA 2 data transfer speed.
When choosing the amount of memory, it is advisable to purchase the most capacious drive possible, especially if the MP is limited to 2 - 3 SATA connectors. However, if the buyer is not limited in funds, he can purchase a hard drive with the maximum capacity available on sale. Although, of course, it is better not to store all data on one drive.
As a manufacturer, it is best to purchase hard drives that are developed by well-known companies, such as Toshiba, WD and Seagate.
A running computer makes quite a noticeable noise, the source of which is the hard drive. The hard drive is especially noisy when reading or writing. Naturally, the more hard drives, the louder the noise emitted by the computer. Hard drives with a lower rotation speed of 5400 - 5700 rpm are less noisy. Unfortunately, the reduced rotation speed negatively affects the overall speed of operation. In addition, if the computer is assembled to order or independently, then you should choose a high-quality case with anti-resonance properties. In order to completely get rid of noise, you need to purchase SSD drives, but their cost is much higher than the cost of classic drives with a lower capacity.

A 250 GB SSD hard drive will cost the same as an ordinary 1 TB HDD, but its data exchange speed is several times higher than ordinary hard drives. The material "" explains about the units of measurement of information.
Before installing a new component, you must turn off the computer and remove both system unit covers. You can access the motherboard from the left side of the case. In the front of the case there are several compartments “pockets” into which hard drives are installed. The number of “pockets” depends on the form factor of the case. A standard ATX form factor case on average has about four pads for installing hard drives.

The hard drive placed in the bay is secured with bolts on both sides of the system unit. Typically, bolts are included with the hard drive.

A securely fixed hard drive produces significantly less noise. In addition, the hard drive has a moving mechanism, which is why a poorly secured part can be damaged due to constant vibrations.
After installing the hard drive into the case, it must be connected to the motherboard and power. Both connectors are similar, but it is simply impossible to connect power to the data connector.

Thus, a special SATA cable is connected to the hard drive, the other end of which is connected to the motherboard.

Wires for powering the hard drive are connected directly from the power supply.
After a successful connection, the computer turns on in normal mode. Most often, after turning on, a tool for adding a new device appears on the screen.
If the hard drive is not detected by the system, then you need to enter the menu “ Control Panel", Further " system and safety" And " Administration", Then " Computer management", then "Disk Management" and format the new volume.

After formatting, you should right-click on the unmarked space and select “ Create a new volume».
Thus, the ideal option is a computer with 2 - 3 hard drives, the smallest of which will be allocated for the operating system (system drive).

Hard drives installed on your computer will appear in “My Computer” as local drives.
Share.
They are the main store of information. In most cases, user data is stored there. And every day the volume of this data increases. Therefore, it is not surprising that sooner or later all users are faced with the fact that free space is running out. There is only one way out of this situation; you need to buy and connect a second hard drive to the computer. In this article we will try to help solve this problem.
Step #1: Disconnect power from the computer.
Before doing anything to the computer, it must be completely de-energized. Disconnect all cables from the system unit. Simply turning off the button on the power supply is not enough; all cables must be disconnected.
Step No. 2. Remove the side covers of the system unit.

One of the bays will already have one hard drive installed. This is your first hard drive, it contains your operating system and all your data. The second one needs to be placed nearby. If the bay is designed for more than two drives, then it is advisable to place the second drive not adjacent to the first. This will significantly improve its cooling.
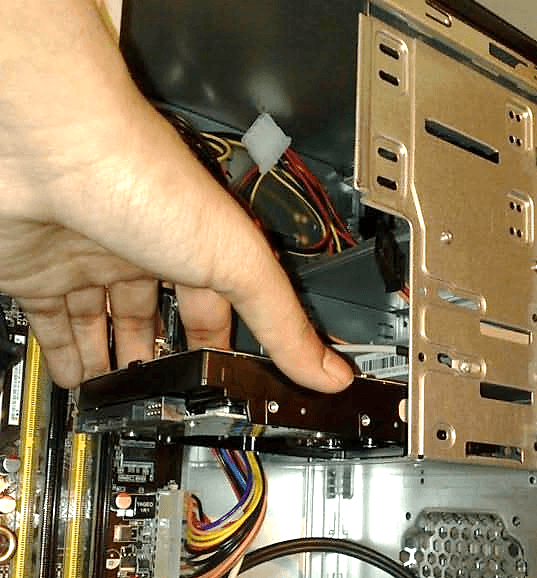
Carefully insert the hard drive into one of the installation locations. Please note that the drive should rest on small ledges and be secured with four screws. If there is not enough space inside the system unit, you may have to remove the video card or other components before installation. But, as a rule, this is not required.

After you have installed the hard drive in your computer, you need to secure it with four screws. Two screws are tightened on one side and two on the other. You should not skimp on screws, as this can cause unnecessary vibration and noise when the computer is operating.
Step #4: Connect the second drive to the motherboard and power supply.
Once the second drive is installed and securely fixed inside the computer, you can begin connecting it. Two cables are used, one goes to the motherboard, and the second to the power supply.
To connect to the motherboard, use this one (picture below). It is typically red in color, making it difficult to confuse. One cable connector needs to be plugged into the hard drive, and the other into the connector on the motherboard.

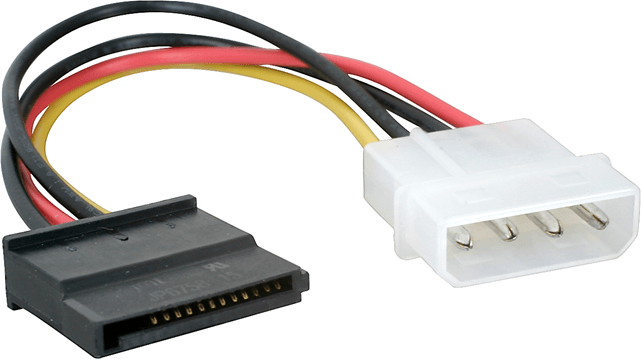
To connect to the power supply, a similar cable with a wider connector is used (picture below).

If your power supply is not equipped with a cable with such a connector, then you will need an adapter (picture below) from the old connector to the new one.
Step No. 5. Close the system unit.
After you have connected the second hard drive to the computer, you can close the system unit. Install the side covers and secure them with screws. Once the covers are installed, you can turn on the computer. If you did everything correctly, then after the computer boots, a new drive will appear in the system.