How to open a usb flash drive on android. Connecting a flash drive to your phone
1630
A USB flash drive connected to a phone is very convenient, but how to connect a flash drive to a smartphone? And is this possible? Maybe! And today in the “Tips” section we will reveal the secret of how to do this. Stay with us.
So, how to connect a flash drive to the smartphone that you already love so much?
There are several problems with answering this question:
- What to do with the connector? After all, the smartphone does not have a full-fledged USB connector.
- How to view files on your phone from a flash drive? After all, this is not a computer where the flash drive is automatically detected.
Do you know that besides connecting a flash drive to your phone, there are many other jokes. For example, you can use your phone as a webcam.
Solving the first problem with the connector
Your smartphone has a MicroUSB connector
IN in this case everything becomes as simple as possible. You need to go to the store or order from an online store (this is usually cheaper) and purchase a cable called USB OTG, which will be an adapter for your flash drive and smartphone.
Where to buy USB OTG cables and which one:
We have selected several options for you with best ratio price quality. For the price, they are all quite inexpensive. We ended up with this list (links to the store are attached):
- Cable from Prolink - 360 rubles;
- Cable from OEM - 300 rubles;
- Cable from Deppa - 390 rubles;
- Cable from Vention - 360 rubles.
All of them have the same characteristics and with USB 2.0. Then choose according to your taste.
You insert the required ends into the connectors and if your smartphone supports the OTG function, the flash drive will be detected automatically (this is usually what happens). Move on to solving the second problem.
Your smartphone does not have a MicroUSB connector
In this situation, small difficulties arise, but they can also be resolved. You just have to buy except USB cable OTG is also an adapter for the connector you need to synchronize your smartphone. Please note this is specific to your connector. And you can move on to point 2.
Solving the second problem with viewing the contents of a flash drive
So, everything is actually simple here: you need file manager, with which you will view all the files on the flash drive. It happens that your smartphone has a built-in file manager, then there are no problems. If you don’t have a built-in manager, then you just need to download it.
We would advise you to look towards these file managers for Android:
- ES File Explorer (ES Explorer)
- FX File Explorer
- Total Commander
- Solid Explorer
- File Manager by Rhythm Software
- File Manager HD by Rhythm Software
- ASTRO File Manager
- OI File Manager

The path to the files will be like this: /sdcard/usbStorage.
If your smartphone cannot detect a flash drive , then you will have to purchase paid application Nexus Media Importer - please note that although the application is called Nexus... it works with all smartphones, not just Nexus ones.
Eat free alternative StickMount, but it requires superuser rights (root), which can be obtained using the Kingo program Android ROOT, your computer and simple manipulations. Read how to root a phone, that is, make a root user. Since there is no particular need, we will not talk about it in this article, but if you have problems and you need to set ROOT rights for your smartphone, and you don’t know how, then write in the comments to this article, and we’ll be here Let's write how to do this.
Almost every tablet computer user has encountered the need to transfer information from a flash drive to the device itself. Did everyone succeed? Unfortunately no. Already at the first stage, difficulties often arose. After all, most tablets are not equipped with a usb host connector. On top of that, another trouble often happens - some models refuse to see the flash drive. As a result, a seemingly simple procedure turns out to be difficult to implement. But there is no need to worry. In this article we will tell you how to connect a flash drive to a tablet.
When using a tablet computer, situations often arise in which you need to use a USB drive. For example, to copy documents for study or work, transfer your favorite music to a flash drive or, conversely, from it. Some people like to take pictures and therefore periodically have to transfer photos to removable media. Otherwise, the device memory will quickly fill up. There are even users who prefer to watch movies on their tablet directly from a flash drive. Convenient, nothing to say.
All that remains is to find out how to connect everything correctly. Of course, the easiest way is to use a special adapter - usb otg cable:
- One end of it is inserted into the micro-USB port on the tablet. The charger is usually connected to the same connector.
- The other end of the cable does not have a plug, but a standard USB host. The flash drive is connected to it.
- Have you connected? The device should now automatically detect removable storage, if, of course, it supports USB function Host.
- However, there are a couple of nuances. Via usb otg you can connect a flash drive only to a tablet with Android OS 3.1 and higher. Also, some devices do not have a micro-USB port, but instead have a wide 30-pin connector. For example, the Samsung Galaxy Tab and many Asus models. Then to paste usb plug otg cable into the device you will need an adapter or a proprietary cord.

How to open files from a USB drive on a tablet?
Finally, you managed to complete connecting the flash drive to the tablet. Now you need to understand how to copy information from it (or, conversely, transfer some data to the media itself). Again, there is nothing complicated. You must use a file manager (required for devices with Android OS versions 3, 4 and 5). The most popular options are ASTRO File Manager or ES Explorer. They are downloaded through a regular store.
The file manager is easy to use. Launch it and look for the folder related to the USB drive. Look, it will contain all the information stored on the flash drive. Typically the data is located here:
- sdcard/usbStorage/sda1
- /sdcard/usbStorage/
- /mnt/sda4/
- /mnt/usb/system_usb etc.
If you have a tablet with Android version 6.0 or older, then you can do without the help of a file manager (it is built-in in the latest firmware):
- Go to "Settings".
- Open the "Storage and USB Drives" section.
- Next, click on “Open”.
- A list of files and folders that are stored in the tablet’s memory and on removable media will open. All you need to do is find the section related to the connected flash drive.
For reference! To transfer information to a flash drive from Google tablet Nexus file manager is not needed. The manufacturer has released a special paid application for this, Nexus Media Importer. You can download it from Google service Play.
Is it possible to connect a flash drive to a tablet via full-size USB or Wi-Fi?
Most similar gadgets are not equipped with such a connector. However, there are a few tablet models with full-size USB port. It allows you to connect a flash drive directly without using additional cables and adapters. For example, given input has:
- Gigabyte S1080
- Lenovo IdeaPad MIIX (Lenovo also has other models with a full-size USB port)
- Acer Iconia Tab W700
- Acer Iconia Tab A211
- Prestigio Multipad Visconte A, etc.
In addition, there are flash drives with Wi-Fi (though there are very few of them). To connect such removable media The tablet does not require any cable at all. They are connected via a module Wi-Fi connection, which every modern gadget has.
Why doesn’t the tablet see the USB flash drive and what to do in this situation?
It also happens that the device does not recognize the removable drive. There are several reasons that cause this problem:
- For connectors and ports tablet computers Little power is supplied. This is done to save battery power. As a result, devices are simply “physically” unable to read data from some types of flash drives.
- Sometimes the tablet does not see the removable drive due to its large capacity. In this case, you should try connecting a flash drive with a smaller memory size. Preferably up to 32 GB.
- An incorrect format can also cause the tablet to not recognize the USB drive. After all, most of these devices “cooperate” only with those flash drives that have a fat32 file system, and not ntfs. Solving the problem is not difficult - just change the format using standard means Windows or special utilities.
- Sometimes the tablet does not see or read the memory card due to software “obstacles”. Therefore, if you have tried all the methods, but the gadget still does not recognize the flash drive, then download and install the free StickMount program. In most cases, it helps solve the problem. All you need is root rights and a file manager (the same ES Explorer). In this case, StickMount will create separate folder for a flash drive.
- It also happens that the tablet does not see the USB drive due to its breakdown. Therefore, be sure to check the functionality of the flash drive by connecting it to a PC or laptop.
- A faulty usb otg cable is another reason for connection problems. external media information. In this case, all that remains is to change the cord itself.
- It cannot be ruled out that the micro-USB connector itself has failed. So, if possible, check the device and its ports at a service center.
Is it possible to connect a micro or usb flash drive to an android smartphone via an otg cable? Yes, you can and it’s not difficult, especially if you have Android 4.0, Android 4.4.2 or higher.
Those below, such as Android 2.3, do not support this technology - as far as I remember, it partially began with version 3.1.
Only if you even have Android 6.0, Android 7.0 or even Android 8, then some manufacturers block this, but you can bypass the ban.
TO android smartphone you can connect peripheral devices such as flash drives, external hard drives, mice and keyboards - but you must have an otg cable with standard USB For Micro cards memory.
After connecting a flash drive with such a cable, the system should activate a mode through which you can control the connection.
This mode is available on most devices. Only if your smartphone or tablet does not support this function, you can try to activate it manually, but this will require root rights.
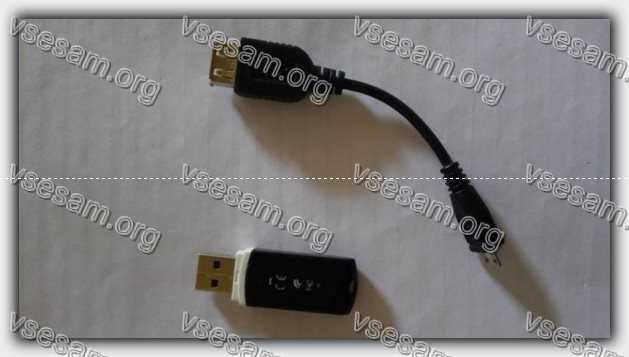
What is a USB OTG cable for connecting a flash drive?
This is a cable that has a standard micro USB connector on one side and USB input female on the other.
It allows you to connect a regular USB device, for example, a flash drive to the micro USB port on an Android phone.
The cost of such a cable is very small - a typical “Chinese” one can be bought for a trifle and is quite enough for home use.
If you want a branded cable (for example, Samsung), then the costs will increase several times.
How to check whether an Android smartphone supports connecting a USB flash drive via an OTG cable
Most Android phones have built-in OTG cable support, but some have it disabled by default.
To check if your smartphone or tablet supports this technology, you can use USB application OTG Checker.
After installing the application, run the appropriate setting for testing.
USB OTG Checker will analyze your device and check if it supports OTG.
How to connect a USB flash drive to Android via an OTG cable
First of all, you must format the USB flash drive to FAT32 file system. To do this, connect it to your computer and open the “This PC” window.
If you have important data on a flash drive, then copy it to disk. Click right click mouse to the flash drive and select “Format...”.
In the new window, click "Restore device settings to default" and then in the " File system» select “FAT32” and confirm formatting with the “Start” button.
Once the operation is completed, simply connect the flash drive to your smartphone using the OTG cable you purchased.
You will need following devices, such as a cable, a USB flash drive and an Android phone.
Now insert the flash drive into OTG cable, as shown in the figure below.

Now insert the USB OTG on your android phone as shown in the picture below.

After inserting, you can see that your USB flash drive has connected automatically and see “OTG UDisk installed” in the notification center.
After connecting the flash drive, it should be automatically detected and mounted on the system, after which you can view and copy files using any file manager, for example, Astro File Manager or ES File Explorer.
How to connect a USB flash drive via OTG cable on an unsupported device
If your smartphone or tablet does not work with the cable and does not have built-in support for this mode, there is still a way to activate it yourself, but we need root rights.
After receiving them, install the USB OTG Helper application on your Android phone. It is used for automatic connection flash drives via cable.

USB OTG Helper should start automatically after connecting the device via cable.
The OTG Helper interface will appear on the screen where we can enable (Mount) this feature or disable (Unmount).
After installation, the contents of the flash drive will be displayed on the smartphone, just like a micro memory card connected directly to the microSD card slot.
That's all. It turned out great! If it didn’t work out, it’s bad, but if you describe the problem in the comments, I’ll help you solve it, or rather, we’ll solve it together. Good luck.
In this article we will figure out how to connect Android to a computer/laptop via USB as a flash drive and be able to transfer information without using a classic flash drive.
This article is suitable for all brands that produce phones on Android 9/8/7/6: Samsung, HTC, Lenovo, LG, Sony, ZTE, Huawei, Meizu, Fly, Alcatel, Xiaomi, Nokia and others. We are not responsible for your actions.
Before Android versions 4.4 KitKat it was possible to establish a USB connection as a flash drive. The PC saw the device as a removable disk and provided the same rights: the user could also perform other actions.
Then in new versions of Android USB mode was replaced by MTP, in which only the data transfer function remained, and the same formatting did not work.
Setting up a USB connection
To manage the connection to a computer via USB, you need. To do this, add to Android settings section “For Developers” (if it doesn’t exist):
- Open settings.
- Go to the "About phone" or "About device" section.
- "Build number" or "MIUI version".
- Press (click) on this item until you see a message that you have become a developer (usually 7-10 clicks are enough).
After the developer section appears in the settings, you can enable USB debugging. The item is called that way, so you just need to move the slider to the “On” position and confirm the resolution.
 Increase
 Now you can connect the device to your computer via USB and select the operating mode. IN latest versions Android most used are:
- MTP - transfer any files from computer to phone and vice versa.
- PTP - transfer of photos, as well as transfer of files not supported in MTP mode.
- Charging only.
Connecting in USB storage mode
If you can't get used to using the media player, go back to using USB storage mode. For this you will need:
- Installed program USB MASS STORAGE Enabler.
This method may cause damage system files. In this case, you will have to reflash Android.
To connect Android to your computer as a drive:
- Launch USB MASS STORAGE Enabler.
- Grant superuser rights and agree to change how Selinux works.
- If the device is supported, the main application menu will open.
- Click "Enable USB MASS STORAGE".
 Increase
 Now, when connected to a PC, the phone or tablet will appear as a drive. To connect in MTP or PTP mode, just restart the device. Once you're done with mass storage mode, go back into the app and disable USB MASS STORAGE.
A mobile device that runs on the Android OS, unlike other portable gadgets, can be connected to a computer as a flash drive. Many Android smartphones and tablets are initially equipped by manufacturers with functions that allow them to be used as flash drives.
This allows the user to record necessary information, remove files from the product that are not used, but at the same time take up a lot of space in it.
Using Android mobile device in the form of a flash drive, there is no need to constantly carry the drive with you. Now you don’t need to carry out a lot of manipulations with connecting to a laptop or computer, spending a lot of time on it.
Options for connecting a mobile gadget as a flash drive
Let's look at how to connect mobile device like a flash drive. To do this you need to perform certain consistent actions:
If you lower the curtain in the menu, it will display USB connection in the form of a flash drive. If you need to turn off the drive, you must also lower the curtain and click on the corresponding inscription.
Connecting the product with different versions of Android
Now let's look at ways to connect a tablet or smartphone as a flash drive, depending on the version used Android. First, we determine which operating system is on the device. To do this, go to “Settings”, select the “About device” or “About phone” section. Often it is located last in the list that opens.
OS Android 2.1 - 2.3.7
If installed operating system Android 2.1 - 2.3.7, you need to follow these steps:
- You need to connect the gadget to your PC using a USB cable.
- The computer should automatically detect the new device. If this does not happen, you need to disconnect the smartphone from the computer, go to “Settings”, select “Applications”, click on “For Developer”, then “USB Debugging”. Now you need to connect it to your PC again.
- A drive icon will appear in the gadget. You need to click on “USB Connection”, and the connection itself should be made as a media device.
Android OS version 4 and higher
Since version 4.4 KitKat, the mode is not used in Android USB storage device, tablet or smartphone can be used as Media Transfer Protocol (MTP). But you can make the gadget work as a storage device.
Required to use special application, which will help you connect Android with MTP as a USB drive in a few steps. To do this you will need:
- Install on Android Root rights.
- Download and install the special application “USB MASS STORAGE Enabler”.
Then you need to do the following:
- Launch “USB MASS STORAGE Enabler”. It will be displayed in the menu as a USB activator.
- Root rights must be granted. You will be prompted to change how Selinux works. It needs to be resolved.
- If this device is supported, the application will go to the main menu.
- To solve the “flash drive” in Android, you need to click on “Enable USB MASS STORAGE”.
After using Android as a USB drive, you need to disable this mode. For this it opens program“USB MASS STORAGE Enabler” and press the corresponding button there. To connect a mobile device in a different mode, you need to restart Android.
Android does not detect memory card
There are situations when the flash drive in the device does not work. To find it, you can use the ES Explorer file manager or similar application. By using similar programs you can find almost everything. In its functionality it is similar to the My Computer program.
To recognize the memory card, you should launch ES Explorer. After launching it, a menu will appear on the left side of the screen where the SDcard (memory card) will be located. All you have to do is click on it. After this, the memory card will be detected and available for use.