How to clear your navigator of old routes. How to View and Delete Google Maps History on Android and iOS
If you often use Google Maps You probably know (or maybe not) that they keep a detailed history of all the places you've been, regardless of whether you use navigation or not. We'll show you how to delete this data.
Google Maps saves your travel history in several different places: Timeline and Map History. "Chronology" is very detailed description where you were, even if you didn't use navigation to get there (yes, your phone tracks your every move). “Map history” is only the places you used to navigate.
How to edit or delete individual entries from your Google Maps timeline
I'm using Android in this article, but the steps for iOS are exactly the same. To access your timeline, launch Google Maps and swipe right or click on the three bars in the top left corner to open the menu. Select Timeline.

The default view is a mini-map at the top of the screen and a view of your last places at the bottom. To edit (or delete) any of these locations, simply click on the entry.


From here you can edit the entry by clicking the "Edit" button, which will allow you to change the time and specify the exact location if it is inaccurate.

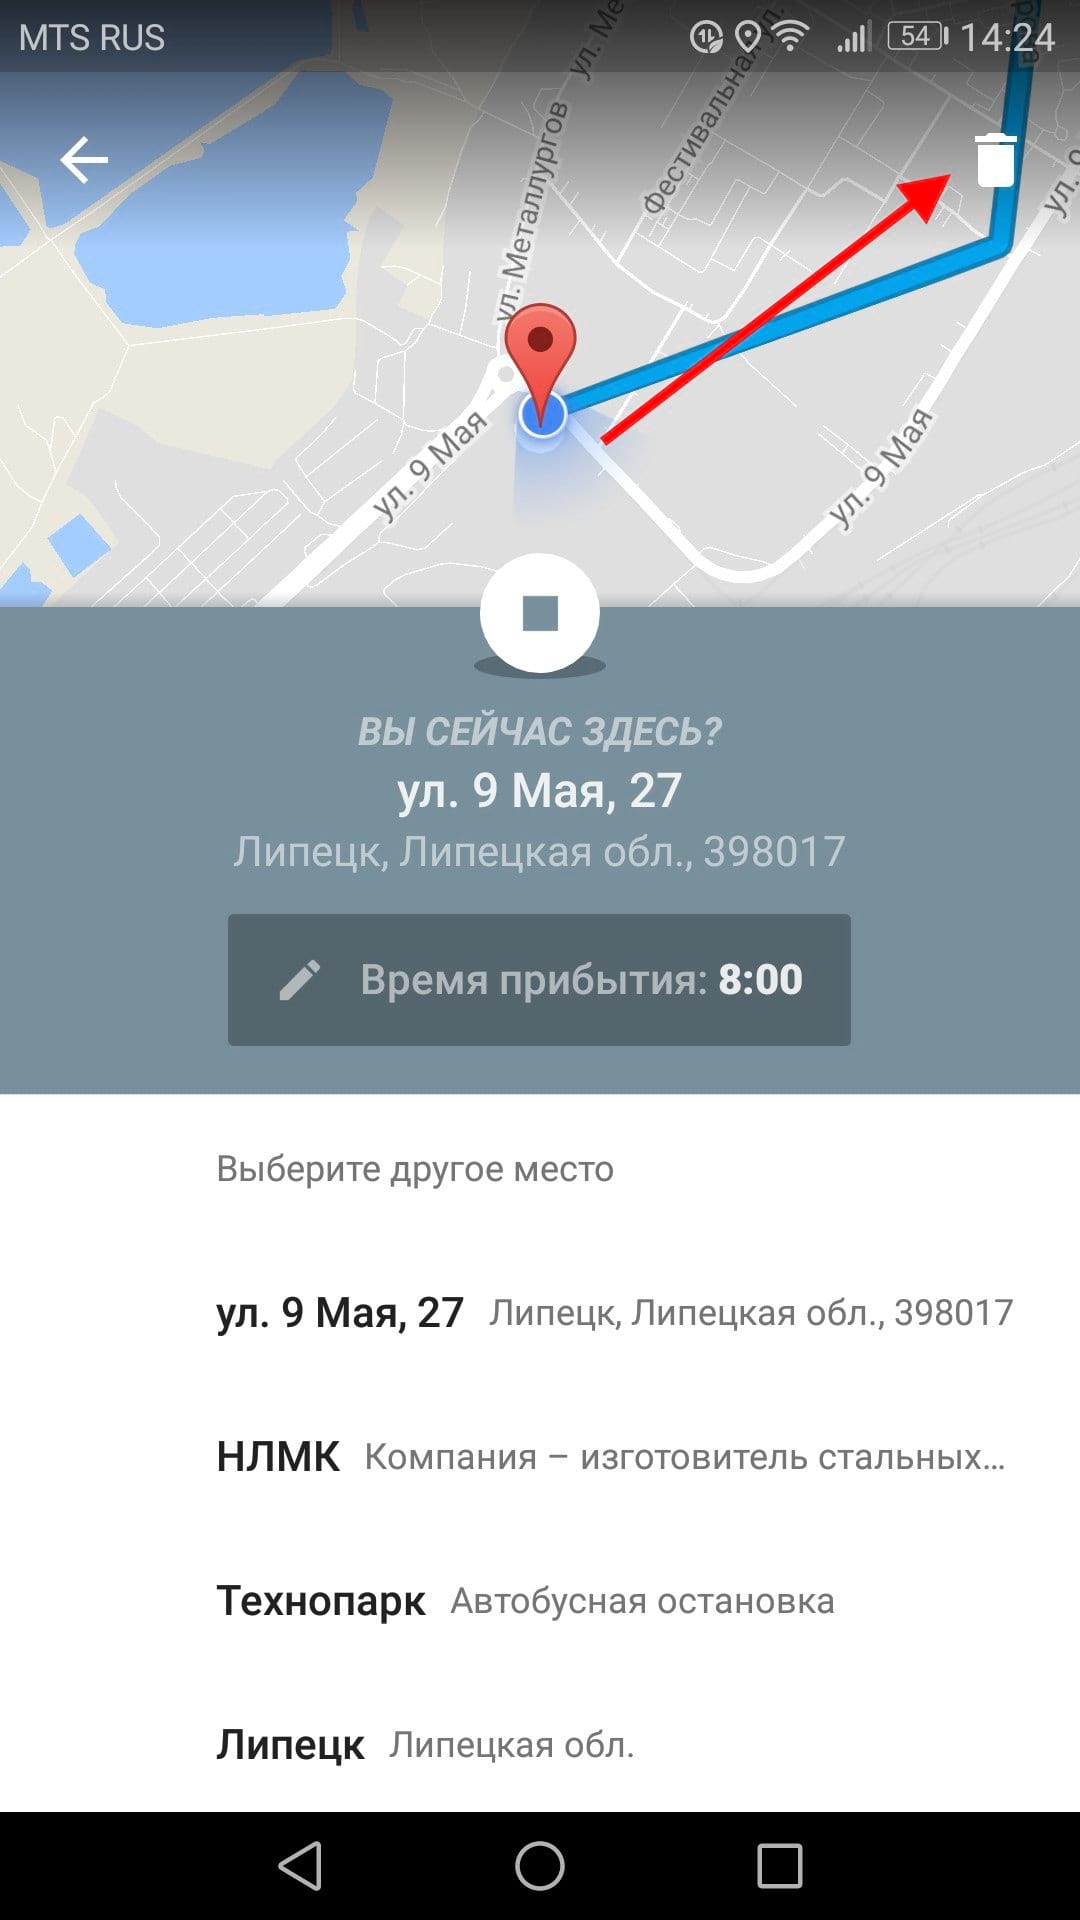
To delete an entry, click on the trash can icon in the right top corner. A pop-up window will appear asking you to confirm deleting the entry.

How to Stop (and Remove All) Location History Tracking in Google Maps
You don't have to delete each entry individually. You can delete all your data from the history.
While in Timeline, click the three dots in the top right corner, then select Settings.


It's actually quite difficult to disable timeline completely because it can negatively impact other aspects of navigation. But if you want to remove entries from your history, then go to the bottom of the history settings page and turn off the “Location history enabled” option.

You can turn off location history for specific device or not at all - just press the appropriate switch. The top switch will turn off location history tracking on all devices, and the switch next to the device name will simply turn it off on that specific device.

You can also delete your location history if you wish. There are two ways to do this: “Delete all location history” or “Delete part of location history.” These are the last two options on the History Settings page.
To delete your entire location history, click on this item. You'll see a warning that this action cannot be undone and may affect apps that use your location history. If you agree, check the “Yes, delete” box and click “Delete”.


If you want to delete location history only for a period, then select “Delete part of location history.” Specify the start date of the period and the end date and click “Continue”.


A warning will appear again, check the “Yes, delete” box and click “Delete”.

How to delete navigation history
Deleting navigation history is a little more difficult because there is no way to delete everything with one click - you can only delete individual entries.
First, launch Google Maps. Open the menu by swiping right or tapping the three bars in the top left corner. Scroll down the menu, there you will see the “Settings” item, click on it.

Here, find and click on the “History” item.

Here you will see all the routes you used during navigation. It is not possible to clear all the data at once, so you will have to delete them individually by pressing the X on the right side.

After clicking on X, you will receive a small warning that this entry will be deleted from your Maps history. Confirm the deletion by clicking on the “Delete” button.

More than half of users prefer search in Yandex mobile internet, using for this device based on Android OS. Since the search engine, as well as the solutions it has developed, in particular the Yandex browser, saves the search queries you enter, the pages you visit and other information, you need to know how to delete history in Yandex to ensure unavailability personal information other people who may have access to your tablet or smartphone.
Note! Often, search users using Yandex and the browser of the same name confuse the displayed search bar As the request is formed, a summary with the search queries entered earlier. The guide is generated automatically by the search engine and cannot be deleted or disabled. History search queries adjusted by deleting data for individual periods or for the entire period of use.

What methods to do this
To figure it out how to clear history in the Yandex browser, you need to delve into the features of storing the history of search queries. So, provided that you are logged into your Yandex account in the browser, all search queries and history will be stored on the device and duplicated in online service storing search engine user data.Thus, even after deleting history from the browser on the device, using search engine Yandex from another mobile device or personal computer, you (or other users who have access to it) will see traces of search queries and other information deleted from the device.
Based on this, it is important to understand that in order to completely exclude the possibility of access to your personal information according to actions in Yandex search, you need to not only clear browser history on mobile device under Android control, but also erase search history in Yandex global settings.
Delete history in Yandex browser
Yandex browser allows delete not only the history and queries specified from under it, but also exported from the browser pre-installed in the system, provided that during installation and initial setup Yandex Browser you have given consent to export. To do this you will need to perform the following steps:
- Launch Yandex browser. Click the icon with Latin letter S, which takes you to the navigation menu between tabs.
- To go to the history menu, click on the clock icon.

- Click on the history menu to open a list of visited pages. Note! You can selectively clear your history. At the same time, visited sites are deleted and the rest remain unchanged. It makes sense to use this in the case when you need to delete individual visits while preserving the remaining data.

Sometimes it's more rational to completely cleanse history of online activity. To do this, follow these steps:
- Click on the icon with three vertical dots. Some devices do not have this icon. In this case, touch contextual button“Menu” located at the bottom of the screen of a smartphone or tablet.

- In the menu that opens, tap on the “Settings” item. The browser will take you to new screen, which contains controls for the capabilities of the Yandex browser. We do not recommend changing the settings on this screen, except for those that we will talk about later, if you do not understand their purpose.
- Go to the section called "Privacy".

- Make sure that the “History” function is turned on on the page that opens. Note! If you want the browser to not save information about your actions in the future, disable this feature after cleansing data. It is important to understand that this will not provide anonymity - the search engine will still collect information about you and transfer it to the cloud service.
- If you want to delete only your browser history, check the box next to “History” only. In most cases, it is worth completely getting rid of the information by checking the boxes next to each of the items offered by the browser.
- Click on the “Clear data” button and confirm the action in the dialog box that opens.

You can verify that the history data has been successfully deleted by going to the “History” menu according to the instructions above. If everything was done correctly, the menu will not contain data about visited sites.
Now let's figure out how to remove global history your online activities.
Global clearing of search history using Yandex settings
As is the case with the Yandex browser, your Internet surfing history can be deleted partially (for a separate period of time) or completely (from the beginning of the account’s existence). The data will become inaccessible to you and other people who potentially have access to the Android device or personal computer, where Yandex or another browser is installed, with which you are logged into the system. At the same time, the search engine will still have access to them, since it is on their basis that the search tips and other activities of Yandex.
To delete data, proceed as follows:
- Make sure you are logged in to the account from which you want to delete the activity history. To do this, go to any page of Yandex services and check which user is shown there.
- Go to the page that is the main page for working with history in Yandex at yandex.ru.
- At the top right corner there is a “Settings” button.

- Click on it and go to the “Portal Settings” sub-item.

Build a route in Yandex.Navigator completely hands-free. To turn on voice control application, say “Listen, Yandex!” When the “Speak!” prompt appears, say the right command. To confirm the constructed route, simply tell the Navigator “Let's go.” If you saw an accident on the road and want to warn your fellow travelers about it, just tell the navigator “Listen, Yandex! -> accident in the right lane" and it will automatically add a mark to the traffic map.
Parking
Park so that you don’t have to look for your car in the impound lot! At the end of each trip, the navigator automatically offers a quick route (no longer than 15 minutes) with a tour of the nearest parking spaces. In this case, the parking place will be within walking distance to the destination of your trip, and if parking is paid, the application will inform you about this separately. Allowed parking spaces will be marked in blue, and prohibited parking spaces will be marked in red. You can study this map of parking areas for the area you are traveling to before leaving home.
Look in the app for seats that have become available within the last 5 minutes. An empty parking space appears as a green circle. If you click on the dot, you will find out how long ago the car left this place. Of course, the presence of a mark on the map does not yet give a 100% guarantee that no one has taken this place yet. But the chances of parking there are definitely much higher!
Browse button
Save time! In order not to distract the driver from the road every minute, Yandex.Navigator suggests changing the route only if the estimated time savings is more than 5 minutes. Especially for those who don’t want to waste a minute in the panel quick access The navigator has a “Browse” button. With its help, the driver can check at any moment whether there is a route 2-3 minutes faster than the current one.
My trips
Keep statistics! For those who write down every detail of the biography of their car or simply want to remember which route they took to quickly get to their dacha last summer best friend, in the Navigator settings there is a section “My trips”. You can find out details about each trip: the exact route, travel time and average speed. Summary statistics are also available - by week and by month.
Entrances
Drive straight to the treasured doors! Recently, Yandex.Navigator learned to navigate to the house from the entrances. The company collects information about them through the People's Card. There are only a few of them for now, but you can add your own and your friends will easily find their way to you. To drive directly to the desired entrance, enter its number in the search bar after the main address, for example: st. Lesnaya, 5, p. 2.
Roadside assistance
Don't get confused if something goes wrong! Now you can call for roadside assistance without leaving the Navigator. You can submit a request in the application settings. All you need to do is indicate the make and model of the car, tell us where it is located and what kind of help you need. You can, for example, call a tow truck, which will deliver the car to to the right address, or a mechanic who will change a tire, start the car, or even bring a can of gasoline. Within 15 minutes, the application will send offers from several services that are ready to accept your order. They are selected based on rating, price and distance from the car. All you have to do is choose a service and wait for specialists.
Intermediate waypoint
Change your route whenever you want! If on the way to your destination you remember that you need to stop, for example, at a pharmacy or you just want to drive along Vozdvizhenka and admire Morozov’s mansion, you can ask the Navigator to rebuild the route through desired point. To do this, go to the “Browse” section, find the blue “plus” icon on the map and drag it to the intermediate point that you need to capture along the way.
Background mode
Don't get lost if you get distracted (or better yet, don't get distracted!). The navigator, it turns out, can work in background. Oksana, Dima and other favorite characters will not abandon you, even if you minimize the application to check your mail or take an important call: the application will continue to guide you along the route and give voice prompts.
Moreover, camera prompts and warnings will be heard even if you turn off your phone screen. This may be necessary, for example, to save battery on your phone if you don’t have a charger at hand.
Speed warnings
Configure speeding notifications in a way that suits you personally! In the application settings, you can set an overspeed threshold (from 1 to 60 km/h), after which the Navigator will warn about cameras. For example, if you set the permissible excess to “19” and drive on a road with a limit of 60 km/h, the application will respond to cameras only after the “79” mark on the speedometer.
From desktop to phone in one click
Bonus. Is navigation possible without the Internet?
If you are worried that you will run out of internet during your trip, you can download maps of the area in advance. Of course, to build a route you will need access to the Internet. But, as Yandex told us in confidence, the company is already preparing completely offline routing.
Nowadays, almost no motorist can do without a navigator. With its help, you can not only pave the road from point A to point B, but also, thanks to the traffic jam indicator, pave the most fast way. But sometimes it becomes necessary to clear the navigator’s memory of old addresses or even erase everything that is in it. It is how to clear the navigator that will be discussed further. To do this you need to turn it on. Then enter the main menu and find the list of addresses. Most likely, somewhere there will be an item “functions” and “clear list”. You can also completely format the navigator's memory when changing software.
Sometimes you need to download some information from the navigator to the computer and vice versa. And then we'll tell you how to synchronize your navigator. To do this, first of all you will need USB cord, which should be supplied with the kit. In addition to the cord, you must install a special software on computer. It should also come with the device, or you can download it from the company’s official website. When the software is installed and the cord is connected, you can synchronize the devices with one click, and then perform the necessary actions.
If you need to find out the version of the navigator, below is described how to find out the version of the navigator. To do this you need to remove back cover device and battery, if possible. The version of this device will be written under it. Most often, the version is written directly on the case on the front side. Below we will describe how to make a navigator from a tablet.
This will require Tablet PC and software, that is, maps. In order to use your tablet as a navigator, you need to download and install maps on it. Navitel, Yandex and Google maps are perfect for this. After installing the software, it can be used as a regular navigator, but with a number of additional functions. And then for beginners we will tell you how to indicate the path in the navigator.
To plot a route, a person only needs to indicate the arrival point, after which the navigator will independently calculate and plot best option ways. In addition, you can save frequently used routes so as not to waste time planning a route in the future. These routes will be available in the saved menu and can be launched by clicking on them. This could be the way home, to work, to your parents or to kindergarten. Such saving will be useful for maps that are able to see traffic jams and congestions on the roads and are able to lay a new route into the area of congestion to old route points.
The functionality of the GPS receiver allows you to perform any actions to adjust the route of interest: develop it yourself, taking into account personal preferences, change the trajectory, and also delete both individual parts of the route and the entire route. Deleting an already completed or irrelevant route from the GPS navigator's memory frees up space for new data without visually overloading the route selection menu.
For a correct partial change or complete removal route from a GPS receiver, you need to be well versed in the functionality of the device. The main source of knowledge about any navigator model is the instructions that come with it.
You can change the coordinates of a waypoint if you go to the “Waypoint Manager” from the main interface of the navigator. The function of changing waypoints in the GPS navigator is available if at least one waypoint has been created. In the manager, select the point whose data you want to change. Enter new information. Check that the entered coordinates are correct and that the desired waypoint corresponds. Confirm the action of changing the data by clicking the “Finish” button.

To delete an individual waypoint, select the planned waypoint in the Waypoint Manager. Click the delete button, and then confirm the delete action. The GPS navigator has the ability to delete a group of waypoints at once. To do this, select “Settings” in the main menu, then “Reset” and “Delete all waypoints” in the menu that opens. Confirm the deletion action.

You can delete or change not only waypoints, but also the entire route at once. The action of deleting a route is carried out in the “Route Planner”, the button of which is located in the main menu of the GPS navigator. You need to select a route and click the “Delete route” button. If you need to delete all routes, then you should carry out the exact sequence of actions: “Main menu” – “Settings” – “Reset” – “Delete all routes” – “Yes”.

