How to set up a TP-Link Archer C9 router: step-by-step instructions. Accelerated setup of Tp-Link Archer C7 ac1750
!
The Internet and all kinds of online services have long become an integral part of our lives, and if, at the dawn of the active consumption of gigabytes of traffic, the main platform for immersion in world wide web there was a stationary PC “tied” to a wire from the provider, but now these are mainly mobile devices such as laptops, tablets and mobile phones. No matter how hard we try mobile operators communications, wired technologies still provide the fastest and most stable connections to an apartment or office, but then everything depends on what the buyer chooses Wi-Fi router, whose task is to ensure the connection of wireless client devices to the existing wired connection. The choice of router must be approached very carefully, because, to a large extent, the stable and fast connection indoor devices and wireless network coverage. It is very important to choose a device that combines ease of setup and stable, continuous operation at high speeds, while also providing side on-network services such as video broadcasting to smart TV and public access to files and printers. In this review we'll talk about the wireless router TP-LINKArcher C20, opening the line Archer modern high-speed dual-band WiFi routers with speed support 802.11ac, produced by the company TP-LINK.
In the assortment of the line Archer, home high-speed wireless routers company TP-LINK, on this moment 4 massively and actively selling models with operating speeds WiFi modules from 750 Mbit/s to 1750 Mbit/s. Naturally, the indicated speeds are theoretical technical maximums under ideal conditions with simultaneous operation in two ranges according to the standard IEEE 802.11ac. The youngest model Archer C20 is a router with a built-in switch with 100 Mbit/s ports and wireless module operating at speeds up to 433 Mbit/s (5 GHz) + 300 Mbit/s (2.4 GHz). His target buyers- users whose Internet provider provides a channel within 100 Mbit, but at the same time there are several high-speed wireless devices (for example, computers and NAS) between which is needed fast exchange large volumes data. Subject to use tariff plans implying an Internet connection above 100 Mbit or the presence of gigabit wired Ethernet devices inside home network, you need to look at models from Archer C2 and more powerful.

Packaging and equipment
Router Archer C20 supplied in a box measuring 285 x 220 x 90 mm, decorated in the traditional style TP-LINK combinations of white and light green colors with a mandatory illustration of the appearance of the device. TP-LINK traditionally not only lists the main characteristics and key functions devices, but also leads comparison table the main differences between all devices in the line Archer. Unlike many well-known competitors that produce universal multilingual packaging, on which the inscriptions on clear language can only be found somewhere in a distant corner, all description Archer C20 completely localized into Russian. Table comparative characteristics is divided into two parts and contains not only dry technical specifications, but also terms that are understandable to ordinary people.


For those who want to familiarize themselves with the description of the device in more detail in a special section of the official website, on one of the side faces there is a QR code with a link to the product page.

Under the outer glossy packaging there is a tray made of recycled cardboard, which houses the router itself and some simple accessories for it, in particular, a short 220 V power supply Ethernet cable, CD with software, quick setup guide, warranty card and promotional booklet.

Complete patch cord 1.1 m long, made of eight-core twisted pair with PVC insulation white and crimped at both ends according to the “straight” scheme ( EIA/TIA 568B). The Quick Setup Guide, well illustrated and in clear Russian language, describes the process of initial configuration through three main setup interfaces: application on the bundled CD, web-interface and mobile app Tether.
Specifications
- Model: TP-LINK Archer C20 (AC750)
- Hardware revision: V1
- Type: wireless router
- Supported network standards: IEEE 802.11ac/n/a, IEEE 802.11n/g/b
- Data transfer rate: up to 733 Mbps: up to 433 Mbps on 5 GHz and up to 300 Mbps on 2.4 GHz
- Antennas: 2 pcs., non-removable, dual-band, omnidirectional
- Frequency range: 2400-2483.5 MHz, 5150-5350 MHz, 5650-5725 MHz
- Safety: Protection against DoS attacks, firewall SPI, IP/MAC address filtering, domain name, binding by IP and MAC address
- Encryption modes: 64/128-bit WEP,WPA / WPA2,WPA-PSK/ WPA2-PSK
- VPN support: PPTP, L2TP, IPSec
- Connection types: Dynamic IP/Static IP/PPPoE/PPTP (Dual Access)/L2TP (Dual Access)/BigPond
- Protocols: IPv4 and IPv6
- Ports: 4 LAN ports 10/100 Mbps, 1 WAN port 10/100 Mbps, 1 USB 2.0 port
- Dimensions: 285 x 223 x 91 mm
- Options environment: Working temperature: from 0 to 40 degrees Celsius, air humidity during operation: 10% - 90%, without condensation.
Appearance and controls

The design of the case is made in a very interesting shape, from a distance a little reminiscent of a dark pebble, the top surface of which is textured glossy plastic with imitation of cutting precious stones, and is similar to the design of competitors - routers ASUS. Overall, the router's glossy, impressive surface TP-LINK Archer C20 It looks great, plays with edges in the light from different angles and undoubtedly attracts attention, just like fingerprints and dust.


The lower half and antenna housing of the device are made of matte plastic gray. On the bottom and side beveled edges there is a large number of ventilation holes for passive cooling router.


There are no holes for wall mounting; only a horizontal arrangement of the case is provided on four protrusions-legs at the bottom. The weight of the device is small, one might say almost weightless, and the fit of parts is at a high level.

All ports and buttons are located on the back wall of the device (from left to right):
- Button WPS/reset- to turn on WPS and resetting the device
- Button Wireless On/Off- to turn the wireless module on and off
- WAN port, 1 pc. (blue) - for connection Ethernet cable from the provider
- LAN ports, 4 pcs. (orange) - for connecting local network devices Ethernet cable
- USB 2.0 port - for flash connections drives, USB modems and printers
- Button Power On/Off- to turn the device on and off
- Connector for connecting a power supply.

In the vertical plane, the deflection angle is 90 degrees, with intermediate fixation at an angle of 45 degrees, left-right tilt angle is 180 degrees with limited extreme positions.

First start
U wireless router TP-Link Archer C20 There is a separate switch on the back wall, next to one of the antennas.
Direct power is provided by the external unit of the model T120100-2C1 working in networks alternating current with a voltage of 100-240 V 50/60 Hz and a consumption of about 0.3 A, output 12 V, 1 A.

The initial setup of the router can be done in several ways:
- Using the program on the included CD-disk.
- Via the router's built-in Web interface.
- Via the app for mobile devices Tether.

Before you begin setting up any of these methods, you need to prepare the data required for connection and issued by your Internet provider, in particular you will need:
- type WAN connections
- username (if available)
- password (if available)
- server and authentication domain (if available).
Setup program
On CD On the disk that comes with the kit, the manufacturer includes documentation for the router and two utilities: Master quick setup And Settings USB printer . Using the first one, you can literally set up in just a few minutes, following the prompts that appear on the screen Archer C20 to work. The wizard will step by step offer you to connect the cables to the device, turn on its power, select an Internet provider from the list and specify authorization data for the connection, set names and passwords wireless networks in both ranges, after which it will download specified settings into the memory of the wireless router.

Using the program USB setup printer can be arranged network access to the printer by connecting it to the port USB wireless router. For his further use You will need to use this utility on each computer from which you need to access the printer.

WEB interface
The second configuration method is more universal and gives access to all detailed parameters. Web interface, traditional for routers TP-LINK, available at , you can also access it via the link http://tplinkwifi.net using factory admin credentials - username admin and password admin(it is recommended to change it immediately after the first login).

Web interface Archer C20 looks familiar to routers TP-LINK a design that has been used by the company for many years in a row without significant visual changes. You can't call him very friendly ordinary users, nevertheless, the parameters are well structured and, most importantly, translated into Russian, including background information, displayed on the right side of the window. If you have previously had experience setting up another device from TP-LINK, then the setting Archer C20 It will pass quickly and as usual.

Before setting up your router, it is recommended to update the firmware software before latest version, which will allow you to avoid shortcomings that have already been corrected since the device first went on sale. To do this, on the official page, in the corresponding section, you need to download the image file with the “firmware” and load it into the router’s memory using the section System Tools - Firmware update.

Important! Company TP-LINK quite often updates not only the firmware, but also the hardware of the models, under the same name Archer C20 There may be several modifications that differ in the component base; they are usually marked V1, V2 and so on, you can find out which one you have by looking at the exact model on the sticker on the bottom of the device. Firmware for different hardware versions are incompatible with each other, so it is very important to download it for your device revision. At the time of publication of the review for the tested model Archer C20 V1 software version was available 0.9.1 2.1 v0044.0 Build 160318 Rel.46541n.
After the update, you can start setting up. By the way, the web interface also has a section Quick Setup Wizards , with step-by-step user tips.

Let's briefly go through the key "manual" settings...
In parameters WAN(directly wired connection to the Internet), you can set one of the following connection types:
- static IP
- dynamic IP
- PPPoE
- L2TP
- PPTP
- BigPond

If your Internet provider is configured to bind to a physical address network interface (MAC address) of the client, you can replace the one visible to the provider MAC to the desired one (usually this is the address network adapter the computer from which the connection was previously made).

Support IGMP Proxy versions 2 and 3 required for the service to work IPTV from providers, present.

Because TP-LINK Archer C20 supports dual-band operation WiFi- 2.4 GHz and 5 GHz, in the settings you can both enable/disable each of them, and configure each in detail separately. The transmitter power is within the officially permitted 100 mW, in order to reduce interference to other networks or reduce the coverage radius, in additional settings each of the wireless bands, you can reduce it. Filtration MAC addresses implemented separately for each range.


You can also configure limited speed and operating time Guest network.

If it is necessary to introduce restrictions on Internet speed or block a certain URL For individual devices, present Control bandwidth And Parental control.


Available USB the port can be used for organizing backup connection through 3G/4G modem. Operators supported mobile communications: Beeline, Megaphone, MTS, SKYLINK, TELE2, YOTA. List of compatible models USB modems for our country can be viewed at >link< .

To organize file sharing via network folders, DLNA or FTP server, can be connected to USB port of a removable storage device and configure access to it.


There is also support DDNS services provided by the sites DynDNS, No-IP, iComeexe.

Note : These are not all the parameters that can be changed via the web interface; if you want to familiarize yourself with the device’s firmware capabilities in more detail and study the available settings, I recommend using online- device emulator, available on the official page for .
Tether mobile app
The third way to configure a wireless router TP-Link Archer C20- branded mobile application Tether, available for the two most common platforms - Android And Apple iOS. The application is easy to find in PlayMarket or AppStore by name, it's free and only takes up about 3.5 MB.


After logging into the application, a map of devices connected to the router is displayed. After clicking the Manage button, the settings sections for Wireless modules, guest network, parental controls and Internet connection appear.


Using the application left a pleasant impression; the interface is intuitive and friendly, and key parameters are available for quick configuration through it.
Operation speed
Note:
testing wireless adapters at home does not ensure repeatable results, even when absolutely identical devices are reused. This is due both to the different congestion of the radio airwaves by neighboring Wi-Fi networks, and is also strongly tied to the testing location, in particular the configuration of walls and obstacles.
Testing of equipment within the framework of this article was carried out in an apartment of a multi-storey panel building, with the 2.4 GHz band heavily loaded by neighboring networks and the free 5 GHz band. You can roughly estimate the environment in which the testing was carried out using the program's readings Insider And Wi-Fi Analyzer.


The signal level provided at different points of the room in which testing was carried out was as follows.

The average three-room apartment is within 80-100 square meters, even with “difficult” WiFi equipment with obstacles in the form of reinforced concrete walls, the router is able to fully provide a stable and fast wireless network, provided that a good location is chosen.
To test your wireless router TP-LINK Archer C20 in conditions similar to most home applications, the following were used: a stationary PC with 802.11n (2.4 GHz) USB adapter TP-Link WN-822N, laptop with 802.11ac (5 GHz) USB adapter TP-LINK Archer T4U. Testing the data transfer speed over the network was carried out at a distance of about 2 m from the router to WiFi clients. We tested the transmission speed between computers over a wireless channel, through a wired connection to the built-in switch (LAN ports), between LAN and a wireless connection, and the speed of working with a real network of one of the Internet providers using PPPoE technology. The results are summarized in one diagram.

The router's performance is sufficient to provide a connection at the maximum speed limit of the built-in 100 Mbit LAN And WAN ports. Over a wireless channel, the speed is no worse than wired connections and during testing was limited by the capabilities of the devices used. USB WiFi adapters. By the way, home use by the whole family, in which smart- the TV was used to watch videos from YouTube, with parallel surfing the Internet with Android smartphone, tablet Apple iPad and playing an online game on a desktop PC, it was possible for the router.
Speed testing TP-LINKArcher C20 With USB 3.0 flash drive SanDisk Extreme 64 GB connected to the built-in USB 2.0 router port was carried out in two modes:
- wired connection to a PC via a gigabit network card based Qualcomm Atheros AR8161
- WiFi connection in mode 802.11n at displayed speed of 300 Mbps via adapter TP-Link WN-822N.

Based on the test results, we can say that to work as a kind of analogue NAS The router is not designed at all; working with storage media is quite slow for a modern device. Port USB more useful for organizing a backup connection via 3G/4G modem or as a print server than for sharing video, since despite the read speed sufficient for playing HD content, writing is very slow, and with current tariff plans, copying files to a flash drive over the network may take time more than browsing directly from the Internet.
Conclusion
During tests Archer C20 showed a good balance between the performance of the hardware component (in terms of the operation of network modules) and stability of operation. It seamlessly ensures the operation of wired 100 Mbit connections to the Internet, using any supported connection types. The wireless part also provides a good coverage range and high speed due to support of the standard 802.11ac. Support for operation in the 5 GHz frequency range is today an extremely necessary option in urban environments, since at 2.4 GHz the radio air is simply overcrowded with neighboring WiFi networks. Even under maximum load, the router does not overheat and operates stably without failures or freezes. The disadvantages of the model include the lack of built-in torrent client on factory firmware and low speed of work with USB carriers of information.To summarize, we can write that a wireless router TP-LINK Archer C20- a good solution for home, for those users whose Internet connection is at a speed below 100 Mbit/s and who do not require the wide functionality of the built-in software of expensive models and gigabit wired LAN ports, but at the same time, you need a stable network device with an affordable price, which you set up once and forget about its existence.

Pros:
- stable work
- good coverage radius
- operation in two bands (2.4 GHz and 5 GHz)
- universal USB port (for flash drives / 3G/4G modems / printers)
- IPTV support
- nice design.
- non-removable antennas
- low writing speed on USB storage media
- lack of a torrent client in the device firmware.
The TP-Link Archer C9 router is a dual-band wifi router with four Gigabit Ethernet ports (and one Internet port), supporting Beamforming signal coverage technology and a total throughput of 1.9 Gb/s.
The average cost of this model is 8,500 rubles, but for this price the company offers very solid technical characteristics.
Technical characteristics of the TP-Link Archer C9 router

 The scope of application of the model is extensive - from building a stable, resource-intensive home network to an average corporate local area network.
In addition, it is worth noting that the router has already earned more than one award: the latter dated back to 2016 from the Russian resources “PC World” as “Best Product of 2016” and “PC Magazine” in the category “Best Router in the Network Equipment for Home and Small Category” office."
Brief review of the TP-Link Archer C9 router
The Acrher C9 router is made in a pleasant white color and is equipped with three removable antennas in the body color that support the aforementioned “Beamforming” technology, the operating principle of which is based on identifying connected devices and amplifying the signal strictly in their direction.
There are eight indicators on the front panel of the case:
- "POWER";
- "2.4 GHz Wireless";
- "5 GHz Wireless";
- "Ethernet";
- "Internet";
- "WPS";
- 2 "USB" 2.0 and 0
Accordingly, on the rear panel there are ports and connectors:

- USB 0 port
- combined “RESET/WPS” button
- Internet port
- four Ethernet ports
- ON/OFF button
- connector for power supply.
On the right side of the case there is a “WiFi” button and a “USB 3.0” port.

Setting up an Internet connection on the TP-Link Archer C9 router
First of all, from which the router will be configured. To access the web interface, use the address “http://tplinkwifi.net”, which should be entered in the address bar of your Internet browser.
To set up your Internet connection correctly, prepare the documentation provided by your provider (which contains information about the parameters required to gain Internet access).
Like all modern representatives, the web interface of the Archer C9 model is made in white and blue colors and is divided into 3 main tabs:
1 "Quick Setup"


3 “Advanced” - this tab is worth taking a closer look at.
To create a new connection, open the “Network” menu, then “Internet”. Here you need to select the type of connection (according to your agreement with the provider). There are 6 options to choose from:
"PPTP" or "L2TP"


Select the type of secondary connection: when you select “statistical”, the lines will become active where you should specify the requested addresses.

Select “Connection Mode” as desired.
"PPPoE"

Setting up the router is carried out by analogy with the previous type of Internet connection.

"BigPond Cable"

- fill in the username and password;
- specify the server address of the authentication domain and its domain.
"Statistical IP"

Here you only need to specify the addresses and subnet mask.
"Dynamic IP"

There is no need to change anything here.
How to set up WiFi?
To set up a wireless network on the TP-Link Archer C9 router, go to the “Wireless Settings” section. A window will open with a set of the most basic parameters of the access point, so configuration will not take much time.
So, first, select in which range the created access point will operate: “2.4 GHz” or “5 GHz”.

In the “Protection” line, select the authentication type; there are 3 groups to choose from:
- “Personal” - it includes “WPA-PSK” and “WPA2-PSK”. Select an encryption method and specify a password that will be prompted for entry.
- “Enterprise” - you need to specify the address and password of the “Radius” authentication server.
- “WEP” - select “Type” - “Open System” or “Key”, “Format” and “Key Type”, and enter the password in the “WEP Key” line.
Select “Mode”: for “2.4 GHz” it is better to select “802.11 b/g/n mixed”, and for “5 GHz” the “802.11ac” standard will be available.
“Channel Power” and “Channel” - “Auto”.
Setting up IPTV
To configure IPTV, go to the section of the same name in the “Network” menu/

Check the “Enable IPTV” box. In the list of ports, select one to which the television will be connected.
Additional features of the TP-Link Archer C9 router: setting up a VPN server
The Archer C9 router supports “VPN server”.
To begin, select which protocol will be used: “Open VPN” or “PPTP”.
Depending on the selected protocol, you will need to set the following settings:
"Open VPN"

- select “Service Type” - “UPD” or “TCP”;
- specify the values for “Service Port”, “Subnet/Subnet Mask”, select a type for the “Client Access” line and click “Save”.
"PPTP"

- specify the “client IP address”;
- check all the boxes in the “Advanced settings” block;
- and add a user account with login and password.
For those who are bothered by the blinking of the router indicators at night, in the “System Tools” menu there is a section “LED indicator”, in which you can configure the indicator backlight to automatically turn off at a certain period of time.

This function is called “Night mode” - you just need to check the box and select the time range for turning off the backlight.
Now the setup of TP-LINK Archer C7 with two bands will begin. After you have purchased this router, you need to connect it to your PC and configure it, for this we will move on to the next step.
The Tp-Link AC1750 Archer C7 router is an excellent router for home use, apartment or office. When you want to connect many different devices, enjoy playing games or watching videos and not worry that the Internet will be cut off, network speed will drop and other troubles.
If you are going to configure your device via a wireless Wi-Fi network from a smartphone or tablet, we recommend using the TP-LINK Tether application. The box includes a disk with a program for setting up the Tp-Link Archer C7 router.
Connecting the TP-LINK Archer C7 router
First of all, connect the power adapter to the power supply, connect the Internet cable to the blue WAN connector, and using the cable that comes with the router, connect the router to the PC. Everything will come out roughly in this order:

We connect power to the Tp-Link AC1750 Archer C7 router and from the PC to which you connected the router, enter the router settings control panel. The router can also be connected via a wireless network.

All factory data is located on the back of your device, login and password to enter the router control panel there.

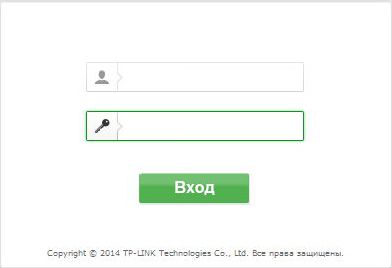
Open your browser and write in the search bar tplinklogin.net or 192.168.0.1. Enter the factory username and password " admin". If you cannot access the address or, there are separate articles where you will learn how to fix these problems. The router options control panel will open, where you can configure all the necessary parameters.
Setting up a wireless router TP-LINK Archer C7
The main thing that needs to be done is to configure the Internet, Wi-Fi, and set a security password. You can configure these parameters in several tabs in the options of the Tp-Link AC1750 Archer C7 router, or you can use the “Quick Setup Wizard”.

In the left panel, switch to the " tab Quick setup", and press the button " Further".
Attentively! If a window with Wi-Fi settings appears, it means that the Internet is connected automatically (you probably have a “Dynamic IP” connection type). Scroll down the page and continue setting up your wireless network.

You will probably also have to specify parameters to connect to the provider. The first method is to mark your country of residence, your region and Internet provider. On earlier firmware this parameter may not be available. If you can't find your Internet provider, check the box " I didn't find any suitable settings" and click " Further".
Check the type of connection that your provider uses ( Dynamic IP, Static IP, PPPoE, L2TP, PPTP). If you don’t understand what parameters to set, you can more accurately determine the connection characteristics from your provider, or find information on its official website, as well as in the connection contract. The necessary information for connection is also indicated there: username, password (if necessary).
In the case of "Dynamic IP" everything is much simpler - you need to determine whether there is a binding by MAC address or not. If there is a link, then clone MAC address from a PC, if not, then the Internet should already be working.

Let's look at an example of connection " PPPoE". Click " Further" and move on to another stage of setting up the Tp-Link Archer C7 router.

A window will appear in which you need to write your username and password (these are provided by your provider). And if you have L2TP, or PPTP, then you must also specify the server. Click "Next". If everything is correct, a window with Wi-Fi network options will appear. Or rather, a window where you need to select the frequency at which you want to transmit the wireless network. It is allowed to mark only the item 2.4 hertz, or 5 hertz.

There is an option to use both ranges simultaneously. Check the appropriate box and click "Next". We selected "Immediately 2.4 hertz and 5 hertz (802.11a/b/g/n/ac)". This means that the router will broadcast 2 Wi-Fi networks at different frequencies.

Then a window will pop up, where you need to specify a name for the wireless network, select your own region, and specify a password to connect to Wi-Fi. If you have checked the items " 2.4 hertz and 5 hertz", then 2 windows will appear, for each frequency separately.

Here we configure Wi-Fi at a frequency of 5 hertz.

We see a window informing us that the setup process is complete, and the Internet is working. The setup of Tp-Link Archer C7 was successful, now click on the “Reboot” button. The Internet should now work. We changed the Wi-Fi name and set a security password. This completes the setup process. We also recommend changing the factory password admin, used to protect the options of the Tp-Link Archer C7 ac1750 router.
How to configure Tp-Link Archer C7 at 5 hertz
Since this is a dual-band device, it has the ability to transmit 2 Wi-Fi networks on both frequencies: 2.4 GHz and 5 GHz. If at the stage of setting up the Tp-Link AC1750 Archer C7 router, for example, you connected only 1 frequency, but you need 2, or vice versa, then all this can be changed in the router options control panel. In addition, it is separately allowed to change the name and password for a separate network (at each frequency).

In the settings panel, find the " Selecting operating frequency". There you are allowed to specify the frequency at which the router will transmit the wireless network.

Then, we switch to the tab with the options for the Wi-Fi network that suits us. For example, on "". There you can see or change the necessary characteristics. Everything is elementary and clear.
We have shown the main options that need to be set for the router to function properly. However, there are sometimes many different options that you may need. For example: setting up IPTV, FTP server, guest network, etc.
Authorization
In order to get to the router’s web interface, you need to open your Internet browser and type 192. 168.1.1 in the address bar, Username - admin, Password – admin(provided that the router has factory settings and its IP has not changed).
Changing the factory password
To ensure that no one but you can enter the router settings, you need to change the password to enter the settings.
To do this, select from the menu on the left System Tools(System Tools) – Password(Password) and enter the settings:
- Old User Name: old username, enter admin
- Old Password: old password, enter admin
- New User Name: enter a new username, you can leave admin
- New Password: enter a new password
- Confirm New Password: confirm the new password

Setting up an Internet connection
In the router interface, you need to go to the tab Network(Net ) , menu WAN(Here you can add, edit and delete connections).

Setting up a PPPoE connection
- In the WAN connection type field ( WAN Connection Type): select PPPoE/Russia PPPoE
- User Name
- Password(Password) and Confirm Password(Password Confirmation): Your password as agreed.
- Secondary Connection(Auxiliary connection): Disabled(Disabled)
- WAN Connection Mode(WAN connection mode): Connect Automatically(Automatic connection)
- Save .

Setting up an L2TP connection
- WAN Connection Type(Type WAN connections): select L2TP/Russia L2TP
- User Name(Username): your login according to the agreement
- Password Confirm Password)
- We put a point on Dynamic IP
- Server IP Address/Name- server address or name (specified in the contract)
- MTU size- change the value to 1450 or less
- WAN connection mode - Connect Automatically(connect automatically)
- After entering the above settings, click Save

Configuring PPtP (VPN) while automatically obtaining a local IP address (DHCP)
- In the WAN connection type field ( WAN Connection Type): select PPTP/Russia PPTP
- User Name(Username): your login according to the agreement
- Password(Password): your password according to the agreement. In some firmware, just below it asks you to confirm the password ( Confirm Password)
- Choose Dinamic IP address(Dynamic IP address)
- In field Server IP Address/Name We put the address specified in your contract
- WAN Connection Mode(WAN connection mode): Connect Automatically(Automatic connection)
- After entering the above settings, click Save(Save). Internet is set up

Setting up PPtP (VPN) with a static local IP address
- In the WAN connection type field ( WAN Connection Type): select PPTP/Russia PPTP
- User Name(Username): your login according to the agreement
- Password(Password): your password according to the agreement. In some firmware, just below it asks you to confirm the password ( Confirm Password)
- Choose Static IP address(Static IP address)
- In the fields Server IP Address/Name, IP Address, Subnet Mask, Gateway Enter the data from the contract. In field DNS you can enter DNS your provider's address
- WAN Connection Mode(WAN connection mode): Connect Automatically(Automatic connection)
- After entering the above settings, click Save(Save). Internet is set up

NAT when automatically obtaining an IP address (DHCP)
- In the WAN connection type field ( WAN Connection Type): select Dynamic IP(Dynamic IP)
- Click Save(Save). Internet is set up

Setting up Wi-Fi on the router
Works in two frequency ranges simultaneously, maximum data transfer speeds up to 1300 Mbit/s at 5 GHz and 450 Mbit/s at 2.4 GHz. Total throughput up to 1.75 Gbps.
First we turn on both networks (or we can turn on only one). Let's go to Dual Band Selection and put a tick on Concurrently with 2.4GHz and 5GHz.

There are two tabs in the side menu - Wireless 2.4GH z and Wireless 5GHz. We configure both networks. The names of the set should be different.
Wireless 2.4GHz
- Wireless Network Name -
- Region
- Mode(Standard) : 11bgn mixed
- Next, click Save

Wireless 5GHz
- Wireless Network Name - the name of your wireless network
- Region(Region): You can choose Russia, or you can choose nothing. It's not critical. 3. Mode(Standard) : 11bgn mixed
- Next, click Save

We configure Wi-Fi encryption for each network. The passwords may be the same. In the side menu go to Wireless Security(Wireless Protection):
- Selecting the encryption type WPA-PSK/WPA2-PSK
- PSK Password(PSK password): enter the password for the Wi-Fi network. The password must not be less than 8 characters
- Click the button below Save(Save). After saving the settings, you will be prompted to reboot the router, ignore this requirement (red text below)

Port forwarding/forwarding
This feature automatically redirects requests for specific services from
Internet to the corresponding host on your local network, located behind the internetwork
router screen. You should use this function if you want
create a server on the local network behind the router’s firewall (for example,
Web server or mail server). Let's go to forwarding, press Add New.

IP address- network address of the device to which the request will be redirected Service Port- port number that needs to be opened Protocol- Select the required protocol Status- Enable Click Save.

Before we start setting up the router, let's check the local network connection settings. For this:
Windows 7
Click on " Start", "Control Panel".
Then click on " View network status and tasks".


LAN connectionProperty".
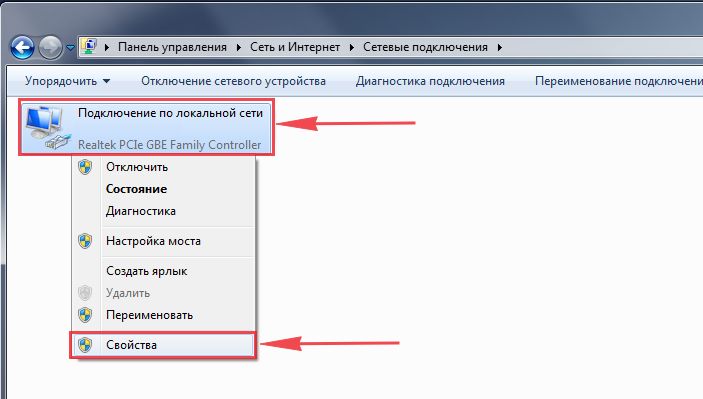
Then select from the list " Internet Protocol Version 4 (TCP/IPv4)" and press " Property".

" and "", then press the " button Ok".

Windows 10
Click on " Start", "Options".

Then click on " Network and Internet".


In the window that opens we see " Ethernet". Right-click on it and select " Property".

Then select from the list " IP version 4 (TCP/IPv4)" and press " Property".

In the window that opens, you need to check the box " Obtain an IP address automatically" And " Obtain DNS server address automatically", then press the button " Ok".

Connecting the TP-Link Archer C7 AC1750 router to a computer
The next step is to connect the router TP-Link Archer C7 AC1750 to your Laptop or Personal Computer (PC). To do this, you need to connect the cable that your provider provided to you to the blue port of the router (that is, this is the cable that goes to your apartment, house, office, etc. from outside), and the cable that came with router, one end into one of the four ports, which are marked in yellow on the router, and connect the other end to your laptop or PC. And yes, don't forget to connect the power cable.

Authorization of the TP-Link Archer C7 AC1750 router
So, we have connected the router, now you need to access its web interface through any browser (be it Google Chrome, Mozilla Firefox, Internet Explorer, etc.). To do this, open the browser and enter the router address in the address bar: 192.168.0.1 and press the button " Enter" on your keyboard.
- Username - admin
- Password - admin
So, enter the data and press " Login"

Setting up the Tp-Link Archer C7 AC1750 router
And finally we got to the router’s Web interface and now you need to configure the equipment. First of all, let's secure the wireless network by setting a password for wi-fi. Then you will need to find out what type of connection is used to access the Internet, is it PPTP, L2TP or PPPOE. You can find out by calling your provider (this is the organization with which you entered into an agreement to provide Internet services). So, let's start setting up the router.
Setting a password for wi-fi
The Tp-Link Archer C7 AC1750 router is dual-band, which means that the router supports 2 operating frequencies for wireless connections, 2.4 GHz and 5 GHz. 5 GHz allows for higher throughput, but has a shorter range than 2.4 GHz; 2.4 GHz is more susceptible to interference. 5 GHz is not supported by all devices. Therefore, which frequency to choose is up to you. You can select both, and depending on the circumstances, change the wireless connection on your devices. In our example, we will consider exactly this option, when 2 frequencies are operating.
So, on the Web interface, go to the menu in the "tab" Selecting operating frequency" and put a checkmark next to the frequency that is more suitable for your devices; in our case, select both and press the button " Save".

Wireless mode - 2.4 GHz"and we get into" basic settings". Here it is necessary in the column " Wireless network name"come up with and indicate the name of your wireless network; this name will then light up when you connect to the network. I advise you to indicate the frequency used in the name of the network, for example: "imya seti 2.4". Then select " Region" - Russia and press the button " Save".

Wireless Security"and select the encryption type" WPA/WPA2-Personal", below we display " Authentication Type:" on " WPA2-PSK" And " Encryption:" on " AESWireless password:Save".

After that, go to the "tab" Wireless mode - 5 GHz"and we get into" basic settings". Here it is necessary in the column " Wireless network name"come up with and indicate the name of your wireless network; this name will then light up when you connect to the network. I advise you to indicate the frequency used in the name of the network, for example: "imya seti 5". Then select " Region" - Russia and press the button " Save".

Now you need to set a password for the wireless network. To do this, go to the tab " Wireless Security"and select the encryption type" WPA/WPA2-Personal", below we display " Authentication Type:" on " WPA2-PSK" And " Encryption:" on " AES". These settings are recommended. Next in the field " Wireless password:"we come up with and enter a password. Then click " Save".

After we pressed " Save"A message will appear above this button indicating that the settings have been saved and now we need to reboot the router. This is what we do by clicking on the button" click here"by sending the router to reboot. After the reboot, the name of your wireless network will appear in the network settings of your computer.
Setting up PPTP
PPTP on the router Tp-Link Archer C7 AC1750
Let's also write and illustrate PPTP on the router Tp-Link Archer C7 AC1750.
Net", then " WAN".
IN " WAN connection type:"choose" PPTP/PPTP RussiaUsername:"), password (in line " Password:IP Address/Server Name:
Connect automatically NOT Connect on demand
Save".

Setting up PPTP with a static IP address
Let's look at the connection setup PPTP with static IP address on the router Tp-Link Archer C7 AC1750.
So go to the menu in the tab " Net", then " WAN".
IN " WAN connection type:"choose" PPTP/PPTP Russia", below you will be asked to indicate your username (in the line " Username:"), password (in line " Password:").
Static IP addressIP Address/Server Name:"), IP address (in the line " IP address:"), subnet mask (in line " Subnet mask:"), default gateway (in line " Main gate:") and DNS (in the line " DNS:"). All of the above data is provided to you by the provider (the organization that provided you with the Internet).
All this data is usually specified in the contract with the provider. If for some reason you could not find them, you need to call your provider's hotline and find out how you can get them.
After you have entered all the necessary data, check the box next to " Connect automatically" (This setting will keep your Internet connection permanently, so if you have NOT For an unlimited tariff, I recommend checking the box next to " Connect on demand", that is, the Internet is connected only when you start using it).
After all manipulations with the settings, press the button " Save".

L2TP setup
Let's look at the connection setup L2TP on the router Tp-Link Archer C7 AC1750.
So go to the menu in the tab " Net", then " WAN".
IN " WAN connection type:"choose" L2T/L2T Russia", below you will be asked to indicate your username (in the line " Username:"), password (in line " Password:"). You will also need to specify the server IP address (in the line " IP Address/Server Name:"). All of the above data is provided to you by the provider (the organization that provided you with the Internet).
All this data is usually specified in the contract with the provider. If for some reason you could not find them, you need to call your provider's hotline and find out how you can get them.
After you have entered all the necessary data, check the box next to " Connect automatically" (This setting will keep your Internet connection permanently, so if you have NOT For an unlimited tariff, I recommend checking the box next to " Connect on demand", that is, the Internet is connected only when you start using it).
After all manipulations with the settings, press the button " Save".

Setting up L2TP with a static IP address
Let's look at the connection setup L2TP with static IP address on the router Tp-Link Archer C7 AC1750.
Typically, a static IP address is provided to legal entities, or as an additional service to the basic tariff to individuals.
So go to the menu in the tab " Net", then " WAN".
IN " WAN connection type:"choose" L2TP/L2TP Russia", below you will be asked to indicate your username (in the line " Username:"), password (in line " Password:").
Since the connection uses a static IP address, you check the box next to " Static IP address", then indicate the server IP address (in the line " IP Address/Server Name:"), IP address (in the line " IP address:"), subnet mask (in line " Subnet mask:"), default gateway (in line " Main gate:") and DNS (in the line " DNS:"). All of the above data is provided to you by the provider (the organization that provided you with the Internet).
All this data is usually specified in the contract with the provider. If for some reason you could not find them, you need to call your provider's hotline and find out how you can get them.
After you have entered all the necessary data, check the box next to " Connect automatically" (This setting will keep your Internet connection permanently, so if you have NOT For an unlimited tariff, I recommend checking the box next to " Connect on demand", that is, the Internet is connected only when you start using it).
After all manipulations with the settings, press the button " Save".

Setting up PPPOE
I bring to your attention Video instructions for setting up the connection type PPPOE on the router Tp-Link Archer C7 AC1750 using the Tp-Link TL-WR1043ND router as an example.
PPPOE on the router Tp-Link Archer C7 AC1750.
So go to the menu in the tab " Net", then " WAN".
IN " WAN connection type:"choose" PPPOE/PPPOE Russia", below you will be asked to indicate your username (in the line " Username:"), password (in line " Password:Confirm the password:"). All of the above data is provided to you by the provider (the organization that provided you with the Internet).
All this data is usually specified in the contract with the provider. If for some reason you could not find them, you need to call your provider's hotline and find out how you can get them.
After you have entered all the necessary data, check the box next to " Dynamic IP address" And " Connect automatically" (This setting will keep your Internet connection permanently, so if you have NOT For an unlimited tariff, I recommend checking the box next to " Connect on demandConnect according to schedule
After all manipulations with the settings, press the button " Save".

Setting up PPPOE with a static IP address
Let's look at the connection setup PPPOE with static IP address on the router Tp-Link Archer C7 AC1750.
Typically, a static IP address is provided to legal entities, or as an additional service to the basic tariff to individuals.
So go to the menu in the tab " Net", then " WAN".
IN " WAN connection type:"choose" PPPOE/PPPOE Russia", below you will be asked to indicate your username (in the line " Username:"), password (in line " Password:") and password confirmation (in the line " Confirm the password:"). Since the connection uses a static IP address, you check the box next to " Static IP address", then indicate the IP address (in the line " IP address:"), subnet mask (in line " Subnet mask:").
All of the above data is provided to you by the provider (the organization that provided you with the Internet).
All this data is usually specified in the contract with the provider. If for some reason you could not find them, you need to call your provider's hotline and find out how you can get them.
After you have entered all the necessary data, check the box next to " Connect automatically" (This setting will keep your Internet connection permanently, so if you have NOT For an unlimited tariff, I recommend checking the box next to " Connect on demand", that is, the Internet is connected only when you start using it, or " Connect according to schedule", that is, the Internet works at a certain time specified by you).
After all manipulations with the settings, press the button " Save".

Changing the web interface password
I bring to your attention Video instructions for changing the password on the router web interface Tp-Link Archer C7 AC1750 using the Tp-Link TL-WR1043ND router as an example.
Resetting the web interface password
If you set a password for the web interface of the router and forgot it, I invite you to watch the Video instructions for resetting the web interface password on the router Tp-Link Archer C7 AC1750 using the Tp-Link TL-WR1043ND router as an example.
Firmware update
I bring to your attention Video instructions for updating the firmware on the router Tp-Link Archer C7 AC1750 using the Tp-Link TL-WR1043ND router as an example.
Setting up an FTP server on the Tp-Link Archer C7 AC1750 router
I bring to your attention Video instructions for setting up an FTP server on a router Tp-Link Archer C7 AC1750 using the Tp-Link TL-WR1043ND router as an example.
Setting up a media server on the Tp-Link Archer C7 AC1750 router
I bring to your attention Video instructions for setting up a media server on a router Tp-Link Archer C7 AC1750 using the Tp-Link TL-WR1043ND router as an example.
Setting up a print server on the Tp-Link Archer C7 AC1750 router
I bring to your attention Video instructions for setting up a print server on a router Tp-Link Archer C7 AC1750 using the Tp-Link TL-WR1043ND router as an example.
Connecting a computer to wi-fi
After connecting and setting up the router, you need to connect the computer to a wireless network (wi-fi), let's consider connecting to wi-fi in two operating systems, these are Windows 7 and Windows 10:
Windows 7
Video instruction

Sultan

Connect automatically" and press
"Connection".


Windows 10
Video instruction
In the lower right corner of the desktop, find the wireless network (wi-fi) icon and click on it with the left mouse button.

A window pops up with a list of available wireless networks. Select a wireless network, in my case it is the network " Sultanova"(You select the network whose name was given at ).

After selecting the network, check the box next to " Connect automatically" and press " Connect".


We wait perhaps a couple of seconds and you are connected to your wireless network.
