How to set up a TP-Link Archer C9 router: step-by-step instructions. Setting up the TP-Link Archer C1200 router
Another instruction for setting up routers, and today we will be setting up the TP-Link Archer C60 (AC1350). I have already reviewed this model, you can see it at the link. There you will find specifications and you can leave your review about the TP-Link Archer C60.
Usually, all instructions for setting up routers turn out to be long and boring. There are a lot of different moments and nuances that need to be talked about. Many options for settings, etc. After all, everyone different devices, providers, installations. I will try to make this instruction as simple and short as possible. Essentially, for normal operation With the router, you just need to set the parameters for connecting to the Internet provider, change the Wi-Fi network name and set a Wi-Fi password.
Settings TP-Link router Archer C60 is practically no different from setting up other TP-Link routers. New models with an already updated control panel installed. And in general, the algorithm of actions when setting up a router will always be almost the same, regardless of the manufacturer or model.
Connect TP-Link Archer C60 and go to the control panel
There are two ways to configure the router:
- Connect to it via network cable, which comes with the kit. In this case, you must have a laptop, or desktop computer which has a network card. This is the best way. If possible, then at the time of setup I advise connecting the router via cable.
- Via Wi-Fi network. With factory settings, the router immediately distributes the Wi-Fi network. We can connect to it, go to the control panel and set the necessary settings. This the method will work for those who do not have a LAN port on their laptop, or do not have a computer at all. You can configure it from your phone or tablet. I wrote more about this here. To configure the TP-Link Archer C60, you can use the proprietary one.
By cable:
All you need to do is connect the router to your computer. Also, immediately connect the Internet to the router’s WAN port. Here is the connection diagram.

Via Wi-Fi:
In this case, it is enough to turn on the power of the router, connect the Internet to it, and connect your device to the Wi-Fi network, which will have a factory name.

To connect to this network, you will need a password. Factory password (PIN), name of Wi-Fi networks (at 5GHz and 2.4GHz frequencies), MAC address, IP address of the router and factory username and password indicated on the sticker at the bottom of the router.
I will show the setup process using the example of a router with factory settings. Before writing this article, I reset them to factory. Therefore, if you have already tried to configure the router, or it has been configured before, your settings may differ. If you have already tried to configure the router, then it is better to reset the settings. To do this, you need to hold down the Reset button for 10 seconds with something sharp.

The router will reboot and the settings will be restored.
To access the Archer C60 control panel, just open your browser and go to http://tplinkwifi.net(or 192.168.0.1), and specify the factory username and password (admin and admin). If you haven't changed them yet.

If you encounter any problem and cannot access the router settings, then see the solutions from this article:. AND separate instructions at the entrance to .
The control panel will open, and the router will immediately prompt us to change the factory username and password to enter the settings. I recommend doing this. Just indicate new login(I left admin) and twice New Password.

The next time you enter the settings, you will need to specify the set password and username. If you forget them, you will have to do a factory reset (I wrote about this above).
The wizard will open immediately quick setup. Cool stuff. You can use it to configure your router step by step (specify region, Internet connection parameters, Wi-Fi network settings). You can try it.
I don’t know about you, but in my case the settings were only in English. It was not possible to switch the language. Perhaps you just need to update the firmware. But I haven't checked.

I will show you how to set the necessary parameters in different sections of the settings. I will not use the Quick Setup Wizard.
Internet setup
Important point. Let me remind you that the cable from your Internet provider or modem must be connected to WAN port of the router.
If you previously launched an Internet connection to connect to the Internet ( high speed connection), then now there is no need to do this. The router will establish this connection. It is important.
To connect to the Internet, your ISP uses some type of connection. This can be: Dynamic IP, PPPoE, L2TP, PPTP, or Static IP. You should definitely know what type of connection your ISP uses. No other way. It would also be nice to immediately find out whether the provider uses MAC address binding (this is rare, but it happens). This information can be found directly from the provider, or in the connection agreement.
If you have a popular connection type Dynamic IP (without binding by MAC address), then the Internet should work immediately through the router. Since the default router settings are Dynamic IP. You can immediately go to the Wi-Fi network settings.
If the Internet does not work through the router (without internet access, or limited), then you need to set the parameters for connecting to the provider. To do this, go to the tab "Advanced" - "Network" - "Internet".
There we select our connection type and set the necessary parameters. Typically, this is the username, password, and server address. For example, I chose PPPoE.

After you have set all the parameters, click on the “Connect” button. If the router connects to the Internet, then save the router settings. If it doesn’t connect, then check the settings. We clarify the parameters with the provider.
L2TP and PPTP are configured in the same way. Only there, in addition to the username and password, you will also need to specify the server address (which is also issued by the provider).
Our goal is for the router to establish a connection with the provider.
Setting up a Wi-Fi network and password on TP-Link Archer C60
From the Wi-Fi network settings, I advise you to change only the name of the network itself, and of course the password. Since we have a router, the settings need to be set for both networks. Or, if necessary, you can turn off one of the ranges. I'll explain now.
Since we don’t need to change any special parameters, we open the basic settings on the “Basic” – “Wireless” tab.
There you will see settings for two networks: 2.4GHz Wireless and 5GHz Wireless. We change the name (SSID) and password for each range. The password must be at least 8 characters long. In English letters.

If, for example, you do not currently need a 5GHz network (well, you don’t have devices that support it), then you can turn it off. Simply uncheck the "Enable Wireless Radio" checkbox next to it and save the settings.
After saving the settings, you will need to reconnect to the Wi-Fi network. By specifying the new password we just set.
If you forget your Wi-Fi password, you can always look it up in the router settings. Or, use the tips from the article: .
Setting up IPTV
IPTV settings are set in the section "Advanced" - "Network" - "IPTV".
It is enough to connect the set-top box to one of the LAN ports of the Archer C60 router, and set this port for IPTV in the settings. In bridge mode.

I think there will be no problems with this.
That's it, we have finished setting up the TP-Link Archer C60 router. I hope everything worked out for you. If you encounter any problems, then reset the settings and try setting up again. Check your settings with your provider.
Ask questions in the comments and share your experience. Best wishes!
Settings television IPTV on a TP-Link router, as well as on the most modern family of routers - TP-Link Archer - a fairly simple procedure. As a rule, it consists of correctly setting the port for connecting a digital STB set-top box. This is the case with most providers in Russia - Rostelecom, TTK, Dom.RU, Beeline, etc. Usually it is enough to simply select one Ethernet port from the general group of LAN ports and combine it into one group with the WAN port in Bridge mode. At the same time, in some cases, in order to set up IPTV, you need to additionally set one more parameter on the TP-Link router - VLANID, which is the number of the virtual network used. Let's consider both options for setting up a router.
Basic IPTV setup on TP-Link
Before doing anything, we strongly advise you to call technical support your telecom operator and clarify all the settings that will need to be specified in the device configuration. Particular attention to the need to indicate the VLAN number. If you need to do this, find out and write it down.
This is what a typical receiver connection diagram looks like digital television to a TP-Link or Archer router or modem. It is quite simple and should not cause any difficulties:

Separately, I would like to note the following feature - not all TP-Link routers can work with IPTV, especially older models. For example, older models like tl-wr740n, tl-wr741nd, tl-wr841n, tl-wr940n and the like do not always know how to separate a port for a TV set-top box. And even if they do, they don’t always support working with VLAN ID. Sometimes this can be solved by updating the router firmware. The new version will already have the necessary function. Therefore, if your TP-LINK router does not have IPTV settings, download the latest version of the software from the manufacturer’s website and install it on the device. And if this functionality does not appear on the latest version, then all that remains is to change the router. Fortunately, modern TP-Link Archer C2, C5, C7, C20, C50, etc. models do not have this problem.
How to configure the IPTV port TP-Link and Archer
The easiest way, which will allow you to quite easily set up IPTV television on a TP-Link router, which works with most providers in Russia - Dom.ru, TTK, Beeline, Rostelecom - is the following: you need to select one port from the general LAN group, TV will be connected to it -console. It is called configure the port in transparent bridge mode. The VLAN ID is not specified.
The setup procedure is as follows:
1. You need to go into the router settings through its IP - or, or via the URL tplinkwifi.net. Login for access - admin, password - admin. If you can’t get into the configurator or the password doesn’t match, look here.
2. In the TP-Link router menu, go to the section Network >> IPTV.

3. Check if the IGMP Proxy mode is enabled. Enabled - leave it that way. If not, turn it on.
4. In the “Mode” column, enter the value Bridge, In the “Port for IPTV” field, put LAN4.
5. Save the IPTV setting on your TP-Link router by clicking the “Save” button.
Setting up a TV port on an Archer router
For TP-Link Archer C2, C5, C7, C20, C50, C1200 routers latest version The IPTV firmware setting looks like this:
Open section Additional settings >> Network >> IPTV/VLAN:

Check the “Enable IPTV” checkbox.
Operating mode - Bridge.
In the line “LAN4” you need to put the value “IPTV”.
Connect the set-top box to the fourth port of the router and check the operation of interactive television.
Setting up VLAN IPTV on a TP-Link router
If your provider needs to register a virtual network number - VLAN ID - on the router for IPTV to work, then setting up television on TP-Link will look a little more complicated. First, in the “Mode” line, put the value - 802.1Q Tag VLAN:

For Internet traffic, you usually do not need to specify a VLAN ID, so check the box Disable Vlan TAG for Internet.
In the line “VLAN priority for IPTV service” put a number 4 .
In the line “LAN4 port operating mode” enter the value IPTV and save the settings.
Comment:
If suddenly the specified method does not work and the router also requires you to specify the Multicast VLAN ID, then try doing this:

That is, we enter the VLAN ID from the television in the “VLAN ID for using an IP phone” field. Below we indicate the priority - 4 . In the “LAN4 port operating mode” field you need to set the value IP Phone. Click on the "Save" button.
How to configure VLAN for TV on Archer
Setting up IPTV television on a router TP-Link Archer C2, C5, C7, C20, C50, C1200 with VLAN ID specified is done like this:

Set the mode to “Specify manually”.
In field VLAN ID for IPTV enter the VLAN number for digital TV.
Enter the number 4 in the priority field.
In the LAN4 line, select IPTV.
Save your settings.
Connect the set-top box and check the operation of the digital TV set-top box.
TP-Link Archer C20 router is quite good modern model With good characteristics. Today I will not talk in detail about it appearance And technical capabilities. This will be detailed step-by-step instruction for beginners about how to set up a TP-Link wifi router. The process is simple and is essentially done once, but it is better to do everything correctly right away so that there are no problems in operation in the future. Here I will tell you in detail how to connect TP-Link to a computer and establish a connection to the Internet and distribute it via wifi signal.
Before moving directly to the setup itself wifi router TP-Link Archer C20, you need to check and, if necessary, adjust some parameters on the computer. I mean the "Connections by" configuration. local network" or "Wireless connection", which are located in the Panel Windows management.
If everything is so, then move on to the next step.
Connecting the TP-Link Archer C20 router to a computer
To connect to a computer we can use two methods.
- By cable
- Via wifi
By cable
The first is traditional, connecting the PC to the router with a cable “ twisted pair", which is in the box. It must be inserted into one of the four “Ethernet” connectors yellow color, located at the rear of the housing. By the way, please note that there are no “WAN” or “LAN” designations here - everything is labeled as clearly as possible. The other end of this wire must be inserted into the network card on the computer - where the cable from the Internet used to be (it, accordingly, needs to be removed from there). After this, we connect the cable from the provider to the blue “Internet” slot.
If you use a modem from a mobile operator to receive Internet, then you need to plug it into USB port router.

Via Wi-Fi
The second way is to immediately use a WiFi connection. The fact is that as soon as you supply power to the TP-Link Archer C2 router and turn it on with the button on the case, it will start relaying wireless signal, which will show up on devices as “TP-LINK_XXXX”. It is usually password-free, so you can easily connect to it.
Choose whichever one you like best, but for some reason I’m more accustomed to doing everything through cable connection, although if you only have a laptop without wifi module, then except how to do it by wireless channel there are no other options.
Setting up the Internet on the TP-Link Archer C20 router
Let's move on to the actual settings of the TP-Link Archer C20. Information for authorization in the control panel is located on a sticker that is present on the bottom of the router. But since you are reading my blog, you are damn lucky, because you don’t need to go to it now - I will say right away that in order to get into the settings, you need to type in address bar browser http://192.168.0.1. And enter the same word as login and password - “admin”

Happened? Great! Go to the “Quick setup” section in the side menu. At the first stage, we will connect the TP-Link Archer C20 to the Internet. To do this, in most cases you will not need to guess what type of connection you have, since simple level all providers are sorted by country and city. You just need to find yours.

The Russian department of TP-Link did an excellent job and almost all service providers are present. If by some miracle yours was not among them, then check the appropriate box and select the type manually.
Setting up TP-link Archer C20 for Beeline (L2TP)
If your provider uses the L2TP type, for example, then to connect to the Internet you will need to specify a login, password and server address.

Setting up TP-link Archer C20 for Rostelecom (PPPoE)
For PPPoE, only login and password are used for authorization. This type is used by and.

Static IP
Here you will need to enter several items at once - the individual IP address given to you, the subnet mask and the gateway - all this is issued by the provider.

Dynamic IP
If it’s dynamic, then you don’t need to enter anything additional - you can immediately proceed to setting up wifi on the router. The only thing that may be required is if the binding is required by the provider.

Setting up TP-link Archer C20 via USB modem for 3G/4G Internet
If you connected a 3G-4G modem to TP-link Archer C20, then Mobile Internet can be activated as backup source. However, if it is your main one, then it will be used by default if there is no cable in the WAN connector.

For USB connections modem, simply insert it into the USB port and select the country and operator from the proposed list. None additional actions you are not required - all settings are for the operator cellular communications are already built into the software and will work automatically.
Setting up wifi on the TP-Link Archer C20 router
Finally, the final stage is installing a wireless network. Because the this model operates in two frequency ranges - 2.4 and 5 GHz - accordingly, you will need to configure each of them in turn. Although, it is possible to enable only one of them, and not two at the same time, as is the case on some other routers.

Namely, come up with a name for future networks, set the encryption type and password for them.

That's all - save and use! Oh more detailed settings Read about TP-Link routers in other publications on our blog.
Views: 943 Today we will be setting up two powerful router from TP-LINK company. I will show the setup process on example TP-LINK Archer C8. But, since the Archer C8 and Archer C9 models are almost the same, the instructions will be the same. They are identical in appearance, and they have the same, new panel
Today we will be setting up two powerful routers from TP-LINK. I will show the setup process using the example of TP-LINK Archer C8. But, since the Archer C8 and Archer C9 models are almost the same, the instructions will be the same. They are identical in appearance, and they have the same, new control panel. No longer green, as we are used to seeing on TP-LINK routers, but new, modern, in blue tones. And this will be the first instruction on this site for setting up Wi-Fi router TP-LINK with a new control panel.
I will write about the TP-LINK Archer C8 router itself, and about the new settings page, in a separate article. Let's do a short review of this router, and as usual, I'll write my review. As for TP-LINK Archer C9, it is a little more expensive and more powerful. There are no special differences in it. Both routers are powerful, of course dual-band, provide a very good Wi-Fi network coverage range, and have a set of modern functions. Plus, they look very cool.

I’m glad that TP-LINK has finally made a new web interface for its routers, albeit only for flagships for now. The new control panel is very easy to understand. But, unfortunately, on the TP-LINK Archer C8, which I have, there is no Russian language in the settings. And with TP-LINK Archer C9, in hardware version V3, you can already select Russian. There is a multilingual web interface. I will take screenshots of the English version, and I will also write the names of the items in Russian.
We will configure according to the standard scheme:
- Installation and connection of the TP-LINK Archer C8 (C8) router.
- Setting up a router using the Quick Setup Wizard. Setting up the Internet, Wi-Fi network and password.
- Change the most necessary parameters through advanced settings.
- Change the password to protect the control panel.
If you have a desktop computer or laptop, then I advise you to configure the router from it. If you only have a smartphone or tablet, then you can also configure it from them. This can be done through a browser, in the usual way, or using the proprietary TP-LINK Tether program.
Connecting the TP-LINK Archer C8 (C9) router
We take our router and screw the antennas to it. Next, we connect the power adapter and plug it into the outlet. If the indicators on the front panel do not light up, then the power is turned off by the button on the back of the router.
We take the network cable that comes with the kit and connect the computer to the router. On the router, we connect the cable to the LAN (Ethernet) connector (it’s yellow), and on the computer to the network card. If you want to configure via Wi-Fi, then just connect to the router’s Wi-Fi network, which will appear immediately after turning on the power. By default, the Wi-Fi password is indicated on the back of the router, on a sticker (Wireless Password/PIN). Also, the SSID (factory name of the Wi-Fi network) will be indicated there.

Next, you need to connect the Internet to the router. We connect the cable from the Internet provider, or from the modem, to the WAN connector (Internet). It's blue.

As a result, the device from which we will configure must be connected to the router via cable or Wi-Fi.
If the router is not new, then I would advise resetting the settings on the TP-LINK Archer C8 (C9). So that the old parameters do not interfere with us. To do this, when the router is turned on, you need to hold down the button for 5 seconds Reset/WPS(above in the photo, you can see this button). We press, hold, and look at the indicators on the front panel. The power indicator will start blinking, then all indicators will go out and the router will reboot. And the settings will be reset to factory settings.
Quick setup of TP-LINK Archer C8 and Archer C9 router
Depending on the Internet provider and connection method, immediately after connecting the router, it can already distribute the Internet. Usually, there is a connection, but without access to the Internet. This is normal, the router is not configured yet. In any case, you need to go into the settings and configure the router to work with the provider, Wi-Fi network, set a password, etc.
To go into the settings of the Archer C8 router, just open any browser and go to the address tplinklogin.net, or 192.168.0.1. Next, an authorization page will appear, on which we indicate the user name, password (factory, admin and admin), and click on the button "Login". The address for entering settings, username and login are indicated on the back of the router. If you can’t get into the settings, you can find solutions in this article.

The Quick Setup Wizard will open immediately. What we need. With its help, you can configure your router very simply and quickly.
In the first window, we need to specify the region and time zone (or only the time zone). Nothing special. Indicate and click the “Next” button.

The next page is very important. You need to specify the type of connection, and if necessary, set the parameters for connecting to the Internet provider. If this is done incorrectly, the Internet will not work.
If you know what type of connection your Internet provider uses (Dynamic IP, Static IP, PPPoE, L2TP, PPTP), then select it and click “Next”. Or click on the “Auto Detect” button, and the router itself will try to determine the type of connection. For example, I have a Dynamic IP.

If you also have a Dynamic IP, then the router will ask you if the provider binds by MAC address. If not, then leave the item “No, I do not need to clone MAC address", and proceed to setting up Wi-Fi. If there is a binding, then select "Yes, I want to use the main computer"s MAC address". And the router clones the MAC address of the computer from which you are currently setting it up. Nowadays, few providers use MAC binding, but there are some.
With a dynamic IP everything is clear. But let's go back a little and deal with setting up PPPoE, L2TP, PPTP.
Setting up a PPPoE, L2TP, PPTP connection on TP-LINK Archer C8 (C9)
Select the appropriate connection type and click the “Next” button.

If you have PPPoE (TTK, Rostelecom, Dom.ru), then a window will appear asking for a login and password. They are issued by your Internet service provider. We indicate them and click “Next”. The Wi-Fi network settings will appear.

L2TP and PPTP(for example, Beeline provider). Having chosen one of these connection types, in addition to the username and password, you will most likely also need to set a static IP and DNS, and a server name.

The next item is setting up a wireless network (Wireless Settings).
Setting up Wi-Fi and password on TP-LINK Archer C8
In the Quick Setup Wizard, we only need to specify the name for the Wi-Fi networks and the password. Since the router is dual-band, each network is configured separately. You can disable one of the wireless networks, leaving only 2.4GHz, or 5GHz.
Set the SSID (network name), password that will be used to protect your Wi-Fi network, and click on the “Next” button.

You can change these settings at any time on the "Basic" tab ( Basic setup) – “Wireless”.
In the next window of the setup wizard we will see all the specified parameters, click “Save”. We see a message that everything is ready, and click on the “Finish” button.

That's all, the network map will open. You can connect your devices and use the Internet. To connect via Wi-Fi, use the password you specified during the setup process.
Manual configuration of the required parameters
In the control panel, you can go to the “Basic” or “Advanced” section, and you will have access to the router’s advanced settings. For example, set up a Wi-Fi network on the “Basic” – “Wireless” tab. Or, set the parameters for the drive that is connected to the router’s USB port.

And if you need to change broader parameters, I would even say professional ones, for example, Wi-Fi network channel, operating mode, then open the parameters on the “Advanced” tab. This is how this section with additional settings looks on TP-LINK Archer C9:

The settings there are very different: local network, Wi-Fi, USB settings, parental controls, security, etc.
Protecting the web interface of the TP-LINK Archer router
To enter the router settings, you need to enter your username and password. We already know that the factory settings are admin and admin. So, it’s better to change the password. To do this, go to the “Advanced” section and select “System Tools” – “Password” (Administration, in the Russian version) on the left.
We first enter the username and password that are currently set, then we enter a new username and password twice. Click "Save".

Just write down the password you are setting somewhere. If you forget it, you will have to reset the settings. TP-LINK Archer C9 has many more settings on this tab. There is even a password recovery function via email, control panel access control for certain devices, and even remote control of router settings. I think that in the next hardware version (or firmware), such functions will appear on the Archer C8.
By the way, I have already written instructions for updating the firmware on the TP-LINK Archer C8.
Afterword
I set up my TP-LINK Archer C8 in about three minutes. Everything is very simple and clear. The most common error that you may encounter while setting up any router is when the Internet does not work after setup. Wi-Fi is available, but the Internet does not work. To solve this problem, I wrote a separate article.
If you encounter any problems during the setup process, please describe them in the comments and we will sort it out. Well, leave your reviews and impressions of these routers in the comments, it will be interesting to read.
Before we start setting up the router, let's check the local network connection settings. For this:
Windows 7
Click on " Start", "Control Panel".
Then click on " View network status and tasks".

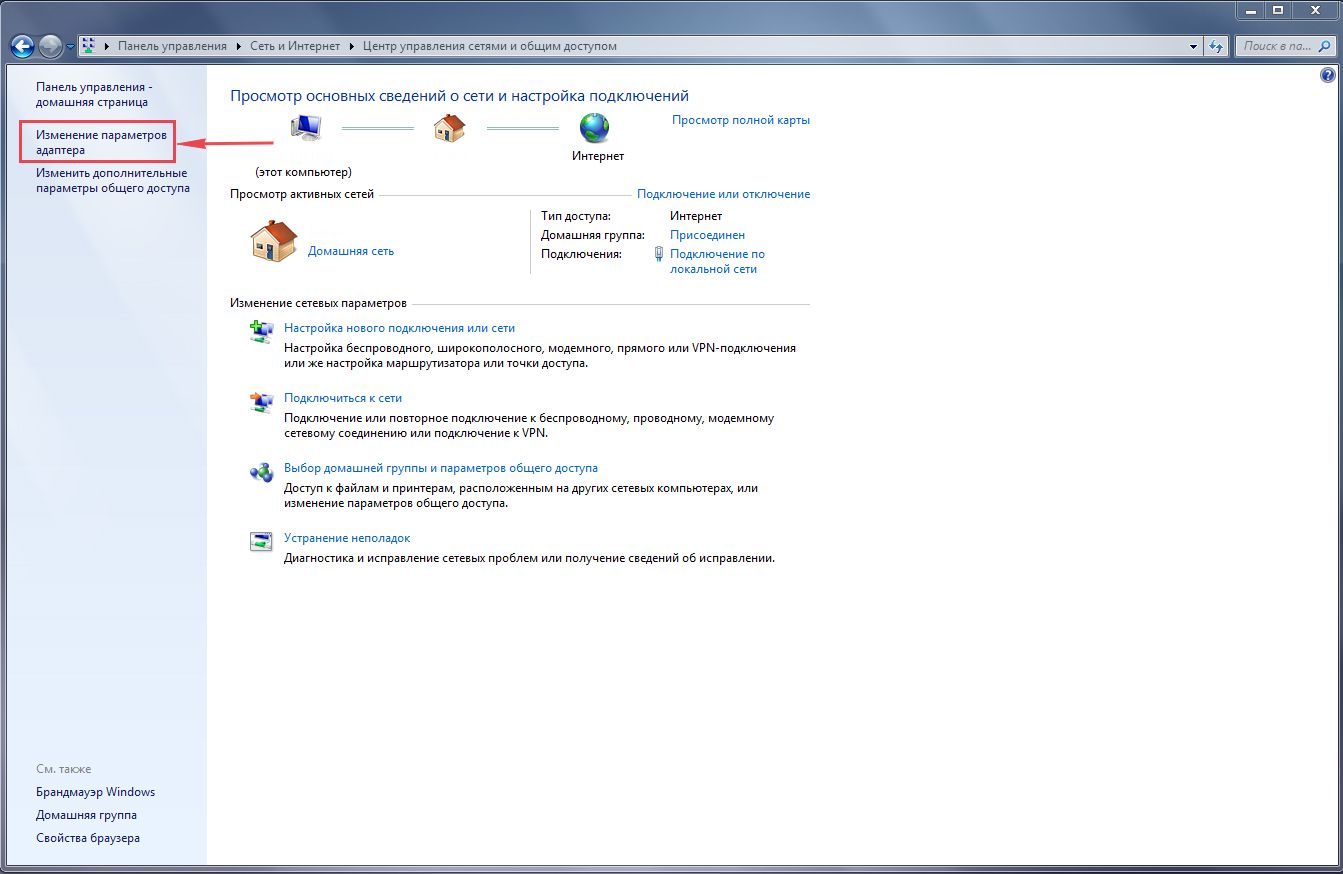
LAN connectionProperty".

Then select from the list " Internet Protocol Version 4 (TCP/IPv4)" and press " Property".

" and "", then press the " button Ok".

Windows 10
Click on " Start", "Options".

Then click on " Network and Internet".


In the window that opens we see " Ethernet". Click on it right click mouse, select " Property".

Then select from the list " IP version 4 (TCP/IPv4)" and press " Property".

In the window that opens, you need to check the box " Obtain an IP address automatically" And " Obtain DNS server address automatically", then press the button " Ok".

Connecting the TP-Link Archer C7 AC1750 router to a computer
The next step is to connect the router TP-Link Archer C7 AC1750 to your laptop or Personal computer(PC). To do this, you need to connect the cable that your provider provided to you to the blue port of the router (that is, this is the cable that goes to your apartment, house, office, etc. from outside), and the cable that came with router, one end into one of the four ports, which are marked in yellow on the router, and connect the other end to your laptop or PC. And yes, don't forget to connect the power cable.

Authorization of the TP-Link Archer C7 AC1750 router
So, we connected the router, now you need to use any browser (be it Google Chrome, Mozilla Firefox, Internet Explorer, etc.) get into its web interface. To do this, open the browser and enter the router address in the address bar: 192.168.0.1 and press the button " Enter" on your keyboard.
- Username - admin
- Password - admin
So, enter the data and press " Login"


Setting up the Tp-Link Archer C7 AC1750 router
And finally we got to the router’s Web interface and now you need to configure the equipment. First of all, let's secure wireless network by setting a password for wi-fi. Then you will need to find out what type of connection is used to access the Internet, is it PPTP, L2TP or PPPOE. You can find out by calling your provider (this is the organization with which you entered into an agreement to provide Internet services). So, let's start setting up the router.
Setting a password for wi-fi
The Tp-Link Archer C7 AC1750 router is dual-band, which means that the router supports 2 operating frequencies for wireless connections, 2.4 GHz and 5 GHz. 5 GHz allows you to achieve higher bandwidth, but has a shorter range than 2.4 GHz, 2.4 GHz is more susceptible to interference. 5 GHz is not supported by all devices. Therefore, which frequency to choose is up to you. You can choose both and change depending on the circumstances wireless connection already on your devices. In our example, we will consider exactly this option, when 2 frequencies are operating.
So, on the Web interface, go to the menu in the "tab" Selecting operating frequency" and put a checkmark next to the frequency that is more suitable for your devices; in our case, select both and press the button " Save".

Wireless mode - 2.4 GHz"and we get into" basic settings". Here it is necessary in the column " Wireless network name"come up with and specify a name for your wireless network, given name In the future it will light up when you connect to the network. I advise you to indicate the frequency used in the name of the network, for example: “imya seti 2.4”. Then select " Region" - Russia and press the button " Save".

Protection wireless mode "and select the encryption type" WPA/WPA2-Personal", below we display " Authentication Type:" on " WPA2-PSK" And " Encryption:" on " AESWireless password:Save".

After that, go to the "tab" Wireless mode - 5 GHz"and we get into" basic settings". Here it is necessary in the column " Wireless network name"come up with and indicate the name of your wireless network; this name will then light up when you connect to the network. I advise you to indicate the frequency used in the name of the network, for example: "imya seti 5". Then select " Region" - Russia and press the button " Save".

Now you need to set a password for the wireless network. To do this, go to the tab " Wireless Security"and select the encryption type" WPA/WPA2-Personal", below we display " Authentication Type:" on " WPA2-PSK" And " Encryption:" on " AES". These settings are recommended. Next in the field " Wireless password:"we come up with and enter a password. Then click " Save".

After we pressed " Save"A message will appear above this button indicating that the settings have been saved and now we need to reboot the router. This is what we do by clicking on the button" click here"by sending the router to reboot. After the reboot, the name of your wireless network will appear in the network settings of your computer.
Setting up PPTP
PPTP on the router Tp-Link Archer C7 AC1750
Let's also write and illustrate PPTP on the router Tp-Link Archer C7 AC1750.
Net", then " WAN".
IN " WAN connection type:"choose" PPTP/PPTP RussiaUsername:"), password (in line " Password:IP Address/Server Name:
Connect automatically NOT Connect on demand
Save".

Setting up PPTP with a static IP address
Let's look at the connection setup PPTP with static IP address on the router Tp-Link Archer C7 AC1750.
So go to the menu in the tab " Net", then " WAN".
IN " WAN connection type:"choose" PPTP/PPTP Russia", below you will be asked to indicate your username (in the line " Username:"), password (in line " Password:").
Static IP addressIP Address/Server Name:"), IP address (in the line " IP address:"), subnet mask (in line " Subnet mask:"), default gateway (in line " Main gate:") and DNS (in the line " DNS:"). All of the above data is provided to you by the provider (the organization that provided you with the Internet).
All this data is usually specified in the contract with the provider. If for some reason you could not find them, you need to call hotline Your provider and find out how you can get them.
After you have entered all the necessary data, check the box next to " Connect automatically" (This setting will keep your Internet connection constantly, so if you NOT unlimited tariff I recommend checking the box next to " Connect on demand", that is, the Internet is connected only when you start using it).
After all manipulations with the settings, press the button " Save".

L2TP setup
Let's look at the connection setup L2TP on the router Tp-Link Archer C7 AC1750.
So go to the menu in the tab " Net", then " WAN".
IN " WAN connection type:"choose" L2T/L2T Russia", below you will be asked to indicate your username (in the line " Username:"), password (in line " Password:"). You will also need to specify the server IP address (in the line " IP Address/Server Name:"). All of the above data is provided to you by the provider (the organization that provided you with the Internet).
All this data is usually specified in the contract with the provider. If for some reason you could not find them, you need to call your provider's hotline and find out how you can get them.
After you have entered all the necessary data, check the box next to " Connect automatically" (This setting will keep your Internet connection permanently, so if you have NOT For an unlimited tariff, I recommend checking the box next to " Connect on demand", that is, the Internet is connected only when you start using it).
After all manipulations with the settings, press the button " Save".

Setting up L2TP with a static IP address
Let's look at the connection setup L2TP with static IP address on the router Tp-Link Archer C7 AC1750.
Typically a static IP address is provided legal entities, or as additional service to the main tariff individuals.
So go to the menu in the tab " Net", then " WAN".
IN " WAN connection type:"choose" L2TP/L2TP Russia", below you will be asked to indicate your username (in the line " Username:"), password (in line " Password:").
Since the connection uses a static IP address, you check the box next to " Static IP address", then indicate the server IP address (in the line " IP Address/Server Name:"), IP address (in the line " IP address:"), subnet mask (in line " Subnet mask:"), default gateway (in line " Main gate:") and DNS (in the line " DNS:"). All of the above data is provided to you by the provider (the organization that provided you with the Internet).
All this data is usually specified in the contract with the provider. If for some reason you could not find them, you need to call your provider's hotline and find out how you can get them.
After you have entered all the necessary data, check the box next to " Connect automatically" (This setting will keep your Internet connection permanently, so if you have NOT For an unlimited tariff, I recommend checking the box next to " Connect on demand", that is, the Internet is connected only when you start using it).
After all manipulations with the settings, press the button " Save".

Setting up PPPOE
I bring to your attention Video instructions for setting up the connection type PPPOE on the router Tp-Link Archer C7 AC1750 using the Tp-Link TL-WR1043ND router as an example.
PPPOE on the router Tp-Link Archer C7 AC1750.
So go to the menu in the tab " Net", then " WAN".
IN " WAN connection type:"choose" PPPOE/PPPOE Russia", below you will be asked to indicate your username (in the line " Username:"), password (in line " Password:Confirm the password:"). All of the above data is provided to you by the provider (the organization that provided you with the Internet).
All this data is usually specified in the contract with the provider. If for some reason you could not find them, you need to call your provider's hotline and find out how you can get them.
After you have entered all the necessary data, check the box next to " Dynamic IP address
" And " Connect automatically" (This setting will keep your Internet connection permanently, so if you have NOT For an unlimited tariff, I recommend checking the box next to " Connect on demandConnect according to schedule
After all manipulations with the settings, press the button " Save".

Setting up PPPOE with a static IP address
Let's look at the connection setup PPPOE with static IP address on the router Tp-Link Archer C7 AC1750.
Typically, a static IP address is provided to legal entities, or as an additional service to the basic tariff to individuals.
So go to the menu in the tab " Net", then " WAN".
IN " WAN connection type:"choose" PPPOE/PPPOE Russia", below you will be asked to indicate your username (in the line " Username:"), password (in line " Password:") and password confirmation (in the line " Confirm the password:"). Since the connection uses a static IP address, you check the box next to " Static IP address", then indicate the IP address (in the line " IP address:"), subnet mask (in line " Subnet mask:").
All of the above data is provided to you by the provider (the organization that provided you with the Internet).
All this data is usually specified in the contract with the provider. If for some reason you could not find them, you need to call your provider's hotline and find out how you can get them.
After you have entered all the necessary data, check the box next to " Connect automatically" (This setting will keep your Internet connection permanently, so if you have NOT For an unlimited tariff, I recommend checking the box next to " Connect on demand", that is, the Internet is connected only when you start using it, or " Connect according to schedule", that is, the Internet works at a certain time specified by you).
After all manipulations with the settings, press the button " Save".

Changing the web interface password
I bring to your attention Video instructions for changing the password on the router web interface Tp-Link Archer C7 AC1750 using the Tp-Link TL-WR1043ND router as an example.
Resetting the web interface password
If you set a password for the web interface of the router and forgot it, I invite you to watch the Video instructions for resetting the web interface password on the router Tp-Link Archer C7 AC1750 using the Tp-Link TL-WR1043ND router as an example.
Firmware update
I bring to your attention Video instructions for updating the firmware on the router Tp-Link Archer C7 AC1750 using the Tp-Link TL-WR1043ND router as an example.
Setting up an FTP server on the Tp-Link Archer C7 AC1750 router
I bring to your attention Video instructions for setting up an FTP server on a router Tp-Link Archer C7 AC1750 using the Tp-Link TL-WR1043ND router as an example.
Setting up a media server on the Tp-Link Archer C7 AC1750 router
I bring to your attention Video instructions for setting up a media server on a router Tp-Link Archer C7 AC1750 using the Tp-Link TL-WR1043ND router as an example.
Setting up a print server on the Tp-Link Archer C7 AC1750 router
I bring to your attention Video instructions for setting up a print server on a router Tp-Link Archer C7 AC1750 using the Tp-Link TL-WR1043ND router as an example.
Connecting a computer to wi-fi
After connecting and setting up the router, you need to connect the computer to a wireless network (wi-fi), consider connecting to wi-fi in two operating systems, these are Windows 7 and Windows 10:
Windows 7
Video instruction

Sultan

Connect automatically" and press
"Connection".


Windows 10
Video instruction
In the lower right corner of the desktop, find the wireless network (wi-fi) icon and click on it with the left mouse button.

A window pops up with a list of available wireless networks. Select a wireless network, in my case it is the network " Sultanova"(You select the network whose name was given at ).

After selecting the network, check the box next to " Connect automatically" and press " Connect".


We wait perhaps a couple of seconds and you are connected to your wireless network.
