How to change email address on Android. Account or mailing address? How to create an email in Yandex
IN Lately The email address has become as popular an attribute as an address or telephone number, and due to the widespread use of mobile telephony, the problem of working with e-mail using only a telephone has become acute. No matter what they say, but none of them telephone services(SMS, EMS or MMS) does not provide the flexibility of email. However, this is natural, e-mail is a computer product, and, accordingly, it is designed for computer power and capabilities. Well, a telephone is just a specialized mini-computer, and full-fledged work with electronic correspondence is contraindicated for it. On the other hand, everything e-mail capabilities The phone doesn't seem to be needed. Why do you, for example, executable files or images of several megabytes? But still, if you really want to, then you can, so we will try to put together mobile phone And email.
Practice: How to set up e-mail for cell phone
Options, options...
The problem of email on the phone appeared a long time ago, when phones that only supported voice communication and SMS. Accordingly, the first solution is to use the service short messages. Everything here is simple and clear, letters leave and come in the form of SMS, so only “clean” text is acceptable, and even then with volume restrictions. This can be done in two ways: activate the corresponding service from mobile operator or use the services of independent gateways.
Without your own electronic mailboxes on the Internet, the user will be very limited in convenience and capabilities. Not only will it not be possible to send and receive emails on most Internet sites and services, as well as in social networks, participant registration is almost always done via email confirmation. So, if you don't have your own email yet, take care of this problem as soon as possible.
Moreover, it is free and very simple. Free for home use. But if we're talking about about an enterprise solution for business, you will need paid system. Why is that? Why can’t you use the regular free service to communicate with business partners? Google mail or Yandex?
It's all about the level of confidentiality. Free services use rather weak encryption and protection schemes for data transmitted over the Internet. Access to free mail hackers can get hold of and steal important and expensive trade secrets. In addition, on the servers free mailers emails are stored in unencrypted form. And once attackers hack the server, millions of emails will end up in third hands.
How to create a Yandex email address
First of all, open the page https://passport.yandex.ru/registration/

If you need mail to communicate with subscribers within the RuNet, Yandex.Mail is suitable. To get a new account, complete the following steps.
- Go to the Yandex website. On the right top corner there is a mail form.
- Find the Registration link.
- Log in to the registration interface and fill out the fields provided.
- Confirm your agreement and click OK.
That's it. Now wait, in a few seconds you will receive your first email congratulating you on creating a new address. Minutes pass, but the letter has not arrived? And it won't come because you forgot to set up yours mail client.
In order for the service to receive letters from a certain address, you need to add new account. Go to settings, enter your email and password, create a new mailbox. Now check your correspondence and read your first letter.
How to create a Gmail account
Google email will come in handy if you actively communicate with foreigners. In addition, the Gmail address is your login and password for all free services Google. You won’t even be able to access YouTube without a Google email address.
If you have a desktop computer, it is most convenient to create Gmail in a browser Google Chrome. If you don’t have this yet, it is recommended to download and install it. In addition to all Google services, you will receive the fastest and most economical Internet browser today. That's right, Chrome has overtaken the long-time leader Mozilla Firefox in speed.
To create Gmail account, you don't even have to look for an interface. Just try to log into any of the Google services. A panel will appear asking you to log in or create a new account. Select create a new one, fill out all the form fields, get a new Google account. This is your address. Don't forget to create additional account in the email client, use the wonderful Gmail mail for health absolutely free.
Registration in Mail.ru
In most email services, registration is the same and there is no point in describing it in detail. Mail.ru has a similar registration form.
And register:

Procedure for registering a new postal address
The algorithm for creating a new email address varies slightly depending on the provider and the email client you use - an application for receiving and sending emails. If you don’t already have such a program on your computer, start your own new life necessary from downloading the product.
For free email at desktop computer optimal choice will Mozilla Thunderbird. If your default browser is Opera, this browser has a built-in client. You don't have to run separate program to receive and send emails.
These two services are also good because the user does not need to enter any addresses of incoming and outgoing servers and other unclear things. All you need is your mailbox address and password. Everything else happens automatically.
How to create an email on a tablet or smartphone
If you have a smartphone or tablet with iOS platform or Android, the process of creating an electronic mailbox is greatly simplified. Mobile devices are specifically designed for user comfort.
Check pre-installed applications. There will definitely be an email client. And if you have an Android device, then without question there will be an application for Gmail. In this case, you can create new boxes directly from within the service.
- Open the Gmail email application.
- Find Settings and go into it.
- Find the Add account item and click on it.
You will now be asked to select which email you would like to register. If the mail is from Google, then you can create new box right here. Select and click OK. Addresses of other providers here can only be added to the list of accounts. And to create new addresses you will have to visit the websites of these providers.
National features of email
Some providers are poorly adapted to work in our country. When registering an AOL mailbox (popular in the UK), you will need to provide your home address and ZIP code. And all this is in a format that we do not use. There may be problems with authorization.
Despite the fact that classic email is losing popularity, it is still one of the most popular methods online communication. Therefore, users often ask how to set up mail on an Android smartphone.
You can set up mail on Android in two ways: using a client application that is tailored for one email service, or using a universal email program. The first method is best suited if you use only one email service (for example), the second method will be useful for those who need to receive mail from several mailboxes that are located on different mail services. In this material we will look at both of these methods of setting up mail on Android.
Method number 1. Use special application client.
If you use one specific email service, then you can download an application created specifically for of this service. There are apps like this for everyone. popular services Email. As an example, we will demonstrate how this is done for Yandex mail.
First, we need to find and download the client application. To do this, open and enter the name of your email service into the search. Then open the page of the found application.

After installation is complete, launch the application. This can be done directly from Play Market or using a shortcut on the desktop.
After launching the client application, you should see a form to sign in to your email account. Typically, this form contains only two fields: your login and your password. In general, everything is exactly the same as when accessing email through a browser.

Enter your username/password and click on the “Login” button. After this, the client application will automatically download your letters and display them on the screen.

As you can see, setting up mail on Android using a special client requires very little effort. Install the application, enter your data and you're done.
Method No. 2: Using a universal email application.
If you want to receive mail from several mail services, or you have corporate mail on separate domain, then you will have to use universal email applications. There are quite a lot of such applications for Android. As an example, we will demonstrate how to set up mail using the K9 Mail application as an example.
First, open the Play Market and enter the phrase “K9 Mail” in search bar. Then open the page of this application.
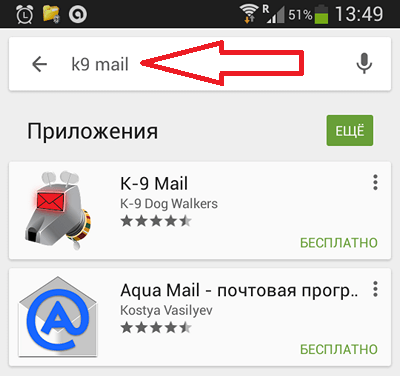
Here we click on the “Install” button and wait for the installation to complete.

After opening the application, click “Add a new mailbox” and see in front of you a form for entering your login and password. After entering your login and password, you can click on the “Next” button, in which case the application will try to connect to the mail server using standard settings. If you need to enter the settings manually, then click on the “Manual” button.

After clicking on the “Manual” button, the application will ask you to select the protocol type for accessing your email. For example, let's choose POP3. You can choose the one you need.

The next stage is settings for accessing the mail server. Here you need to enter the server address, security method, connection port and authentication method.
Information about the settings to use can be found in the help of your email service. Or from your administrator if you are using corporate mail. After filling out all the fields, click on the “Next” button.

If all the entered settings are correct, then after clicking on the “Next” button, the program should download your mail and display it on the screen.
Our man won’t go into his pocket for a word, but for mail he will. No, we are not talking about an envelope with a letter taken out of a box and stuffed into a pocket, but about a smartphone, which is our personal “postman” in a modern version.
Many people think that Android phones allow, which is tied to Google account, and iPhones only work with a mailbox that is associated with an Apple ID. And what are needed for other email accounts? additional programs. In fact, gadgets have enough capabilities for everything. Let's talk about how to set up email on your phone to receive emails from all your accounts in one mailbox - built into the system.
Setting up mail in the Gmail app on Android
Adding and setting up a new account
Mail client " Gmail", pre-installed on Android phones, can be used to assemble letters from various mail services, except those that do not support third-party applications, such as the highly secure ProtonMail and Tutanota. By default, it collects emails only addressed to the Google account associated with the device.
To connect to Gmail client another mail account, do the following:
- Launch the application. If anyone doesn’t know, his label is a white envelope with a red letter “M”.
- Tap the hamburger button and open the side menu. To access the account management section, tap the triangle circled in the screenshot.

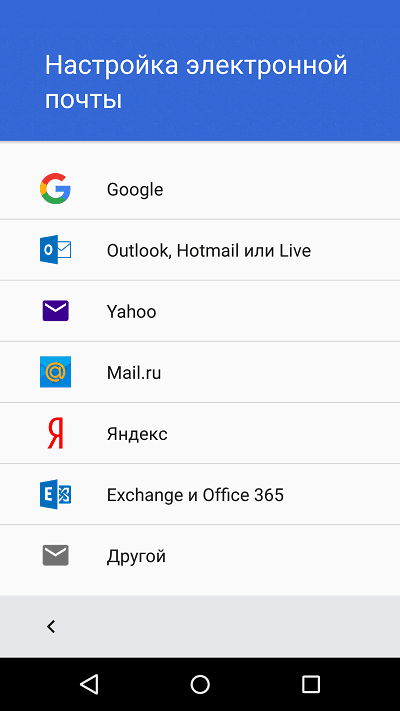
- Select " +Add account».

- Select the mail service you want to connect. For example, if Domain name server where your mailbox is located, yandex.ru or ya.ru, select Yandex; if gmail.com, choose Google, etc. If the required service not in the list, your choice is " Another». Further actions Let's look at the last option as an example.
- Enter your email address. To set it to default settings, click " Further" If you want to specify your settings, tap the " Manually».

- If you choose manual setup, the program will ask you to specify one of three account type options. For personal mail, these are POP3 or IMAP protocols (you can find out what to choose from the user manual of your mail service). For mail on a corporate server - Exchange, unless otherwise used.

- Enter your login or full mailbox address and password again to log in.

- In the next step, specify the incoming message server. If the program does not detect it itself, you will have to once again refer to the manual of your mail service.

- Next, enter the address of the outgoing message server and, if desired, enable automatic login into the system. Then you won’t have to enter a password every time you access your mailbox.

- The basic setup is almost complete. The only thing left to do is to allow or disable program synchronization with mail server. If allowed, set the synchronization frequency (15 minutes by default), and also enable or disable notification of new emails and auto-downloading of attachments when the phone is connected to a Wi-Fi network.

- Account added. As a final step, you can change your name, which will be displayed in the emails you send. By default, the account login is specified instead of the name.
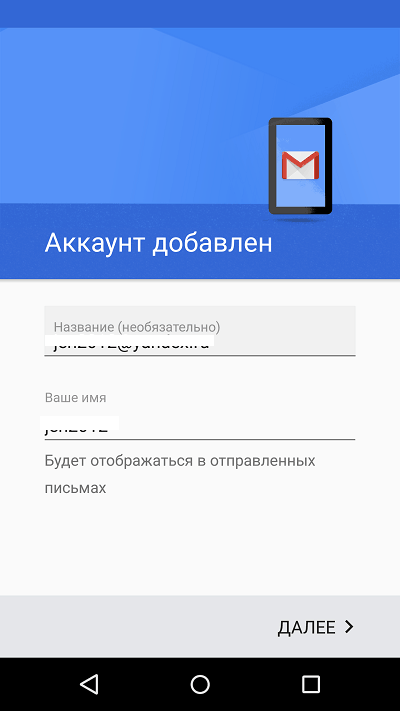
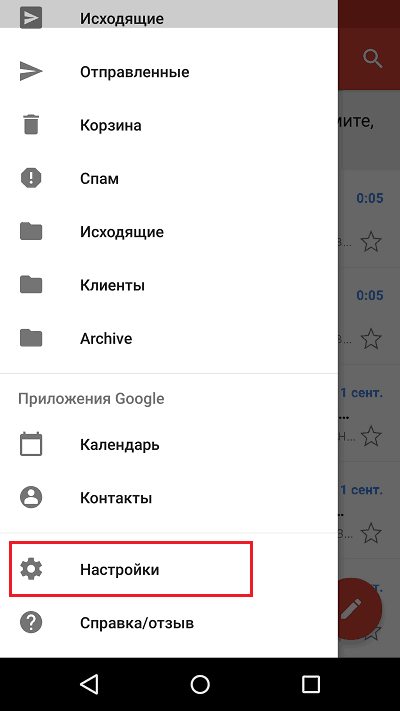
You can finish here, but if you want to customize the new box more subtly, open the side menu in the application again, scroll down and tap the button Settings».
Select the account you want to edit.
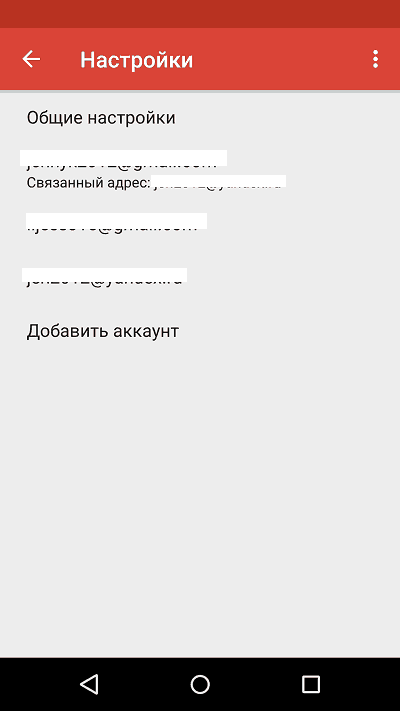
The following parameters are available for change:
- Account name (email address).
- Your name (by default, this is your account name).
- Signature in the letter.
- Linking an address to another Gmail account.
- Request to display images in emails (if your Internet connection is slow or is charged based on traffic volume, it is better to enable it).
- Synchronization with the mail server and its frequency ( high frequency synchronization increases the amount of traffic and speeds up the drainage of the phone's battery).
- Automatic downloading of files attached to emails when connected to Wi-Fi.
- Notifications about new letters.
- Sorting of incoming correspondence by categories (unsorted letters, social networks, forums, promotions and notifications). Not supported by all email services.
- Automatic response to incoming emails. Not supported by all email services.
- Automatic substitution of quick answers. Not supported by all email services.
- Select a ringtone to notify you of an incoming message.
- Adding shortcuts.
- Vibrating alarm to notify you that a letter has been received.
- Incoming and outgoing mail servers (user name, address, port and encryption type), etc.

In exactly the same way, accounts for other mail services are added to Gmail. There are no restrictions on quantity. It is usually not necessary to use manual settings, as described above, except for connecting corporate or some exotic mail accounts. In other cases, the application selects the optimal parameters by default.
How to change and delete your Gmail account
By default, Gmail only displays correspondence from one account—the one active in this moment. To check another person's mail, you need to make it active.
All connected accounts are displayed in the top field of the main application menu (hidden behind the “hamburger” button). To switch between them, just touch the desired shortcut. And for simultaneous download messages from all your mail, select " All boxes».

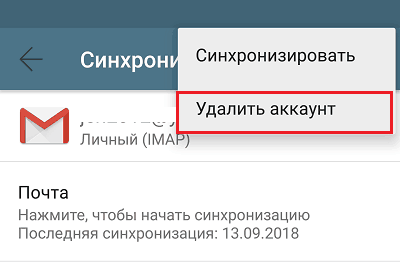
To delete an account from Gmail apps press the triangle button in the main menu and open “ Account management».

Next select postal service and the account you want to delete. On the next screen, highlight again required address and go to the menu hidden behind the “three dots” button (top right). Tap " Delete account».
Setting up mail on iPhone and iPad
Connect and set up your account
Adding and setting up an email account on mobile devices ah Apple is no more labor intensive than Android, but, in my opinion, less intuitive. And they are executed not in the mail section, but in “ Accounts and passwords».
To use a different email account on your iPhone or iPad other than the one linked to your Apple ID, do the following:
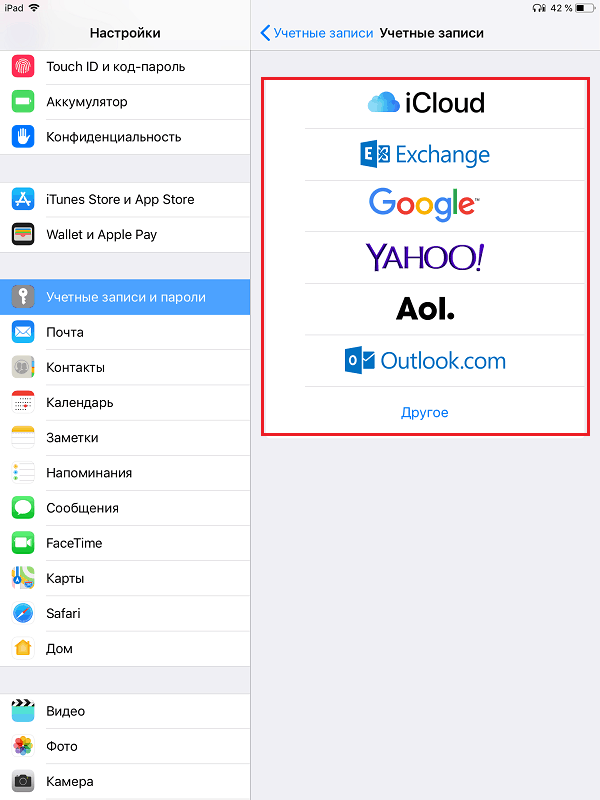
- In the list, tap " Accounts» point « Add».

- Select the mail service where your mailbox is registered. If it is not in the list of suggestions, click " Other».
- Next, select the section “ Mail" And " New account».

- Enter your account information: username (by default the email account login is entered), email address, password and description (the latter by default matches the mailbox address). Tap the button Further».

- In the next window - IMAP, check " Mail" Paragraph " Notes» It is not necessary to mark. Save the setting.
- Next, if you think the settings are sufficient, click “ Ready" A new account will be added. If you want to edit settings that are not displayed in this window, click " Additionally».

In chapter " Additionally» contains the following options:
- Behavior of boxes. Allows you to assign or change the roles of some folders - drafts, sent, archived and deleted messages.
- The place to move unnecessary letters is to the trash or archive box.
- Frequency of emptying the recycle bin ( complete destruction deleted messages). The default is one week.
- Options for receiving incoming correspondence: use SSL encryption, select authentication method, port number IMAP server and IMAP path prefix.
- Whether to use S/MIME encryption. Disabled by default, supported by most but not all email services.

After closing the settings window, you will be taken to the newly created account section. By the way, there is also a button to delete it.

Now built into the system mail program will receive letters, including from this mailbox.
Setting up the mail application
The parameters of the built-in mail program are configured, as you probably already guessed, through the section “ Mail».
The following is collected here:
- Application integration with Siri and search system.
- Ways to notify about incoming correspondence (ringtone and sticker). You can assign individual notification settings to each mailbox.
- Message list display: number of rows to display when viewed, labels, swipe options (right, left, adding a flag, etc.), flag style and color.
- Actions when reading a message (request confirmation for deleting a message, uploading pictures).
- Sorting and processing correspondence: grouping by topic, collapsing read letters, location last message(top or bottom), topic completion (showing chains of emails that make up one topic, even if they have been moved to other folders).
- Options created message: sending a copy of the letter to yourself, marking addresses, indenting when inserting a quote, signatures - general or separate for each account and the default account from which new letters will be sent.

As you can see, the email program on Apple phones and tablets allows you to completely configure it to suit your own needs. Not everyone can boast of such functionality. third party application. Another plus in the collection of mailers built into the system - both on Android and Apple - is the absence of advertising, which almost all of them are stuffed with free analogues. So both programs are quite good.
Enjoy it for your health!
Also on the site:
How to set up email on your phone for Android and iOS updated: September 13, 2018 by: Johnny Mnemonic
One of the most requested functions in any modern smartphone is an email client that allows you to receive and send emails from various services, be it standard services search engine Google systems, Yandex or third-party mail services, for example, Mail, Beeline and others. In this material we will describe to you in detail how to set up mail on your Android and how to create backups your letters!
You can set up mail not only using standard tools of the system itself, but also using specialized applications downloaded from the service Google Play, as well as directly from the browser by logging in with your account.
So, the process of setting up mail can be divided into three different categories:
- Mail settings system means in OS Android.
- Setting up mail in applications.
- Setting up mail on Android in browsers.
Attention! Whatever service you use to send and receive emails, the essence of email does not change. Almost all projects to work with by email use identical technologies.
1. Setting up mail using the operating system itself
So, how to set up mail on Android? Standard means this system allows you to receive and send letters from the attached email addresses, for example, the same Gmail or connecting a separate address for working with mail. We will consider both options.
The first option is Standard Mail from Google
Initially, we will consider the option of working with by standard mail from Google. As soon as you add an account for your smartphone running operating Android systems, mail will be configured automatically, and all letters will be downloaded to your device, both previously read and not yet opened.
To work with accounts and configure them, you need to go to the “Settings” tab, select “Accounts and synchronization”, and then log in to the account in which your mail is attached. IN in this case We are talking specifically about Google - Gmail service, which is used by millions of people around the world.
Second option - Connecting mail from third-party services
Let's say that you use mail from Yandex or Mail.ru. What to do in this case? As mentioned earlier, the principle of operation of mail services is the same, the only thing is that some settings in the records differ.
To set up mail in any other service, you need to select in the main menu of the system Email application and open it. First try logging in with automatic tuning. To do this, simply enter your email address in the “E-mail” field and your password in the “Password” field. Once the data has been entered, click the “Next” button.
If the system gives an error, return to the previous point and click the “ Manual setting" Using the example, we will configure Mail.ru mail.


In the window that appears, enter the settings as in the picture:

For the outgoing message server, set the following parameters:

Attention! All parameters for your email client can be viewed on the official website, for example, www.mail.ru or www.yandex.ru, by going to the appropriate section. In the “Help” section, find the item that mentions setting up mail on your smartphone, and see the list of parameters that you need to register for your account.
Once all the data has been entered, you will need to click on the “Finish” button, after which the system will check the accuracy of the entered data and synchronize with the mail server. All your emails will be automatically downloaded to your phone. You can delete incoming emails from your phone at any time by first making copies. It is also worth considering that several email accounts can be connected on one smartphone, for example, if you work directly with Yandex, Mail.ru and other email services!
2. Setting up mail in Android applications
Above we described a method that allows you to connect and configure mail in standard options operating system Android. In this same paragraph we are talking about specialized applications that are developed specifically for each service, for example, Yandex Mail or Gmail, Mail.ru and many others. The procedure in this case will be as follows:
- Determine what mail you have and where it is registered. For example, if you have mail of this type - [email protected], then it belongs to Yandex if [email protected], then to Mail.ru and so on.
- Go to Google Play and in the search enter the name of the mail service, for example, the same Yandex or Yandex, Mail.ru, Rambler and so on.
- Download the program (mail client) for this mail service and run it.
- Enter your username and password. As practice shows, in most programs the email address can be entered either simply a login or in full email.
- The system will check the correctness of the entered data and automatically download letters from the server to your device.
Each program has its own design, its own specific settings, and separate functionality, so here each user himself determines whether he should check mail through official application mail service or indicate your e-mail via standard settings in Android.
You can install several programs, for example, to work with Mail, Yandex, Rambler, just keep in mind that this significantly increases battery power consumption.
3. Setting up mail on Android in browsers
Due to the fact that most users prefer to access the Internet from mobile devices and smartphones, many email services have developed a mobile version, with which the site automatically adjusts to the diagonal dimensions of your device. All these operations are carried out in a browser, for example, Safari or Google Chrome, Opera.
So that you can log into your Post service, you need to open any browser on your device and in search engine write its name or immediately go to the official website, for example, at www.yandex.ru to work with mail from Yandex. Next, you go to the “Mail” tab, enter your username and password. We recommend that you save your password in your browser so that you do not have to enter it every time you log in.

Subsequent times you will be logged into your email account automatically as soon as the page opens. In your browser settings, you can also add a page to bookmarks to get to the email service with one click.
As you can see, setting up mail on Android is quite simple, and there are many ways to do this! Based on statistical data, we can say with complete confidence that most users prefer to use standard Android settings or specialized applications. Exit through mobile versions from the browser is carried out only by those people who cannot independently install the application from Google Play or register the settings in Android. What you should do is up to you to decide! Good luck!