What to make speakers from. Parting words for beginning designers
If you don't want to buy equipment, you can make your own speaker system. In this article we will tell you how to assemble a column for such a system. Of course, we will talk about a stationary sound speaker, since the technology for making portable speakers is much more complex and will require you not only to have special knowledge and skills, but also special equipment and materials.
How to assemble speakers correctly
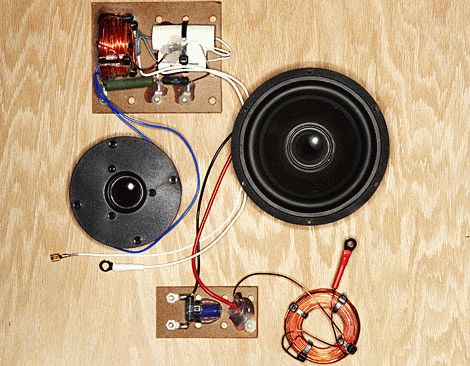
First you need to take 2 identical dense cardboard boxes. The boxes should not be deformed and it is desirable that they be strong enough and attractive in appearance. Please note that the sound quality will directly depend on their size. Now we take 2 dynamic heads (of any suitable size) with a power of about 3 W. The dimensions of the heads are not so important, because the sound quality will primarily be determined by the cardboard housing of the speakers. Remember that it is better to use small speakers in large enclosures than large ones in small ones. Next, you need to cut holes in the middle of the box lids that follow the shape of the head diffuser. Now we drill holes for mounting the speakers - 4 in each box. Next, between the box lids and heads you need to lay any fabric that has good sound-transmitting properties. Then we secure the heads with screws, nuts and washers and drill with reverse side Each box has 20-30 small diameter holes. On top of the boxes we make holes in the shape of thermometers for fastening to the wall.
We complete the assembly
Now you need to glue 4 rubber circles about 5 mm thick in the corners of each back wall. This is necessary so that the speakers are not attached tightly to the wall, otherwise you will not get high-quality sound. With this simple procedure, you can get your 3-watt speaker system to sound as powerful as a modern, foam-lined 15-watt speaker system. Moreover, your system will also benefit from bass performance. Next, we just need to take a 2-wire flexible multi-core cable with a cross section of 0.75 mm2. and solder it to the dynamic heads. Now you need to take the cable out and secure the covers to the speaker housing. Having assembled the speakers in this way and hung them on the wall, connect them to an amplifier with an output power that does not exceed the power of each of the speakers. Please note that these systems are designed for indoor use. Well, we found out how to assemble a speaker with our own hands, and now a few words about the amplifier, because without a good, high-quality “amplifier” the speakers will not sound as they should. This is actually a topic for another article, but we will give you instructions on how to build your own IC-based speaker amplifier.
How to assemble a speaker amplifier
Best to do transistor amplifier, the circuit of which has long been known - unlike an amplifier on microcircuits, a transistor one will reproduce sound much better. However, if you don’t want to bother with such a design and sound quality is not so critical for you, the easiest way is to make an amplifier using microcircuits. To make an amplifier, take printed circuit board and install the corresponding microcircuit on it (usually a microcircuit with legs numbered 5, 11, 12 removed is used). The radiator area must be at least 600 sq.cm. Now connect the case to the common wire, and for the power supply, take a step-down transformer with a current of 5 A and a voltage of 25 V. The transformer must have two windings. Next you need to solder the capacitor in parallel with the diodes and the filter capacitors. The capacity of the first capacitor should be 0.01 μF, capacitors C2 and C4 0.1 μF, and capacitors C1 and C3 - 22 μF with a voltage of 50 V. The supply voltage with a load of 8 ohms should be 35 V, and with a load of 4 ohms - 27 V. In this case, the voltage on the transformer windings (secondary) should be 20 V. You can find the circuit diagram of such an amplifier here
At first glance, making your own speakers is quite simple. However, this is misleading. First of all, it should be noted that the models are manufactured with various elements. Depending on them, the device parameters and sound quality will be different.
Pull out to computer speakers special requirements. You can also make a model for your car or studio yourself. IN in this case It is very important to follow the instructions. First of all, for assembling speakers you should consider standard scheme models.
Speaker layout
The speaker circuit includes drivers, pads, diffuser and crossover. U powerful models a special bass reflex is used. Amplifiers can be installed with field-effect or switching transistors. To improve sound quality, capacitors are used. The woofer is matched with the amplifier. The dynamic head must be attached to the seal.

Single speaker models
Single speaker speakers are very common. To assemble the model, you will first have to deal with the body. Plywood is often used for this purpose. At the end of the work it will have to be sheathed. However, the first step is to make the side posts. For this purpose you will have to use a jigsaw. you can choose a small power.
The inside of the plywood is necessarily stitched with vibration-proof tape. After fixing the speaker, the seal is fixed. Glue is used for this purpose. Next, all that remains is to attach the diffuser. Some people make a separate shelf for it and fix it with stacking screws. To connect the speaker to the plug, a terminal block is installed. How to turn on speakers? For this purpose, a cable is used from the terminal block, which should lead to a power source.
Model drawing for two speakers
Speakers with two speakers can be made for home or car. If we consider the first option, then a pulse type diffuser will be required. First of all, durable plywood is selected for assembly. The next step is to cut out the bottom post. Models with legs are very rare. To cover the veneer, you can use regular varnish. There is no need to glue vibration isolation tape to the front pillar. The diffuser is mounted under the speaker. To make a hole in the panel, you need to use a jigsaw. The bass reflex is fixed at the rear wall. Some manufacture devices with horizontal speakers. In this case, the diffuser will be located at the top of the structure. Speaker wires are of the two-core type.

Devices with three speakers
Speakers (homemade) with three speakers are very rare. These devices are most suitable for the multi-channel type. To assemble the model, first of all, sheets of plywood are selected. Some also recommend using veneers. However, models made of natural wood are quite expensive on the market. Speakers should be installed in horizontal position. The device will also require an amplifier.
Metal corners are used to secure it. To connect the plates you will need tightening screws. In some cases, the plates are secured with glue. Next, the model will have to be partially covered with leatherette. The next step is to install the terminal block. In order to fix it on the body, you will need to make a separate hole. It is also important to note with regulators. Microcircuits for them are used of the capacitor type. When the speakers produce noise, you need to change the diffuser.
Studio devices
Speaker drawings for studios assume the use of powerful speakers. The diffuser is most often used of the pulse type. Many experts recommend installing two amplifiers. For normal operation you will need a zener diode.
With the aim of self-assembly For speakers, the body is first made. Round holes are made on the front panel for the speakers. You will also need a separate output for the bass reflex. The design of the columns is quite different. Some people prefer to varnish the surface of the case. However, there are models covered in leather.

Models for computers
Speakers for computers are often made with one speaker. To assemble the model, veneer sheets of small thickness are selected. A hole for the speaker is cut out on the front panel. The bass reflex must be located at the rear of the housing. If we consider low-power models, the amplifier can be used without a resistor.
To adjust the speaker volume, special crossovers are used. These elements are allowed to be installed on a bass reflex. If we consider devices with a power of more than 100 W, then amplifiers can only be used with resistors. Some people select pulse diffusers for the model. At the end of the work, the terminal block is always installed.
Automotive modifications
Available with two or three speakers. To assemble the model yourself, you will need sheets of plywood. In some cases, varnished veneer is used. To fix the speaker, you need to make a hole in the panel. The next step is to install the bass reflex. Some modifications are made with low-frequency cores. If we consider speakers (homemade) of low power, then the bass reflex can be installed without an amplifier.
In this case, a multi-channel crossover is used to control sound. Some specialists install terminal blocks behind the bass reflex. If we consider speakers with a power of more than 50 W, then the microcircuits are used for two amplifiers. The diffuser is installed as a standard pulse type. Before fastening the case together, it is important to take care of the vibration-proofing layer. For the terminal block, you need to make a separate hole on the plate. Some people believe that the body must be cleaned. The wires for the speakers are of the two-wire type.

Open-back speakers
Portable speakers with open body It's pretty easy to do. Most often they are made with one speaker. Holes are made on the back panel of the device with a drill. The plates are directly connected with tightening screws. The diffuser for such devices is suitable for pulse type. Bass reflex units are often installed with one amplifier. If we consider powerful portable speakers, they use a resistor crossover. It is attached to the bass reflex. Many experts recommend installing speakers on a seal.
Devices with closed housing
Speakers (homemade) with a closed housing are considered the most common. Many experts believe that they are the best in sound quality. Bass reflex devices are suitable operational type. The woofers are installed in the holes. For the purpose of assembling the case, ordinary sheets of plywood are suitable. It is also important to note that there are modifications with cores. If we consider high-power speakers, the terminal blocks are installed in the lower part of the housing. The design of the models is quite different.

20 W models
Assembling 20V speakers is quite simple. First of all, experts recommend preparing six sheets of veneer. They should be varnished at the end of the work. It makes more sense to start assembly by installing the speakers. The bass reflex is used as a pulse type. In some cases it is installed on pads. Experts also recommend using rubber seals.
Power supply to the speakers is provided through the terminal block. It is attached to the back panel. The bass reflex can be installed either with or without an amplifier. If we consider the first option, then the cores are selected of the phase type. In this case, the woofer does not need to be used. If we consider speakers without an amplifier, then they use a crossover. At the end of the work, it is important to clean the body and varnish it.
50 W devices
Speakers (homemade) rated at 50 W are suitable for ordinary acoustic players. In this case, the body can be made from ordinary plywood. Many experts also recommend using natural wood veneer. However, it is important to note that he is afraid of high humidity.

After choosing the material, you should work on the speakers. They must be installed next to the bass reflex. In this case, you cannot do without an amplifier. Many experts recommend selecting only low-frequency crossovers. If we consider modifications with a regulator, then they use a pulse diffuser. The terminal block in this case is installed last. You can always use leatherette to decorate the speakers. More simple option is considered to be coating the surface with varnish.
Speakers with a power of 100 W
100 W speakers are suitable for powerful ones. In this case, the bass reflex is taken only of the pulse type. It is also important to note that the amplifier is installed with a crossover. Many experts recommend using veneer to assemble the case. It is better to install the woofer on a pad.
Before a detailed consideration of the problem, we will outline the range of tasks; knowing the final goal, it will be easier to choose the right direction. Manufacturing speaker systems with your own hands is a rare occurrence. Practiced by professionals and novice musicians when store-bought options are not satisfactory. The problem arises of integrating into furniture or high-quality listening to existing media. These are typical examples that can be solved by typing generally accepted methods. We'll take a look at it. We do not recommend scrolling diagonally through the speaker system, delve into it!
Acoustic system design
There is no chance of making an acoustic system yourself without understanding the theory. Music lovers should know that the biological species Homo Sapiens hears sound vibrations with frequencies of 16-20,000 Hz through the inner ear. When it comes to classical masterpieces, the variation is high. The lower edge is 40 Hz, the upper edge is 20,000 Hz (20 kHz). Physical meaning This fact is that not all speakers are capable of reproducing the full spectrum at once. Relatively slow frequencies are better handled by massive subwoofers, and squeaking at the lower edge is reproduced by smaller speakers. Obviously, this means nothing to most people. And even if part the signal will disappear, will not be reproduced, no one will notice it.
We believe that those who set the goal of making their own acoustic system should critically evaluate the sound. It will be useful to know that a suitable speaker has two or more speakers in order to be able to reflect the sound of a wide swath of the audible spectrum. But the subwoofer even in complex systems one. This is due to the fact that low frequencies cause the environment to vibrate, even penetrating through walls. It becomes unclear where exactly the bass is coming from. Consequently, there is only one low-frequency speaker – a subwoofer. But as for other things, a person will confidently say from which direction this or that special effect came (the ultrasound beam is blocked by the palm).
In connection with the above, we will divide the acoustic systems:
- Sound in Mono format is unpopular, so we avoid touching on historical excursions.
- Stereo sound is provided by two channels. Both contain low and high frequencies. Equal speakers equipped with a pair of speakers (bass and squeak) are better suited.
- Surround Sound is distinguished by the presence of a larger number of channels, creating a surround sound effect. We avoid getting carried away with subtleties; traditionally, 5 speakers plus a subwoofer convey the range to music lovers. The design is varied. Research is still underway to improve the quality of acoustic transmission. The traditional arrangement is as follows: in the four corners of the room (roughly speaking) there is a speaker, the subwoofer is on the floor to the left or in the center, the front speaker is placed under the TV. The latter is in any case equipped with two or more speakers.
It is important to create the correct enclosure for each speaker. Low frequencies will require a wooden resonator, but for the upper end of the range it doesn’t matter. In the first case, the sides of the box serve as additional emitters. Find a video demonstrating dimensions, corresponding to wavelengths low frequencies According to science, all that remains is to practically copy ready-made designs; the topic is devoid of relevant literature.
The range of tasks is outlined, readers understand that a homemade acoustic system is built with the following elements:
- a set of frequency speakers according to the number of channels;
- plywood, veneer, body boards;
- decorative elements, paint, varnish, stain.
Acoustics design
Initially, select the number of columns, type, location. Obviously, producing more channels than a home theater has is an unwise tactical move. Cassette recorder Two columns are enough. TO home theater At least six cases will be released (there will be more speakers). According to the needs, accessories are built into the furniture, the quality of low frequency reproduction is poor. Now the question of choosing speakers: in the publication by Naidenko and Karpov the nomenclature is given:

- Low frequencies - CA21RE (H397) head with an 8-inch fit.
- Mid range - MP14RCY/P (H522) 5" head.
- High frequencies – head 27TDC (H1149) by 27 mm.
Brought basic principles designing acoustic systems, offered electrical diagram a filter that cuts the flow into two parts (a list of three subranges is given above), the name of the purchased speakers was given, solving the problem creating two stereo speakers. We avoid repetition; readers can take the trouble to look through the section and find specific titles.
The next question will be the filter. We believe that National Semiconductor will not be offended if we screenshot the drawing of the Ridico translation amplifier. The figure shows an active filter with a power supply of +15, -15 volts, 5 identical microcircuits (operational amplifiers), the cutoff frequency of the subbands is calculated by the formula shown in the image (duplicated in text):
P – number Pi, known to schoolchildren (3.14); R, C – resistor and capacitance values. In the figure, R = 24 kOhm, C is silent.

Active filter powered by electric current
Taking into account the capabilities of the selected speakers, the reader will be able to select a parameter. The characteristics of the speaker's playback band are taken, the overlap junction between them is found, and the cutoff frequency is placed there. Thanks to the formula, we calculate the value of the capacitance. Avoid touching the resistance value, reason: it can (disputed fact) set the operating point of the amplifier, the transmission coefficient. On frequency response given in the translation, which we omit, the limit is 1 kHz. Let's calculate the capacity of the specified case:
C = 1/2P Rf = 1/2 x 3.14 x 24000 x 1000 = 6.6 pF.
It’s not that big of a capacitance; it’s selected based on the maximum permissible voltage. In a circuit with sources of +15 and -15 V, it is unlikely that the nominal value exceeds the total level (30 volts), take a breakdown voltage (the reference book will help) of at least 50 volts. Do not try to install DC electrolytic capacitors; the circuit has a chance of blowing up. There is no point in looking for the original circuit diagram of the LM833 chip due to Sisyphean labor. Some readers will find a replacement chip that is different... we hope for your understanding.
Regarding the relatively small capacitance of the capacitors (retail and total), the description of the filter says: due to the low impedance of the heads without active components, the ratings would have to be increased. Naturally causing the appearance of distortions due to the presence of electrolytic capacitors and coils with a ferromagnetic core. Feel free to move the range division boundary, general throughput remains the same.

Passive filters will be assembled with your own hands by anyone trained in soldering in a school physics course. As a last resort, enlist the help of Gonorovsky; there is no better description of the intricacies of the passage of signals through radio-electronic lines that have nonlinear properties. The presented material interested the authors in low and high frequency filters. Those wishing to divide the signal into three parts should read works that reveal the basis of bandpass filters. The maximum permissible (or breakdown) voltage will be scanty, the nominal value will become significant. Matching the mentioned electrolytic capacitors are capacitances with a nominal value of tens of microfarads (three orders of magnitude higher than those used by an active filter).
Beginners are concerned about the issue of obtaining a voltage of +15, -15 V to power speaker systems. Wind the transformer (an example was given, PC program Trans50Hz), equip it with a full-wave rectifier ( diode bridge), filter, enjoy. Finally, buy an active or passive filter. This thing is called a crossover, carefully select the speakers, correlate the ranges more accurately with the filter parameters.
For passive crossovers acoustic systems, you will find many calculators on the Internet (http://ccs.exl.info/calc_cr.html). The calculation program takes the input impedances of the speakers and the division frequency as the initial numbers. Enter the data, the robot program will quickly provide the values of capacitances and inductances. On the page below, specify the filter type (Bessel, Butterworth, Linkwitz-Riley). In our opinion, this is a task for the pros. The above active stage is formed by 2nd order Butterworth filters (rate of frequency response reduction 12 dB per octave). It concerns the frequency response (frequency response) of the system, understandable only to professionals. When in doubt, choose the middle ground. Literally check the third circle (Bessel).
Acoustics of computer speakers
I happened to watch a video on YouTube: a young man announced that he would make an acoustic system with his own hands. The talented boy: he ruined the speakers personal computer- well, none at all - I brought out an amplifier with a regulator and placed it in a matchbox (speaker system housing). Computer speakers are notorious for poor bass response. The devices themselves are small, light, and secondly, the bourgeoisie saves on materials. Where does bass come from in a speaker system? The young man took... read on!
Most expensive component music center. Acoustics hi-end class costs less than a cheap apartment. Repairing and assembling speakers is a good business.
The low-frequency amplifier of the speaker system will be assembled by an advanced radio amateur; no Kulibins are needed. The volume control knob sticks out of the matchbox, the input is on one side, the output is on the other. The speakers of the old sound system are small. The young man got hold of an old loudspeaker, not of fabulous size, but solid. From a Soviet-era speaker system.

To prevent the sound from disturbing the air with squeaking, the clever youth nailed together one-inch boards into a box. The speaker of the old acoustic system was placed in the size of a mailbox, moved, as is done by the manufacturers of modern home theater subwoofers. I was too lazy to decorate the inside of the speaker with soundproofing. Anyone can use batting or other similar material for the acoustic system. Small speakers are placed inside oblong boxes that just contain a loudspeaker at the end. The proud youth connected one channel of the speaker system to two small speakers, the second to one large one. Works.
The young man is a fabulous fellow, he doesn’t drink in the gateway, being like his peers, he doesn’t spoil the free time future brides, busy with business. As one acquaintance said: “The younger generation is forgiven for a lack of knowledge and experience, not an excess of arrogance, strengthened by indifference.”
Improvements
We decided to improve the method; we sincerely hope that the addition will help make the acoustic system itself somewhat better. Problem? The concept was invented by radio engineers and creators of acoustic systems - frequency. The vibration of the Universe has a frequency. They say that it is even inherent in a person’s aura. Each good speaker No wonder it accommodates several speakers. Large ones are intended for low frequencies, bass; others - for medium and high. Not only the size, but also their structure is different. We have already discussed this issue and refer those interested to the written reviews, which provide a classification of acoustic systems and reveal the operating principles of the most popular ones.
Computer scientists know the system buzzer, which operates via a BIOS interrupt, which seems to be capable of producing one sound, but talented programmers wrote elaborate melodies on it, even with an attempt at digital synthesis and voice reproduction. However, such a tweeter cannot produce bass if desired.
Why this conversation... A large speaker should not just be adapted to one of the channels, but should be given a specialization for bass. As you know, most modern compositions (We don’t take Sound Around) are designed for two channels (stereo playback). It turns out that two identical speakers (small) play the same notes, this makes little sense. At the same time, from the same channel, the bass is lost, and the high frequencies die on a large speaker. What should I do? We propose to introduce passive bandpass filters into the circuit, which will help split the flow into two parts. We take the diagram from a foreign publication for the simple reason that it was the first one that caught our eye. Here is a link to the original site chegdomyn.narod.ru. The radio amateur copied it from the book, we apologize to the author for not indicating the original source. This happens for the simple reason that he is unknown to us.
So, here's the picture. The words Woofer and Tweeter immediately catch your eye. As you might guess, this is, respectively, a subwoofer for low frequencies and a speaker for high frequencies. The range of musical works is covered from 50-20000 Hz, with the subwoofer accounting for the low frequency band. Radio amateurs themselves can known formulas calculate the bandwidths; for comparison, A of the first octave is known to be 440 Hz. We believe that such a division is suitable for our case. I just wish I could find two large speakers, one for each channel. Let's look at the diagram...

Not exactly a musical scheme. In the position occupied by the system, the voice is filtered. Range 300-3000 Hz. The switch is signed Narrow, translated as a stripe. To get Wide playback, lower the terminals. Music fans may want to throw out the Narrow bandpass filter; those who like to surf Skype should avoid a hasty decision. The circuit will completely eliminate the microphone loop effect, which is known everywhere: a high-pitched hum due to over-amplification (positive feedback). A valuable effect, even a military man knows the difficulties of using a speakerphone. The owner of the laptop is aware...
To eliminate the feedback effect, study the issue, find at what frequency the system resonates, cut off the excess with a filter. Very comfortably. Regarding popular music, we turn off the microphone, move it away from the speakers (in the case of karaoke), and start singing. We will leave the high and low pass filters unchanged, the products were calculated by unknown Western friends. For those who have difficulty reading foreign drawings, we explain that the diagram depicts (the Narrow bandpass filter is discarded):
- Capacitance 4 µF.
- Non-inductive resistances R1, R2 with a nominal value of 2.4 Ohm, 20 Ohm.
- Inductance (coil) 0.27 mH.
- Resistance R3 8 Ohms.
- Capacitor C4 17 uF.
The speakers must match. Advice from this site. The subwoofer will be MSM 1853, the tweeter (the word has not been written off) will be PE 270-175. You can calculate the bandwidth yourself. The capital letter Ω means kOhm - no big deal, change the value. We remind you that the capacitances of parallel-connected capacitors add up, like series-connected resistors. In case it is difficult to get suitable denominations. It is unlikely that you will be able to make speakers with your own hands; it is realistic to obtain small resistance values. Do not use coils; we cut out plates of nichrome or similar alloys. After manufacturing, the resistor is varnished; high current is not planned; the element should not be protected.
It is easier to wind inductors yourself. It is logical to use an online calculator, by setting the capacitance, we will get the parameters: number of turns, diameter, core material, core thickness. Let's give an example, avoiding being unfounded. We visit Yandex, type something like “ online calculator inductance". We receive a number of output responses. We choose the site we like, and begin to think about how to wind the inductance of an acoustic system with a nominal value of 0.27 mH. We liked the site coil32.narod.ru, let's get started.
Initial information: inductance 0.27 mH, frame diameter 15 mm, PEL wire 0.2, winding length 40 millimeters.

The question immediately arises, seeing the calculator, where to get the nominal diameter of the insulated wire... We worked hard, found a table on the website servomotors.ru, taken from the reference book, which we present in the review, consider it for your health. The diameter of the copper is 0.2 mm, the insulated core is 0.225 mm. Feel free to feed the values to the calculator, calculating the required values.
The result was a two-layer coil with 226 turns. The length of the wire was 10.88 meters with a resistance of about 6 ohms. The main parameters have been found, we begin to wind. A homemade speaker system is made in self made case, there is a place to place the filter. We connect a tweeter to one output, and a subwoofer to the other. A few words about amplification. It may happen that the amplifier stage will not support four speakers. Each circuit is characterized by a certain load capacity; you cannot jump higher. The speaker system is designed with a fixed headroom in mind; to match the load, an emitter follower is often used. The cascade that makes the circuit work, full impact on any speaker.
Parting words for beginning designers
We believe that we have helped readers understand how to properly design an acoustic system. Passive elements (capacitors, resistors, inductors) can be obtained and manufactured by anyone. All that remains is to assemble the speaker system body with your own hands. And we believe that this will not be the case. It is important to understand that music is formed by a range of frequencies that are cut off by improper manufacturing of the device. When you are planning to make a speaker system, think about it and look for the components. It is important to convey the magnificence of the melody, there will be a strong confidence: the work was not in vain. The speaker system will last a long time and will give you joy.
We believe that readers will enjoy making speaker systems with their own hands. The coming time is unique. Believe me, at the beginning of the 20th century it was impossible to obtain tons of information every day. Training resulted in hard, painstaking work. I had to rummage through the dusty shelves of libraries. Enjoy the Internet. Stradivarius impregnated the wood of his violins with a unique composition. Modern violinists continue to choose Italian examples. Think about it, 30 years have passed, the cart has been left behind.
The current generation knows the brands of adhesives and the names of materials. Necessities are sold in stores. The USSR took away the abundance of people, providing them with relative stability. Today, advantage is described by the possibility of invention unique ways earnings. A self-taught professional will cut down cabbages everywhere.
Assembling a speaker at home is not such a difficult task as many might think. Possessing necessary materials and information, you can not only get a good, high-quality speaker with clear sound, but also save a decent amount of money.
First you need to buy or make your own sound amplifier.
How to make a homemade speaker amplifier
This is a very simple way to build an audio amplifier. Absolutely anyone can assemble such an amplifier without much effort.
Necessary materials
Crown connector;
Krona 9 Volt;
1 Watt speaker with 8 kOhm impedance;
Mini-jack 3.5 mm;
10 kOhm resistor
Switch;
Chip LM386;
Capacitor 10 Volt and 220 µF;
Soldering iron.
Manufacturing
Step 1
Place the chip on the table. In order not to confuse the sides and to correctly solder all the wires to the microcircuit, you need to pay attention to the hole on one of the sides of the microcircuit. This hole needs to be positioned away from you, as shown in the image:

Step 3
The positive contact of the connector must be soldered to the second contact of the switch.

Step 4
The fifth “leg” of the microcircuit must be soldered to the positive contact of the capacitor.

20 Signs You've Found the Perfect Guy

How to behave if you are surrounded by boors

What happens if you look into a person's eyes for too long?

Step 5
Connect the remaining contact of the capacitor using a soldering iron and cord to the positive contact of the speaker.

Step 6
Having made a jumper as shown in the picture, you need to solder the negative contact of the speaker to pins 2 and 4 of the microcircuit.

Step 7
Solder a resistor to the third pin of the microcircuit.

Step 8
Disassemble the mini-jack, connect the left channel to the right and solder the resistor to the remaining channel through the wiring.

Step 9
Connect the minus of the mini-jack to the minus of the speaker using a wire and a soldering iron.


Benefits of Drinking Coffee

13 signs you're wasting your life but don't want to admit it

How a cat can ruin your life
Step 10
Solder the negative wire of the connector to the negative terminal of the speaker.

Step 11
The speaker for the future speaker is ready! Now all that remains is to test. If the speaker does not work, then it is worth reviewing the previous paragraphs to correct errors.
Column assembly
Now let's start making the column itself.
Necessary materials
Polypropylene pipe, the diameter of which is equal to the diameter of the column or slightly larger;
DVD or CD disc;
Drill;
Hot melt adhesive;
Scissors;
Drill or screwdriver with drilling attachments;
Sandpaper;
Manufacturing
Step 1
Cut the pipe, leaving a small bulge for the connector. Before you start cutting, you need to mark this bulge on the pipe according to the size of the connector itself.

Step 2
Draw a circle on the disk in the center using a polypropylene tube. This circle needs to be cut out with scissors and the edges smoothed with a drill. Using scissors, make two small indentations on the disk not far from each other for the wires.

Step 3
Insert the amplifier into the tube. If necessary, carefully fix it with hot glue from the inside.

Step 4
Drill a hole above the convexity for the switch, equal in size to the switch itself or slightly smaller.

Step 5
You need to unsolder the wires from the switch in advance in order to insert the wires into this hole, and then solder them back. Then insert the switch into the hole. If necessary, secure with hot glue on the inside.

Step 6
Using hot glue, glue the disk, having pulled out the wires in advance, to the inside of the tube. And also fix the connector on the bulge with glue. It should look like the image shown:

Step 7
Use a drill to trim off all excess protruding parts, helping with sandpaper.

Step 8
The column is ready! If desired, you can decorate it with stickers or carefully paint it with spray paint.
All that remains is to test it. You need to insert the crown into the connector and connect the mini-jack to the device. It turned out portable speaker with very high quality and clear sound.

Even a new laptop can have weak sound. This is due to the fact that modern models, despite high performance, they do not have strong speakers. This primarily applies to budget laptops. Even more often, users encounter low quality audio tracks V individual applications, audio or video files.
How to improve the sound in each of these cases?Quiet sound on the computer: reasons
We will look at both obvious problems that can be solved within a few seconds, and serious difficulties that interfere with the usual use of your PC.
Not working jacks/headphones/speakers
If the computer is far from new, and various sound devices have been inserted into its connectors for many years, then the deterioration of contact, and with it the sound, can be considered a natural phenomenon. However, when trying to make your headphones louder, check the volume control. Connect the device to another PC to see if the headphones or speakers are faulty.
Tip 1: Disconnect the cable connector and then connect it again. Reconnecting will reveal problems with the socket or plug.
- If your speakers break down, you should consider buying their portable counterparts. Mini models are different high mobility. You can use them as an addition to your tablet or smartphone. But please note that minimum value lung power portable devices should start at 3 watts. Higher values will be required for those who are going to listen to music in places with extraneous noise. The number of speakers indicates whether you will hear stereo or mono sound.
- If the headphones are working properly, you can make the sound louder by correcting the system settings. From the Start menu, go to Control Panel. In the window that appears, select “Sound”. Then find your headphones in the list that opens. In the next context menu select " Additional features" Here you will need to find a list of effects, and then check the “Volume equalization” item in it. These simple steps in some cases they help no worse than a headphone amplifier.
Tip 2. If you do not want to understand the settings of various software products, then purchase headphones with low impedance. The last property is the key to higher volume.
Driver problems
The lion's share software problems with the PC it is somehow connected with the drivers. Experts identify 4 groups of problems:
- developer errors (this kind of problem can be solved by updating);
- driver mismatch with OS version;
- incorrect driver settings;
- driver conflicts (“the opposing side” is often different multimedia devices).
First, you should make sure your audio driver settings are correct. As an example, we use the well-known Realtek. Refer to the “Control Panel”, you will need the “Hardware and Sound” department, where the mentioned software. Then check each tab. No line should be lowered or muted. Don't miss the filters and surround sound.
- If the sound has become quieter due to drivers, then try to update them. Special utilities will help you with this.
The named utility will scan the OS and provide a list of direct links to new driver modifications.
- OS capabilities also allow you to test and update the driver. Use the following step-by-step instructions.
- Use the Control Panel.
- Open the tab responsible for “System and Security”.
- Open the "Sound, Game and Video Devices" section.
- Please refer to your sound card driver.
Fig.3. Update audio driver (Realtek)
In Device Manager, next to drivers, there should be no additional characters, especially exclamation marks. The presence of such symbols indicates driver errors. You will not be able to increase the volume, because in such situations, as a rule, there is no volume at all.
Problems with settings
This refers to OS settings. Before attempting to change anything, play the audio file. This will make it easier to control the volume of the sound, because you will hear the changes immediately.
Then go to the “Control Panel”, in the “hardware and sound” item. To increase the sound on your computer, you will need the options: “control sound devices" and "volume adjustment". IN last tab the user can adjust the sound according to different applications. In the first tab you will need to determine the device through which the PC plays sound. Select the item you want, such as speakers, and open the device properties.
The following tabs will help you increase the sound on your computer:- levels (to increase the sound, raise the sliders to the maximum level);
- special (uncheck “Limited output”);
- improvement (check the “Loud Compensation” box and uncheck the remaining items).
How to improve sound on a computer: using utility software
Special utilities are an interesting alternative to additional acoustics. They are worth using if you don’t like the sound when watching a movie or listening to an audio file. Similar shortcomings are typical for audio and video content downloaded from torrents.
But before you turn to such tools, make sure that it is not possible to adjust the sound using standard Windows OS capabilities. After all, the utility will increase the sound only if there are no serious problems with the hardware or peripheral devices. And be sure to try opening the file in another player. Among software video devices, experts often highlight VLC.
Tip 3. As soon as playback starts in VLC, move the corresponding player slider. Note that it maximum volume equal to 200, which is much more than in many similar devices.
The following programs will help you boost the sound on your computer:
Sound Booster
This program can increase the volume by 1.5 timesThis works for both browsers and Skype. In this case, the sound quality will not be affected. The utility does not load the processor and RAM. After installation it takes up no more than 10 MB. The named volume amplifier is fully integrated into the OS. Thanks to this, changing the sound reproduction is carried out using the Windows slider. Among other conveniences, Sound Booster is distinguished by the presence of sets of hot keys. You can create combinations yourself.
WATCH THE VIDEO
Hear
This amplifier will not only help make the sound on your computer louder, but will also improve the quality of playback of movies, music and any other sounds.Let's look at the list of the main functions of this software product.
- 3D Sound. This is surround sound. The sound will be available to the user from all sides.
- Equalizer. The multi-band equalizer gives the user absolute control over frequencies.
- Channel management. This component of the program allows you to organize a concert with the effect of a “live” performance. Not every computer sound amplifier provides this effect.
- Speaker correction. This mechanism is responsible for the resonance of the speakers.
- Atmosphere. This effect is a set of reverberations that simulate the sound from a telephone booth, well, etc.)
- Fidelity. Manager for restoring frequency and intensity that were lost during recording.
Audio Amplifier
The named utility is designed to process files with problematic soundA few clicks will quickly change the level and tone of a video or audio file. The conversion process lasts a matter of seconds. This tool is not only responsible for amplifying the sound, but also helps to equalize the volume of the selected list of files. This eliminates the need to adjust the volume of the speakers. The named program for increasing the sound on a laptop will make it easier to prepare for events that require a constant volume level.
SRS Audio SandBox
Specified program to enhance the sound turns the speakers into a real audio systemThe list of functions includes improving the sound quality of built-in speakers, producing 3D sound and highlighting voices during movie viewing. You will feel the difference in sound already at the first start. It is worth mentioning that this utility provides customization sound for games and films, taking into account the characteristics of the genre (action or melodrama, RTS or action).