Hide all translation in Photoshop. Understanding blending modes (Blending Modes in Photoshop)
Blending modes) determine how the top layer interacts with the layer directly below it. Blending modes make it easier and faster to change shades, remove imperfections, and perform a number of other operations. In Photoshop, all modes are divided into functional groups: Basic modes, Darkening modes, Lightening modes, Contrast modes, Comparison modes and Component modes.
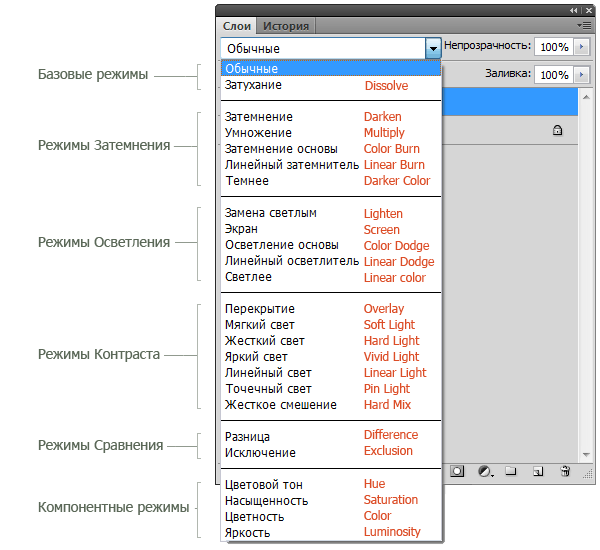
Layer blending modes are found in the drop-down menu at the top of the Layers panel ( Layers). In the picture, for convenience, I wrote the name of the mode in English in red.
1. Basic modes
Normal (Normal) — this layer mode is the default. The top layer pixels are opaque and the images do not interact. As an example, we will look at the blend modes in these two pictures. 

Attenuation (Dissolve) uses a pixel pattern. Gives a porous effect. The effect will only appear if the transparency of the top layer is less than 100%. Here the transparency is 20%. 
2. Dimming modes
Blackout (Darken)—leaves only dark areas of the image visible. Blends pixels where the top layer is darker than the bottom layer. 
Multiplication (Multiply) - allows you to darken the entire image and is useful in situations where you need to increase the density of highlights and midtones. This is especially useful when working with overexposed or overly bright images. 
Darkening the base (Color Burn) - darkens dark colors and shades without affecting light shades. 
Linear dimmer (Linear Burn) - uses the same approach as the Base Burn mode, but produces a stronger darkening effect. If the top layer is white, no changes will occur. 
Darker (Darker Color) - similar to the Burn mode, except that it works on all layers at once, rather than on just one. When you blend two layers, only the dark pixels will remain visible. 
3. Lightening modes
Replacement with light (Lighten) - compares the colors of the top and bottom layers and mixes pixels if the top layer is lighter than the bottom. 
Screen (Screen) - allows you to lighten the entire image and is useful in situations where you need to “develop” some areas in unexposed images. 
Lightening the base (Color Dodge) - the opposite of the "Body Darkening" mode, it brightens light colors and shades without affecting the dark areas of the image. 
Linear Dodge (Linear Dodge) - allows you to lighten the image, but unlike the Screen mode, it “cuts off” the values and produces sharper results than the Screen or Color Dodge blend mode. 
Lighter (Linear Color) - similar to the “Lighten” mode, only it works with all layers at the same time, instead of just one layer. When you blend two layers together, only the lightest pixels will be visible. 
4. Contrast modes
Overlap (Overlay) - combines the effect of the “Multiply” and “Screen” modes, blending the top layer with the bottom. If the top layer is 50% gray, there will be no effect. 
Soft light (Soft Light) - similar to the Overlay mode, but gives a more moderate effect. If the top layer is 50% gray, there will be no effect. 
Hard light (Hard Light) - uses the same approach as the Overlay mode, but the effect is stronger. Here, the top layer is subject to either Screen or Multiply mode, depending on its color. If the top layer is 50% gray, there will be no effect. 
Bright light (Vivid Light) - Combines the effects of the Base Dark and Base Light modes and applies blending based on the color of the top layer. If the top layer is 50% gray, there will be no effect. 
Linear light (Linear Light) - Similar to Bright Light mode, but with a stronger effect. If the top layer is 50% gray, there will be no effect. 
Spot light (Pin Light) - blends light colors using the Lighten mode and dark colors using the Burn mode. If the top layer is 50% gray, there will be no effect. 
Hard mixing (Hard Mix) - creates a picture with even tones, limited in colors and posterized. The glow of the top layer mixes with the color of the bottom. 
5. Comparison modes
Difference (Difference) - Displays the tonal difference between two layers by removing light pixels from either layer. The result is a dark and sometimes upside-down picture. 
Exception (Exclusion) - similar to the "Difference" mode, but with a less extreme effect. 
5. Component modes
Color tone (Hue) - combines the color of the top layer and the color fluctuation and tone of the bottom. 
Saturation (Saturation) - combines the color variation of the top layer with the color and tone of the bottom layer. 
Chroma (Color) - combines the color and color variation of the top layer with the tone of the bottom layer. 
Brightness (Luminosity) - combines the tone of the top layer and the color and color variation of the bottom layer. 
The way the layers interact with each other is determined by the blend modes of the top layer. By default, the layer mode is set to Normal, which causes the image content on the top layer to obscure parts of the images below, but Photoshop has many ways to control how pixels interact. These are called blending modes—various options that give the user a variety of ways to control the blending, overlay, and any interaction of layer content.
Layer blend modes are found in the drop-down menu at the top of the panel. Blend modes can also be applied to images using the drop-down menu in the toolbar.
The blending modes are divided into 6 different sections. The Basic section replaces the base pixels, Darken darkens the base pixels, Lighten brightens them, Contrast increases or decreases overall contrast, Comparative inverts the base color, and HSL modes determine a specific color component. Some blend modes need to be made semi-transparent to achieve the best effect. With all the variety of Photoshop features, only experimentation will give you a real understanding of the technique.
To help you learn and understand how blend modes work, we've prepared a summary of all the blend modes present in Photoshop CS3 Extended today. In the following example of blending modes, the image has two layers - 'Top Layer'

And 'Bottom Layer'.

In each example, the blend mode of the top layer is changed to visually illustrate how the layers stack on top of each other.
Basic
Normal- The pixels of the top layer are opaque and therefore cover the bottom layer. Changing the opacity of the top layer will make it translucent and cause it to blend into the other layer.

Dissolve- Combines the top layer with the bottom using a pixel pattern. There will be no effect if the top layer has 100% opacity. Reduce the transparency for the effect to appear. The example shows 80% transparency.

Darken
Darken- Combines the colors of the top and bottom layers and blends pixels in places where the top layer is darker than the bottom.

Multiply- Superimposes the color of the bottom layer onto the top layer, thereby giving a darkened result. If the top layer is white, no changes will occur.

Color Burn- Darkens or “burns” the image using the contents of the top layer. If the top layer is white, no changes will occur.

Linear Burn- Uses the same approach as Color Burn mode, but produces a stronger darkening effect. If the top layer is white, no changes will occur.

Darker color- Similar to Darken mode, except that it works on all layers at once, rather than on just one. When you blend two layers, only the dark pixels will remain visible.

Lighten
Lighten- Compares the colors of the top and bottom layers and mixes pixels if the top layer is lighter than the bottom. 
Screen- The opposite of the Multiply mode as it applies an inversion of the top layer to the bottom, giving a lighter effect.

Color Dodge- Makes the image lighter by hiding the top layer behind the bottom. If the top layer is black, there will be no effect.

Linear Dodge (Add)- Similar to Screen mode, but gives a brighter effect. If the top layer is black, there will be no effect.

Linear color- Similar to Lighten mode, but works with all layers at once, instead of just one layer. When you blend two layers together, only the lightest pixels will be visible.

Contrast
Overlay- Combines the effect of Multiply and Screen modes, blending the top layer with the bottom. If the top layer is 50% gray, there will be no effect.

Soft Light- Similar to Overlay mode, but gives a more subtle effect. If the top layer is 50% gray, there will be no effect.

Hard Light- Uses the same approach as Overlay mode, but the effect is stronger. Here, the top layer is set to either Screen or Multiply mode, depending on its color. If the top layer is 50% gray, there will be no effect.

Vivid Light- combines the effect of Color Burn and Color Dodge modes and applies blending depending on the color of the top layer. If the top layer is 50% gray, there will be no effect.

Linear Light- Similar to Vivid Light mode, but with a stronger effect. If the top layer is 50% gray, there will be no effect.

Pin Light- Mixes light colors using Lighten mode and dark colors using Darken mode. If the top layer is 50% gray, there will be no effect.

Hard Mix- Creates a picture with even tones, limited in colors and posterized. The glow of the top layer mixes with the color of the bottom.

Comparative
Difference- Displays the tonal difference between the contents of two layers by removing light pixels from either layer. The result is a dark and sometimes upside-down picture.
Greetings, readers of the site. Today we will talk about blending modes in photoshop(sometimes they are also called blending modes). I assume you are already familiar with what it is. If not, then I advise you to read about blending modes in Photoshop in the lesson.
Yes, this is the same Blend Mode that I talk about in almost every Photoshop tutorial. The blending modes are located in the layers panel, here:

However, their sphere of influence is not limited to this, and find blending modes You can also use layer styles:

Photoshop users are free to choose from 27 blending modes:
As you can see, all modes are divided into 6 groups, according to the principle of influencing the lower pixels: standard modes, darkening, lightening, contrast modes, comparison modes and color modes.
Let us now look at each group in more detail.
I will give an explanation for each blending mode, as well as a visual illustration in the form of an overlay of this texture:

To this image:

Standard modes
Normal(Ordinary). This mode is the default and has no special blending options.
Dissolve(Dissolution). “Dissolves” the current layer, i.e. removes some of the pixels in a random order, resulting in a scattering effect. To see this mode in action, you need to reduce the layer's opacity:

Dimming Modes
This group's blending modes darken the image as well as white pixels become transparent.
Darken(Dark Replace) - Compares the brightness of the pixels of the current layer and the pixels of the layer that is located below. All pixels on the current layer that are darker than the bottom ones remain, while the rest become transparent.

Multiply(Multiply) - The name says it all, this blending mode makes intersecting colors 2 times darker. It is usually used to darken a very light image or add depth.

Color Burn(Color Darkening) - The effect is similar to the Multiply mode, but it increases the saturation of the image.

Linear Burn(Linear Dimming) - Similar to Multiply, except that it dims intersecting points more than twice.

Darker Color(Color Darker) - Compares all color channels, highlighting the base and composite colors, and then displays the color with the lowest value.

Lightening modes
The blending modes in this group lighten the image and replace black pixels with transparent ones.
Lighten(Replace with light) - Works exactly the opposite of the Darken mode, that is, it leaves those pixels of the current layer that are lighter and removes the rest.

Screen(Screen) - Makes intersecting colors 2x lighter. One use case is to brighten photographs (duplicate the photo layer and apply this blending mode)

Color Dodge(Base Lighten) - Makes the black colors invisible, and the remaining colors lighten the image on the layer below. Increases image saturation.

Linear Dodge (Add)(Linear Base) - Same as Color Dodge, but increases brightness rather than saturation.

Lighten Color(Lighter Color) - Works the opposite of Darker Color (displays the color with the highest value).

Contrast modes
The blending modes of this group take into account both light and dark pixels, unlike the previous two. And the modes of this group work with image contrast.
Overlay(Overlay) - Mixes pixels on the current and lower layers, removes light areas, and multiplies dark ones.

Soft Light(Soft Light) - Darkens or lightens the color on the bottom layer, depending on the color of the current one.

Hard Light(Hard light) - Similar to the previous one, but the effect is stronger. Darkens the underlying colors if the current layer has a dark color, and lightens it if it is light.

Vivid Light(Bright Light) - Almost the same as Soft Light, but the contrast value is adjusted.

Linear Light(Linear Light) - Depending on the color of the current layer, it greatly highlights or darkens the image. Can be used to simulate image flare.

Pin Light(Spot Light) - Depending on what colors (dark or light) are on the active layer, moves the colors on the layer below.

Hard Mix(Hard mix) - Mixing by brightness, the output is a very bright image :)

Comparison Modes
Difference(Difference) - Combines the top and bottom images on top of each other. The colors are reversed and their brightness depends on the difference.

Exclusion(Exception) - Same as Difference, but the contrast is much less.

Subtract(Subtraction) - Subtracts 8-bit colors from the base channels of each pixel on each layer. If the result is negative, black is displayed.

Divide(Separation) - Divides the colors of the top and bottom images into each other.

Color Modes
This group of Photoshop blending modes allows you to blend just one parameter (such as color or brightness) without affecting the others.
Hue(Color Tone) - Applies the color tone of the top layer to the bottom layer, leaving all other parameters of the bottom layer untouched.

Saturaion(Saturation) - The same thing, only for saturation,

Color(Color) - the same for color,

Luminosity(Brightness) - and for brightness.

Overall, blending modes provide immeasurably more freedom and flexibility when working with images in Photoshop than simply changing parameters. And when combined with layer styles and masks, it is perhaps the most powerful tool for creating stunning effects.
We've covered everything blending modes layers in photoshop, I hope this photoshop tutorial was useful for you, do not forget to leave comments. With that, I wish you success and say goodbye until we meet again in the next lesson.
Help the site
Did you like the site? Did you find the lessons useful? You can support the project simply by downloading and installing the Flashlight application for Android. The application was written by the author of the site and hopes to publish his own applications in the future. The flashlight controls the phone's camera flash LED and also turns on the screen backlight at full brightness.
Advantages: flexible settings. You can set in the settings so that the flashlight turns on immediately when you start the application and the timer automatically turns on when the application starts. Settings allows you to disable screen lock and flashlight lock with the phone's power button. You can also set the timer yourself.
If the application gains popularity, this will give the author an incentive to create new applications taking into account the wishes of site visitors.
Thanks in advance, Dmitry.
QR code for installation:
If you liked the material, say “thank you” and share the links with your friends on social networks! Thank you!
Sponsor of the material.
Today, purchasing a child car seat is often the main purchase for a newly born baby. After all, the parents’ first priority is to pick up the baby from the maternity hospital and bring him home by car. You can buy a child car seat in the AKBkids online store. Free delivery throughout Ukraine.
Good afternoon, friends, I have already published manual articles on Photoshop (and descriptions of all of them).
Now I want to start a series of posts in which I will describe all the main features of the Layer Styles window or “layer styles” in Russian. 
All these styles and effects are probably the most used by any web designer, so knowledge of all the basic features is simply necessary, especially for beginners. As you can see in the screenshot, there are quite a lot of styles and I will try to make a separate detailed post for each, according to my calculations, there will be 10 - 11 posts, starting from Drop Shadow and ending with Stroke. Maybe I’ll combine something or, on the contrary, split it, we’ll see in the future, but for now first post in a series about Color Overlay. Go!
I would like to immediately note that I always use the English version of Photoshop and therefore I take all my screenshots in this form and I am not going to translate the names of the styles into Russian. By the way, I have always said and will continue to say - work on the English version, because all good manuals, sources and documentation are created specifically for the English versions. This makes it easier to learn new things, since there is almost no sensible information on the RuNet.
Using Color Overlay
Color Overlay is literally translated from English as “color overlay” or “color mixing”; from the name it is already clear that the main function of this style is working with color, mixing the color scheme of the layer with the background in different ways, etc.
The Color Overlay style is quite simple to use and has only two settings - Blend Mode and Opacity.
Blend Mode- is the main feature of Color Overlay, it has 25 color mixing modes, using which we can create various color effects.

All “blending modes” are divided into the main types of effects on layers and colors:
| Modes | Meaning | Mode Type |
| Normal | Normal, normal condition | Basic Modes |
| Dissolve | The combination of the top layer with the bottom, due to special. pattern. If the top layer is 100% opaque, the effect will not be visible. | |
| Darken | Compares two layers and darkens the light pixels of one layer and the dark pixels of the other layer. | Darken Modes Group |
| Multiply | Multiplies the top layer's pixels with the corresponding number of bottom layer's pixels. The result is a darker image. | |
| Color Burn | Creates a darker image with increased contrast. If the top layer is white, then no changes will be visible. | |
| Linear Burn | A more “powerful” mix of Color Burn and Multiply blending modes, the bulk of dark pixels are converted to black. | |
| Darker Color | Only dark pixels remain in the visible part of the image | |
| Lighten | The exact opposite of the Darken blend mode | Lighten Modes group |
| Screen | Multiplies the background of two layers towards lighter pixels. The effect is similar to projecting several photographic slides at the same time. | |
| Color Dodge | Lightens the layer. If the top layer is black, there will be no effect. | |
| Linear Dodge (Add) | This is a mixture of Color Dodge and Screen modes. Light pixels are converted to even lighter ones. | |
| Lighter Color | Compares the color modes of all layers and displays the lightest pixels. | |
| Overlay | This mode simultaneously brightens light pixels (Screen mode) and darkens dark pixels of layers (Multiply). | Contrast Modes |
| Soft Light | A mixture of Burn and Dodge modes. The image contrast increases slightly more than the Overlay mode. | |
| Hard Light | A stronger version of Overlay. | |
| Vivid Light | It all depends on the color of the top layer. If it is lighter than 50% gray, then the contrast decreases (Color Burn), if on the contrary, the contrast increases |
|
| Linear Light | The principle of operation is similar to Vivid Light, only instead of contrast there is an increase or decrease in brightness | |
| Pin Light | A combination of Lighten and Darken blend styles that replace pixel colors. | |
| Hard Mix | Heavy mix of colors - light ones are darkened, dark ones are lightened. | |
| Difference | Similar pixels are combined into one color | Comparative Modes |
| Exclusion | Similar to Difference, but the transformed layers have less contrast. | |
| Hue | Combines the Saturation and Luminance of the bottom layer with the color palette of the top layer. | Composite Modes |
| Saturation | The same as Hue, only the Saturation of the top layer is compared. | |
| Color | Matches the saturation and tone of the top layer with the luminosity level of the bottom layer | |
| Luminosity | The exact opposite of the Color blend mode. |
In the example below, you can see how the blending of the top layer with the background changes depending on the selected mode.