Gulp project build from github. Understanding the front end assembly on Gulp
Gentleman's kit for Front-end developer
It's no secret that a modern front-end developer must have one of the project assembly tools in his arsenal, such as Gulp or Grunt. Until some time, Grunt held a monopoly in this matter, but a group of developers that separated from Grunt decided to create their own lightweight and fast task manager Gulp.
In this article, we will prepare a starter package from scratch for use in future projects.
What technologies do we use?
- Software platform: Node.js
- CSS pre-processor: Stylus
- Task manager: Gulp
Why does a frontender need a task manager?
Until recently, I myself wondered why I needed to spend time setting up the task manager config, if I was already doing a good job with layout layouts, until I started using CSS pre-processors.
CSS pre-processors are really convenient and speed up the writing of styles, but compiling code written on a pre-processor into regular CSS is not a completely trivial task that can be solved with one button. This is where the task manager comes to our aid. Code conversion doesn’t just happen at the click of a button, everything happens online without your participation (of course, if you configure everything correctly).
Of course, the task manager’s tasks go far beyond the processes associated with converting pre-processor code into pure CSS. The project builder also deals with minification, concatenation, checking code for errors, assembling images into sprites, optimizing images for the web, etc. You simply create many logically separated files in your project, which are then conveniently collected into one directory, already processed and ready for use in the browser. But more on that a little later, but now let’s start with the preparation.
Installing Node.js
If you know how to install node.js on your system and are using it, you can safely move on to the next title.
I would like to immediately warn you that all the described actions are relevant for Mac OS X, but generally applicable to others Unix systems Development via task manager and command line in Windows somewhat more difficult and will not be described here. However, if you still use Windows and are not ready to give it up, then I can suggest the option of using a virtual machine with installed Ubuntu, I use this option on my home system, which is generally quite convenient.
So, first of all, we have to download and install the node.js package on our system to work with the node through the console. Go to the official node.js website and download the latest stable version for your system. Once installed, the node command should be available on your command line. To check that your node is running, enter the command on the command line
the response should show the version of installed node.js. If everything is good, we move on.
Project directory structure
In our projects we will use a unified version of the structure:
Develop - development root directory└─start - project directory├─build - build assembled by the task manager├─resource - all source files for development (.psd, etc.)├─src - development directory│├─css - style development directory││├─images - all static images││├─sprites - image collected into a sprite││├─partial - custom style files│││├─mixins.styl - custom mixins│││└─styles.styl - custom styles││├─vendor - other external style files││└─styles.styl - main style file│├─fonts - font directory│├─img - catalog of dynamic images│├─js - JavaScript development directory││├─_*.js - side js files││├─_main.js - basic custom js││└─main.js - main js file│├─.htaccess - config for the server│├─*.html - page layout files│├─pages.html - a file with links to all pages of the template│├─index.html - page layout index file│└─include - directory of included markup files│ └─*.html - included markup files (header.html, etc.)├─package.json - npm package manager config├─gulpfile.js - Gulp config├─stylus.template.mustache - mask for reading sprites├─TODO - todo sheet└─.gitignore - config for Git
Installation
In the console, using the cd command, go to the root development directory, create a directory for our project mkdir start and go to it.
Let's install our structure for the project via the console:
mkdir build resource src src/css src/css/images src/css/sprites src/css/partial src/css/vendor src/js src/template src/template/include src/img src/fonts
Let's create initial files in the project structure:
touch gulpfile.js stylus.template.mustache .gitignore src/.htaccess src/TODO src/css/styles.styl src/css/partial/styles.styl src/css/partial/mixins.styl src/js/main.js src/js/_main.js src/template/pages.html src/template/index.html src/template/include/header.html src/template/include/footer.html
Let's create package.json
All pop-up questions can be clicked via Enter, node will set them to default values, or you can fill in the suggested fields.
.gitignore
We tell Git which directories to ignore and not upload to the repository:
/node_modules/ /build/ /resource/
The node_modules directory will appear later after installing the plugins and will contain all the node plugins for the project.
src/.htaccess
We install additional gzip compression and caching for the server:
AddOutputFilterByType DEFLATE text/html text/plain text/xml text/css text/javascript application/javascript
src/css/styles.styl
Let's include custom style files into the main style file:
@import "partial/styles"
Please note that for connection.styl files, the extension is not specified, according to the semantics of the Stylus pre-processor code. To include styles in another extension, for example .css, the latter is required.
TODO
This page contains a development todo sheet. You can read more about working with this file on the PlainTasks plugin page for Sublime Text.
This completes the installation of the structure.
Installing plugins using the npm package manager
Node.js by default includes the npm package manager, whose repositories contain many plugins that we will work with.
Installing the Gulp plugin
First we need to install Gulp globally (with the -g switch) on our system
npm install gulp -g
You only need to do this once, further global installation is not required.
Now you need to install Gulp locally in your project directory
npm install gulp --save-dev
The --save-dev switch means that information about the plugin (name in the repository and its version) will be added to the package.json config and will remember it for this project. Since we do not store a heavy folder with node_modules plugins in Git, the information about installed plugins saved in the config will allow you to deploy all the necessary plugins in the project with just one npm i command.
There are abbreviations for each command, so we can write the command above in a shorter format
In the future we will also use the shortened command format.
Stylus plugin for Gulp
In our projects we use the Stylus pre-processor, which works great and compiles on the node.
Install:
npm i gulp-stylus -D
CSS processing plugins
Autoprefixer- automatically inserts the prefixes -ms- -o- -moz- -webkit- into the required properties:
npm i gulp-autoprefixer -D
CSS minification- the plugin minifies the output CSS file, eliminating unnecessary spaces and tabs:
npm i gulp-minify-css -D
Image processing plugins
Combining pictures into sprites- you no longer need to spend hours of precious time combining all the images into sprites and then calculating their coordinates, this plugin will do all this automatically for you:
npm i gulp.spritesmith -D
Let's add a mask for calculating positions in sprites to the previously created stylus.template.mustache file:
((#items)) $((name)) = ((px.x)) ((px.y)) ((px.offset_x)) ((px.offset_y)) ((px.width)) (( px.height)) ((px.total_width)) ((px.total_height)) "(((escaped_image)))"; ((/items))
Let's add special mixins to mixins.styl:
SpriteWidth($sprite) width $sprite spriteHeight($sprite) height $sprite spritePosition($sprite) background-position $sprite $sprite spriteImage($sprite) background-image url($sprite) sprite($sprite) if !match( "hover", selector()) && !match("active", selector()) spriteImage($sprite) spritePosition($sprite) spriteWidth($sprite) spriteHeight($sprite)
Let's connect the mixins and the generated file with coordinates to the main styles file src/css/styles.styl:
@import "partial/sprite" @import "partial/mixins"
Please note that sprite files must be included before user styles @import "partial/styles"
Optimizing images for the web- the plugin will automatically cut out all unnecessary information from your images and compress them to the optimal size, which in some cases will allow you to reduce the volume of images by up to 90%:
npm i gulp-imagemin -D
JavaScript processing plugins
JS minification- the plugin minimizes your JS code as much as possible, reducing its loading time:
npm i gulp-uglify -D
JS Error Tracking- the plugin will thoroughly check your JS code to identify all inconsistencies and display them in the console:
npm i jshint gulp-jshint -D
HTML processing plugins
Included files- the plugin allows you to store static parts of the site, such as header, footer, aside, etc., in separate files and connect them in any part of another file. In case of minor changes in the header, there is no longer a need to change dozens, or even hundreds of html pages of the template:
npm i gulp-rigger -D
The plugin is also compatible with JS.
Let's connect custom JS to the main JS file src/js/main.js with the following construction:
//= _main.js
Let's include the files header.html and footer.html in index.html
//= include/header.html//= include/footer.html
Other plugins
LiveReload- the plugin eliminates the need to reload the page in the browser every time to see the changes, now this happens automatically when saving the changed file:
npm i gulp-connect -D
Preventing Gulp from crashing- sometimes it happens that Gulp can crash out of watch mode if critical errors occur (mainly due to JS). This plugin tries to keep Gulp processes running whenever possible:
npm i gulp-plumber -D
Renaming files- the most common work with file names. The plugin allows you to completely rename files, change the extension, add prefixes and postfixes, for example, to convert a file like style.styl to style.min.css:
npm i gulp-rename -D
Cleaner- sometimes there is a need to completely clean out the build directory, here a plugin comes to our aid:
Sourcemap- in order for your files to remain readable through browser debugging after minification, you need to add a sourcemap to the minified files:
npm i gulp-sourcemaps -D
Advanced watch features- the plugin makes watch smart, now it does not overwrite all files in the build when just one file is changed, the specific changed file is overwritten, which saves time and resources:
npm i gulp-watch -D
Let's check package.json
After all the plugins are installed, let's check our package.json. It should look something like this:
( "name": "start", "version": "1.0.0", "description": "Start pack for Front-end develop", "author": "Ivan Ivanov", "license": "MIT", "dependencies": (), "devDependencies": ( "gulp": "latest", "gulp-autoprefixer": "latest", "gulp-connect": "latest", "gulp-imagemin": "latest", "jshint": "latest", "jshint-stylish": "latest", "gulp-jshint": "latest", "gulp-minify-css": "latest", "gulp-plumber": "latest", "gulp-rename": "latest", "gulp-rigger": "latest", "gulp-sourcemaps": "latest", "gulp-stylus": "latest", "gulp-uglify": "latest", "gulp-watch": "latest", "gulp.spritesmith": "latest", "rimraf": "latest") )
Instead of latest, in your case specific versions of installed plugins will be specified. Because We are creating our starter package, which will be used in many projects, it is also recommended to replace the version values with latest to always install the latest versions of plugins in the project.
A node_modules directory should also appear in the project folder, which stores all node plugin files. All the necessary plugins are installed, you can proceed to the Gulp config settings.
Setting up gulpfile.js
gulpfile.js- this is the main configuration file of our task manager; this is where we will store all the settings and commands.
All Gulp work comes down to task ( English task). A task is a separate independent function with a name. Each task can be called separately.
Compatibility mode with modern standards
First, at the beginning of the file, let’s enable compatibility mode only according to modern standards:
"use strict";
You can learn more about this directive.
Initializing the plugin
Plugins are initialized with the following construct:
var initPlugin = require("plugin-name");
In accordance with this design, we initialize all our plugins:
Var gulp = require("gulp"), //main gulp plugin stylus = require("gulp-stylus"), //preprocessor stylus prefixer = require("gulp-autoprefixer"), //arrangement of autoprefixes cssmin = require(" gulp-minify-css"), //css minification uglify = require("gulp-uglify"), //js minification jshint = require("gulp-jshint"), //js error tracking rigger = require("gulp -rigger"), //working with includes in html and js imagemin = require("gulp-imagemin"), //minimizing images spritesmith = require("gulp.spritesmith"), //merging images into sprites rimraf = require( "rimraf"), //cleaning sourcemaps = require("gulp-sourcemaps"), //sourcemaps rename = require("gulp-rename"), //renaming files plumber = require("gulp-plumber"), // fuse to stop gulp watch = require("gulp-watch"), //expanding capabilities watch connect = require("gulp-connect"); //livereload
Path Constants
For convenience, let’s immediately define all paths and masks:
Var path = ( build: ( //Here we indicate where to put the files ready after assembly html: "build/", js: "build/js/", css: "build/css/", img: "build/css/ images/", fonts: "build/fonts/", htaccess: "build/", contentImg: "build/img/", sprites: "src/css/images/", spritesCss: "src/css/partial/" ), src: ( //Paths from where to get the sources html: "src/template/*.html", //The syntax src/template/*.html tells gulp that we want to take all files with the extension .html js: "src/ js/[^_]*.js",//In styles and scripts we only need main files jshint: "src/js/*.js", css: "src/css/styles.styl", cssVendor: "src /css/vendor/*.*", //If we want to store library files separately, then uncomment the img line: "src/css/images/**/*.*", //Syntax img/**/*.* means - take all files of all extensions from the folder and from subdirectories fonts: "src/fonts/**/*.*", contentImg: "src/img/**/*.*", sprites: "src/css/ sprites/*.png", htaccess: "src/.htaccess" ), watch: ( //Here we indicate which files we want to watch for changes html: "src/template/**/*.html", js: "src/js/**/*.js", css: "src/css/**/*.*", img: "src/css/images/**/*.*", contentImg: "src/ img/**/*.*", fonts: "src/fonts/**/*.*", htaccess: "src/.htaccess", sprites: "src/css/sprites/*.png" ), clean : "./build", //directories that can be cleaned outputDir: "./build" //initial root directory for starting the miniserver );
Please note that we can use name masks:
- *.js- all files with js extension
- [^_]*.js- all files with the js extension, excluding those that begin with an underscore
- *.* - any files with any extension within the current directory
- /**/*.html- all files with the extension .html within the current directory and all child directories
Task
Now that all the constants are written, you can start writing tasks. All tasks have the following structure:
Gulp.task("taskName", function())( //some functions ));
Mini-server and LiveReload
First of all, we will configure the local server and LiveReload:
// Local server for development gulp.task("connect", function())( connect.server(( //set up server configs root: , //root directory for running the server port: 9999, //which port we will use livereload: true //initialize the work of LiveReload )); ));
Most likely, you will often have to work on several projects simultaneously. The server allows you to run many servers simultaneously; it is enough to register your own port for different projects.
Build HTML
// task for building html gulp.task("html:build", function () ( gulp.src(path.src.html) // Select files along the desired path.pipe(rigger()) // Run it through rigger . pipe(gulp.dest(path.build.html)) //upload them to the build folder .pipe(connect.reload()) //And reboot our server for updates ));Build JS
// check js for errors and output them to the console gulp.task("jshint:build", function() ( return gulp.src(path.src.jshint) //select files along the desired path.pipe(jshint()) //run it through jshint .pipe(jshint.reporter("jshint-stylish")); //style error output to the console )); // JavaScript building gulp.task("js:build", function () ( gulp.src(path.src.js) // Find our main file.pipe(rigger()) // Run it through rigger .pipe(sourcemaps .init()) //Initialize sourcemap .pipe(uglify()) //Compress our js .pipe(sourcemaps.write()) //Write maps.pipe(rename((suffix: ".min"))) / /add the suffix.min to the output file.pipe(gulp.dest(path.build.js)) //upload the finished file to build .pipe(connect.reload()) //And reboot the server ));Sprite build
All images to be combined into sprites are placed in the src/css/sprites/ directory and, after running through Gulp, they become a single sprite image. You should not put logos and backgrounds into sprites without clear dimensions.
// build sprites gulp.task("sprites:build", function () ( var spriteData = gulp.src(path.src.sprites) // choose where to get images to combine into a sprite.pipe(spritesmith(( imgName: " sprite.png", //name of the sprite image cssName: "sprite.styl", //name of the style where we store the positions of the images in the sprite imgPath: "images/sprite.png", //path where the sprite is cssFormat: "stylus", //format in which we process positions cssTemplate: "stylus.template.mustache", //mask file cssVarMap: function(sprite) ( sprite.name = "s-" + sprite.name //the name of each sprite will consist of the file name and the construction "s-" at the beginning of the name ) ))); spriteData.img.pipe(gulp.dest(path.build.sprites)); // path where we save the image spriteData.css.pipe(gulp.dest(path .build.spritesCss)); // path where we save the styles ));
To display a sprite, just use a mixin. For example, for the file lorem.png, the selection from the sprite will look like this:
Lorem sprite($s-lorem)
Now the object with class .lorem will take the dimensions of the image and the image itself as the background.
Build static images
Static images are images used in a layout template.
// build static images gulp.task("image:build", function () ( gulp.src(path.src.img) //Select our images.pipe(imagemin(( //Compress them progressive: true, // compression.jpg svgoPlugins: [(removeViewBox: false)], //compression.svg interlaced: true, //compression.gif optimizationLevel: 3 //compression degree from 0 to 7 ))) .pipe(gulp.dest(path. build.img)) //upload to build .pipe(connect.reload()) //reboot the server ));
Build dynamic images
Dynamic images are content images that will change on the site and are included at the template level only for demonstration. For example, these could be images for news, etc.
// build dynamic images gulp.task("imagescontent:build", function() ( gulp.src(path.src.contentImg) .pipe(imagemin(( //Compress them progressive: true, //compression.jpg svgoPlugins: [(removeViewBox: false)], //compression.svg interlaced: true, //compression.gif optimizationLevel: 3 //compression degree from 0 to 7 ))) .pipe(gulp.dest(path.build.contentImg)) //upload to build .pipe(connect.reload()) //reboot the server ));
Build CSS
// building custom css gulp.task("cssOwn:build", function () ( gulp.src(path.src.css) //Select our main style file.pipe(sourcemaps.init()) //initialize soucemap . pipe(stylus(( compress: true, "include css": true ))) //Compile stylus .pipe(prefixer(( browser: ["last 3 version", "> 1%", "ie 8", "ie 7"] ))) //Add vendor prefixes.pipe(cssmin()) //Compress.pipe(sourcemaps.write()) //write sourcemap .pipe(rename((suffix: ".min"))) / /add the suffix.min to the name of the output file.pipe(gulp.dest(path.build.css)) //upload to build .pipe(connect.reload()) //reboot the server ));Separate task for external styles:
// building vendor css gulp.task("cssVendor:build", function () ( gulp.src(path.src.cssVendor) // Take the vendor folder .pipe(sourcemaps.init()) //initialize soucemap .pipe( cssmin()) //Compress.pipe(sourcemaps.write()) //write sourcemap .pipe(gulp.dest(path.build.css)) //upload to build .pipe(connect.reload()) // reboot the server));
Let’s also add a task for building general CSS:
// build the entire css gulp.task("css:build", [ "cssOwn:build", // "cssVendor:build" ]);
If you need to process external styles separately from home styles and upload them as separate files, you need to uncomment the line “cssVendor:build”
Font build
// build fonts gulp.task("fonts:build", function() ( gulp.src(path.src.fonts) .pipe(gulp.dest(path.build.fonts)) //upload to build ));Build.htaccess
// build htaccess gulp.task("htaccess:build", function() ( gulp.src(path.src.htaccess).pipe(gulp.dest(path.build.htaccess)) //upload to build ));General build
So that we don’t have to build each part separately, let’s write a task for the general build:
// build everything gulp.task("build", [ "html:build", "jshint:build", "js:build", "sprites:build", "css:build", "fonts:build", " htaccess:build", "image:build", "imagescontent:build" ]);
Cleaning up the build
Sometimes you need to completely clean out the build directory. Here the following task will come to our aid:
// clean the build folder gulp.task("clean", function (cb) ( rimraf(path.clean, cb); ));
Watch or track changes in real time
One of the most important and useful functions of Gulp is the watch function, which allows you to monitor in real time all changes to the files produced and, depending on this, perform specific actions:
// watch gulp.task("watch", function())( //build html in case of change watch(, function(event, cb) ( gulp.start("html:build"); )); //build sprites in case of change watch(, function(event, cb) ( gulp.start("sprites:build"); )); //build contextual images in case of change watch(, function(event, cb) ( gulp.start(" imagescontent:build"); )); //build css in case of change watch(, function(event, cb) ( gulp.start("css:build"); )); //check js in case of change watch(, ["jshint"]); //build js in case of change watch(, function(event, cb) ( gulp.start("js:build"); )); //build static images in case of change watch(, function (event, cb) ( gulp.start("image:build"); )); //build fonts in case of change watch(, function(event, cb) ( gulp.start("fonts:build"); )) ; //build htaccess in case of change watch(, function(event, cb) ( gulp.start("htaccess:build"); )); ));
Default actions
Default actions are what tasks the task manager will perform when you enter the gulp command into the console:
// default actions gulp.task("default", ["build", "watch", "connect"]);
In our case, as usual, we will build our project, enable watch mode and start the server.
Command line commands
All gulp commands for the command line consist of two parts: the gulp command itself and the name of the task separated by a space. Here is a list of commands applicable to our config:
- gulp - main command, starts the default task
- gulp build - build everything
- gulp watch - launch watch
- gulp clean - cleans the build directory
- gulp connect - start the server
- gulp html:build - HTML build
- gulp jshint:build - check JS for errors
- gulp js:build - JS build
- gulp sprites:build - sprite build
- gulp image:build - build static images
- gulp imagecontent:build - build dynamic images
- gulp cssOwn:build - custom CSS build
- gulp cssVendor:build - build external CSS
- gulp css:build - general CSS build
- gulp fonts:build - font build
- gulp htaccess:build - build.htaccess
At this point, the configuration of gulpfile.js is complete.
Copy the starter package to the project
First, let's go through the console in the folder where we are developing, for example cd develop/example and copy everything from the starter package directory to our project cp -a ~/develop/start/. ~/develop/example/
This copying method is the most convenient, because... will accurately copy everything, including hidden files.gitignore, etc.
Conclusion
Using this guide, we have prepared a starter package for using Gulp in our Front-end development projects.
This package is also available on GitHub
Post Scriptum
This article is not final and will be updated depending on changes and improvements.
In those days when websites were small, there was no need for a separate frontend assembly. However, the volume and complexity of CSS and JS were increasing, and the view in which it was convenient to develop became very different from the view in which the result should be presented to the user. Such tasks as concatenation (gluing) of files, code minimization, and even pre-compilation appeared. The result of this was specialized frontend assembly systems, which we will talk about.
Of course, as soon as the need for assembly became noticeable, the tools used by the backend immediately began to creep onto the frontend. Their main problem and the reason that at the moment they are being used less and less for the front-end is that they are not at all tailored to its specifics, since the project structure, the technologies used and the development cycle very much depend on the project’s tasks and can differ significantly. Ant, for example, has a verbose syntax and is not particularly able to do things necessary for the frontend: there are very few built-in tasks, and it is poorly extensible. If we talk about GNU make, then it is much more universal, since it operates with shell commands. Disadvantages include a special syntax that requires additional study, the need to know the shell well, and the tendency for Makefiles to quickly become more complex as build requirements increase.
Let's look at a medium-sized website with a standard structure and try to list the main stages of assembly that it goes through. For simplicity, let's assume that you don't bother with creating different JS files for different pages, but at the same time you want to keep several small files in the development environment to support some kind of modularity. Usually it looks something like this:
/libs/ jquery.min.js underscore.min.js /js/ common.js carousel.js popups.js ....
The build system typically does the following:
- concatenates all JS files into one (in the right order, we don’t want to load our scripts before jQuery);
- checks JS code for validity (for example, using JSHint);
- minimizes the code, obfuscates it if necessary (that is, makes it incomprehensible);
- concatenates CSS files (the order is also important here, since properties are often overridden);
- minimizes CSS;
- puts the files in a separate directory, from which you include them in your HTML.
Often this simple scheme is complicated by additional requirements: tests are run, CSS preprocessor code is compiled, images are optimized, templates are compiled.
All these tasks, and even more, can be solved by modern assembly tools. We will consider the most popular solutions that work on the Node.js platform. Their common advantage is a clear language that all front-end developers know (or think they know), an initial focus on solving front-end problems, as well as an understandable Node.js environment in which you may already be developing your application.
Grunt
Grunt is the oldest, most important, and most popular build tool. Almost all of the build systems we review compare themselves to Grunt in one way or another, and some originated as faster or simpler alternatives. Despite this, it does have a couple of significant drawbacks.
First, as many front-end developers point out, Grunt is verbose. Setting up a simple build system will require a config of about a hundred lines. However, this in itself is not such a drawback: the config is quite easy to read, and due to the popularity of Grunt, finding a ready-made config for a typical task is usually not difficult.
Secondly, Grunt was developed as a universal product, that is, on its basis you can solve almost any problem related to project assembly. It's cool, but it comes at a price for versatility. Both the aforementioned verbosity and speed. Compared to other Node.js build systems, Grunt is noticeably slower, and, most annoyingly, tends to slow down as the project grows. Without going into the details of Grunt's architecture, the reason is that every time you need to build, for example, a JS file, it rebuilds all the JS files. You can try to speed up the build process by manually specifying the necessary connections between files, but on a project with a complex tree of file dependencies this can be overly complicated.
Despite all this, Grunt has a huge ecosystem: hundreds of plugins, thousands of projects, billions of developers, that's all. That is, not only is Grunt universal, but a plugin for your task has most likely already been written.
To summarize, Grunt is a great choice for small to medium-sized projects, especially if you haven't set up any build systems before. A huge community, a bunch of plugins, clear documentation and even articles and reports in Russian for those unfortunate people who cannot live without it. And of course, if in the future for some reason Grunt no longer suits you, you can always switch to another system that is devoid of its shortcomings.
Gulp
Gulp is an actively developing build system at the moment. Its architecture is based on the use of threads in Node.js, which eliminates the need to write temporary files and folders to disk. The main advantages of Gulp are the speed and brevity of the config. Moreover, if the first is indisputable, then brevity in comparison with Grunt is achieved simply due to its different structure. If in the Grunt config you operate plugins individually, setting up each of them, then in the Gulp config you need to describe the process that each file (or set of files) must go through in order to be collected. Here's a real-life example of SASS compilation:
Gulp.task("styles", function() ( return gulp.src("styles/*.scss") .pipe(sass(( style: "expanded" ))) .pipe(rename((suffix: ".min "))) .pipe(minifycss()) .pipe(gulp.dest("build/styles/css")); ));
On the first line we register a Gulp task called styles. Then we sequentially describe what needs to be done with each of the files that matches the styles/*.scss mask: compile SASS, add .min to the file name, minify it, put it in the final directory. If we need to do something else with this file, we will simply add the appropriate command, for example.pipe (add a comment with an ASCII unicorn at the beginning of the file) (I hope they will finally make a plugin for this everyday task). I like this approach to writing a config better: it better describes what actually happens to your files.
Of course, Gulp is still inferior to Grunt in terms of the number of plugins, but there are plugins for many tasks. Most likely, the existing plugins will be enough for you, and if something is really missing, you can always write your own (just kidding). By the way, there is a gulp-grunt package that allows you to run Grunt tasks from Gulp, if you really need to.
If you like this approach to building, speed is important, and you don't need to perform specific tasks that only Grunt has a plugin for, then Gulp could be a great choice. At the moment, Gulp remains Grunt's most serious competitor.
Broccolli
The youngest of the assembly tools under consideration is now, in fact, in the development stage. The developers of Broccolli do not hide the fact that they were inspired by Gulp, but they consider some of the concepts underlying it to be erroneous. For example, they chose to cache all intermediate build results (implemented by each of the plugins) to speed it up instead of partially rebuilding only the required files. They also didn’t like the fact that Gulp works best with the transformation of one file into one final one, that is, one to one. To improve many-to-one operations, Gulp is currently developing a complex virtual file system design that Broccolli sees as an unnecessary complication and a weakness of Gulp's original concepts. Broccolli initially operates in terms of trees instead of files and only performs transformations of trees into other trees (even degenerate ones from the same vertex).
A very reasonable theoretical approach to the assembly problem does not solve the problem of the number of extensions to Broccolli. Unfortunately, there are about two dozen of them and they perform only the most basic tasks. If you want to try something new, look at Broccolli, it is fast enough, is actively being developed, but is probably still too raw for use on serious projects.
Brunch
Brunch was created with the same task - to beat Grunt on all fronts, but approached it from a completely different angle. The Brunch developers decided to take a good understanding of the subject area, that is, to make a less universal tool that will be tailored specifically to front-end tasks, for example, without any settings, to understand that *.js is a file with scripts, *.coffee is CoffeeScript, and so on. Brunch is quite fast, much faster than Grunt, but slightly slower than Gulp. The undoubted advantages of Brunch also include a truly compact configuration, several times smaller than that of Grunt and Gulp. Here, for example, is a simple Brunch config:
Exports.config = files: javascripts: joinTo: "javascripts/app.js": /^app/ "javascripts/vendor.js": /^(bower_components|vendor)/ stylesheets: joinTo: "stylesheets/app.css" order :after: ["vendor/styles/helpers.css"] templates: joinTo: "javascripts/app.js"
Please note that the config can be written both in CoffeeScript (as in this case) and in regular JS. We create a regular module that returns JSON with build settings.
Pay attention to the joinTo and order keys. This is the domain knowledge I mentioned - at the config level, Brunch knows that you most likely want to merge files, some before others. This is what allows you to replace 400 lines of the Grunt config with 20–30 lines of Brunch.
Plus, Brunch's ecosystem is much smaller than Grunt's and even Gulp's. There are about 50 plugins (compared to 450+ for Gulp, for example), development is not very fast, in general, everything is quite sad here.
To summarize: if you really like short configs, speed is important, but you don’t need any special actions at the build stage, then you can look at Brunch. Of course, the small number of plugins is confusing, but maybe the situation will change.
ENB
And finally, the sweetest part. I would like to tell you about the assembly system developed at Yandex by Marat Dulin, which is called ENB. This is what we are currently using on our project. Its approach is fundamentally different from all the systems described: it was originally created to work with projects using the BEM methodology, although, as the author notes, its platform is free from the BEM ideology and can be used for all projects of a suitable structure.
Briefly, that's the point. In ENB we operate with the concept of a target, that is, the final file that needs to be collected, or a node (folder, in general, a page) for which a certain set of files needs to be collected. In order to build the target file, we use a number of technologies (roughly speaking, plugins in Grunt terms, although the technologies are smaller and more specialized). First of all, ENB determines the initial set of files that are needed to assemble the targets (several basic technologies do this, working with the BEM methodology by default, that is, they look for a *.bemdecl file that contains the dependencies of a given node on different blocks), fully expands it's a dependency tree (when the block your page depends on is itself dependent on another, both are connected in the right order), and then finds the files needed for each registered technology. Then ENB follows the sequence of file transformations described in the config (here you can see some analogy with Gulp). Despite some differences from the standard approach of build systems, once you understand the basic concepts, further working with ENB is quite easy.
The main advantages of ENB: speed of assembly, due to a flexible caching system and the ability to exchange intermediate data between different technologies, parallelization of independent processes, and separation of the heaviest technologies into separate subprocesses. It is extremely easy to write new technologies for ENB if you are somehow dissatisfied with the behavior of the standard ones.
The disadvantages include the fact that the ENB config is quite verbose, since it is possible to control absolutely all stages of the build. Plus, ENB was still written for the BEM methodology, and attaching it to a project with a completely different structure will require unnecessary movements. There are not many technologies written for ENB (about 60), but it copes with most of the tasks of BEM projects with a bang.
To sum it up: ENB is the best choice for projects based on the BEM methodology, which I personally consider most suitable for medium and large sites, since organizing code into blocks rocks and beeps. It is very fast, collects dozens of pages and hundreds of files in seconds, is easy to set up and pleasant to use. If your project is large, you get confused in the code and edit files thousands of lines at a time, I advise you to study BEM in more detail as a way to organize the structure of front-end projects. And when you love BEM, you will love ENB as the most native tool for building BEM projects.
Want to score more on Google Page Speed? Don’t know what “front-end assembly” is? Then it will be interesting for you to come here.
What is Node.JS?
Node.JS is commonly called “Northern JavaScript”. This platform allows you to write programs using JavaScript syntax.
There are implementations for Windows, Mac OS and Linux.
Package manager included NPM, with which you can install packages.
What is Gulp?
Gulp is a package written in Node.JS that helps webmasters build projects at the layout stage.
To install Gulp you need to use the command line.
Npm install gulp
At the end of this article there is a file that will help you assemble a standard project.
In this example we will do the following using Gulp:
- Automatically optimize images for the web;
- We collect one minified style file from preprocessors (SASS, SCSS);
- We collect one minified file with scripts.
How to build front-end using Gulp?
To understand how everything works, let's take it step by step.
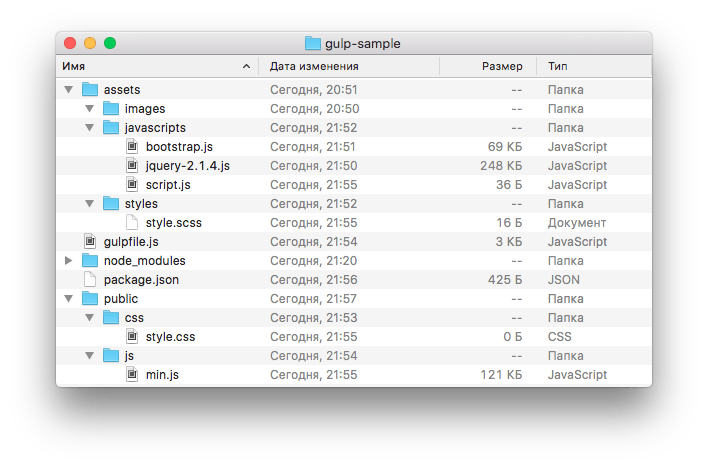
The structure can be seen in the screenshot.
- The assets folder is for sources of images, styles and scripts;
- Public folder - the result of building the project will be located in it;
- gulpfile.js - a file that describes the logic of the collector;
- package.json is a file that contains information about programs and plugins used to make Gulp work correctly.
package.json
File contents:
( "name": "gulp_project", "version": "1.0.0", "description": "Example", "main": "gulpfile.js", "scripts": ( "test": "echo\" Error: no test specified\" && exit 1"), "author": "Dmitriy Ilichev", "license": "ISC", "devDependencies": ( "gulp": "^3.9.0", "gulp-csso ": "^1.0.0", "gulp-concat": "^2.6.0", "gulp-uglify": "^1.2.0", "gulp-imagemin": "^2.3.0", "gulp -sass": "^2.1.1" ) )
From this file the following is clear:
- Project name gulp_project, version and description;
- The main file is gulpfile.js;
- The author of the project, the license - all this is not so important and these fields can simply be empty;
- An interesting point is devDependencies. It describes the dependencies.
The file can be edited in a regular text editor. It can also be created for a new project with the npm int command.
Based on this, Node.JS understands that to work we will need:
- Gulp version 3.9.0 and higher for assembly;
- Gulp-csso version 1.0.0 and higher - plugin for minifying styles (css);
- Gulp-concat version 2.6.0 and higher is a plugin for merging several files into one;
- Gulp-uglify version 1.2.0 and higher - plugin for javascript minification;
- Gulp-imagemin version 2.3.0 and higher - plugin for image optimization;
- Gulp-sass version 2.1.1 and higher is a plugin for getting css from sass (scss).
Great! After that you need to install all this. This is done from the command line. While in the project folder, you need to run the command:
Npm install
All necessary information will be taken from package.json.

After all this magic, the node_modules service folder will appear.
gulpfile.js
File contents:
/* * * Define variables * */ var gulp = require("gulp"), // Actually Gulp JS uglify = require("gulp-uglify"), // JS minification concat = require("gulp-concat"), // Gluing files imagemin = require("gulp-imagemin"), // Minifying images csso = require("gulp-csso"), // Minifying CSS sass = require("gulp-sass"); // Convert SASS (SCSS) to CSS /* * * Create tasks (tasks) * */ // Task "sass". Launched by the command "gulp sass" gulp.task("sass", function () ( gulp.src("./assets/styles/style.scss") // file to be processed.pipe(sass().on(" error", sass.logError)) // convert sass to css .pipe(csso()) // minify the css obtained in the previous step.pipe(gulp.dest("./public/css/")); // We write the result to the specified address)); // Task "js". Run by the command "gulp js" gulp.task("js", function() ( gulp.src([ "./assets/javascripts/jquery-2.1.4.min.js", "./assets/javascripts/bootstrap. min.js", "./assets/javascripts/script.js" ]) // files that we process.pipe(concat("min.js")) // merge all JS .pipe(uglify()) // minify the resulting "footcloth".pipe(gulp.dest("./public/js/")) // write the result to the specified address )); // Task "images". Run by the command "gulp images" gulp.task("images", function() ( gulp.src(".assets/images/**/*") // take any files in the folder and its subfolders.pipe(imagemin() ) // optimize images for the web.pipe(gulp.dest("./public/images/")) // write the result to the specified address )); // Task "watch". Launched by the "gulp watch" command // It monitors file changes and automatically launches other tasks gulp.task("watch", function () ( // When changing *.scss files in the "styles" folder and subfolders, launch the sass gulp task. watch("./assets/styles/**/*.scss", ["sass"]); // When changing *.js files in the "javascripts" folder and subfolders, run the js task gulp.watch("./assets/ javascripts/**/*.js", ["js"]); // When changing any files in the "images" folder and subfolders, run the images task gulp.watch("./assets/images/**/*", ["images"]); ));
The main trick is in the task watch. Having launched it once, you can easily work with sources, and the project will be automatically assembled every time you save edited files.
As a result, we will receive a template ready for publication on the Internet.

Tasks can be run separately. As a result, in the archive at the end of the article you will find the following:
! note The fact is that after unpacking this archive, you will first need to run the npm install command. This folder contains quite a large number of files, and copying/pasting them every time is a waste of time.
In custody
There are tons of other useful plugins. For example, the excellent template engine Jade, which greatly speeds up writing html code, someone may need LESS, and so on.
The presented example is just a platform and a template from which you can quickly and without special knowledge start using all these wonderful features.
In this article we will analyze in detail the process of assembling a front-end project, which has taken root in my daily work and has greatly simplified the routine. The article does not claim to be the ultimate truth, since today there are a large number of different assemblers and approaches to assembly, and everyone chooses to their taste. I will just share my thoughts on this topic and show my workflow.
We will use the Gulp builder. Accordingly, Node js must be installed on your system. We will not consider installing a node for a specific platform, because it can be Googled in a couple of minutes. And first, I’ll answer the question - why Gulp? Of the more or less tolerable alternatives, we have Grunt and Brunch. When I just started getting involved in the collections, both Grunt and Gulp were already on the market. The first one appeared earlier and therefore has a larger community and variety of plugins. According to npm: Grunt - 11171 packages Gulp - 4371 packages
But Grunt seemed too verbose to me. And after reading several comparison articles, I preferred Gulp for its simplicity and clarity. Brunch is a relatively young project, with all the ensuing pros and cons. I'm watching it with interest, but haven't used it in my work yet.
Let's get started: Let's create a folder for our project, for example “habr”. Let's open it in the console and run the npm init command. You can simply press Enter to all the installer's questions, because now this is not important. As a result, in the folder with the project we will generate a package.json file with approximately the following content ( “name”: “habr”, “version”:”1.0.0”, “description”:”, “main” : "index.js", "scripts": ( "test": "echo \"Error: no test specified\" && exit 1"), "author":", "license": "ISC" ) Let's modify it a little to suit our needs: ( "name": "habr", "version":"1.0.0", "description":", "author":", "license": "ISC", "devDependencies": ( "gulp ":"^3.8.1") ) in the devDependencies block we indicated that we need gulp and will immediately register all our plugins. Plugins: gulp-autoprefixer - automatically adds vendor prefixes to CSS properties (a couple of years ago I would have killed for this tool :))gulp-cssmin - needed for compressing CSS codegulp-connect - using this plugin we can easily deploy a local dev server with blackjack and livereloadgulp-imagemin - for compressing imagesimagemin-pngquant - additions to the previous plugin, for working with PNGgulp- uglify - will compress our JSgulp-sass - to compile our SCSS code. Not for the sake of holivar. I have been using LESS in my work for a very long time. I was very impressed with this preprocessor for its speed and ease of learning. I even gave a report on it at one Rostov hackathon. And in particular, in this report, I did not speak very flatteringly about SASS. But time has passed, I have become older and wiser :) and now I have become familiar with this preprocessor. The basis of my dissatisfaction with SASS was that I do not write in Ruby. And once upon a time, to compile SASS/SCSS code, you had to drag Ruby into the project, with the necessary bundles - which really upset me. But everything changed with the advent of such a thing as LibSass. This is a C/C++ compiler port for SASS. The gulp-sass plugin uses exactly this. Now we can use SASS in a native node environment - which makes me extremely happy. gulp-sourcemaps - let's use sourcemaps to generate css, which will help us when debugging the codegulp-rigger - this is just a killer feature. The plugin allows you to import one file into another with a simple construction //= footer.html and this line during compilation will be replaced with the contents of the file footer.htmlgulp-watch - Will be needed to monitor file changes. I know that Gulp has a built-in watch, but I had some problems with it, in particular, it did not see newly created files, and I had to restart it. This plugin solved the problem (I hope this will be fixed in the next versions of gulp). opn is a little nicety that allows you to open some link in the browser with a command from node jsrimraf - rm -rf for the node Let's write all our plugins in package.json
( "name": "habr", "version":"1.0.0", "description":", "author":", "license": "ISC", "devDependencies": ( "gulp":"^ 3.8.1", "gulp-autoprefixer":"*", "gulp-connect":"*", "gulp-cssmin":"*", "gulp-imagemin":"*", "gulp-sass" :"*", "gulp-sourcemaps":"*", "gulp-rigger":"*", "gulp-uglify":"*", "gulp-watch":"*", "imagemin-pngquant" :"*", "opn":"*", "rimraf":"*" ) ) and run the command in the console
npm install Bower I can’t imagine my work without the Bower package manager and I hope you can too. If not, then you can read about what it is and what it is eaten with here. Let's add it to our project. To do this, run the bower init command in the console. You can also Enter to all questions. At the end we get something like this bower.json file ( “name”: “habr”, “version”: “0.0.0”, “authors”: [ "Insight