Where is Windows 10 User Account Control? Why is UAC needed and how to disable it
Account control technology UAC entries.Made to prevent unauthorized dangerous operations that could cause harm to the system. Confirming actions every time becomes quite tedious and you want to turn it off this function or change its settings. Next, we will tell you how to disable User Account Control in Windows 10
Method No. 1. Disabling User Account Control using Windows 10 Control Panel
You can change UAC settings through the panel Windows management. To do this you will need to do the following:
- Go to the control panel from start menu systems.
- Select icon "User accounts" .
Note: You must have icons instead of categories enabled.
(You can get into the UAC settings by entering the command UserAccountControlSettings to line "Run" by opening it from the start menu).
- You can partially disable User Account Control, setting the following settings: First position from the top – maximum control. Notifications will be displayed for any action that may change anything in the system settings or request access to the computer disk.
- The second position disables control over user actions and leaves monitoring of attempts to change settings by programs. This parameter installed by the system by default.
- The third option differs from the second only in that the system desktop will not be blocked when the notification appears.
- We put the switch in the lowest position. To completely deactivate User Account Control in Windows 10 and press « OK » .
Method number 2. Disabling UAC by editing the OS registry
Disabling the function can be done by editing the corresponding parameter in the system registry. To do this you will need:
- Press keyboard shortcut « Win + R » , enter regedit to the menu that appears "Run" and press "Enter" .
- Go to:
HKEY_LOCAL_MACHINE\ SOFTWARE\ Microsoft\ Windows\ CurrentVersion\ Policies\ System
Method number 3. Disabling User Account Control using a special command
- You can also perform the operation of editing the registry using the command line. For this you will need: context menu buttons "Start" choose "Command line" , with administrator privileges.
- Next enter cmd and press "Enter" .
- After this you will need to dial next text, press "Enter" and restart your PC.
C:\Windows\System32\cmd.exe /k C:\Windows\System32\reg.exe ADD HKLM\SOFTWARE\Microsoft\Windows\CurrentVersion\Policies\System /v EnableLUA /t REG_DWORD /d 0 /f
To avoid entering text manually, you can copy and paste it into command line. To do this, call up the menu by clicking on the icon on the left top corner, and in the section "Edit" choose "Insert" .
Summarizing the ways deactivating UAC, it is necessary to mention that it is recommended to disable this function if you are sure that the programs you work with and the sites you visit do not contain malware or viruses. You can always return UAC to normal state from the system control panel using the options described in the first method.
Windows 10 operates a UAC (User Account Control) component to protect your computer, which notifies the user to confirm an action to protect your computer. UAC (User Account Control) - user account control, when trying to install software as an administrator, stops the process, notifies the user so that he can independently make a decision about further action: Allow the application to change your computer settings, or block it.
This ensures greater computer security. If there were no UAC, then some applications with elevated rights could independently change the computer settings. The user sees the notification, and if he himself did not launch this application, then you can cancel the installation or changes that you make software in operating room parameters Windows systems.
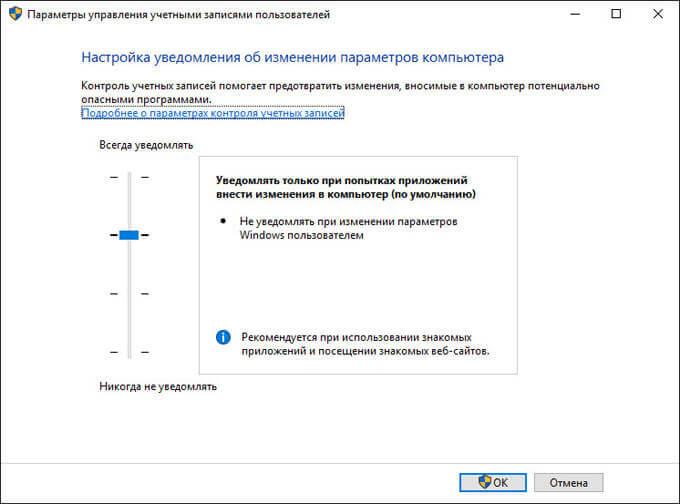
The Windows 10 operating system has several options for receiving notifications about changes to computer settings: “Always notify in the following cases”, “Notify only when applications try to make changes to the computer (default)”, “Notify only when applications try to make changes to the computer ( Do not dim the desktop)", "Do not notify me."
Some users are annoyed by the appearance of UAC notifications, so they want to disable User Account Control in Windows.
Warning! If you disable User Account Control in Windows 10, your computer's security may be compromised.
In the “Notification settings for changes in computer settings”, you can change the order in which notifications are received without disabling UAC on the computer.
Logging into User Account Control settings
To enter User Account Control settings, click on “Search in Windows” on the taskbar. In the "Windows Search" field, enter the expression: "uac".

After this, the “User Account Control Settings” window will open. In the “Configuring notifications about changes in computer settings” section, the user can independently change the settings for receiving notifications.
Here you can configure the receipt of notifications: increase the level of security when receiving notifications, lower it, or disable notifications altogether.
Review the options available to change.
Notifications about changes to computer settings
Always notify in the following cases:
Notify only when applications try to make changes to your computer (default):
- Don't notify when changed Windows settings user.
Notify only when applications attempt to make changes to the computer (do not dim the desktop):
- Don't notify me when I change Windows settings.
Do not notify me:
- When applications try to install software or change computer settings.
- When I change Windows settings.
To change the settings for receiving notifications, you need to switch the selector to the appropriate position.
How to disable UAC in Windows 10
To turn off User Account Control (UAC) in Windows 10, move the selector all the way down, which corresponds to the Never Notify setting.

Now the Windows operating system will not notify you about changes on the computer, when installing programs, or when changing computer settings. This is the easiest way to disable User Account Control in Windows 10.
You can also disable UAC using the Registry Editor or the Command Prompt.
Run and then enter the following commands:
C:\Windows\System32\cmd.exe /k %windir%\System32\reg.exe ADD HKLM\SOFTWARE\Microsoft\Windows\CurrentVersion\Policies\System /v EnableLUA /t REG_DWORD /d 0 /f C:\Windows\System32\cmd.exe /k %windir%\System32\reg.exe ADD HKLM\SOFTWARE\Microsoft\Windows\CurrentVersion\Policies\System /v EnableLUA /t REG_DWORD /d 1 /fAfter restarting the computer, User Account Control will be disabled, or vice versa, enabled.
Conclusions of the article
You can disable UAC (User Account Control) in Windows 10 by changing the User Account Control settings. After disabling UAC, you will not receive notifications from operating system When installing new programs or changing system settings, the level of computer protection from potential threats will decrease. Therefore, do not disable User Account Control on your computer.
How to disable User Account Control in Windows 10 (video)
In almost all Windows versions 10 there is a special service - account control (UAC or UAC). You can encounter it at the moment when you try to start performing some action that will require you to have administrator rights. That is, at this moment you will see a notification “To perform this operation, you must have administrator rights. Continue the operation? These messages can be turned off very simply, but whether this is necessary will be discussed in the next section.
Should I turn off User Account Control?
The bottom line is that User Account Control (UAC) exists to prevent accidental user intervention in important tasks and system processes. Administrator rights are only asked if the task you are about to assign or change could interfere with the operation or processes of the operating system. Therefore, decide for yourself: if you deactivate the KUZ, then you will no longer have annoying notification, but at the same time the chance of launching something dangerous or accidentally editing something that shouldn’t be touched increases greatly.
Enable, disable and configure KUZ in Windows 10
Activation, deactivation and setting up control occur in almost the same way, so we will consider these actions together.
There are several ways to carry out operations to activate, deactivate and configure UAC. All of them will be described below in the article and you can choose from them the one that seems most convenient to you.
Setting up the KUZ via the control panel
- Using search bar, find the control panel.
- Expand the “User Accounts” section.
- Repeat the action.
- In the launched window, click on the lowest option. Please note that to access this section you will need administrator rights, as indicated by the corresponding icon in the form of a multi-colored shield.
- Move the slider all the way to the bottom of the line to select the “Never notify” option. The selected option completely disables UAC.
- If you need to increase the security of your system, then select the top option. If you set this parameter, warnings will appear at any slightest chance of making changes to the system. Also, if the user logs in under a different account, that is, without administrator rights, when a corresponding notification from UAC appears, he will have to enter the login and password for the administrator account.
- By selecting the second parameter from the top, which is usually selected by default, notifications from the KUZ will appear only if any third-party program tries to introduce changes into the system.
- The penultimate mode of operation includes the same option for performing UAC duties as the previous one, but has one difference - notifications sent by KUZ will not darken the screen and interfere with the operation of running applications.
- After completing the settings, click on the “OK” button at the bottom of the window to save the changes. Sometimes, in order for the KUZ to change its operating mode, you need to restart the computer.
Path through the registry
To exhibit specific mode, insert the numbers below:
- Always notify - PromptOnSecureDesktop=1, EnableLUA=1, ConsentPromptBehaviorAdmin=2. The remaining parameters will go in the same order.
- Notify when applications try to change parameters (default values) - 1, 1, 5.
- Notify without dimming the screen - 0, 1, 5.
- Disable UAC and do not notify - 0, 1, 0.
How to enable or disable UAC via the command line
You can configure UAC mode only through the methods described above, but you can also activate and deactivate it through the command line.
People who usually try to disable UAC in Windows 10 are those who want to expose themselves to a virus. According to our observations, not a single normal software requires lowering the security level. Think about it, what is UAC? This is the component that forces the administrator to confirm his actions. Who needs to sneak into a PC unnoticed and without confirmation? The same one who needs to disable UAC Windows 10. For the same reason, it is not recommended to use the administrator account when working on a PC.
How do virus creators work? They say: turn off this and that. In particular, they recommend disabling UAC Windows 10. Many utilities in various industries operate in the same way. If you see this one, test it first on virtual machine. This will help somehow isolate the attack from the real hardware.
Via Control Panel
UAC levels and complete shutdown
We have already said that at the lowest level of UAC the computer will be clogged with various crap, and the user will not even know about it. The result is usually:
- extremely slow operation;
- incomprehensible advertising in browsers (and now on the desktop).
And so, every time it tries to launch, the Trojan must receive permission. Please note that the smartest of them interfere with the operation of antiviruses, prevent scanning software from being downloaded, and so on. That is, it is not so easy to get rid of a misfortune if it has managed to properly register itself in the system. Therefore, before installing any incomprehensible applications, create at least a restore point. It should be remembered that the creators of malware are aware of such things and will most likely bypass the protection.

In the latter case, any system changes will go unnoticed. Unless, of course, the admin knows some trick!
If we put aside the ubiquitous Wikipedia, information notes are available on the official Microsoft website (technet.microsoft.com/ru-ru/itpro/windows/keep-secure/user-account-control-overview). From the note it becomes clear that:
- Not only does UAC notify you when you try to make changes to the system, but it also controls permission levels.
- UAC manages login and assigning rights to launched applications.
- Apps that require permission are often called outdated. They are designed by people who have little understanding of what functions new system should be used, and which ones are not recommended to be touched.
All this taken together is designed to prevent the installation of unwanted software on your PC. For example, ordinary accounts, the owners of which often do not understand what they are doing.
The corporation writes that the user cannot run some applications as an administrator, even if this is directly indicated (support.microsoft.com/ru-ru/kb/2273047). Such exceptions include, for example, Explorer. Although for some reason permission is required at startup. Check:

It seems that Windows is demonstrating a restriction of rights, the enabled UAC asks for permission, but the application does not have the necessary rights? In itself, disabling Windows 10 User Account Control or enabling it does not change anything, except for the fact of informing the user about what is happening in the system.
Via the registry
When UAC is disabled, a key is written in the registry that anyone can create with their own hands. For example, on home version, where many features are missing.

There are rumors that you also need to create an EnableLUA and assign a value to it, but we have not found confirmation of this. On the Microsoft website they write (msdn.microsoft.com/ru-ru/library/ff715520.aspx) that it is this that changes the behavior of the system when sending notifications, but this was not confirmed during testing. However, keep this in mind. LUA stands for Limited User Account, which is what UAC used to be called. We would venture to assume that this parameter is responsible for the operation of all equipment in general. If you disable it, then other changes will have no effect. Also pay attention to PromptOnSecureDesktop, it must be equal so that the system does not send requests.

Don't forget to enable User Account Control after all experiments.
If you are tired of User Account Control pop-up messages that require confirmation to launch certain applications, then you should read this article. I will give 4 ways to disable the annoyingness of this control, which each of you can repeat on your computer. Let's also look at how to reduce the intrusiveness of User Account Control without disabling it completely. Let's look at why this is the most preferred method.
First of all, let's find out what User Account Control is.
Account Control or UAC is an important component Windows security 10 required for protection against malicious code And unwanted programs. Every time you launch a dubious program or make changes to the operating system settings, UAC opens a pop-up window on a dark background asking you to confirm the action. IN previous versions Windows operating system did not have such a notification until Windows Vista, with which the history of the existence of Account Control begins. UAC serves to reduce system vulnerability and reduce the likelihood of confidential information being stolen.
I do not recommend disabling UAC on systems that are in use inexperienced users, on systems that are used primarily to store sensitive credentials, personal information such as access passwords or any other personal information. Remember, if User Account Control is disabled, the level of overall system security against external threats inevitably decreases.
Disable Windows 10 UAC in Control Panel
The way to disable or change UAC is the fastest and does not require running any commands. To use it, you need to open the Control Panel. You can do this by clicking right click mouse to Start and selecting Control Panel.
Start - Control Panel
In the Control Panel we find the section user accounts.

 user accounts
The next window is the Manage Your account. Click on the link Change User Account Control settings.
 Change User Account Control settings
Now the most important thing. To completely disable UAC, drag the slider with the left mouse button to the very bottom and click OK.
 Disabling UAC
But I personally recommend not to do this, but to try to start by placing the benunok at least one level higher. This will allow you to leave your computer's protection turned on and working, even if not as effectively as in the up position.
Disabling UAC in Windows 10 through the registry
Disabling UAC and choosing any of the four options for Windows 10 User Account Control is also possible using the Registry Editor. Open Start and type regedit and press Enter.
 Launching Regedit
UAC operating parameters are determined by three keys, which are located in the section HKEY_LOCAL_MACHINE\ SOFTWARE\ Microsoft\ Windows\ CurrentVersion\ Policies\ System .
 UAC keys
These DWORD type parameters are responsible for UAC operating modes: PromptOnSecureDesktop,EnableLUA,ConsentPromptBehaviorAdmin. You can change their values by double click on each. This will open a window in which you need to specify the digital value of the parameter and press the button OK.
 Changing a DWORD Value
- Always notify - 1, 1, 2 respectively. (for example, PromptOnSecureDesktop - 1 , EnableLUA - 1 , ConsentPromptBehaviorAdmin - 2 );
- Notify when applications try to change parameters (default values) - 1, 1, 5;
- Notify without dimming the screen - 0, 1, 5;
- Disable UAC and do not notify - 0, 1, 0;
After changing the registry values, restart your computer for the new UAC settings to take effect.
Also for shutdowns User Account Control you can create and apply a registry file with the following content:
"ConsentPromptBehaviorAdmin"=dword:00000000
"EnableLUA"=dword:00000000
"PromptOnSecureDesktop"=dword:00000000
For inclusion User Account Control, create and apply the following registry file:
Windows Registry Editor Version 5.00
"ConsentPromptBehaviorAdmin"=dword:00000005
"EnableLUA"=dword:00000001
"PromptOnSecureDesktop"=dword:00000001
Again, a reboot is required for the new UAC settings to take effect.
Disable Windows 10 UAC on the Command Line
The command line in Windows 10 is invoked in a similar way by calling the registry. Open Start and enter the command cmd and press Enter.
 Launch cmd
To change UAC settings, use the following command:
C:\Windows\System32\cmd.exe /k %windir%\System32\reg.exe ADD HKLM\SOFTWARE\Microsoft\Windows\CurrentVersion\Policies\System /v EnableLUA /t REG_DWORD /d 0 /f
The d 0 /f parameter turns off notifications completely.
C:\Windows\System32\cmd.exe /k %windir%\System32\reg.exe ADD HKLM\SOFTWARE\Microsoft\Windows\CurrentVersion\Policies\System /v EnableLUA /t REG_DWORD /d 1 /f
The parameter d 0 /f returns the mode back.
 cmd
cmd
To save new settings UAC you need to restart your computer.
Disabling UAC in Windows 10 using the msconfig utility
Open Start and enter the command msconfig and press Enter.
 MsConfig
After launching the utility, go to the tab Service and select the item Setting up User Account Control and press the button Launch.
 Setting up User Account Control
A window will open in front of us Set up notifications when computer settings change. And then the settings are similar to this article.
If you decide to disable UAC, then do not forget to use antivirus programs. In addition, I do not recommend downloading files from dubious sources to your computer. Running programs from flash drives and disks whose origin you doubt is also not advisable.