4 color settings available. How to set up your monitor for correct color reproduction
A laptop is a constant companion of a 21st century person at work, at home, and on the road. It is known that the time spent setting up software will pay off later when you don't have to waste it on unnecessary steps or waiting for the operating system to respond. It is equally important to correctly configure the color rendition of the laptop display - this is necessary both for designers, photographers, etc., and for ordinary users. It’s not that difficult to make your eyes less tired and your vision not to deteriorate.
To avoid color distortion, the laptop should be located in a place where it is not exposed to outside light. Designers, for example, use special curtains - then there is no threat of glare or light exposure. The easiest and fastest way is to calibrate the display using the built-in program (using Windows 7 as an example). To launch it, go to the “Control Panel” and select “Color Management”. In the “Details” tab, you need to click on the “Calibrate screen” button and then follow the instructions. There are other special programs that help adjust colors - these are Adobe Gamma, Corel Draw, Ati Catalist Control Center. In order to use one of them, for example, Adobe Gamma, you will need a source color scheme that you can use as a reference when changing color parameters. The pattern consists of stripes with gradations of different colors. For correct settings, first set the color temperature. Next, to calibrate the display of a home laptop, look at the gray stripe - 32 rectangles should be clearly visible on it, including the ones on the left and right. To evaluate the result, print the resulting image, always in the “Grayscale” mode. If necessary, change the adjustments further until the colors on the paper and display are identical, then save the result.

Different types of devices have different characteristics and color rendering capabilities. For example, a monitor display and a printer reflect different ranges of colors because these devices use different processes to reproduce color content. Scanners and digital cameras also have different color rendering characteristics. Even different programs sometimes interpret and process colors differently. Without a consistent color management system, a single image may look different on each of these devices.
Color rendition is also affected by viewing conditions (such as ambient lighting) as the human eye adapts to different lighting conditions, even when viewing the same image. Color management systems maintain acceptable color performance on devices with varying color capabilities under varying viewing conditions.
When to change color management settings
No need to change often color management settings. Typically the default settings are fine. Change them only if you have specific color rendering requirements that the current color settings do not meet. These options are commonly used by image processors.
- add or remove a color profile;
- associate one or more color profiles with one of the devices;
- change the default color profile for one of the devices;
- change system default color settings for a specific device for all computer users;
- change the default rendering method or color space.
What is Windows Color Profile
Color profile is a file that describes the color rendering characteristics of a specific device in a specific state. The profile may also contain additional information that determines viewing conditions or color gamut display methods. Color profiles, which work with your computer's color management system, help ensure proper color reproduction regardless of device or viewing environment.
IN color management system color profiles are used to create color transformations used by programs to convert color from one device color space to another. (A color space is a three-dimensional model that graphically represents hue, brightness, and saturation of colors to represent the color rendering capabilities of a device.) When a new device is connected to the computer, the color profile for that device is automatically installed.
There are two main types color profiles, Windows continues to support Windows Color System (WCS) and International Color Consortium (ICC) profiles. This gives you plenty of options to customize your color management settings and color rendering processes. WCS is an advanced color management system that is included in the latest versions of Windows. By supporting color management using an ICC profile, WCS provides additional capabilities that are not supported by existing ICC color management systems.
Add a color profile for a device
Color profiles are usually added automatically when new color devices are installed. These can be added using color management tools, such as monitor calibrators.
You probably already have color profiles for your devices installed on your computer. But if you need to install a new color profile, follow these steps:
- Open the Color Management window;
- Go to the tab All profiles and click the Add button;
- Find and select a new color profile and click the Add button;
- Click the Close button.
Associating color profiles with a device
A device can have multiple color profiles because a color profile reflects the color rendering characteristics of a specific device in a specific state. Each change that causes a change in the color behavior of the device requires a separate profile.
Profiles can be optimized for different types of projects. For example, a printer may have multiple profiles, each designed for a different type of paper or ink.
If a device has multiple profiles installed, you can determine which profile to use for a specific project.
Linking multiple color profiles to one device
- Go to the tab Devices.
- On the list Device Select a device to associate with one or more color profiles.
- Select the checkbox and click the Add button.
- In the dialog box
- To use a color profile that is already installed on your computer, select a color profile from the list and click OK.
- To use your own color profile that is not installed on your computer, click the Browse button, find the profile you want, and click the Add button.
The selected color profile (or profiles) is now associated with the device. It can be used by programs that use Windows color management to describe the color characteristics of a device. To set the new associated color profile as the default profile for the selected device, click Set as default profile.
- Click the Close button.
Note: In the program for and images, it is possible that you can also select color profiles. If you make changes to color settings in such a program, those settings are typically used only by that program.
Unlink a color profile from a device
- Open the Color Management window.
- Go to the tab Devices.
- On the list Device Select the color device for which you want to unlink one or more color profiles.
- Check the box Use my settings for this device, select the color profile that you want to unlink from the selected device, and click the Remove button.
The selected color profile(s) are no longer associated with the device. It will no longer be used by programs that use Windows Color Management to describe the color characteristics of a device.
- Click the Close button.
Note: In your graphics and imaging software, you may also be able to select color profiles. If you make changes to color settings in such a program, those settings are typically used only by that program.
Maintaining and using a device connection
Once a color profile (or profiles) have been associated with a device, the new association can be saved and used in several different ways. Any changes you make affect the color settings for the selected and current user account only.
- Open the Color Management window.
- Go to the tab Devices.
- Follow these steps:
- To combine the current system default color settings the device uses with the current set of profiles associated with the device, click Profiles And Merge my settings with system defaults.
- If you don't want to use color profiles associated with your device and instead want to use the system default color settings, click the Profiles button and select Reset my settings to system defaults or uncheck Use my settings for this device.
- To save the connection between the selected device and the current set of profiles it uses, click Profiles And Save connections. In field File name
Saving the connection file with the device, you can download it if you need to return to the color settings for the selected device. For example, you have different link files saved for multiple projects, and you need to quickly switch color settings by loading a different device link file. Each device association file contains information about which color profile was the default profile when the file was saved.
To load a device association file (so that the selected device can use the color settings specified in that file), click Profiles And Download connections
- Click the Close button.
Change device color settings for all users
Any changes to color settings only affect the current user. However, you can change the system default color settings for a specific device so that the color settings are used by everyone on the computer (by leaving the Use my settings for this device check box unchecked in the Color Management window for this device).
To change the system default color settings, you must be logged in with a user account that has administrative rights.
Change color settings for all users
- Open the Color Management window.
- Go to the tab Additionally and select Default setting.
- In the dialog box on the list Device Select a device to associate with one or more color profiles for all computer users who use the device's default color settings.
- Do one or more of the following:
- If you want to add a new color profile for the selected device, click the Add button and go to step 5.
- To unassociate a color profile from the selected device, select the color profile, click the Remove button, and then click Yes. Continue to step 6.
- If you have multiple color profiles selected for your device, select the color profile you want to set as the default profile and click Set as default profile. Continue to step 6.
- In the dialog box Color Profile Matching do one of the following (or both):
- To specify a color profile that is already installed on your computer, select the desired profile from the list and click OK.
- To specify your own color profile that is not installed on your computer, click the Browse button, find the profile you want, and click the Add button.
The selected color profile(s) are now associated with the device. It will be used to describe the color characteristics of the device.
- (Optional) Do one of the following:
- To save the connection between the selected device and the current set of profiles it uses, click Profiles And Save connections. In field File name Enter a name for the device association and click the Save button.
- To load a device association file (so that the selected device can use the color settings specified in that file), click Profiles And Download connections. Browse to and select the saved communication file and click the Open button.
- In the dialog box Color Management - Default Options Click the Close button.
- In the dialog box Color management Click the Close button.
If the default color settings are not already in use (provided that the Use my settings for this device), when you open the Windows Color Management dialog box, you will be notified that the system default color settings have been changed.
At this point, you can combine these changes with your own settings, or reset your color settings to match the new system default color settings for the selected device.
How to calibrate your monitor | Two Reasons to Calibrate Your Monitor
If you have already gone through all the stages described, it means that a lot has already been done. If your monitor does not have a color management system, or you want to create an ICC profile, you are welcome to the next section, where we will explain in detail how it works.
How to calibrate your monitor | Application: How to adjust color
In monitor reviews, we always measure the color gamut and brightness of the signal, even if in most cases these parameters are not adjustable. This requires a color management system (CMS), which is not available on most monitors. In particular, our experience with this feature is based on only a couple of expensive TVs and projectors. If your monitor settings include color gamut presets, you can use them to improve color accuracy. You should choose the one that best suits the user's needs (sRGB/Rec. 709 for most applications or Adobe RGB 1998 for image editing). A measurement must then be carried out to ensure that the preset meets the standard requirements.
Let's do a little "anatomy" lesson.

Chromaticity of AOC Q2963PM after calibration
You will find such a diagram in all our monitor reviews. This particular one belongs to the monitor AOC Q2963PM. At the top is the color saturation field. Color saturation level is simply the distance from the white point on the CIE chart. You can see how the reference dots go in a straight line from the white point towards each primary and secondary color. The further the point is from the center, the greater the saturation until the measurement reaches 100% at the top of the gamut triangle. Instead of measuring only the 100% saturation level, we also measure stops at 20, 40, 60 and 80%. If you only measure saturation at 100%, many monitors can generate nice-looking charts. Measurements at different levels provide more accurate color gamut results.
The middle part of the chart shows the brightness of the color gamut. This is the third dimension of color that is missing from the CIE chart. We believe it has a greater impact on perceived color accuracy than the points on the gamut triangle. The shorter the columns, the higher the quality. This monitor is excellent.
The bottom diagram contains Delta E error data. Here, too, values below three are invisible to the naked eye. Our chart shows the errors for each color at each saturation level.
If you have one of the very rare displays with a color management system, then a quick guide to setting it up might be useful. Please remember that no two systems are alike and some may not work correctly. You should use the CMS carefully, using the necessary tools and understanding that your actions may not improve the quality of the image.
Traditional CMSs have three adjustments for each primary and secondary color: Hue, Saturation, and Lightness. Obviously, each has certain effects. Let's take another look at the blank CIE chart.

For example, if you adjust the tone to green, the color point will shift towards cyan or yellow. If you adjust the tone of a secondary color, its point will move towards one of the primary colors that it is composed of. For example, purple moves between blue and red.
Adjusting saturation moves a color closer and further from the gamut triangle. As with the grayscale adjustment chart (bullseye), you can manipulate hue and saturation adjustments to bring the color point into the target square.
Now let's look at adjusting the brightness.

In CMS, brightness is simply another term for signal brightness. To configure it, you first need to set the color points on the CIE chart. Then, starting with red, adjust the lightness until the bars shown above are as close to zero as possible. It sounds simple, and maybe it is. There is a chance that all three settings will influence each other, and you will have to tinker a lot to get the best result. Setting up a CMS can take a long time. However, the basic procedure involves adjusting the hue and saturation for each color, and then you need to go back to adjusting the lightness.
Creating an ICC profile
Most monitors have chromaticity data built into the firmware, but this assumes it was measured correctly at the factory. And, based on our experience, we know that no two monitors are identical. It is best to create an ICC profile by measuring the primary colors yourself. We use the free QuickMonitorProfile program for this.

After collecting the CIE coordinates for each primary color, you have everything you need to create a profile. All you have to do is select Custom from the Chromaticity drop-down menu, and then enter the X and Y values for each color. You can then save them so that you can return to them later if necessary.
How to calibrate your monitor | Calibrate your monitors to improve image quality
Since the calibration steps are well-diluted with theoretical information, we decided to combine them into one compact list of recommendations:
- Warm up the monitor for at least 30 minutes before taking any measurements. It's better to be sure that the backlight is completely stable.
- Select a picture mode that gives you access to all possible settings, including level points, gamma, grayscale, and color.
- Customize your levels with PLUGE and templates. Try to prevent clipping of the darkest and lightest areas of the brightness scale. It may be worth using a meter to determine the maximum light level. We always use 200 cd/sq.m.
- Set the gamma control to 2.2, if available. To unlock the RGB sliders, the color temperature setting must be set to custom or custom.
- Make sure the gamma is close to 2.2. If not, change the preset.
- Using the 80% white template as an example, adjust the RGB sliders using a meter and appropriate software. We like the bar and bull's-eye charts, but you can use whatever method you prefer and use to set the white point to 6500K or D65.
- Measure color gamut using window templates. Record CIE coordinates to create an ICC profile. Some software packages will do this for you. If your monitor offers a choice of color gamuts, choose the one that best suits your needs. sRGB/Rec. 709 are great for gaming, watching videos and working on a PC. Adobe RGB 1998 is suitable for photo editors if the camera has the same color gamut.
- Verify the results with a final series of measurements. Now everything is ready!
The main advantage of this method over a software compatibility table is related to stability. With LUTs, it's very easy to start chasing color settings after each other, especially when you add an additional ICC profile variable. Each application performs its functions slightly differently, and a slight change in color on your monitor can mean a big inconvenience later when you're printing an image, for example. When the display is properly configured with its own adjustments, there is no need for a LUT and you can use a single ICC profile that is turned on or off depending on the application. For example, when creating graphs for reviews, we do not use profiles, since everything is created for the Internet.
If you want to figure out which monitor to buy, it's fairly easy to create your own benchmarks based on the steps above. Then you will know exactly the weaknesses or strengths of the display. Similar to how we look at brightness, gamma, grayscale and color, you can test these parameters to find a model that suits your needs.
If after reading this material you still have or have new questions, we would like to warn you that a new article on this topic is coming. Next time we'll focus on the CalMAN CalPC package. SpectraCal has several kits with inexpensive meters and a template-generating client module for about $300. If you already have a measuring device, you can additionally buy the program online for $149.
We hope you now have a better understanding of monitor calibration and how the built-in adjustments work to improve image quality. By following the steps in this article that we use in our reviews, anyone with the right tools can achieve the same results.
Calibration is the process of adjusting the color rendition, brightness and contrast of the image of a monitor or other visualization device (for example, a projector or TV) in order to achieve the most complete match of tone, colors and shades on the screen and when printing. In everyday life, calibration has the goal of simply making the image natural and pleasing to the eye.
Almost everyone has encountered the need to calibrate a monitor - when they brought it home from the store and turned it on for the first time. For those who do not work in graphic editors and are not involved in photography, it is enough to do this “by eye”, using the adjustment buttons on the monitor itself or Windows tools. Great accuracy is not important here - the main thing is that the image is without obvious color distortions, moderately bright and moderately contrasting.
Artists, designers and photographers need deeper - professional calibration, which is done either using programs or special devices - calibrators.
The first option is available to everyone - the majority of such applications are free and not too difficult to use. However, to achieve a good result you also need a diamond eye. The second option provides maximum accuracy, but few people use it. The reason is the high cost of calibrators. Even a budget device costs as much as a good smartphone, but some artists and photographers rent them or use the services of calibration specialists, fortunately this is not required to be done often.
Since we don’t have a calibrator, let’s talk about ways to configure the monitor using programs.
Easy monitor calibration using Windows
The tool we are interested in is called “Color Calibration”. In Windows 10, it is called through the “Settings” application - section “System” - “Display” - “Advanced display settings”.

In Windows 7 and 8.1 - through the Control Panel and the “Display” section. Or through “Display Settings” in the desktop context menu.

After launching the utility, follow the suggested operations step by step. But before doing this, be sure to expand the window to full screen and sit directly in front of it, otherwise the result may not be accurate. The distance from your eyes to the screen should be the same as during normal work.
The first step is to set the basic color parameters
Open your monitor's menu by clicking the button on its panel and set the default color settings. If you have a laptop, continue to the next step.
Second step - adjusting the gamma
Here is an image of a square with dark spots inside and a settings slider. There is a dot in the center of each spot. Your task is to make the dots invisible (merge in brightness with the background).

Third step - adjust brightness
Open the monitor menu again or the “Power Options” section in the Windows Control Panel - now we will need the brightness adjustment slider. Instead, you can use the “Brightness-” and “Brightness+” buttons on the monitor panel or laptop keyboard.
Move the slider to adjust the brightness so that the suit details and shirt of the person in the picture are moderately visible, and the X on the wall behind him does not blend into the background, but is barely noticeable.

Fourth step - adjusting contrast
By controlling the contrast adjustment slider, make sure that all the folds and buttons on the white shirt are clearly visible, and the shirt does not blend into the wall.

Fifth step - color balance
Move the sliders of the three colors - red green and blue - until the stripes in the center of the screen are neutral gray.

Sixth step - saving calibration
Compare the current (new) calibration with the previous one. If you are satisfied with it, click "Done". If you next want to proceed to setting up text display, first check the “Launch ClearType tool...” checkbox.

Setting the display of text
Here you should select an example where the pangram (text that includes all the letters of the alphabet) is read best and apply the setting.

The Windows Calibrator is sufficient to properly set up your monitor for work other than graphics editing and fine art printing.
To check the quality of calibration, you can use specially created wallpaper from the website RealColor.ru. Select a set of wallpapers according to your screen resolution so that the picture does not change in size.

Calibrating your monitor for photo printing and graphics work
How to get the best results
To get a really good image, where black is black (not dark gray), white is white, and color does not depend on the angle of rotation of the screen, you need a professional monitor. Photographers and graphic artists prefer screens with an IPS matrix (the best option is S-IPS).
On budget monitors with TN-type matrices, it is, alas, impossible to achieve high accuracy of shades and colors. And the point is not that the programs do not allow this, but in the qualities of the screen itself. But we will work with what we have.
So, let's start with preparing the workplace:
- The monitor should be placed where you usually use it.
- The room must be sufficiently lit. It is better to carry out calibration in the lighting in which you are working. If you work in both natural and artificial light, it is optimal to create two color profiles. Directional light sources should be removed from the screen during calibration.
- Before calibration begins, the monitor must be operated for some time. CRT monitor - at least an hour, for others 30 minutes is enough.
- The background image should be set to neutral, preferably gray tones.
Adobe Gamma
Using Adobe Gamma, monitors are calibrated for working in Photoshop. Since the applications were created by a single developer, they are optimal for sharing - profiles created in Gamma are displayed in the Photoshop menu, and the user can quickly switch between them.
The utility is included with Photoshop, but if desired, it can be downloaded separately, although not from the official website (it is not there), but from third-party resources. It does not require installation, you just need to run it.
If you are calibrating for the first time, select the Step by Step version.

Next, we’ll create a description of the new profile (in Latin letters).

Next we move on to the calibration process. Using the monitor settings menu, we will adjust the brightness and contrast so that the gray square in the center of the window almost merges with the black one, but is distinguishable against its background. The frame should remain white.

The next step is to determine the type of glow (color of the phosphor). The required value can be taken from the monitor’s factory profile (it will be set by default if you have not previously changed anything in the settings). If you are at a loss, leave “Native” or “HDTV (CCIR 709)”.

Now let's set up the gamma for correct color rendering (the ratio of red, green and blue channels). Using the slider, we will align the brightness of the gray square against the background of black and white stripes, or set one of the default values. For an LCD monitor it is better to choose 1.8, for a CRT - 2.2.
If you uncheck the "Consider one gamut" checkbox, instead of a gray square there will be three - red, green and blue, with separate adjustment tools. With their help, you can remove the color tint of the screen, if any. If not, it’s better not to touch them.

After adjusting the gamma, we will determine the color temperature of the monitor’s white point. This setting depends on the ambient lighting. To work in daylight, it is optimal to set 6500° K, for artificial heat (incandescent lamps) - 5000° K, for artificial white heat (fluorescent lamps) - 9300° K.
To determine the color temperature visually, click the “Change” button.

Three light squares will be displayed against a dark background. Your task is to choose the most neutral gray.

At the final stage, set the white point display as a hardware value and save the profile.

To quickly edit existing profiles, it is more convenient to open the program as a control panel. Here all the settings are in one window.

Assessing calibration quality using web services
Online monitor testing services are convenient to use as an addition to calibration programs. With their help, you can evaluate and adjust not only brightness, contrast and color, but also sharpness, geometry, the presence of dead pixels, flicker level, etc. This is important if you use the monitor for photo editing or professional graphics work.
There are no settings elements in the services, so if you need to fix something, you will have to use third-party tools - monitor buttons and menus, Windows tools or programs.
Monteon.ru
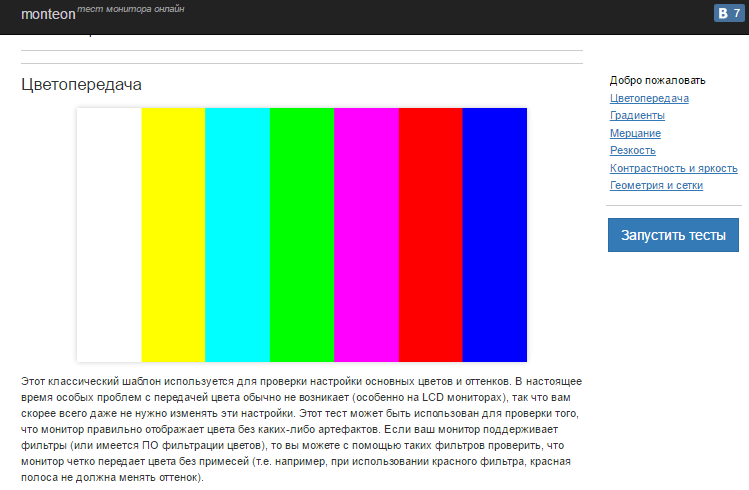
The Monteon.ru service allows you to evaluate the following:
- Color accuracy.
- Presence of dead pixels.
- Smooth gradient transitions.
- Flicker (phase synchronization on VGA monitors) and moire (stains in the form of a wave-like pattern, which should not normally exist).
- Sharpness of boundaries.
- Brightness and contrast.
- Zonal brightness (the difference in brightness in the center and on the periphery of the screen).
- Geometry and grids (clipping of image edges, peripheral distortion on a widescreen screen with an aspect ratio of 16:9).
Online Monitor Test

Online Monitor Test is an English-language service. There are 4 testing options to choose from:
- Simplified - for Smart TV, tablets and smartphones.
- In a browser window format (it is recommended to run in full screen mode).
- In windowed format with a resolution of 1920X1080 (resolution can be reduced).
- In the form of an application that runs outside the browser. Works without installation.
Online and offline versions of the program (except for the simplified version) contain the same set of tests.
Those who use two monitors can also check for image output delay on one of them (Input lag).
Using the Online Monitor Test you can evaluate:
- Displays similar shades of gray.
- Accuracy of seven primary colors and smooth color gradient.
- Matrix response time (6 different tests).
- Uniform lighting and color fill (5 colors).
- Presence of dead pixels.
- Flicker and moire.
- Readability of text written in several small fonts. The color of the text and background can be changed using sliders.
Each test is accompanied by a hint in English, but it’s not difficult to figure out what’s what without it.
This is how quickly and easily every user can calibrate their monitor at home. To maintain image quality, monitor manufacturers recommend repeating calibration every 3-4 months.
The poor quality of the matrices in mainstream monitors makes it difficult for users to accurately identify details and colors in photographs, printed designs, or other images. But everything is not so hopeless. There is no need to run to the store for a new one. How to adjust your monitor to improve image quality?
First of all, we need to take into account that we are talking about a consumer approach. Professionals are guided by completely different tasks and opportunities. And their requirements differ from everyday ones. Professional decisions require serious costs, which are unlikely to be justified if your earnings do not depend on the quality of the image.
Why adjust your monitor?
A monitor can be good or bad, but more often it turns out to be incorrectly configured. Many of us have noticed the difference in colors on our TV and those of our parents or friends.
You should also understand that a person has individual vision characteristics, so everyone perceives the image differently. In addition to the visual characteristics of the person himself, monitor settings should also be taken into account.
Default computer settings, standard drivers, use of inappropriate color profiles, standard cords, or incorrect screen placement all have a certain meaning. Therefore, you should not rely solely on images on the Internet.
Photographers often show portfolios to potential clients on their laptops, which are set to the appropriate settings. But photos may look different on a different monitor. Therefore, you should not rely on the monitor to assess the quality of pictures. The only way to universally check quality is to print photographs.
How to properly set up a monitor - where to start?
Before setting up your monitor, you should remove possible obstacles to normal color reproduction (with maximum shades for this monitor) and full color perception. First of all, you should place the Monique in a place where there will be no interference from outside lighting. Look around the room - it is optimal that there are no windows in the chosen place, and that the lamp light does not fall directly or at an angle.
Designers also use special curtains that help limit glare and side light. For ordinary users, such curtains may be overkill, but you can at least place them on the table so that no light enters the screen.
Let's consider an image specially created to evaluate the quality of the picture on the monitor. This image contains 2 halves - white and black. Each half is marked with numbers 1-5. If the matrix is of sufficient quality and well configured, you can see all the numbers from this list. Owners of a mid-level monitor can see numbers 1-3. If only numbers 1-2 are visible, or it was not possible to notice them at all, the problem must be solved - this is what our article is intended for.