To create an apple id you need to pay. How to create an account on iPhone: detailed instructions
Today there is simply an incredible variety of phones, but the leading place in demand and sales is occupied by the iPhone. Such phones are very convenient, high-quality and provide a huge number of opportunities, and registering your iPhone will give you even more interesting services and functions. But not every owner knows how to register such a smartphone correctly and profitably, although it is not at all difficult. There are several options for carrying out the mentioned process, but here we will consider a method that does not require the use of a card (credit card). It is the fastest, easiest, most convenient, and also accessible to everyone, because many people are afraid to enter any data from their bank cards. In addition, the majority of iPhone owners are satisfied with exclusively free applications.
Preparing for registration
Each subscriber who has an iPhone can register an Apple ID at any time, both when the device is first turned on, and long after successful activation. In each case, the scheme is almost completely identical. Below we will consider the second option, that is, creating an account on an iPhone that has already been exploited.
The subscriber must prepare:
- An iPhone that has already been activated.
- Connecting to the World Wide Web via Wi-Fi or an inserted SIM card with the Internet (without access to the Internet) Global network nothing can be done).
Registration actions
To successfully register your gadget, you should clearly, carefully, and consistently perform the following steps:

Important Points and Notes
Need to pay Special attention on some nuances:
- You must enter your real name email.
- The password must contain more than eight characters: numbers, English letters, and also there must be at least one capital letter. You need to remember the password, or better yet write it down.
- When indicating your age, you cannot put it below 18 years, but if you are younger, you can exaggerate it a little.
- It is incredibly important to understand the fact that the entered email and password will later become your Apple ID. This data should be accurately recorded and kept well, without showing it to anyone or sharing it.
- You also need to remember that this information is your account, as well as the only confirmation that you are the owner of this mobile device.
- If you do not plan to use a credit card, then in the “Payment Information” section you must select no. Otherwise you need to specify payment system, and then enter all the required data. You need to fill out all the information except for the item called...”
- A message will be sent to the email address you specified some time earlier, which you must open and follow the link contained in it.
That's all, registration with Apple ID (by the way, absolutely free) has been successfully completed. From now on, you can absolutely safely use the store called App Store, download free games (or paid ones by paying money) to your iPhone, as well as various applications.
If you strictly follow the instructions provided and follow them step by step, you should not have any problems with registration. you will spend minimum time This requires even the slightest effort on your part. Your iPhone will be successfully registered and the range of possibilities will expand significantly, which will provide great pleasure, and remember that there are no Money it will not be wasted.
Will be created when the gadget is activated. However, when setting up a smartphone for the first time, users often skip this step for one reason - the device requires plastic card data. Russian users, accustomed to suspecting fraud in everything, are delaying the creation Apple ID, trying to find a way to do without a card.
There are several options for registering an iPhone “account” - among them there is one in which you do not need to enter your credit card information.
Without Apple ID the user will not be able to:
- Download applications from the AppStore (neither paid nor free).
- Buy music and videos from iTunes Store.
- Synchronize your Apple device with cloud storage iCloud.
- Find a lost gadget using the " Find iPhone»
About full using iPhone without Apple ID out of the question. The legendary multifunctionality of this smartphone is due to a huge amount heterogeneous software available in the AppStore. iPhone no apps– just a stylish and well-assembled gadget, but by no means Not multitool, able to cope with any task.
How to create a new account through iTunes?
If you don't have iTunes, you should start by downloading latest version this program from the official Apple website. Once you download and install the media harvester, proceed as follows:
Step 1. Open iTunes and click on the tab " Account" V horizontal menu above.
Step 2. Select " To come in…".

Step 3. In the window that appears, click " Create a new Apple ID».

Step 4. You will be taken to the welcome page iTunes Store– here you need to click on blue button « Continue».

Step 5. At this point you need to read the document called " " and check the box next to " I have become acquainted...”

If you do not confirm that you have read it, registration will not be completed.
If you can't read Apple's position immediately you should use the “Print Version” link. An HTML document will appear in your browser, which you should print so you can read it whenever you have some free time.

After confirming that you have read the terms and conditions, click " Accept».
Step 6. Fill out the form - you must enter the following data:
- E-mail address. It is important that the address is valid and that you have access to it. If desired, you can specify an additional postal address.
- Date of Birth. By date, you must be over 21 years old - otherwise you will not be able to purchase content and software in the AppStore and iTunes Store.
- Created password. Account password requirements Apple records very strict: it must contain numbers, lowercase and capital letters. Plus, one character cannot be repeated three times in a row.

The user will also have to answer three questions - for example, what was your name best friend childhood. This measure is necessary to ensure account security.
Step 7 Unsubscribe from the mailing list if you do not want to receive information about Apple company products and film and music releases to your mailbox. To do this, you need to uncheck the boxes next to “ Recommendations and information...».

Then click " Continue».
Step 8. Select a payment method for purchases and enter the required details. note that indication of details credit card in iTunes in no way poses a threat to your well-being. Money will be written off only if you purchase content or software and only with your consent.

If you have chosen a plastic card as a payment method, you will have to enter its number, expiration date, as well as CVC2 - security code with reverse side. If you preferred the option " Mobile phone ", just indicate cell number and confirm it via SMS.
Step 9. Fill in the fields of the block " Billing address" You must specify:
- Last name and first name.
- City code and name.
- Street of residence and zip code.
- Contact number phone.
- Application form (“ Mr." or " Mrs.»).

Once you have completed the required fields, click " Create an Apple ID" You will see a window directing you to your email.

Step 10. IN mailbox you will find this letter:

You should click " Confirm address", after which you can assume that Apple ID successfully formed.
How to create an Apple ID without a PC?
You can create an Apple account without a computer, but in this case you need the device to be connected to 3G or Wi-Fi. Once you have access to the Internet, proceed as follows:
Step 1. IN " Settings"iPhone, look for the section " iTunes Store, App Store" and go into it.

Step 2. Click on the button " Create a new Apple ID».

Step 3. On the next screen you will see a list of countries - Russia is selected by default. Without changing anything, click " Further».

Step 4. You should read the document entitled " Multimedia Terms and Conditions Apple services " The document is quite capacious - on an iPhone it turns out to be 29 pages small print; that is why most users neglect to read it.

Either way, confirm that you have read " Provisions"and agree to the terms, you have to. To do this, click " Accept» in the lower right corner and then click on the button of the same name in the window that appears.

If you want to read the terms, but not from the phone screen, but from paper, use the “Send by e-mail” link. You can print the document from your email.
Step 5. Fill in the form. You will have to enter the same data as when registering an account in iTunes– e-mail, password, date of birth, questions and answers necessary to ensure security.

If you don't want to subscribe to news about Apple services, apps, or content, switch the sliders below to inactive.

Step 6. Select a payment method and enter payment details. The same data is required as when registering via iTunes.

After you have provided the required information, click on “ Further».
Step 7. Log in to the email you provided during registration. Apple ID, and press " Confirm address».
Account creation Apple ID in the “Settings” of the device and registration via iTunes– similar procedures: the same information is required in both cases.
You can also access the Apple account creation service through the App Store. Go to the app store and scroll to the bottom of the home page. Click on " To come in».
Then click " Create an Apple ID».

How to create an account on iPhone without a credit card?
At least one way to create Apple ID without a “credit card” there is. If you don't want to share your payment details with Apple, do the following:
Step 1. Go to iTunes and select " Programs».

Step 2. Find free application (any) on home page and click on its icon.
Step 3. Once the app description opens, click " Download».
Step 4. In the window that appears, click on the button “ Create a new Apple ID" - this will start the account creation procedure.

Continue registration as usual until you decide on a payment method.
Step 7. On the page " Specify payment method" instead of bank card select the option " No».

With this choice, you will be spared the need to enter payment details. However, numerous fields in the block " Billing address"You still have to fill it out.
Conclusion
Create Apple ID possible both with the help of a PC and without it. However, if you use a computer to perform this task and iTunes, less time will be spent - you will have to type a lot, and it’s more convenient to do it on a PC keyboard.
In addition, when registering from a computer, you will be able to do without specifying the details of the selected payment method. This is important because many domestic users Apple technology They are suspicious of the requirement to leave card details.
When you log into the iTunes Store for the first time, iBooks Store or "App Store" using the ID tool, you will be asked to indicate the method most convenient payment in order to be able to do necessary purchases in the shop . If you do not want to specify the payment type and method for your account, please follow the steps below.
To register Apple company recommends using only one Apple ID for everyone software services and functions for which it is likely to be needed in the future.
If you already have an Apple ID
If you have already created an Apple ID, then when you first sign in using it to the iTunes Store, iBooks Store and App Store, you will be required to indicate the payment type. However, after entering the store, if necessary, the payment method can be deleted.
You won't be prompted to enter your payment type again until you make your first iTunes purchase..
If you don't have an Apple ID yet
In this case, follow the steps below to create simultaneously account for store and Apple ID without adding payment type:
- on a Windows or MAC PC;
- on one of iPhone devices, iPod touch or iPad.
Creating an "app store" Apple ID on a Windows or Mac PC
- iTunes, then go to the iTunes Store by clicking “iTunes Store” at the top of the window.
- Scroll down the page and find the flag of the state in which you live in the lower right corner of the window.
- If your country's flag doesn't appear, click it and select your region or country.
- Next, go to the App Store, TV Shows, Music, or Books menu by clicking on one of the icons in the top left corner.
Download free program, video file, song or book. In order to find free programs, in the right column, click on any link where it says “Free” (“Free on iTunes” or “Best free applications for the App store”). Once you've found a free program or file, click "Download."
If you need to sign in using your Apple ID, click ID.

Follow the instructions on the screen. If you are asked to provide payment type information, click the No option.
After you have entered all necessary information You will need to verify your Apple ID using your email. Before you can start using your Apple ID, you must first verify it.
Registering an Apple ID account on iPad, iPhone and iPod touch
- Go to App store Store, Tunes Store on one of the iOS devices.
- Select free application, video file, song or book.
- Click “Download” next to the object, and then click it again to start the download.

When you're asked to sign in with your Apple ID, choose Create a new Apple ID.
Follow the instructions on the screen. Next, when you are asked to leave information about the type of payment, select “No”.

After you have entered all the necessary information, you will need to confirm your Apple ID by email. Before you start using your ID, you must first confirm it.
Among other things, you should remember that if you are the creator of a family group and use the “ Family Sharing", the "No" option will not be available on the methods page.
That's all for today, now you know how to register in the iTunes Store and App Store.
“Create a single identifier for all Apple products, because I had a vision that this would be very convenient and would win us an audience” - this is what the great prophet said Steve Jobs at one of the board meetings Apple Corporation. Maybe the text was a little different, but the meaning was conveyed accurately. Apple ID is one of the most comprehensive identifiers in the world.
What is an Apple ID for?
So, Apple ID is your identifier in the environment of all services that Apple represents. Moreover, this identifier allows you to activate devices purchased in special stores. Your device will not be able to function at its full potential unless you activate it using your or someone else's Apple ID account. Despite the initial opinion of inconvenience similar work technology, Apple gadgets are leaders in the smart device sales market. First of all, because of the degree of security that Apple products guarantee. Of course, nothing will protect you from a pickpocket or a group of athletic looking people with fittings in their hands. But the security system Apple gadgets allows you to transform your beautiful and feature phones into a useless pile of plastic if they fall into the wrong hands. And no one but yourself can make the tablet show movies again, or the phone make calls and send messages. Statistics say that theft of i-devices is the lowest among all gadgets. Largely thanks to the Apple ID - it guarantees you the convenience and security of all Apple devices.
How to register and create an Apple ID in the App Store
Given that the identifier is used in many services, it can also be registered in different services. This frees you from having to use one application that may not be used again.
One of the most popular ways to register an Apple ID is through an iPhone or iPad.
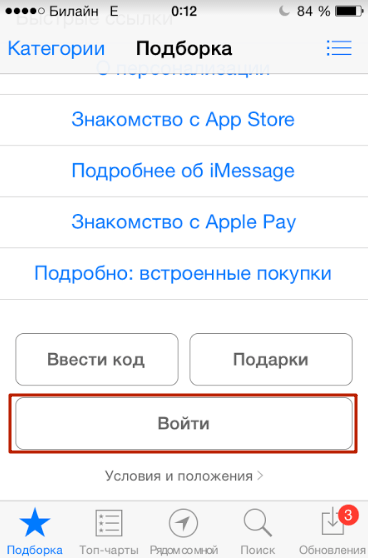
- We find and open app Store. Open the App Store application
- Scrolling to the very bottom of the application page, we find a star icon with the caption “Selection”. Click the icon and in the drop-down menu click on the “Login” button.
 The “Login” button opens the identification menu
 - In the next menu, click on “Create an Apple ID”.
 Using the “Create Apple ID” button, we begin registering an Apple ID
 - Now we enter our data, first we need to select the country and click “Next”.
 Having selected your country of residence, click “Next”
 - We accept the user agreement with the corresponding button.
 We agree with user agreement Apple
 - Next, we enter information from the list of requested data:
- email address to which the confirmation letter will be sent;
- a password that must contain letters (both uppercase and lowercase) and numbers - at least 8 characters in total;
- security questions (and answers for them). This is necessary so that if you lose your password, you can restore your account;
- Date of Birth.
- We agree or refuse to subscribe to advertising and promotions from the App Store and click “Next”.
 We agree or refuse advertising and Shares App Store and click “Next”
 - The next step is to enter your home address and phone number.
 Enter your home address and contact number and click “Next”
 - Next, enter the payment method for goods and services provided Apple store. This could be a credit card (then you need to enter its number, security code, back side, as well as the date until which this card is usable).
- And on last step Confirm your email address. To do this, go to your e-mail, open the letter from Apple and follow the link indicated in the letter.
Voila! You have created your own Apple ID, with which you can make purchases and use all the services of the corporation.
How to Create an Apple ID Using the iTunes App
To create an Apple ID on Mac or PC you need iTunes app.

Video: how to create an Apple ID via iTunes
How to create an Apple ID without a credit card
In most cases, when creating an Apple ID account, you immediately need to enter your bank card or phone account information, from which funds will be withdrawn for purchases made. But you can bypass this point if you only need an identifier.

Other possible ways to create an Apple ID
Register new Apple ID can be done in a couple of other ways:
- using the “Setup Assistant” when you first turn on the device and activate it;
- through the settings of an already activated gadget.
The Setup Assistant will prompt you to create a new ID. Follow the assistant's tips and instructions above, and registration will go as quickly as possible.
If you activated your device, but did not create an Apple ID during activation (for technical or personal reasons), you can create an ID without any additional applications.

Problems when registering and creating an Apple ID and ways to solve them
There are not many such problems, the main one is the lack of connection with the server. But there may be several reasons why such a problem arises.
If you receive a similar error on your gadget, you should check:
- active Internet connection, whether it works;
- ISP settings, as far as possible (there is a possibility that the ISP is blocking access to one or more Apple servers);
- the novelty of your device. If the phone is taken from your hands, then it is better to roll back to factory settings. The owner's old settings could lead to blocking of the Internet or individual segments of it.
If this error occurs on your computer, there are not many more options:
- check your internet connection to see if everything is working;
- update the iTunes application to the latest version;
- check your computer for viruses and, oddly enough, for antiviruses. Some security programs have been caught blocking access to completely safe and trusted sites;
- check VPN settings and proxy servers.
If you do not receive an email, check your Spam or similar folder (depending on your service provider). Also make sure you enter your email address correctly.
Finally, we should not forget that Apple servers not iron (albeit iron) and may well be overloaded or technical work may be carried out on them.
Creating a universal identifier is easy, as is the benefit and convenience that comes from using it. One account can be used for all your Apple devices and in all services and stores of the corporation.
Register in the AppStore from your iPhone possible in two ways, the first method is standard, with the obligatory indication of your number credit card, we will consider the second a way to register in the AppStore without specifying payment information. About how to bind or unlink a payment card from Apple ID read also at the end of this article.
Benefits of using this method:
You can download demon paid games and applications from the AppStore;
- You are insured against accidental withdrawal of funds from your card;
- You can add your data at any time payment card.
So, everything you need to have with you for registration in the AppStore without linking card data- this is your iPhone with the Internet connected via Wi-Fi or via networks mobile operator communications (fees may apply according to the tariffs of your operator).
How to register in the AppStore from iPhone without linking a payment card
Step 1: We open a game store and AppStore applications
Step 2: Choose any free game or application, I chose, for example, Fifa 15
Click on “Free” --> “Install”. The “Login” window will appear in front of us.
Step 3: Select "Create Apple ID"
Step 4: We select the country in which you are located, we are in Russia, so we select Russia
Click "Accept" again
Step 6: A menu will appear in front of us with “Data for subsequent login” and “Security option” filled in.
Step 7: In the first field E-MAIL we write Your current e-mail address , in the future it will be used to log into your Apple ID and to recover your account password.
Important: we come up with, remember and write down somewhere in your notebook New Password from your Apple ID account.
Password requirements:
1) At least 8 characters, including numbers and capitals and lower case;
2) The same character cannot be repeated 3 times in a row (666);
3) The password must contain and numbers and letters;
4) There must be at least one in the password capital letter.
For example: this could be your phone number or its last digits, or some date + your name in English.
6607elenA
Lena1987
Elena4012 and more
This makes it easier to remember and enter. Be sure to write down your password somewhere in a notepad so you don’t lose it.
Step 8: We ask and answer 3 questions to ensure the security of your account (will be required if any data changes).
For example:
Childhood best friend's name? --> Elena
Favorite childhood book? --> ABC
Name of your favorite sports team? -->Zenith
Important: Ask questions and write answers with truthful information, otherwise you may forget the answers, or better yet, write down the answers somewhere in a notebook.
Step 9: Fill in a backup e-mail if you wish, for example the e-mail of a relative. I won't fill it out.
Step 10: Fill in your actual date of birth.
Step 11: Disable "Newsletter Subscriptions" to avoid receiving spam in your email.
Step 13: Scroll down and fill out the “Billing Address”.
Required fields: Salutation, Last name, First name, Address, Zip code, City, Phone number.
The fields will have to be filled out, provide accurate information, in case you have any requirements or complaints against Apple, you will confirm that it is really you.
Click "Done". Account has already been created, but not confirmed.
If you do not pass the E-mail verification, you will not be able to make free shopping.
Step 14: Go to your email and click "Confirm Now".