What to do if it says bootmgr missing. Error "BOOTMGR is missing" or how to change the active partition on Windows7
Sometimes Windows users 7 encounter this situation: when loading Windows computer asks you to press the key combination ctrl+alt+delete for the reason that BOOTMGR is compressed error on Windows 7. Pressing the indicated keys will reboot the system and re-appear the same message. What are the reasons for this error and how to fix them?
Why does this error occur?
From the message itself it is easy to understand the reason - it is that BOOTMGR file is compressed so Windows can't boot and asks you to press the specified keys to reboot, but the reboot causes the error to reappear.
The root of this error lies in the fact that the system drive (in most cases this is drive C) has the information compression function enabled in order to save disk space. You can verify this by looking at the value of the “Shrink disk to save space” parameter in the properties of the system disk. If it has a checkmark, compression is enabled. But you should never do this, so as not to run into the described error.
Unfortunately, the developers from Microsoft did not think to include in their brainchild a compression bypass for the system disk, as a result of which an inexperienced user, wanting to increase free place on the system disk, encounters the described error and ends up with an inoperable computer. And unchecking the already mentioned parameter will do nothing.
The same error may be due to the fact that system disk distorted due to errors in the operation of the disk controller or defects in its magnetic surface. In such situations, rebooting can sometimes help, but the very fact that such an error message appears should make the user think about the need to replace the system drive.
How to resolve the BOOTMGR is compressed error on Windows?
It is clear that to restore the original contents of the BOOTMGR file you need it original copy, although in this case the gentlemen from Microsoft could make the user’s life easier by performing “decompression” at his direction. But, unfortunately, this function is not provided, so you can restore this file only using the installation disk, which contains its original version.
We insert this CD into the drive and try to reboot. It is possible that it will work out the first time. And if it doesn’t work, then you need to go into the BIOS, set it as boot device CD drive and reboot again.
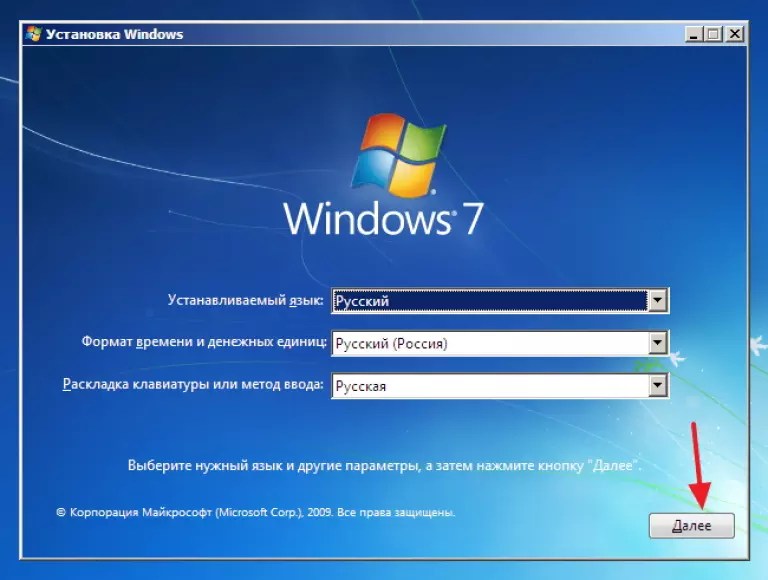
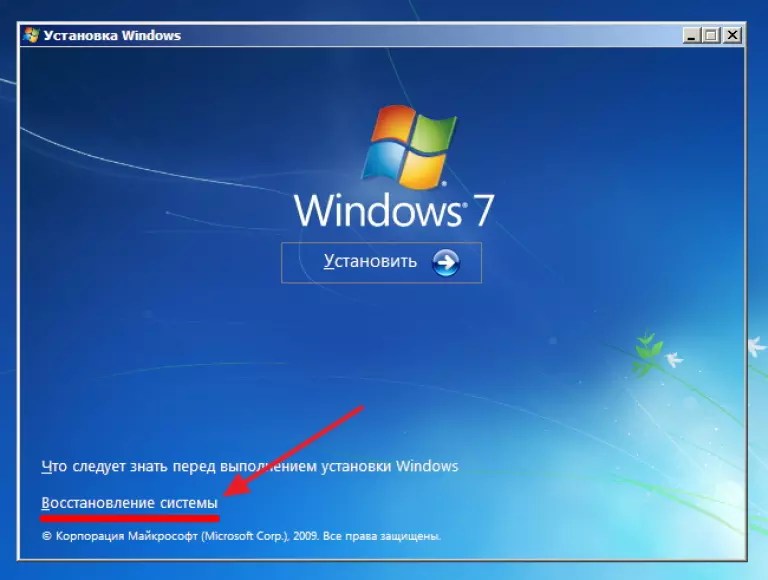
After some time, a window appears asking you to select a language. Select “Russian” and click the “next” button. Then a window will appear in which you need to select “system restore” and click the “next” button. Then there is a search for operating systems installed on the computer, and there may be more than one, in which case you are asked to indicate which operating system we're talking about. and again click on “next”.
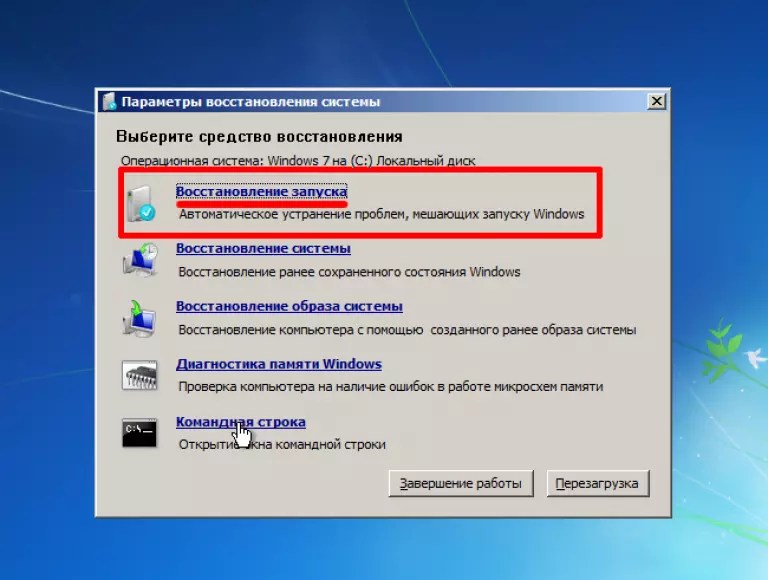
A window appears with different ways recovery, from which you need to select the “Command Line” function. After this, a black window is displayed on the screen, in which we enter one by one following lines, and after entering each one, press “Enter”. The input strings are in quotes and do not need to be entered:
1) "C:"
2) “bootrec /fixmbr”
3) “bootrec /fixboot”
If the system asks for confirmation, press “Y” and “Enter”.
After all this, remove the installation disk from the drive and reboot.
The error should disappear.
Problems with the computer always spoil the mood of users. But it’s one thing for the browser to crash due to a plugin problem, and another for Bootmgr is missing. Even experienced users do not always know what to do in this case. Today we will tell you what this error is, why it appears, and how to fix it.
What it is?
In general, the appearance of such a message during loading is very serious and bad signal, indicating problems with the boot area of the hard drive. As a rule, this happens either due to the actions of viruses, or (much more often) due to the excessive curiosity of the users themselves who experimented with partitions. Sometimes a similar situation occurs after an emergency shutdown due to a power outage.
Important! In the latter case, you can really start to worry seriously: standard spindle disks do not always have time to park the read heads in the event of an emergency stop. As a result, deep (relative to the microscopic level, of course) cuts remain on the surface of the magnetic plate. In this case, the message Bootmgr is missing will also appear. What to do? Unfortunately, in this case, only replacing the hard drive will help. However, we will continue to talk about simpler cases.
By the way, on which system is Bootmgr is missing most often? Windows XP! The reason is both in the “honorable age” of the hard drives used on such computers, and in some system features inherited from their “ancestors”.

If an inexperienced person often assumes that the hard drive will fail, which results in the purchase of a new hard drive and the complete loss of all data. Fortunately, everything is not so serious: you can completely overcome Bootmgr is missing. What should I do to fix all this?
Boot disk!
First you will have to get the one from which you installed the system. However, a regular image will do just as well. normal Windows, recorded regular means to or flash drive. If we talk about old systems, then you should repair Bootmgr is missing XP using disks, since old BIOS version they are not always able to adequately load the recovery environment from another medium.
Insert the media into the drive (or USB port), and then restart the computer. In the BIOS you set it to boot from the media you require. Let’s immediately make a reservation that it is the flash drive that is best used for repairing Bootmgr is missing. Windows 7 perfectly supports booting from such drives right out of the box, and for the user it is important high speed loading and a minimum of errors, which are not so rare when starting a recovery environment from an optical disk.

After this, wait until the system finishes loading necessary files. The installation wizard will appear.
Setting up the "Wizard"
Choose desired language and other parameters, click on the “Next” button. Another window will appear with big button"Install". There is no need to click it, since you need to click on the small “System Restore” item located in the lower left corner. In “System recovery options” and “Selecting an archive image”, click “No” and “Cancel”, respectively.
The “Recovery Options” window will open again, in which you need to left-click on the “Command Prompt” option.
The most important
Now we will use the diskpart utility, with which you can easily change the active disk partition.
By the way, what is active section? Simply put, this is exactly the area of the disk that is causing direct download operating system. Keep in mind that there may be more than a dozen such areas on the hard drive, each of which is designed to load its own operating system. But the OS will start exactly from the partition that is on this moment is active. However, all this is poetry.

Note that at the moment there is great amount various utilities designed for editing partitions. With their help, you can designate as active even one of a dozen areas located on one logical drive! However, it is better not to engage in such experiments if you have little experience, since the risk of losing all the data on the disk is very high.
In this case, the user will inevitably see Bootmgr is missing. You’ll find out what to do now, but it’s better not to risk it.
How can I “activate” a section?
Let's digress a little again to once again talk about the importance of active sections. Many beginners, starting to experiment with the system, often strive to “optimize” it as much as possible, which most often results in a desire to reduce the space it takes up on the hard drive. It is these “unnecessary” sections that most often fall under the knife.
If you select “Disk Management” in the “Administration” panel, you can clearly see all the disks that are in the system, as well as all their partitions. The active area in "Seven" must be at least 100 MB in size, and in Windows 8 - at least 350 MB.
Its importance is indicated by the fact that you cannot see it from the usual “Explorer”. As is easy to understand, all this is done for the security of the system: if you give inexperienced users access to it, you will probably have to reinstall the OS.
We're working!
To recover data on a disk, you will need to follow the commands below consistently and very carefully. You need to do this slowly, since otherwise you will probably make a mistake when entering it, and the next time you boot the system you will again see Bootmgr is missing, press any key.
- Diskpart. This special program, launched in mode command line, designed to manage partitions hard drives. Once upon a time, the FDisc utility performed the same function.
- List disk. This command will display on the monitor a list of all hard drives connected to the system, simultaneously assigning numbers to them all. Attention! The following operations should be done as carefully as possible, without making any mistakes!
- Select Disk x. Instead of "X" put the number of the hard drive from which the required file should be loaded. operating system.
- List partition. This command allows you to once again make sure that you have selected the correct area, since when you use it, all partitions that are on the hard drive you selected will be displayed again.
- Select Partition x. As you can understand, this time the “X” is replaced by the number of the partition that should be made active in order to boot the OS from it.
- Active. This option is precisely responsible for activation.

This is how Bootmgr is missing is “treated”. Windows 7 is a reliable system, so if all the above steps are performed correctly, it will work for a very long time.
BOOTMGR is missing, what should you do if, when you turn on your computer, you see this error instead of the usual one!?
Don't panic, there is nothing wrong with your computer and the error can be fixed. We'll talk about how to do this in today's article.
The “BOOTMGR is missing” error occurs when the system cannot detect the operating system bootloader.
What it is? This is a mini-program that, as the name suggests, boots the system after turning on the PC.
This problem may occur if there is broken clusters on hard drive computer, as well as after a power failure, incorrect shutdown of the computer, making settings in .
Below, in order of increasing complexity, we present several ways to solve this issue.
Checking BIOS settings
This option A solution to the problem should be considered if your computer has more than one physical (not logical!) hard drive, otherwise you should move on to the next step.
The error “BOOTMGR is missing" may occur when in the BIOS, media on which there is no operating system installed .
To resolve the error, go to and see which device is selected as the boot device.
Select Troubleshoot your computer.
If given environment recovery for some reason cannot be launched by pressing the “F8” key, let’s use installation disk (or flash drive) with Windows.
Boot from the installation media.
When the message “Press any key to boot from CD or DVD” appears on the display, press any key on the keyboard to confirm that you want to boot from the CD.
If the key is not pressed, the computer will boot from the hard drive and you will see the error again.
Select the “System Restore” item located at the bottom of the program window.
After this, select the operating system from the list and click “Next”.

Select “Startup Repair”.

After recovery, we try to log into Windows. Often at this stage the problem is resolved.
Fixing the error using the Windows command line
If the problem is still not solved, we will use an even more effective remedy. We follow the steps from the previous paragraph, but in the window for selecting recovery tools, select the command line.
Let's remember the reason why the error occurs - hidden Windows section, the bootmgr boot loader was damaged.
The task is to replace the damaged bootloader with a new one, which can be found on installation disk Windows.
The first thing we need to do is understand where and where to copy the bootloader, because depending on the logical layout of the devices, the letters will be different.
That is why we cannot give universal recommendations from which disk to which file should be copied.
At the command line, enter the commands given below.
Note! After entering each command, you must press the Enter key.
We go to the diskpart program, designed for working with disks:

Let's display a list of all available disks:

From the list of partitions, we need to select a disk with a volume size of 100 MB - this is a hidden partition that contains a damaged bootloader. In our case, this is drive C.
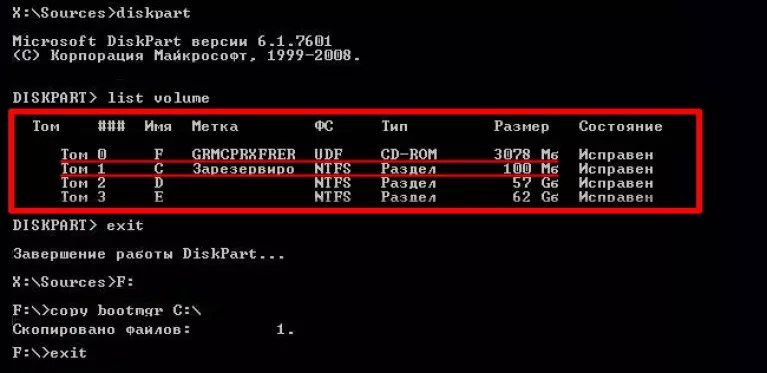
We leave from diskpart programs:
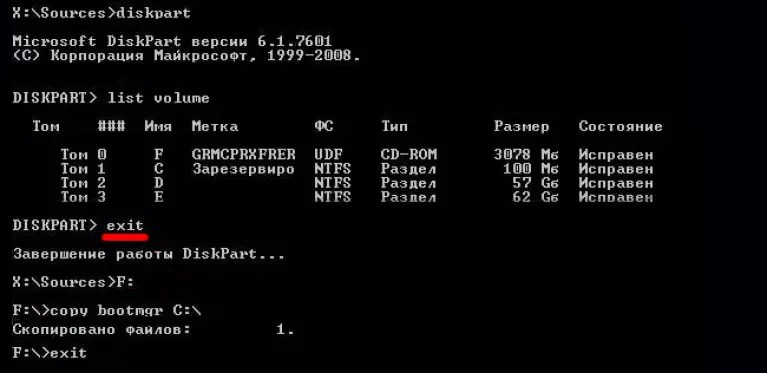
Let's go to installation media:
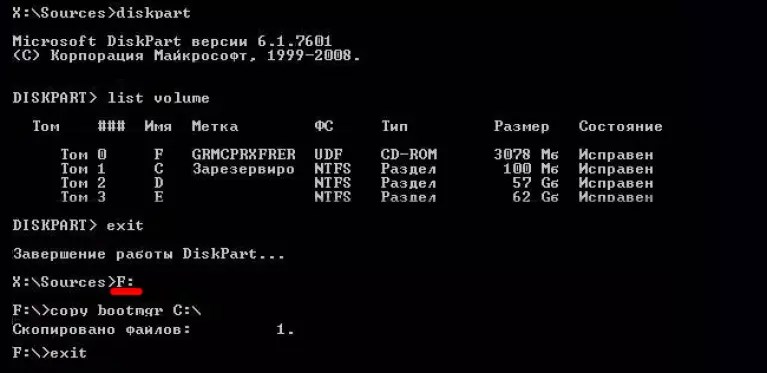
Copy the bootloader file from the installation device to boot partition local disk computer.
copy bootmgr C:\
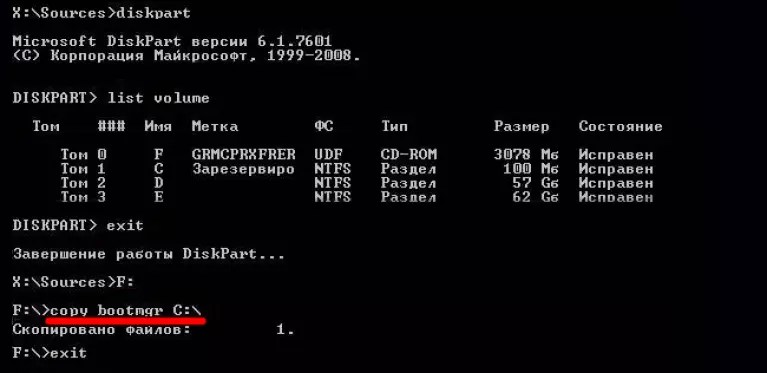
A message should appear indicating a successful file copy operation.

If there is no hidden partition with a capacity of 100 MB, you can reset the bootloader to any other local storage device. In our case, these are drives D and E.
You can simplify the situation and copy the bootloader to both partitions, so that later you don’t have to guess which media to specify as bootable.
To do this, replace the drive letter in the “copy bootmgr C:\” command.
We restart the computer, the error is not fixed? Again, select the command line as a recovery tool and enter the command:
bootsect /nt60 All
Let's reboot. If the operating system fails to start, the problem is that the disk on which the bootloader was reset is not the active partition.
Go to the command line and run the following commands:

An error in loading the Windows 7 operating system is not the best thing you can encounter when working with an operating system. Microsoft system. But sometimes such things happen (one must admit that in Windows 7 much less often than, for example, in Windows XP). Reinstalling the operating system is often a last resort method to fix the problem. In this article I will describe step by step how to fix the error when Windows boot 7.
So, after turning on the computer/laptop we have the ominous inscription " BOOTMGR is missing Press Ctrl+Alt+Del to restart". Often this error occurs after unsuccessful experiments with sections of hard disk.
To resolve this error, you need to insert the disk with your operating system and boot from it. How to do this is described in the article - how to boot from disk
.
After that, select the language and other parameters, click “ Further». 
Then click " System Restore». 
After this, computer recovery will automatically start using the previously created image. In system recovery options, click " No».

If you do not have a system backup, then in the following windows click “ Cancel».

In the window System Recovery Options launch the command line.

Now you need to use the diskpart utility to change the active partition.
Active section- This is the main partition from which the computer boots. A computer may contain several main partitions with their own operating system. At the same time, loading occurs precisely from the main partition that is currently active.
For example, if you press right click mouse on the Computer shortcut, select " Management – Disk Management» you will see everything hard disks and their sections. For Windows 7, the Active partition must be a partition of 100 MB in size (in Windows 8 - 350 MB). The "Active" attribute is needed by the BIOS in order to quickly determine which of the main partitions the download files are located on, and the fact that this partition is not displayed in Windows Explorer and is marked as "Reserved by the system", indicating that it is extremely important and should not be dealt with.
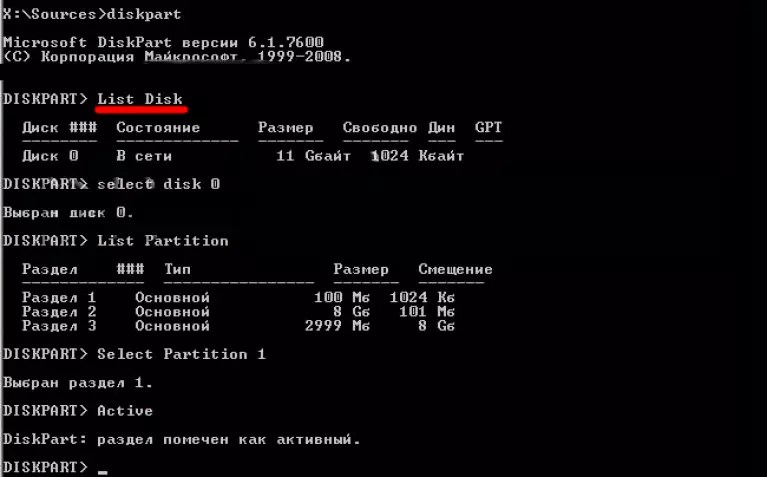
We run the commands sequentially:
1 Diskpart- utility for working with partitions hard drive for the command line, included in versions of the Windows NT OS lines starting with Windows 2000, which replaced fdisk that was under MS-DOS.
2 List disk- the command will display a list of all disks connected to your computer and assign numbers to them.
3 Select Disk x– where x is the number of the disk containing the partition you want to make active.
4 List partition– a command to view all partitions on the previously selected disk.
5 Select Partition x- where x is the number of the partition that needs to be made active
6 Active- will make the section you selected active. 
After this, reboot Windows 7. If everything is done correctly, errors BOOTMGR is missing Press Ctrl+Alt+Del to restart there should not be, the operating system should boot in normal mode.