Free exchange of links for group owners. How to create a group in Odnoklassniki from scratch and make money
Odnoklassniki is one of the most popular Russian social networks, with about 75 million active users from all over the world. By visiting the site, anyone can create a page, open a group, or start a survey on a topic for free. Above all, this is a way - through advertising, carrying out simple tasks or direct targeted fundraising.
To create a group in Odnoklassniki, you need to first register by coming up with a first and last name (or specifying real ones), a password for authorization and linking your account to the number mobile phone. The next thing the user should do is understand the fairly simple interface of the site. Then all that remains is to select and begin to act; The main steps will be described below.
Why do you need a group on Odnoklassniki?
The advantage of Odnoklassniki over other social networks is its adult, solvent and easily classified membership. With rare exceptions, people registered on the site do not intend or do not know how to hide their interests, acquaintances and personal information, making them an ideal target audience.
Thus, receive money from various user-oriented Odnoklassniki advertising campaigns easier than or engaging in similar activities in areas in which it is impossible to clearly imagine the average “buyer”. A social network user just needs to create a group for free and promote it, relying on system tips and gradually gaining regular readers. Clicks on links and purchases will be ensured - which means that the community owner will not be left without money.
Basic concepts of making money on Odnoklassniki:
- promoting your own business: or any other social network you can simply offer your product, services or ideas - this is the simplest, legal and understandable way for ordinary users;
- sale of advertising space: an account owner who has achieved popularity can, for an appropriate fee, allow large companies and private employers to place advertisements on their page or publish advertising posts on their behalf;
- direct fundraising: no one prohibits the user (subject to current legislation) ask other members of the group opened by him to transfer funds to him for bank card or any online wallet- and the more convincing the requests, the better the result will be.
Important: creating a group on Odnoklassniki does not have to be commercial in nature. A user who does not yet intend to make money on a social network can create interest groups: for himself or friends or for anyone - just like that, for the sake of interest, pleasure or fun.
The main thing is to remember the law and take into account the incredible readiness of Odnoklassniki to cooperate with law enforcement agencies. If the account owner agrees to these terms (they are presented in full in the section "Privacy Policy OK") and have already decided on the concept, you can start creating a group - following the algorithm presented below, the task can be completed in a few minutes.
How to create a group in Odnoklassniki?
To open a group on Odnoklassniki for free, you need:
- Log in to the site ok.ru by entering your phone number and password in the appropriate fields of the “welcome” window. On your personal page, move down a little, find the “Groups” link and click on it.
- On new page, if the user has not yet created a group, only third-party offers will be presented. To create your own group, you should use the “Create a group or event” button located in the upper left quarter of the screen.

- Now you need to select the type of group to open in Odnoklassniki. The most common option is a public page, which by default is open to everyone.

- The user who chooses the first option will be asked to fill out a group card, indicating the name and description of the page.

- Particular attention should be paid to the choice of page category in Odnoklassniki and the age limit: both of these criteria are vital to making it easier to find a group among hundreds of similar ones. The first identifies a public page according to classification criteria, allowing it to be distinguished from groups with the same name but different content; the second is, if necessary, to prevent access to the group of minors.

- Using the link “Specify Additional information", the Odnoklassniki user can enter in the appropriate fields the city to which the group is linked, address (as detailed as the creator wants), cell phone or landline number and a web resource recommended to visitors of a public page.

- By clicking on the “Select cover” link, the author of the group has the opportunity to make the group more recognizable; the image may either coincide with the avatar on your personal page or differ from it.

- Having finished entering data into the card, you should click on the “Create” button, highlighted in orange; Now the user can also go to the design and content of a group in Odnoklassniki, also for free.

- The main difference between a “Group for Friends” and a “Public Page” is the ability to make it completely private, including non-indexing search engines, or open by invitation only. For obvious reasons, making money on this option is much more difficult, unless we are talking about specific types of activities.

- The owner of an account in Odnoklassniki, aimed primarily or fully at selling goods or providing services on a commercial basis, should prefer one of the two lower options the group being created: “Bulletin Board” or “Shop.” The functionality of these pages will allow you to sell with greater efficiency; Filling out a group card is no different from the previously described manipulations.

- The user can find the newly created group on their personal page in the section of the same name in the main menu. By clicking on the previously selected avatar, he will proceed to further design of the created page.

- A more convenient option is to go back to the “Groups” section, as described at the beginning, and click on the image. In this case, the user, before proceeding to moderation, will be able to remember how many public and private pages he has in Odnoklassniki.

- If mistakes were made when creating a group or the account owner simply changed his mind, he can always delete it by expanding the “Other actions” menu in the description and clicking on the “Delete” link. Please note that the page is deleted permanently and it will be impossible to restore it without contacting the administration of the social network for help.

Important: the administrator of a group in Odnoklassniki, that is, its creator, can change the avatar, descriptions and other details by simply going to the page - it is not necessary to delete and re-create the community each time.
How to create a topic in a group?
To create a topic in a group for free, you need:
- Having logged into it as an administrator, find the “Create a new topic” dialog box and left-click on it.

- In the window that opens, select a suitable background by clicking on one of the row of icons located below, and then enter the name of the theme.

- If the icons in the bottom row are too small, the owner of the group in Odnoklassniki can call up the “Gallery” with enlarged thumbnails by clicking on the button with nine identical squares; next to it there is another, no less useful one - “Smileys”: they can be used in the title of the topic.

- By navigating the links below the background selection interface, the user can easily add images, music files, videos, or polls to the theme. By clicking on the gear, he can call up a new drop-down menu before publishing, before publishing, he can send the topic for moderation for free, make it hidden (open only to “his own”) or disable comments on it; last setting it can be changed in the future.

- By clicking on the avatar next to the gear, you need to clarify where exactly the topic will be published: in a group (the default option) or on the main page of its owner.

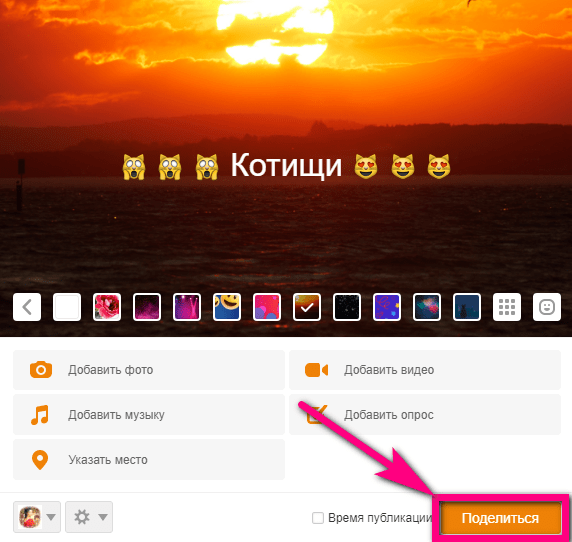
- To get more attention, we recommend pinning the topic by clicking on the pin in the top right corner above the background image.

- By calling the drop-down menu located next to it, the group owner or administrator can disable or re-enable comments in a topic, edit or delete it altogether: to do this, simply follow one of the links offered by the system.

- Finally, you can speed up the progress of the topic by indicating several keywords in the line under the background (any of them can be deleted by clicking on the slanting cross to the right of it) and clicking on the “Done” button.

How to create a poll in a group?
You can make a survey in a group on Odnoklassniki:
- By creating a new topic on the page and selecting the “Add poll” button in the information window.

- In the newly opened window, enter the question and answer options in the appropriate fields - there can be as many of them as the group creator or administrator wants. An unnecessary answer can be removed in the same way as tags under the topic by clicking on the slanting cross to the right of it.

- By checking the required checkbox, the owner of a public page can allow survey participants to check several options at once. In addition, using the “Other settings” link, it is easy to make the number of responses of other users available only to those who have already voted, and also to add anonymity to the survey - of course, within the framework of the Odnoklassniki privacy policy. After completing the settings, click on the “Save” button.

- Now the user can see what the survey looks like for page visitors.

- If you wish, you can add a picture to the beginning of the topic, and also include a music file in the accompaniment by returning to editing again and using the appropriate links.

- If the topic has been pinned to the group header, the survey will appear in its place. To vote, the user will only need to tick one or, if allowed by the author of the vote, several answers.


- In the new drop-down list, you need to select groups to distribute the survey. The topic will appear in the feed of each of the marked groups and, in accordance with the settings, will become available to visitors to the corresponding pages.

Important: if the survey was posted in third party group without the administrator's consent, he can delete it. A similar point must be taken into account when promoting: it is better to negotiate with page owners in advance than to try to restore messages or look for new “donors” later.
Let's sum it up
Receiving money from a group in Odnoklassniki is much easier than in other low-profit projects. In addition, public or closed pages can be used for non-commercial purposes to disseminate important or simply interesting information. In all cases, before creating a group, topic or survey, you must register on a social network by entering your phone number and creating a password.
Creating a group, as well as creating topics in it or conducting surveys, is free for the user. Just open a pop-up window, enter a name, select a background and attach a music file. You can open the survey as follows: new topic, and in the existing one; allow users to select one or more answer options, as well as arrange anonymous or open voting, the administrator decides.
Collapse
Hello! Dear readers, following the recently published article on how to do it, let’s move on to classmates. Many people underestimate their classmates, but they develop this moment no worse than VK
The audience on Odnoklassniki is many times more solvent than the young people on VKontakte.. Paid registration, about which many complained, eventually rid the network of bots, in fact, this was precisely the goal of the management, and not income from new users. In terms of finding traffic and making money, Odnoklassniki is still a tasty morsel for webmasters. If you create a community...
So, how to create a group on Odnoklassniki? Quite simple - if you use the step-by-step instructions below. Yes, you have already created your page on this social network? If not, then immediately go to odnoklassniki.ru and register. Then go to Groups tab.

In the list of your groups there is a window offering create a new community. It clearly stands out and is located to the left of the list of groups that you previously joined. Click on it!

In the window that appears, select type new group in Odnoklassniki: either for business or for communication of interests. I choose the second one. By the way, if you select the group type “For business”, no additional functions If you don’t receive it, the data filling forms are identical. Odnoklassniki management warns that when creating a business group, be prepared to prove that trademark belongs to you...

Next, enter the name of the group (I strongly recommend that you come up with it in advance), insert a description of the community, and select the privacy type with a radio button. And upload the image. The system will not miss very small pictures - select at least 250-300 pixels along the smaller edge.


Now you need conduct fine tuning groups in Odnoklassniki and add photos, videos, topics, news, links. First, let's create a topic, especially since this is the first offer from the service that we see when entering the group. There is nothing complicated here - we enter the text and, if desired, attach a picture.


Creating a photo album: Enter a name, determine its position in the list and allow users to add photos. Or we refuse - it all depends on whether you check the box or not. Managing photos is not difficult: you can add them, delete them, give them descriptions - there are special input forms for this.


Video in a group on Odnoklassniki added in one click - with hard drive computer. Click on the picture with the camera, a window with folders on your PC will open. Select the video you need and delight the group members with useful and interesting information. Video tutorials, for example.


Is everything done? Let's look at the lower right block - there the system prompts what else needs to be added. Convenient, because due to lack of experience you can forget something. You want to start the group correctly and make it effective tool in generating traffic or promoting a product/service?

Odnoklassniki has a well-thought-out and implemented community invitation system. Click "Invite friends"— and in the window that opens, select “victims” :). Next, activate the “Invite” button.

Another one small tweak group that the system tells us about: click on the link "Specify the subject" and enter our location (region, city), select the topic of the group from the drop-down list, add keywords on the topic of community. The “+” button allows you to add multiple keys.

Now, when entering the group, everyone will be able to see news feed groups - all actions of participants are displayed on home page communities indicating who did what (added a picture, video, replied to a topic, etc.).

In the left column, under the header image, there are several tabs that activate the settings of your group in Odnoklassniki. One of the most useful functions – disabling posting of group news to the event feed on the personal pages of participants. Convenient - in case your community is secret and closed :).

How to delete a group in Odnoklassniki? It's simple - click the appropriate link in the left settings block and agree to the offer to part with the project.


So as you see, to create a group in Odnoklassniki You don’t need any special knowledge, money, or special time investment. Everything is simple, accessible, convenient. Good luck!
In this article we will look in detail at how to create a group on Odnoklassniki, the process itself and the nuances of creating and designing a group.
It is worth saying that there are many services for promoting a group in OK and it is not expensive.
The Internet has now replaced communication in many real life and by phone. Most people now communicate through social networks. One of the most widespread social networks in the CIS is Odnoklassniki. With its help, you can not only communicate, find your old acquaintances, classmates and classmates, but also find new friends.
It is easier to find new acquaintances based on your interests. To do this, just join a group and start communicating with other participants. If you are not satisfied with existing communities, create your own.
Beginning of work
In the main menu on your page there is a “groups” button. Click on it. A window will open in which the groups you are already a member of, as well as the currently most popular communities that you can join, will be highlighted.
Increase
Group type
IN currently You should be interested in the “Create a group or event” button.

Increase
By clicking on it, you will be taken to the next item where you need to select the group type. The type of group depends on the purpose for which you are creating your community. The following are available to choose from:
- a public page where you can publish various news and articles on a given topic;
- a company or organization suitable for businessmen or representatives of any company;
- enterprise, institution, place. In this type of community, you can post information about any enterprise or even place, for example, a cafe, a park, or just a street;
- famous person or group. This type of group is ideal if you are a media personality or simply want to gather a fan club of your idol;
- a group of interests or for friends is most suitable for those who are simply looking for communication and want to find new acquaintances on a social network;
- event. Choose this type of community if you have planned an event, for example, a flash mob, and want to gather as many participants as possible. Also, such a group is suitable for organizing competitions or exhibitions;
- a bulletin board, as the name implies, is suitable for posting various notes about selling, buying, exchanging or searching for something;
- The store is suitable for those who are going to start their own online business and do not want to spend money on creating a separate website.

Increase
basic information
After selecting the community type, a window will open where you will need to specify:

Increase

Group registration
The design of the group begins in the same window with loading the cover. The cover of the group says a lot about the community itself. It should attract attention and correspond to the theme and description of the community.
For example, if the group is dedicated to a singer, actor, film, or game, then it is clear that the cover should be a photo representing the idols. For a store cover, it is best to choose an image of one of the products or make a collage. A photo of a community for friends should reflect the interests to which it is dedicated - sports, games, outdoor recreation, fishing and more.
Having decided what exactly will be shown on the cover photo, you need to upload it. To do this, click on the “select cover” button (step 1). Then find on your computer and select the prepared image (step 2). And click the "send" button (step 3). That's it, your group has a cover.

Increase
Shutdown
After filling out all the relevant fields, just click the “create” button at the bottom of the window, and your group is ready.

Increase
Now you can invite friends, create discussions, photo albums, add videos and music files. Its popularity depends on the content of your group. The more interesting the community is, the more subscribers it will gather. Once the community becomes popular, you can make money from it.
Odnoklassniki.ru is a social network, which means it was created primarily for communication between people in world wide web. Actually, other similar sites were created precisely for this purpose. However, as time passed and it became increasingly clear that communication alone could not keep users on the site, so all sorts of services began to appear, including, for example, audio hosting with the ability to listen to your favorite compositions, or a section with videos.
Another interesting service is the presence of groups, which are sort of sites within a site (social network), dedicated to a particular topic and located directly on Odnoklassniki. For example, if you like, say, the songs of Viktor Tsoi, then you can create a fan community of this great singer. But how can you create your own group from scratch and completely free on Odnoklassniki? Believe me, there is nothing complicated here.
First of all, go to your Odnoklassniki page or any other social network page - the main thing is that you can see the menu, which is located in the central part of the page. In it, click on the “Groups” item.

Here is a list of current or new groups. It looks something like this:

On the same page on the left there is a menu - groups by sections, and right above these sections there is a button “Create a group or event” that you need to click on.

- Public page
- Company or organization
- Enterprise, institution, place
- Famous person or group
- Interest group or for friends
- Event
- Bulletin board
- Shop

This list is expanded from time to time.
You need to select a group type. Which? Look at the circumstances. If the group is dedicated to interests, then select “Group based on interests or for friends.”
For our example, we chose this type of group. You must specify the name of the group, add a description, indicate the topic, age restrictions, contacts if necessary, select a closed, open or secret type of group. When you have added all the data, click “Create”.

You did it!

This way you can create a group for your own website, for school, for games, for joint purchases, etc.
How to create a group in Odnoklassniki from your phone?
If you do not have the opportunity to create a group on the desktop version of Odnoklassniki, use a phone, tablet or any other mobile device.
Launch a branded mobile app Odnoklassniki, call up the menu, in it click on the “Groups” line.

Here is a list current groups. See the plus sign on the right top corner? Click on it.


Your group has just been created. As you can see, this process is even easier on a phone than on a computer.

Settings are located in the menu that appears if you click on the three dots at the top of the window. In the settings you can change or add the necessary information.
You are probably subscribed to many communities and for some reason want to know how to create a group on Odnoklassniki. We will give you a full tour of opening your own community on the OK social network. After studying the material, you will learn what types of groups can be created in Odnoklassniki and what topic to choose for your community. We will also answer a popular question about open and closed groups. Simple step by step instructions and auxiliary images will help both experienced and novice Odnoklassniki users quickly master the material.
All you need to create a community is a page on a social network and some free time. Opening a group is free. The process goes according to the following scheme:


How to create your own group in Odnoklassniki?
The community has been successfully created, now it’s worth studying the initial stages of organizing a group. To make the community attractive to current and future members, add videos and photos regularly. Click on the “Photo” tab and click on the “Create Album” button. Once you have decided on the name and theme, save the result. Now you can upload new images to the group photo album. If necessary, the album can be deleted.

The settings saved when creating a community can be changed. To do this, click on the “Change settings” tab located under the main photo of the group. For administrators, the option “In publications, indicate the name of the group instead of names” is important; if you check the box next to the inscription, participants will not see who added the news. You can also change the privacy settings, that is, make the groups closed or vice versa - open them to all Odnoklassniki users. We figured out how to create a group in OK and make basic settings. But what type of community is best to choose for yourself?
Which group is better to create among Odnoklassniki?
Under categories you can see short description. There are no particular differences between types of communities. If you are a novice user, we recommend choosing the “Interest Group” or “Public Page” category. It is convenient to use such groups, and they have the necessary functionality. After selecting a topic, a standard group creation window appears.
If you want to dedicate the community to a specific person or group, then click on the “Famous person or group” section. Do you often organize hikes or other events? Feel free to click on the category with the appropriate name.
The Bulletin Board group type is suitable for people who want to create trading platform, where users of the social network will be able to buy and sell various things.
Users often wonder what type of group to choose for their business. Stop at " Public page"or the section "Enterprise, company". It is important for beginner users to overcome the threshold of 10 thousand subscribers. With the recruitment of a large audience, opportunities for earning money open up: PR for other communities, affiliate program from Odnoklassniki, PR for brands, etc.