Arduino programming language. Go and other languages
28 09.2016
Have you ever thought about making your life easier at home? To have things that would solve everyday, routine tasks for you. A smart device that would perform a useful function, for example, water the garden, clean a room, or carry a load. These problems can be solved. But just buying it won't be enough. Any industrial logic controller or chip needs a “brain” to perform a certain sequence of actions. To perform operations in our case, the Arduino programming language is suitable.
From this article you will learn:
Greetings, friends! For those who don’t know me, my name is Gridin Semyon. You can read about me. Today’s article will be devoted to two main programs, without which we will not have further movement and mutual understanding.
General description of programming languages
As I wrote above, we will consider two popular development environments. By analogy with, can be divided into a graphic editor and a “smart notepad”. These are Arduino IDE and FLprog programs.

The basis of the development environment is Processing/Wiring - this is regular C++, supplemented with functions and various libraries. There are several versions for Windows, Mac OS and Linux operating systems.
What is their fundamental difference?? The Arduino IDE is a development environment that describes program code. And FLprog is similar to CFC CoDeSyS, which allows you to draw diagrams. Which environment is better? Both are good and convenient in their own way, but if you want to get serious about controllers, it's best to learn languages similar to SI. Their main advantage is the flexibility and unlimited nature of the algorithm. I really like the Arduino IDE.
Description of Arduino IDE
The distribution can be downloaded from official website. Download the archive, it takes up a little more than 100 MB. The installation is standard, like all applications for Windows. Drivers for all types of boards must be installed in the package. And this is what the program's working window looks like.

The Arduino development environment consists of:
- program code editor;
- message areas;
- text output windows;
- toolbars with buttons for frequently used commands;
- several menus
Arduino IDE Settings
A program written in the Arduino development environment is calledsketch. The sketch is written in a text editor, which has color highlighting of the created program code. An example of a simple program in the picture below.

Additional functionality can be added usinglibraries,representing code designed in a special way. Basically, it is not accessible to the developer. The environment usually comes with a standard set, which can be gradually replenished. They are in the subdirectorylibraries Arduino directory.
Many libraries come with examples located in the folderexample.Selecting a library in the menu will add the following line to the source code:
Arduino
#include
#include |
This is a directive - a kind of instruction, a header file describing objects, functions, and library constants. Many functions have already been developed for most common tasks. Believe me, this makes the programmer's life easier.
After we have connected the electronic board to the computer. We make the following settings - select the Arduino board and the Com port through which we will connect.

Arduino
void setup() ( // initialize digital pin 13 as an output. pinMode(13, OUTPUT); ) void loop() ( digitalWrite(13, HIGH); delay(1000); digitalWrite(13, LOW); delay(1000 );
void setup() ( // initialize digital pin 13 as an output. pinMode(13, OUTPUT); void loop() ( digitalWrite(13, HIGH); delay(1000); digitalWrite(13, LOW); delay(1000); |
So, by the way, it is convenient to check the functionality of the board that came from the store. Fast and easy.
There is one more convenient thing. It's calledSerial Port Monitor (Serial Monitor). Displays data sent to the platformArduino.I usually look at what signals the various sensors connected to the board give me.

Connecting libraries
There are different ways to add custom features. You can connect libraries in three ways:
- Using Library Manager
- Using import as a .zip file
- Manual installation.
1. Using Library Manager.In the working window of the program, select the Sketch tab. After that, click on the Connect library button. The library manager will open in front of us. The window will display already installed files with a signatureinstalledand those that can be installed.

2.Using import as a .zip file.Often on the Internet you can find library files packed into archives with a zip extension. It contains a header file.h and a code file.cpp. There is no need to unpack the archive during installation. Just go to the Sketch menu - Connect library - Add .ZIP library

3.Manual installation.First, close the Arduino IDE program. We first unpack our archive. And we transfer the files with the extension .h and .cpp to a folder with the same name as the archive. Place the folder in the root directory.
My Documents\Arduino\libraries
Description of FLPprog
FLprog is a free project from independent developers that allows you to work with function blocks or ladder diagrams. This environment is convenient for people - not programmers. It allows you to visually and clearly see the algorithm using diagrams and functional blocks. You can download the distribution at official website.

I have been following the project for quite a long time. The guys are developing, constantly adding new functionality and changing old ones. I see promise in this environment. Since it performs two important functions:simplicity and ease of use.
Let's try to create a simple project. We will switch output 13 to LED.
Let's create a new project. In the top window, add the required number of inputs and outputs, set a name and assign a physical input or output to the board.

We pull out the elements we need from the object tree and the elements we need onto the editing canvas. In our case, we can use a simple RS trigger to turn it on and off.

After creating the algorithm, click on the compile button, the program provides a ready-made sketch in the IDE.

We have looked at the capabilities and convenience of programs for developing algorithms on the Arduino series controller. There are also programs that allow you to create structural diagrams and visual pictures. But I recommend using a text editor because it will be easier for you later. Tell me, which environment is most convenient for you and why??
On September 22, I participated in a seminar in Krasnodar “Touch panel controllers OVEN SPK.” The conference was held in the fashionable and beautiful Bristol Hotel. It was very interesting and cool.

In the first part of the seminar, we were told about the capabilities and advantages of OWEN products. Afterwards there was a coffee break with donuts. I picked up a bunch of things, donuts, cookies, and candies, because I was very hungry. =)
In the second part of the seminar, after lunch, we were presented. They told us a lot about Web visualization. This trend is starting to gain momentum. Well, of course, control the equipment via any Internet browser. This is really cool. By the way, the equipment itself is in the suitcase.

I will publish a series of articles on CoDeSyS 3.5 in the near future. So, if anyone is interested, subscribe or just come visit. I will always be glad!!!
By the way, I almost forgot, the next article will be about the Arduino electronic board. It will be interesting, don't miss it.
See you in the next articles.
Best regards, Gridin Semyon.
This introductory article is for those who have already unpacked a dozen or two colored boxes from construction sets with their child, built hundreds of different structures and filled all available containers in the closet with Lego parts. If you are ready to move to the next level: with electronics, microcontrollers, sensors and smart devices, then it’s time to experiment with Arduino!
In this series of articles we will collect the most important things you need to know about Arduino in order to start teaching children yourself. Even if you have never picked up a soldering iron and the words “controller” and “controller” have approximately the same meaning for you, you can be sure that you will still succeed! The world of electronics and robotics today is full of simple and very convenient solutions that allow you to create very interesting projects practically from scratch. Our tutorial will help you quickly navigate and take your first steps.
In everyday language, Arduino is a device into which you can plug many different devices and make them work together using a program written in the Arduino language in a special programming environment.
Most often the board looks like this:
The figure shows one of the Arduino boards - Arduino Uno. We will study it in more detail in the following lessons.
You can plug wires into the board and connect many different elements. Most often, a breadboard for solderless mounting is used for connection. You can add LEDs, sensors, buttons, motors, communication modules, relays and create hundreds of interesting smart device designs. The Arduino board is a smart socket that will turn everything connected on and off depending on how it was programmed.


All work on the project is divided into the following stages:
- We come up with an idea and design it.
- We assemble an electrical circuit. Here we need a breadboard, which simplifies the installation of elements. Of course, you will need skills in working with electronic devices and ability.
- We connect to the computer via USB.
- and write it to the board literally by pressing one button on the screen in .
- Disconnect from the computer. Now the device will work autonomously - when the power is turned on, it will be controlled by the program that we wrote into it.
The program and programming environment look like this:

The screen shows a program (in Arduino slang the text of the program is called “sketch”), which will blink with a light connected to input 13 on the Arduino UNO board. As you can see, the program is quite simple and consists of instructions that are understandable for those who know English. The Arduino programming language uses its own dialect of the C++ language, but all C++ features are supported.
There is another option for writing code - a visual editor. There is no need to write anything here - you can simply move the blocks and put together the desired algorithm from them. The program will be loaded into the connected board with one click of the mouse button!

Overall, everything looks pretty clear, doesn't it? It remains to figure out the details.
Quick start with Arduino
First, let's understand what and what we are going to do. What is Arduino and how to use it? If you are already familiar with the topic, feel free to skip ahead. If not, let's do a short dive together.
Arduino is...
Arduino is not a brand or the name of a kit supplier. This is a general name for a whole family of different technologies and an open platform, which includes both hardware devices (controller boards and compatible equipment) and software designed to control hardware. At its core, Arduino is an infrastructure and environment in which we can assemble electronic and mechanical components compatible with each other into a single device, and then through a regular computer, in two minutes, program the behavior of these same pieces of hardware the way we need.
Arduino is a bridge from the virtual computer world to the world of real things and devices. Having written a program on a regular computer, we use it to control not virtual objects, but rather real sensors, motors, and screens. We change the world around us - simply by programming on a computer, using free software and many ready-made examples of libraries.
The technology received its name, as often happens, quite by accident. The source of inspiration was a bar where the future creators of Arduino liked to drink a cup of tea. The name of the establishment was exactly that - Arduino, after the main historical figure of the city of Ivrea, King Arduino. The king did not leave any bright mark in history and was considered a failure, but thanks to the team of developers of the new platform, he gained new popularity and is now known to millions of people around the globe.
Why Arduino?
The beauty of Arduino lies in the following simple advantages:
- Simplicity. Yes, yes - exactly simplicity (although Lego and other toys are undoubtedly more familiar, but we are not comparing with them). For young electronics developers, Arduino “hides” a huge number of different technical issues. Many quite complex projects can be created very quickly, without a long immersion in details. And this is very important for a child - not to lose interest until the first result obtained with his own hands.
- Popularity. Arduino is extremely popular, you can easily find answers to any questions on numerous forums or websites. The Arduino community is vast and friendly - there are relatively few life-hardened, snobby engineers there and full of hobbyists and beginners who are happy to share their joy from what they have found and learned. This, of course, leaves an imprint on the quality of advice, but as a rule, even the most complex issues can be quickly resolved with the help of forums and websites.
- Availability. Both the technology itself and almost all software are released under open licenses and you can freely use other people’s developments and schemes, and in many cases even for commercial use. This saves a lot of time and allows you to take big steps, building on the experience of previous researchers.
- Cheapness. A kit for your first lessons in electronics and programming can be purchased for less than 500 rubles. Full-fledged robotics courses are possible with. No other technology will allow you to enter the world of real educational robotics so quickly and so effectively.
Where to begin?
If you want to do robotics using Arduino, then you will need this gentleman's kit:
- with USB cable for connecting to a computer.
- and wires.
- A set of basic electronic components and an adapter for a crown battery.
- Environment installed on the computer
In the future, if the classes really captivate you and there is a desire to continue experiments, then the list of equipment will expand:
- Screens and indicators.
- Motors and , relays and .
- Communication modules.
- Various additional modules and shields
If the first steps give results, over time you will recognize half of the people standing in line at the post office (if you don’t already know them), and the postmen will recognize you by sight when they meet you and nervously run across to the other side of the road.
How to buy Arduino?
Before you learn something useful, you must first buy something useful. To experiment with electronics, you will need the same electronics in the form of a construction set or separate boards. It is recommended to buy a not very expensive domestic kit with the main components and then order sensors, motors, controllers and other treasures from Aliexpress.
Here are some of the most interesting and attractively priced options for purchasing boards and kits for your first lessons:
 A small and very cheap starter kit that contains everything you need for your first projects A small and very cheap starter kit that contains everything you need for your first projects
|
 Very high quality starter kit from the famous manufacturer Keyestudio Very high quality starter kit from the famous manufacturer Keyestudio
|
 Classic Arduino starter kit, enough for dozens of different projects Classic Arduino starter kit, enough for dozens of different projects
|
 Advanced starter kit Robotlinking with Arduino UNO and Mega2560. Instructions and convenient box Advanced starter kit Robotlinking with Arduino UNO and Mega2560. Instructions and convenient box
|
 Simple kit with breadboard, LEDs, resistors and wires for connection Simple kit with breadboard, LEDs, resistors and wires for connection
|
 An unusual kit for rapid prototyping with convenient RJ11 connectors - even a small child can handle it! An unusual kit for rapid prototyping with convenient RJ11 connectors - even a small child can handle it!
|
If you still want to buy the Arduino board separately, here are some interesting links:
 High-quality Arduino UNO R3 board based on CH340G. Set without cable with a minimum price of about 220 rubles High-quality Arduino UNO R3 board based on CH340G. Set without cable with a minimum price of about 220 rubles
|
 MegaPower Uno board based on the original ATmega328 R3, FTDI FT232RL MegaPower Uno board based on the original ATmega328 R3, FTDI FT232RL
|
 An excellent option from KeyeStudio – UNO R3 MEGA328P ATMEGA16U2 with combined Sensor Shield An excellent option from KeyeStudio – UNO R3 MEGA328P ATMEGA16U2 with combined Sensor Shield
|
Let's summarize the lesson
In this short initial article, we learned what Arduino is, why this technology is called exactly what it is, and what typical projects using Arduino controllers look like. It's very easy to start creating interesting technical projects - you don't have to be an electronics engineer to do it. Just take an Arduino board, assemble the desired electronic circuit using it (you can find many ready-made examples on the Internet), connect the controller to your computer and download the program. The smart device is ready!
In the following lessons, we will learn how the controller works, disassemble the Arduino Uno board, and launch our first project.
Useful links to tutorials and websites on Arduino
Official Arduino websites:
- “Almost” official website in Russian: http://arduino.ru/
Excellent sites with a lot of useful information
It can be very difficult to start your journey in IT, if only simply because, looking at the surrounding technologies, it is impossible to separate the “hardware” interest from the software one. On the one hand, there is the desire to create a device with an impeccable appearance, many sensors and limitless possibilities; on the other, there is the mystery of data processing, the desire to maximize performance without neglecting functionality. Arduino is the first step to great inventions, requiring neither in-depth knowledge of circuit design nor programming experience.
What is Arduino
If you call a spade a spade, then Arduino is a construction kit for those who are tired of creating useless images and want to give them at least a little life. In the simplest case, Arduino is a printed circuit board on which a controller, a crystal oscillator, an ADC/DAC, several connectors, diodes and buttons are located. The rest is the work of the owner: if you want, create a robot, if you want, a software and hardware platform for a “smart” home, or forget about the practical benefits and have fun.
Of course, it depends. How far you want to go with your experiments, whether you want to have filtered fun or turn Arduino into a platform for your own income, you will have to get better at both hardware design and learning programming languages. Let’s talk a little more about the latter today.
Arduino is a fairly limited platform in terms of programming capabilities, especially compared to the Raspberry Pi. Due to the fact that the entry threshold is indecently low (the basic Tutorial takes up 3 A4 sheets), you can’t count on an abundance of languages without connecting additional modules. It's based on C/C++, but using a variety of IDEs and libraries you'll have access to Python, C#, Go, and kids' favorites like Snap! and ArduBlock. We’ll talk further about how, when and who to use them.
C/C++
The basic language of the Arduino platform, which, with some modifications and simplifications, is used in the standard software shell. You can find all the available commands “for a beginner,” but no one is stopping you from using the original capabilities of the C++ language; no add-ons are required. If you want to play with “pure” C, then at your service is a program designed, as the name suggests, for interaction between Windows OS and the AVR series MK, which are used on Arduino. You can read a more detailed guide here.
Ardublock
Let's temporarily move away from the languages of adults to the children's favorite language Scratch, or rather to its adaptation - Ardublock. Everything here is the same, but with adaptation to your platform: colored blocks, constructor, Russian names, simple logic. This option is great even for those who are not familiar with programming at all. Just as in the Logo language you can move a virtual turtle on a virtual plane, here with the help of simple operations you can interest a child in a real interpretation of his program actions.
Yes, by the way, to use it you need to install it on your standard Arduino IDE. It’s better not to grab the latest versions, they are quite complex, the one dated the end of 2013 will do for a start. To install, rename the downloaded file to “ardublock-all” and put it in the “My Documents/Arduino/tools/ArduBlockTool/tool” folder. If it doesn't exist, we create it. If you don't understand something, here's more detail.
Snap!
Compared to Ardublock, Snap! has advanced capabilities in the form of additional blocks, the ability to use lists and functions. That is, Snap! in general, it already looks like an adult programming language, without considering that you still need to play the code designer.
In order to use this language, you will have to go to snap4arduino.org and download the necessary components for your OS. Find instructions for installation, use and video examples here.
Python
Formally, you can program on Arduino using at least the Piet language, simply because with the right amount of persistence you can compile anything into machine code. But due to the fact that Python is one of the most popular languages with an almost optimal combination of complexity/capabilities, it would be ridiculous to ignore its applicability in Arduino. You can start learning Python with our free .
So, for this you will need the PySerial libraries (previously, you may have used it to communicate with computer ports) and vPython. You can read about how to set everything up correctly and ultimately make it work.
Go and other languages.
Just as Arduino communicates with Python through the PySerial library, it can communicate with Java, HTML, and anything else you want. Arduino is a popular enough platform that such a trivial question as choosing a convenient language does not stop another researcher. The only thing that is required from the owner of this small board is to come up with something surprisingly interesting, and a convenient tool will inevitably be found.
You will need
- Arduino UNO board;
- USB cable (USB A - USB B);
- Personal Computer;
- Light-emitting diode;
- a pair of connecting wires 5-10 cm long;
- if available - breadboard.
Download the Arduino development environment (Arduino IDE) from the official website for your operating system (Windows, Mac OS X, Linux are supported). You can select the installer ( Installer), you can archive ( ZIP file for non admin install). In the second case, the program is simply launched from the folder, without installation. The downloaded file contains, in addition to the development environment, drivers for boards of the Arduino family.
Download the Arduino IDE from the official website
2 Arduino connection to the computer
Connect the Arduino board using a USB cable (USB-A to USB-B type) to the computer. The green ON LED on the board should light up.
 Cable "USB-A - USB-B" for connecting Arduino to computer
 3 Driver installation for Arduino
Install the driver for Arduino. Consider the installation option on the Windows operating system. To do this, wait until the operating system prompts you to install the driver. Decline. Press the keys Win+Pause, run device Manager. Find a section "Ports (COM and LPT)". You will see a port there with the name Arduino UNO (COMxx). Right click on it and select Update driver. Tell the operating system the location of the driver. It is located in the subdirectory drivers in the folder we just downloaded.
Note the port to which the Arduino board is connected. To find out the port number, launch Device Manager and look for the “Ports (COM and LPT)” section. The port number will be indicated in parentheses after the board name. If the board is not in the list, try disconnecting it from the computer and waiting a few seconds, then connecting it again.
 Arduino in Windows Device Manager
 4 Settings Arduino IDE
Point your development environment to your board. To do this in the menu Tools Board select Arduino UNO.
 Select the Arduino UNO board in the settings
 Specify the COM port number to which the Arduino board is connected: Tools Port.
 Set the serial port to which the Arduino board is connected
 5 Open the example programs
The development environment already contains many example programs for studying the operation of the board. Open the "Blink" example: File Samples 01.Basics Blink.By the way, programs for Arduino are called “sketches”.
 Open an example sketch for Arduino
 6 Circuit assembly with LED
Disconnect the Arduino from the computer. Assemble the circuit as shown in the figure. Please note that the short leg of the LED must be connected to the GND pin, the long leg to the digital pin “13” of the Arduino board. It is convenient to use a breadboard, but if you don’t have one, connect the wires with a twist.
Digital pin "13" has a built-in resistor on the board. Therefore, when connecting an LED to the board, it is not necessary to use an external current-limiting resistor. When connecting an LED to any other Arduino pins, it is necessary to use a resistor, otherwise you will burn out the LED, and in the worst case, the Arduino port to which the LED is connected!
 Connection diagram of LED to Arduino in Arduino memory
Now you can load the program into the board's memory. Connect the board to the computer, wait a few seconds while the board initializes. Click the button Download, and your sketch will be written to the memory of the Arduino board. The LED should start blinking cheerfully at you every 2 seconds (1 second on, 1 second off). Below is the code for our first Arduino program.
void setup() (// initialization block pinMode(13, OUTPUT); // set pin 13 as output. } void loop() (// loop that repeats endlessly as long as the board is turned on: digitalWrite(13, HIGH); // apply a high level to pin 13 - light the LED delay(1000); // for 1000 ms = 1 sec. digitalWrite(13, LOW); // apply a low level to pin 13 - turn off the LED delay(1000); // for 1 sec. } // then the cycle repeatsRead the comments in the text of the program - they are enough to understand our first experiment. First we describe the initialization block setup(), in which we set the initial values of the variables and the functions of the Arduino pins. An endless loop follows loop(), which repeats over and over again as long as power is supplied to the board. In this cycle we perform all the necessary actions. In this case, we turn on and turn off the LED. Operator delay() specifies the execution duration (in milliseconds) of the preceding statement. Operator digitalWrite() tells the Arduino which pin to apply voltage to, and what voltage level. Your first sketch is ready!
There are many sites on the Internet dedicated to working with Arduino family boards. Read, master, don’t be afraid to experiment and learn new things! This is a fun and rewarding activity that will bring you a lot of pleasure.
note
Be careful when working with the Arduino board - this is an electronic product that requires careful handling. There are exposed conductors on the bottom of the board, and if you place the board on a conductive surface, there is a chance of burning the board. Also, do not touch the board with damp or wet hands and avoid damp areas when working.
" presents the training course "Arduino for Beginners". The series consists of 10 lessons, as well as additional material. Lessons include text instructions, photos and instructional videos. In each lesson you will find a list of required components, a program listing and a connection diagram. Once you've completed these 10 basic lessons, you'll be able to move on to more interesting models and building of Arduino-based robots. The course is aimed at beginners; no additional information from electrical engineering or robotics is required to begin it.
Brief information about Arduino
What is Arduino?
Arduino (Arduino) is a hardware computing platform, the main components of which are an input-output board and a development environment. Arduino can be used to create stand-alone interactive objects, or connect to software running on a computer. Arduino is a single board computer.
How are Arduino and robots connected?
The answer is very simple - Arduino is often used as robot brain.
The advantage of Arduino boards over similar platforms is their relatively low price and almost widespread distribution among amateurs and professionals in robotics and electrical engineering. Once you get into Arduino, you will find support in any language and like-minded people who will answer your questions and discuss your developments with.
Lesson 1. Flashing LED on Arduino
 In the first lesson you will learn how to connect an LED to an Arduino and control it to blink. This is the simplest and most basic model.
Light-emitting diode- a semiconductor device that creates optical radiation when an electric current is passed through it in the forward direction.
Lesson 2. Connecting a button on Arduino

 In this tutorial you will learn how to connect a button and an LED to an Arduino.
When the button is pressed, the LED will light up; when the button is pressed, it will not light up. This is also the base model.
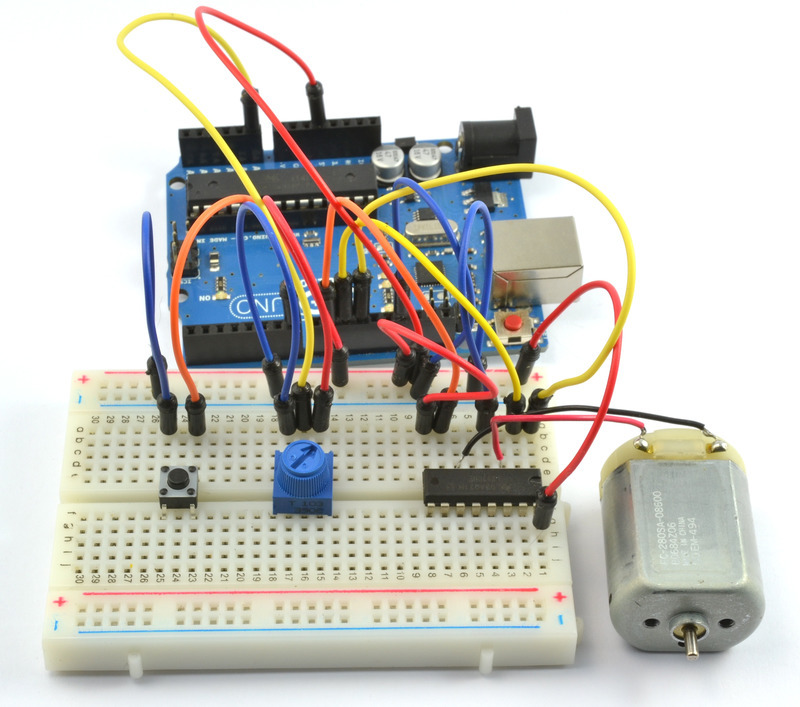
Lesson 3. Connecting a potentiometer on Arduino
 In this tutorial you will learn how to connect a potentiometer to Arduino.
Potentiometer- This resistor with adjustable resistance.Potentiometers are used as regulators of various parameters - sound volume, power, voltage, etc.This is also one of the basic schemes. In our model from turning the potentiometer knobThe brightness of the LED will depend.
Lesson 4. Servo control on Arduino
 In this tutorial you will learn how to connect a servo to an Arduino.
Servois a motor whose shaft position can be controlled by setting the angle of rotation.
Servos are used to simulate various mechanical movements of robots.
Lesson 5. Three-color LED on Arduino
 In this tutorial you will learn how to connect a tri-color LED to an Arduino.
Tri-color LED(rgb led) - these are three LEDs of different colors in one housing. They come either with a small printed circuit board on which resistors are located, or without built-in resistors. The lesson covers both options.
Lesson 6. Piezoelectric element on Arduino
 In this lesson you will learn how to connect a piezo element to an Arduino.
Piezo element- an electromechanical converter that translates electrical voltage into membrane vibration. These vibrations create sound.
In our model, the sound frequency can be adjusted by setting the appropriate parameters in the program.
Lesson 7. Photoresistor on Arduino
 In this lesson of our course you will learn how to connect a photoresistor to Arduino.
Photoresistor- a resistor whose resistance depends on the brightness of the light falling on it.
In our model, the LED lights up only if the brightness of the light above the photoresistor is less than a certain one; this brightness can be adjusted in the program.
Lesson 8. Motion sensor (PIR) on Arduino. Automatic sending of E-mail
In this lesson of our course you will learn how to connect a motion sensor (PIR) to Arduino, as well as organize automatic sending of e-mail. 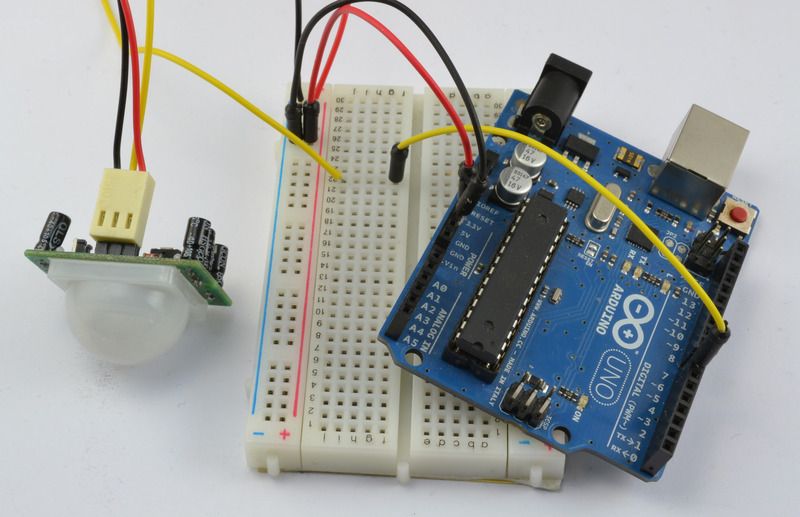
Motion sensor (PIR)- infrared sensor to detect movement or presence of people or animals.
In our model, when receiving a signal about human movement from a PIR sensor, Arduino sends a command to the computer to send an E-mail and the letter is sent automatically.
Lesson 9. Connecting a temperature and humidity sensor DHT11 or DHT22
In this lesson of ours, you will learn how to connect a DHT11 or DHT22 temperature and humidity sensor to an Arduino, and also become familiar with the differences in their characteristics. 
Temperature and humidity sensor is a composite digital sensor consisting of a capacitive humidity sensor and a thermistor for measuring temperature.
In our model, Arduino reads the sensor readings and displays the readings on the computer screen.
Lesson 10. Connecting a matrix keyboard
 In this lesson of our course, you will learn how to connect a matrix keyboard to an Arduino board, and also get acquainted with various interesting circuits.
Matrix keyboard invented to simplify the connection of a large number of buttons. Such devices are found everywhere - in computer keyboards, calculators, and so on.
Lesson 11. Connecting the DS3231 real-time clock module
In the last lesson of our course, you will learn how to connect a real-time clock module from the family  DS to the Arduino board, and also get acquainted with various interesting circuits.
Real time clock module- this is an electronic circuit designed to record chronometric data (current time, date, day of the week, etc.), and is a system consisting of an autonomous power source and a recording device.
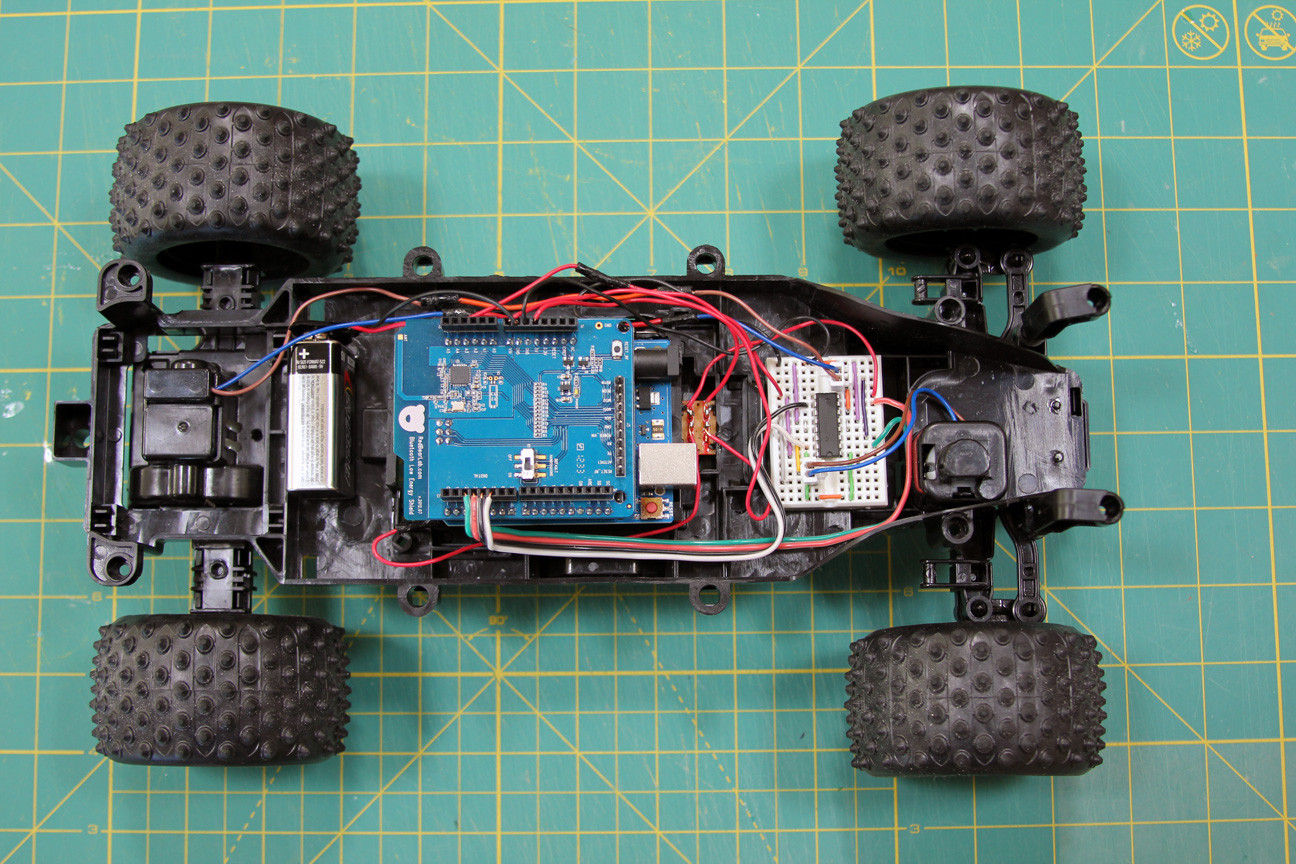
Application. Ready-made frames and Arduino robots
 You can start learning Arduino not only from the board itself, but also by purchasing a ready-made, full-fledged robot based on this board - a spider robot, a robot car, a turtle robot, etc. Such way It is also suitable for those who are not particularly attracted to electrical circuits.
By purchasing a working robot model, i.e. in fact, a ready-made high-tech toy can awaken interest in independent design and robotics. The openness of the Arduino platform allows you to make new toys from the same components.
Another option is to purchase a robot frame or body: a platform on wheels or a track, a humanoid, a spider, etc. In this case, you will have to do the stuffing of the robot yourself.
Application. Mobile directory
 – an assistant for developers of algorithms for the Arduino platform, the purpose of which is to give the end user the opportunity to have a mobile set of commands (reference book).
The application consists of 3 main sections:
- Operators;
- Data;
- Functions.
Where to buy Arduino
 Arduino kits
The course will be updated with additional lessons. Follow us