Requests a password when loading Windows. Account Settings
Disable password prompt in Windows 10
Requiring a password when logging in is the main and, often, the only protection of your computer from unauthorized access. However, some users neglect this protection for the sake of convenience and prefer to log in without a password.
On the one hand, this is unsafe, but on the other hand, everyone has the right to choose for themselves whether they need security or not. Therefore, today we will look at several options on how to disable the password prompt when logging in.
Starting with Windows 8, there are three types of user account - local, domain, and Microsoft account. Regardless of the entry type, a password is required to log in. For a local account, you can simply specify a blank password, but for others this number will not work. However, there is a way out, and although it is impossible to completely remove the user’s password, you can set up automatic login, in which the password for a specific account will be entered automatically.
For local and Microsoft accounts, you can use the User Accounts snap-in. To open the snap-in, click Win+R and execute the command netplwiz or control userpasswords2.
In the window that opens, select the desired user, uncheck the box “Require username and password”

and enter the user password and confirmation. Then we restart the computer and automatically log in under the selected user.

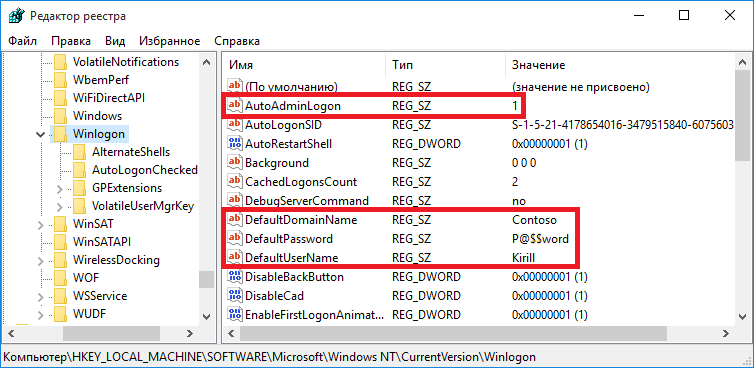
The previous method is not suitable for computers that are members of a domain Active Directory. In this case, you can disable the password request only by editing the registry. To do this, open the registry editor with the command regedit, go to the HKLM\Software\Microsoft\Windows NT\CurrentVersion\Winlogon section and perform the following actions:
Change parameter value AutoAdminLogon on 1
;
In the parameter DefaultDomainName enter the name of the domain or computer (if the computer is not in the domain);
In the parameter DefaultUserName enter a username that must log in without a password;
Create string (REG_SZ) parameter DefaultPassword and specify the current user password as the value.
After this, we reboot and log into the system under the specified user.
This method is suitable for any type of account - domain, local and Microsoft. However, you must understand that this method is less secure, since the user’s password is stored in the registry in clear text.
Disable password prompt when waking from sleep
So, we can disable the password prompt when the system boots. However, if you use sleep mode, the system will still require a password when you wake up. There are two ways to disable the password prompt when resuming from sleep mode.
The first method is power settings in the classic control panel. Quickly open required section you can by running the command control /name Microsoft.PowerOptions and selecting "Power Button Actions".

Default required option is inactive, to enable it you must click on the “Change settings that are currently unavailable” button.

And then in the “Password protection on wake-up” field, switch to the “Don’t ask for a password” option.

The second method is to set up accounts in the new control panel. To do this, open the Start menu, select Settings - Accounts - Sign-in options and in the “Sign-in required” field, select “Never”.

After this, your computer will wake up without a password. But you should understand that this is not safe, because... anyone with access to a computer will be able to easily access your account.
Conclusion
In conclusion, a few important points, which are worth paying attention to.
As already mentioned, passwordless login allows anyone with access to your computer to easily log in and gain access to your data and other resources, both local and accessible over the network. Therefore, you should use automatic login only if you are confident in the integrity of your computer;
Disabling the password request only applies to interactive login, when remote access to the computer (for example, accessing a file share) you will still need to enter a password;
The article is focused on Windows 10, but all methods also work successfully on Windows 8 and Windows 7.
Please note: To follow most of the instructions in this article, you must use a local account. Windows entry with administrator rights.
How to set a password on a Windows computer
If other people have access to your computer, it is wise to protect Windows with a password. This way, your settings and data will be safe: without special knowledge, no one will be able to view or change them. Windows will prompt you for a password when you turn on your computer, when you change your account, or after resuming from sleep mode.
- Open Start → Settings (gear icon) → Accounts → Sign-in options.
- Click "Add" under "Password".
- Fill in the fields according to the system prompts and click “Finish”.
How to set a password on Windows 8.1, 8
- In the right sidebar, click Settings (gear icon) → Change PC settings. In the menu of the window that opens, select “Accounts” (or “Users”), and then “Login Options”.
- Click on the " " button.
- Fill out the fields, click “Next” and “Finish”.
How to set a password on Windows 7, Vista, XP
- Open the section “Start” → “Control Panel” → “User Accounts”.
- Select the desired account and click “Create a password” or immediately click “Create a password for your account.”
- Fill in the fields using the system prompts and click on the “Create password” button.

If strangers don't have physical access to your computer, it may be better to disable protection. This will eliminate the need to enter a password every time the system starts.
- Use the Windows + R key combination and enter command line netplwiz(or control userpasswords2, if the first command does not work). Press Enter.
- In the window that opens, select in the list the account for which you want to remove the password, and uncheck the box next to “Require username and password.” Click OK.
- Enter the password, confirm it and click OK.
Windows will stop asking for a password only when you turn on the computer. But if you lock the screen ( Windows keys+ L), if you log out or the computer goes into sleep mode, a password request will still appear on the display.
If the “Require username and password” option is unavailable or you want to completely remove it rather than disable it Windows password, try another method for more experienced users.
To do this, open the account management section using one of the instructions at the beginning of this article.
If in open section it will say that you are using a Microsoft online profile (login with email and password), disable it. Then use the system prompts to create local profile, but do not fill out the password fields during the process.
After account deactivation Microsoft system will stop synchronizing your settings and files on different computers. Some applications may refuse to work.
If the local profile is initially active in the account management menu, then simply change the current password, leaving the fields for the new password empty.
If you delete an old password, the system will never prompt you for it until you add a new one.
How to remove the password when resuming from sleep mode
If you disable the password prompt when Windows startup, the system may still prompt you for it when you wake up. But you can deactivate this feature separately using these instructions.

- In the search bar in Windows, enter “Power Options” and click on the link found to the section with the same name. Or find it manually through the Control Panel.
- Click "Require a password when you wake up," then "Change settings that are currently unavailable" and check the "Don't ask for a password" checkbox.
- Save your changes.
How to remove password when waking up Windows XP
- Open the “Control Panel” → “Power Options” section.
- In the window that appears, open the “Advanced” tab and uncheck the box next to “Require a password when exiting standby mode.”
- Save your changes.
If you have forgotten your password and cannot log into your local profile Windows administrator, it is not at all necessary to reinstall the OS. There is a simpler solution: resetting the password protection. To do this you will need another computer, a USB drive and free utility to reset your password.
Create a bootable USB flash drive on another PC

- Download the Lazesoft Recover My Password installer onto any available computer.
- Run the downloaded file and complete the installation.
- Connect the flash drive to your computer. If necessary, make a copy of the files stored on it, since all information will have to be deleted.
- Open Lazesoft Recover My Password, click Burn Bootable CD/USB Disk Now! and create bootable USB flash drive using program prompts.
Boot your computer using a flash drive
- Insert the prepared USB drive into the computer for which you have forgotten the password.
- Turn on (or restart) the PC and, as soon as it starts to boot, press the key to go to the BIOS settings. Usually this is F2, F8, F9 or F12 - depending on the equipment manufacturer. More often desired key appears on the screen while loading the BIOS.
- Being in BIOS menu, go to section boot, if the system did not redirect you there immediately.
- In the Boot section, install the USB flash drive to the first place in the list of devices that appears on the screen. If you don't know how to do this, look around - there should be some control tips nearby.
- Save your changes.
If the BIOS is also protected by a password that you do not know, then you will not be able to reset password protection Windows using Lazesoft Recover My Password.
Perhaps instead of the classic BIOS you will see a more modern one GUI. Moreover, even in various older versions BIOS settings may vary. But in any case, the procedure will be approximately the same: go to the Boot menu, select the desired USB drive as the source and save the changes.
After this, the computer should boot from the flash drive on which the Lazesoft Recover My Password utility is recorded.
Reset your password with Lazesoft Recover My Password
- Select Lazesoft Live CD (EMS Enabled) and press Enter.
- Reset your account password using Lazesoft Recover My Password tips.
- Reboot.
After these Windows actions will stop asking Old Password, and you can set a new one according to the instructions at the beginning of the article.
When you turn on the computer, it usually asks you to enter an access code. Protecting your account with a password is designed to prevent access to your confidential information for other users. However, if you are single user personal computer, constantly asking for a password when logging in will be more of a hindrance than a help.
This is an extra action, extra information that needs to be remembered, an increase in boot time when turning on the PC, and so on. Besides, if you forget it, you will get a lot of problems.
Therefore, for most users it is easier remove password entry for your account in Windows 10. This article is devoted to this issue.
Disabling a local account password
In case you need to login Windows system 10 using a local account, cancel password entry simple enough. You can simply delete it.
To do this, do the following:
Active the password will be removed immediately and will not be required to log into the Windows 10 operating system when next switch on personal computer.
Alternative way to disable the request
If you don't like the settings menu that was introduced in Windows 10, you can remove the passcode using the usual control panels. The tool " Change».
Do the following:

As in the previous method, the password will be removed and you will not need to enter it the next time you log into Windows 10.
Disable the prompt for a Microsoft account
The methods described above allow you to get rid of the password check at login, but only when you work with local account. However, Windows 10 allows you to log in to the system using single Microsoft account . And it is no longer possible to remove the password from it. However, you can configure automatic entry of login information when starting this personal computer. This can be done in two different ways.
Account Settings
The first way to remove the check is simpler. However, unfortunately does not work on all computers. It is highly recommended that you try it first. And in case of failure, move on to the next point. To set up automatic entry without prompting, follow the instructions below:

In most cases, this is enough to log into the OS without asking for a password. However, if you were unable to remove the check, you will need to do manually editing the registry.
Registry changes
The registry stores data that Windows 10 uses to operate. By modifying existing entries and creating new ones, users can dramatically change the experience operating system. Therefore, all changes must be made extremely carefully, since any mistake can lead to incorrect operation computer.
Before starting work in the Registry Editor, it is strongly recommended to create a system restore point. If something goes wrong, you can easily roll back to the saved one. Windows versions 10 without resorting to reinstallation.

Registry Editor
To enter the editor, users will need to do the following:

If you do everything correctly, Windows will not ask for a password when you boot.
Video on the topic
If you are the only one using your computer, or you trust those you share it with, then why not remove the password when logging into Windows? This allows the computer to boot faster, straight to the desktop, and can save time. It also removes the extra startup step so Windows can jump to the desktop without your intervention.
Alternatively, if other people have access to your computer, you can enable a login password to keep their data safe.
Enable password when signing in to Windows 10
Password login is enabled by default or when Windows update 10, or at new installation. If you previously disabled it or for some reason did not enable it, follow these steps:
You will need to either log out and log back in or reboot the system for the changes to take effect.
Disable password entry when logging into Windows 10
To disable password entry, you are essentially doing the opposite of the above.
- Press the keyboard shortcut Ctrl+R and enter " netplwiz».
- Uncheck the box next to " Require username and password" and then click " Apply».
- At Windows request enter the password twice .
- Click "OK" to save changes.
You will need to log out and restart your computer for this change to take effect.
If you know more quick way enable or disable password in Windows 10? Please write in the comments.
To remove the password prompt in Windows XP, Windows Vista or Windows 7, open the Start menu and select Run. In the window that appears, enter control command userpasswords2 or netplwiz and click OK.
The User Accounts window will open. Uncheck the “Require username and password” checkbox and click the “Apply” button. The window “ Automatic login into the system." Please enter your username. If you have a password, enter it twice. If your Account does not have a password, leave this field blank. Then click "OK" and "OK" again to close both windows.
How to remove password prompt in Windows 8
In Windows 8, the password prompt is removed in exactly the same way; the only question is how to get there the desired window in the absence of a Start menu. In fact, it’s not at all difficult: press the +[X] keys and select “Run” in the menu that appears, and then proceed as described above.