Burn the system to an ultraiso flash drive. Setting the flash drive to boot into BIOS
CDs are increasingly being replaced by flash drives and other storage devices, but they are still in use. Therefore, it is very important to know how to use them. In this material we will talk about how to burn an image to disk using UltraIso.
Step No. 1. Open the disk image using the UltraIso program.
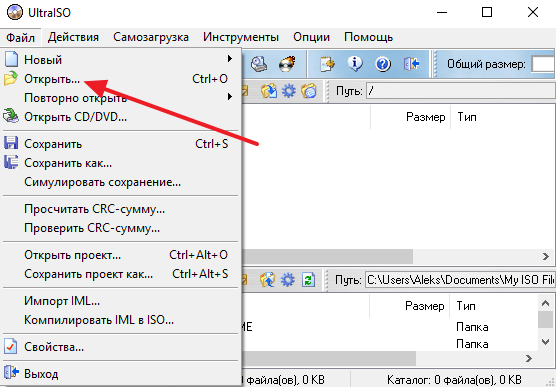
If you want to burn an image to disk via , then the first thing you need to do is run UltraIso and open the disk image. To do this, click on the “Open” button, which is located on the toolbar.
You can also use the “File – Open” menu.
After this, a standard window for selecting files will appear. Here, simply select the disk image file you want to burn and click on the “Open” button.

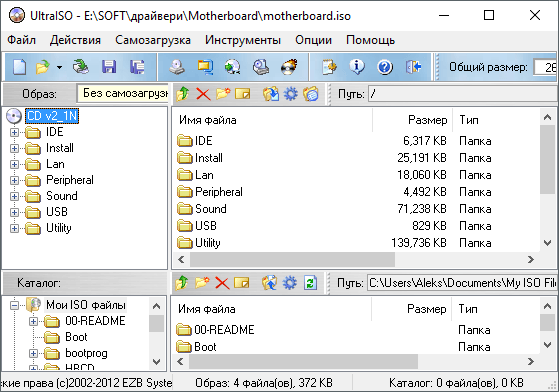
As a result of the above steps, the contents of the disk image you selected should appear in the UltraIso program window.
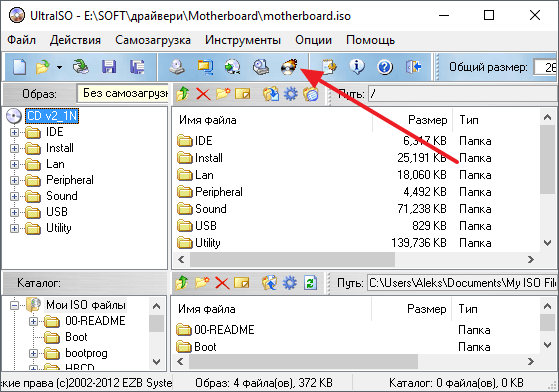
Step #2: Start burning the image.
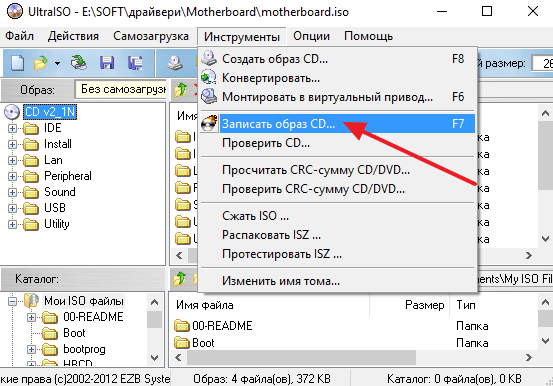
You can also start burning the image using the “Tools – Burn CD Image” menu or using the F7 key on your keyboard.
As a result, a window will appear for burning the image to disk. At this stage, you just need to insert the disc into the drive (if the disc is not already inserted) and click on the “Record” button.

If you have a disposable or empty disc, recording will begin immediately. If you are using a rewritable disk and there is data on it, the program will first ask you to confirm wiping the disk. In order to continue here you need to click on the “Yes” button.

After this, the program will begin cleaning the disk, and after cleaning, writing the image to the disk will immediately begin.

Now all you have to do is wait until the UltraIso program writes the image to disk.
How to burn an image to a flash drive using UltraIso
It should be added that using the UltraIso program you can also use drives. To do this, you need to open the disk image in the UltraIso program (as described in step No. 1), and then open the menu “Boot - Burn image of Hard disk"

As a result, a window will appear for writing images to flash drives. In this window, you need to select the flash drive that you want to use for recording and click on the “Record” button.

After this, the UltraIso program will warn you about deleting old data from the flash drive. In order to continue, you need to click on the “Yes” button.

After this, the process of writing the image to the flash drive will begin.
Sooner or later, every user is faced with the need Windows reinstallation. But what to do if your CD/DVD drive is broken or you don’t have one at all. There is only one option left, but for this you need to create a bootable USB flash drive.
You can burn an image to a disk or flash drive using many various programs, such as Alcohol, Daemon Tools, Nero or UltraISO. Today I want to dwell in detail on the latter. It has a number of advantages, but the main thing is that it is quite simple and intuitive to use.
I'll look at the process of burning an image on Windows example 7, but other OS versions are written similarly.
Beginning of work.
First of all, we launch the program on behalf of the Administrator, otherwise the system will not allow you to perform any actions. To do this, click on the program shortcut right click mouse and in the menu that appears, click Run as administrator.
After launching the program, you need to add a system image, which we will write to a USB flash drive.
To do this, click menu "open", as shown in the first screenshot and proceed to creating a bootable ultraiso flash drive.

An Explorer window will appear in front of us, with the help of which we need to specify the path to the place where our file is located. This image can then be written to a flash drive.
I have already prepared in advance Windows image 7, you can download it from any torrent tracker.
Please note that you need a file with the extension .ISO, not .EXE.

Confirm your image selection by clicking the button "open", after which the program window will display a list of all used OS files.
Under no circumstances should you consider deleting or renaming these files. Otherwise, various errors may occur during the installation process.

Preparing an image for recording
Then we connect the flash drive to the computer and wait until it is detected by the system.
The device must be formatted in the FAT32 file system format. But if you didn’t do this, don’t worry. The program will automatically do all the necessary manipulations. If your device contains files that are valuable to you, copy them to any other medium. After formatting, all data will be deleted.
After saving all the important data, the time has come to record the image. To do this, in the program window, click on the item, and in the list that opens, select “Burn a hard disk image...”.

In the next window you need to select the disk where your image will be written. After making sure that your flash drive is selected, proceed to the next steps.
Paragraph "Recording method" must be installed on "USB-HDD+", A "Hide Boot Partition" - "No".
If you have previously formatted the flash drive, then press "Record" and if you forgot to do this earlier, then "Format".

Formatting a flash drive
As previously mentioned, the flash drive must be formatted in FAT32 format. Usually this format is offered by default, but it’s better to check it yourself.
After these manipulations, click "Begin".

Formatting a USB Drive
A window will immediately pop up warning you that all data on the flash drive will be deleted. We agree with this and click on "OK".

When the process completes successfully, a corresponding window will appear.
If the message says that "formatting NOT completed"- this means the flash drive is damaged, so I advise you to take another one, or find out what the problems are with this one, and then start the process again.

Formatting success message
Burning an image
After formatting the flash drive, it's time to burn the image to it. To do this, click "Record".
A window will pop up again warning that all data stored on the media will be destroyed. We agree with this and click "Yes".

The process of creating a multiboot ultraiso flash drive will begin, which will take some time.

Wait for the process to complete, upon completion of which a notification will appear in the logs "Recording complete". This means that our flash drive with the Windows 7 image has been successfully created.

Since we won’t have to use UltraISO in the future, we can close the program.
If you reconnect the flash drive to the computer, you will see something like the one in the screenshot.

This is how the flash drive with the image is displayed
Depending on the image, its name may differ from this. The picture shows just an example of the final version.

Burned Image Files
Windows 8 or Windows 10 are recorded in the same way.
In order to boot from our flash drive, you need to go into the BIOS. In the settings of which you need to set the priority of booting from a USB drive.
To do this, restart your computer and press the key Del. IN certain versions BIOS may be entered by pressing F1 or Tab.
The settings interface of the BIOS itself may differ, so I will not describe this process in detail.
Creating a bootable Windows flash drives using UltraISOModern laptops are less and less equipped with a drive for working with CDs. And in devices like netbooks, disk drives are not found at all. Refusal of the disk drive allows you to do mobile device lighter and thinner. But, at the same time, users encounter some difficulties in their work. For example, in order to install Windows 7 on a device without a disk drive, you have to create bootable flash drives. In this material we will talk about how to burn a Windows 7 image to a flash drive using UltraISO.
Step #1: Open the Windows 7 image in UltraISO.
In order to burn a Windows 7 image to a USB flash drive through the program, you first need to open this image. To do this, launch UltraISO, open the “File” menu and select “Open” there.
As a result, a standard window for selecting a file will appear in front of you. Here you need to select ISO file with the Windows 7 image that you want to burn to a USB flash drive.

After this, the files from the selected disk image will appear in the UltraISO interface. It is better not to touch these files, otherwise bootable flash drive may not work.

Step No. 2. Connect the USB flash drive to the computer and start recording the Windows 7 image.
Next, you need to connect the USB flash drive to your computer onto which you plan to burn the Windows 7 image via UltraISO. To do this, simply connect the flash drive to any port and wait until the system detects it. After connecting the flash drive, return to the UltraISO program. Now you need to open the “Boot” menu and select “Burn Hard Disk Image”.

After this, a window for burning a disk image will open. Here you need to select the flash drive on which you want to burn the Windows 7 image. Select the desired flash drive and click on the “Burn” button.

After that UltraISO program will warn you about deleting all data from the flash drive and, if the user agrees, will begin recording the Windows 7 image to the flash drive.
Step #2: Wait until UltraISO finishes burning the image.
Now you just have to wait until UltraISO writes the Windows 7 image to the USB flash drive. This usually only takes a few minutes.

A disk image is an exact digital copy of the files that were written to the disk. Images turn out to be useful in various situations when it is not possible to use a disk or for storing information that constantly has to be rewritten to disks. However, you can burn images not only to a disk, but also to a flash drive, and this article will show you how to do this.
To write an image to a disk or flash drive, you need one of the following, and one of the most popular programs UltraISO is of this kind. In this article we will look in detail at how to burn a disk image to a flash drive.
First, you need to figure out why you need to burn a disk image to a flash drive. And there are many answers here, but the most popular reason for this is Windows entry to a flash drive for installation from a USB drive. You can burn Windows to a flash drive using UltraISO just like any other image, and the advantage of writing to a flash drive is that they deteriorate less often and last much longer than regular disks.
But you can write a disk image to a flash drive not only for this reason. For example, you can create a copy of a licensed disc in this way, which will allow you to play without using the disc; however, you will still have to use a flash drive, but this is much more convenient.
Burning an image
Now that we have figured out why you might need to write a disk image to a flash drive, let’s proceed to the procedure itself. First, we need to open the program and insert the USB flash drive into the computer. If there are files on the flash drive that you need, then copy them, otherwise they will be lost forever.
It is better to run the program as an administrator so that there are no problems with rights.
After the program starts, click “Open” and find the image that you need to burn to the USB flash drive.


Now make sure that the parameters highlighted in the image below match the settings in your program.

If your flash drive is not formatted, then you should click “Format” and format it in file system FAT32. If you have already formatted the flash drive, then click “Burn” and agree that all information will be erased.

After this, all that remains is to wait (about 5-6 minutes per 1 gigabyte of data) for the end of recording. When the program finishes recording, you can safely turn it off and use your flash drive, which can now essentially replace a disk.
If you followed everything exactly according to the instructions, then the name of your flash drive should change to the name of the image. In this way, you can burn any image to a flash drive, but the most useful quality of this function is that this way you can reinstall the system from a flash drive without using a disk.