Recording the system to an ultraiso flash drive. Formatting success message
CDs are increasingly being replaced by flash drives and other storage devices, but they are still in use. Therefore, it is very important to know how to use them. In this material we will talk about how to burn an image to disk using UltraIso.
Step No. 1. Open the disk image using the UltraIso program.
If you want to burn an image to disk via , then the first thing you need to do is run UltraIso and open the disk image. To do this, click on the “Open” button, which is located on the toolbar.
You can also use the “File – Open” menu.

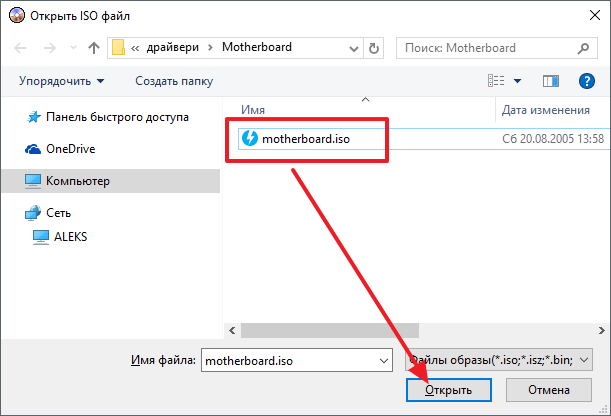
After this, a standard window for selecting files will appear. Here, simply select the disk image file you want to burn and click on the “Open” button.
As a result of the above steps, the contents of the disk image you selected should appear in the UltraIso program window.

Step #2: Start burning the image.

You can also start burning the image using the “Tools – Burn CD Image” menu or using the F7 key on your keyboard.

As a result, a window will appear for burning the image to disk. At this stage, you just need to insert the disc into the drive (if the disc is not already inserted) and click on the “Record” button.

If you have a disposable or empty disc, recording will begin immediately. If you are using a rewritable disk and there is data on it, the program will first ask you to confirm wiping the disk. In order to continue here you need to click on the “Yes” button.

After this, the program will begin cleaning the disk, and after cleaning, writing the image to the disk will immediately begin.

Now all you have to do is wait until the UltraIso program writes the image to disk.
How to burn an image to a flash drive using UltraIso
It should be added that using the UltraIso program you can also use drives. To do this, you need to open the disk image in the UltraIso program (as described in step No. 1), and then open the menu “Boot - Burn image of Hard disk"

As a result, a window will appear for writing images to flash drives. In this window, you need to select the flash drive that you want to use for recording and click on the “Record” button.
After this, the UltraIso program will warn you about deleting old data from the flash drive. In order to continue, you need to click on the “Yes” button.

After this, the process of writing the image to the flash drive will begin.
![]() Often the installation operating system Windows from a USB flash drive is the only way possible solution for owners of devices (netbooks, nettops and others) that do not have a disk drive, and external USB drives, although they are most widely used in the consumer electronics market, are still not available to everyone. In addition, this method is largely justified and has a number of advantages (compactness, reliability of data storage, high speed reading) even in comparison with the traditional installation method with a CD\DVD drive.
Often the installation operating system Windows from a USB flash drive is the only way possible solution for owners of devices (netbooks, nettops and others) that do not have a disk drive, and external USB drives, although they are most widely used in the consumer electronics market, are still not available to everyone. In addition, this method is largely justified and has a number of advantages (compactness, reliability of data storage, high speed reading) even in comparison with the traditional installation method with a CD\DVD drive.
So, in order to install Windows on a nettop or laptop (netbook) in the absence of a disk drive, or if you just want to have a distribution kit with a particular release of the operating system always at hand, you will need to write down bootable USB flash drive. One of the simplest, and most importantly working, options is to write Bootable USB flash drive by using UltraISO programs.
Despite the fact that the program belongs to the category of shareware, the free (trial) version of UltraISO (Russian version) is quite suitable for creating a bootable flash drive with an operating system; you can download the program.
Next, as an example, we will consider the process of creating a bootable USB flash drive for the 64-bit Windows 8.1 OS. Please note that the method described here is only suitable for Windows 7 and Windows 8 operating systems; for Windows XP the process is slightly different.
Download and run the program, this window will appear, select here “ Trial period …».

The main program window will open, select from the menu: File → Open,

after which we find an image file with the extension .iso (or may be different: IMG, MDF, NRG, etc.) in Windows Explorer(it is assumed that we already have on our computer’s hard drive virtual image operating system) and click “Open”.

At the next stage, select the menu item “Boot” → “Burn Hard Disk Image...”

A window like this will appear (if you haven’t inserted the flash drive yet, now is the time to do it).

Here you need to pay attention to the “Recording method” item; UltraISO developers recommend choosing USB-HDD+. It is worth explaining here that the recording method offered by the program at this step, namely: USB-HDD, USB-ZIP, USB-HDD+, USB-ZIP+, USB-HDD+ v2, USB-ZIP+ v 2, are emulation modes of the corresponding devices. For example, the main difference between the USB-HDD method and USB-HDD+ is that when using the extended mode (USB-HDD+), the bootable flash drive will be more likely compatible with the BIOS of a particular computer (laptop), etc., than when using a basic USB-HDD. In turn, USB-HDD+ v2 will ensure compatibility of your bootable flash drive with almost any, even very specific BIOS, so we recommend using it right away.
We also note that when using UltraISO there is no need to format the flash drive in advance, the program will do everything itself, the only thing is that before you insert the USB flash drive and start recording, make sure that there is no important information on it. However, after you click “Record”, the program will warn you about this with the following message.

We wait for the end of the recording process, upon completion we receive a universal bootable flash drive with which we can easily install the Windows operating system (in our Windows case 8.1) on any computer, laptop, nettop, etc.

The actual process of installing an operating system from a flash drive is no different from that using a disk, however, in order for everything to work, you must correctly set the device boot priority in the BIOS of your computer.
Skype (Russian: Skype) is a program that allows its subscribers to make voice and video calls or chat via Internet absolutely free...
Hello friends, today I will again touch on the topic of bootable media. I have already written a lot of materials on how to create a bootable USB flash drive. They cover a bunch of tools that allow you to do this. Perhaps I will list these articles below. And today we'll see...
First, let's see how to burn an image to a disk and then to a flash drive. By using UltraISO utilities It can be done.
How to burn an image to disk using UltraISO
The well-known UltraISO program for working with images allows you to record something on optical media, but also has many others useful functions. I would like to review this wonderful program, but is it necessary? Write in the comments.
To burn the image to disk, you must first run UltraISO. Select a section "File" and press "Open". Select an image, for example, Windows.
The window is divided into four parts, the first shows the directories located inside the image, the second section contains files and folders. If the files are loaded in the window, then the image was selected successfully.
Next, go to the tab "Tools" by selecting the option "Burn CD image"(or click on the button F7). In addition to the above, the utility’s taskbar already has a corresponding icon indicating writing to disk; it is shown as a burning optical disk.

DoctorSmm is one of the best SMM promotion services social networks. Here you can get very cheap services for promoting pages, communities and channels. At the same time, you will be provided not only low prices, but also guarantees for the high-quality execution of any order, as well as for the protection of all payments made.
A window opens where we press the button "Record". Before doing this, do not forget to insert the disk into the drive.
(At the time of writing this article, I didn’t have a disk drive in my laptop; instead, there was a hard disk drive, so you see this screenshot; if you have a disk drive, the burn button will be active!)

As you can see, burn the image to disk with using UltraISO very easy. The disk can be used for its intended purpose.
Well, now we come to the real topic of the article. Let's not delay, but let's get straight to the point.
Now it is advisable to run UltraISO with elevated privileges. Then we select the desired image, as I described above.

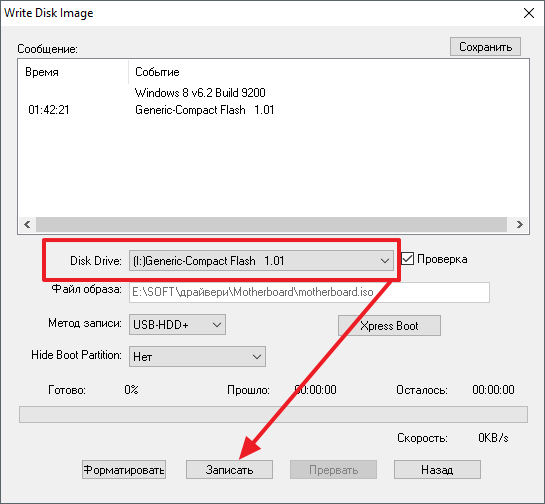
In field "Disk Drive" select your flash drive. Usually it is determined automatically. We leave the recording method as USB-HDD+. Press the button "Record".

A message appears warning you that the data on the drive has been destroyed. We agree by clicking the button "YES".
When the creation of the bootable USB flash drive is completed, the message “Recording complete” will be displayed in the window.
The flash drive is ready for use.
How to make bootable media using Windows tools
IN modern systems Windows icon The image looks like this.

This means that the system already has a built-in tool for working with images. For example, double-clicking on the icon will connect a virtual drive.
You can do this as follows: click right click mouse in the image and select the parameter "Burn disc image".

A tool opens where we select the drive and press the only button - "Record".

Here I showed three more options for creating bootable media. Now you know how to burn an image to a flash drive via UltraISO, on optical disk and how to use standard means Windows for recording images.
Today, more and more netbooks and laptops are being produced that do not have a CD drive. Pre-installed on Windows computer 10 or previous version this operating system may crash and freeze over time. If restoring it and other methods do not help, the system will have to be reinstalled. Since netbooks do not have a disk drive, to reinstall Windows you will have to make a bootable USB flash drive.
But even some owners of desktop PCs prefer to install the OS not from a disk, but from removable media, since it is easier to store and move it this way. You can write an operating system image to a flash drive using a convenient utility. Ultra ISO. This instruction will help you create such an image.
Preparing an image for recording via UltraISO
First we need to load Windows image 10 in ISO format. This can be done using the official website. To do this, follow the link: https://www.microsoft.com/ru-RU/software-download/windows10. If you are not satisfied with version 10 of the system, but need an earlier one, for example XP, 7 or 8, then find and download the appropriate image via the Internet.
To make a bootable USB flash drive, use only licensed, clean software and do not download various modified versions, since, subsequently, problems often arise with them when transferring system files and subsequent installation.
If you have Windows XP, 7, 8 or 10 downloaded, the next step is to install and run the UltraISO program (by the way, you can use it for free for a month). In the working window of the program, click the open button, it is highlighted with a red square in the screenshot:

The appropriate tool for creating a bootable USB flash drive will be launched, and the image of the selected OS (XP, 7, 8 or 10) will open at the top of the program. You will see a list of system installation files and folders.

Preparing and burning an image to a USB drive via UltraISO
To create a bootable USB flash drive, you need to insert it into USB port. It is worth noting that removable media must have a memory capacity of at least 4 GB. For Windows XP, you can use a flash drive with a capacity of at least 2 GB. For successful creation image, the USB drive must be formatted in FAT32. This can be done through the system: in the folder " My computer"Right-click on the device and click " Format" In the settings, check the FAT32 box.
All necessary information, if there is one on the flash drive, you need to save it in memory hard drive, since formatting deletes all existing files. This operation can also be carried out later through a special window for recording and creating UltraISO.
If the USB drive is ready and inserted into the port, you can proceed to next action. In the UltraISO window, select the command "" → " from the menu Burn a Hard Disk Image...».

A window will open for recording a hard drive, in which you need to select our USB drive (check under which letter of the Latin alphabet it is marked in the folder “ My computer"). Here you can also format the flash drive if you have not done so previously. Click the Burn button to burn the ISO image. Next, you will be warned that all information will be deleted. Click Yes. Next, the process of unpacking and copying files begins. We wait until the download finishes. Here you can see the approximate remaining time and recording speed, which will depend on the power of the computer.

After the notification that the recording is complete, you can close UltraISO and check for the presence of the image on USB drive. The number of files will vary depending on the system. Thus, Windows XP takes up less memory and therefore has fewer files.
Then you can use the bootable USB flash drive at your discretion. It is ready to be installed on your computers. To do this, you need to start from it on desired device and then follow the prompts. If you have never installed Windows using a bootable USB flash drive before, read about how to do it.
As mentioned earlier, this ISO burning instruction can be used for any OS. It is best to have a bootable USB flash drive so that if the system fails, you can use it. Please note that the article provides as many as 5 ways to create a bootable device from an ISO file.
Video on the topic