Yandex dix. Cloud Yandex.Disk for photos
Hello, dear readers of the blog site! Modern technologies in the form of cloud storage make it possible to meet the ever-growing needs of users for reliable file storage, which includes Yandex Disk. Today we will look at the main options provided by this service.
The functionality of Yandex Disk is, in principle, available in the web interface, but in order to use all its capabilities, it is still recommended, which will be discussed in a separate article. I decided to divide the publication about Drive into two parts in order to familiarize you with this Yandex product in as much detail as possible and give you the opportunity to understand whether using the cloud interface is enough for you, or whether you need to install its additional application.
Before moving on to technical details, it is necessary to clarify what Yandex Disk is and why it is needed at all. Perhaps some readers will find this information useful. So, cloud technology (in our case, Yandex Disk) allows you not only to store important information, including your documents and files, but also to access them from almost any electronic device from anywhere in the world, as well as transfer them and determine to whom they will be available.
It should also be noted that storing files on Disk is not limited in time and is absolutely safe, since they are all scanned by an anti-virus program, safety is ensured by advanced modern technologies and data is transferred only over an encrypted connection.
How to create an account in Yandex Disk (registration and login)
So, as I said above, today we are getting acquainted with the web interface. If you already have your own mailbox on Yandex, then the task is simplified. Just log into your account and find the Yandex Disk tab. You can log into your cloud storage account by simply clicking on this tab:

Otherwise, you can register on the official page. But there is one nuance here. The fact is that by registering using a referral link, you have the opportunity to immediately receive an additional 1 GB of free space for storing your files in addition to the 10 GB already provided forever. There is a great opportunity in the future increase this space up to 20 GB for free(I will definitely write how to do this in the next article, don’t miss it). So, go to this page and register by clicking on the “Register” button:

Registration is extremely simple. Enter your first and last name, and come up with a more complex password. The only thing you will need to do is enter your mobile phone number, which is necessary to ensure modern security requirements, and click the “Get code” button. This code will be sent to your mobile phone. Next, follow the recommendations of the registration wizard. On the same page, you can also log in by entering your password and login if you already have an account, and also access Yandex Disk using social networks.
My Yandex Disk - working in the cloud storage interface
After logging into your account, you will see an interface that is intuitive and as easy to use as possible. To move the necessary files to Disk from your computer, just click the “Upload” button or use the “select” link. You can also use the “Drug and Drop” method by left-clicking the desired file and simply dragging it from the window with your folders on the computer to the area indicated by the dotted line.

In addition, it is possible to change the way folders and files are displayed: in the form of large or small icons, as well as in a list, similar to how this is done, for example, in Windows. You can also organize their location by name, size, type, modification date; in ascending and descending order, that is, in alphabetical order, where the name is decisive.
To create a new folder, click on the plus sign icon, a block will instantly appear on the right where you need to enter its name in the corresponding column:

After you enter the name of the new object, to save the changes, simply press ENTER on the keyboard or left-click on the free space of the page. The new folder will take its place in the directory:

In order to carry out certain actions, you need to tick the desired object, and an editing block will immediately appear on the right side of the interface. To rename, move the cursor to the name of the folder, it will immediately change the font color to red, and an icon with a pencil image will appear on the right, by clicking on which you will be able to enter a new name.

This same option, along with a number of others, is also present in the main editing block, which appears just below:

Here at your service are almost all possible functions that you may need. For example, you can open a folder to access the files in it, download from Yandex Disk to your computer, and delete. By clicking on the button with three dots, you get additional options (copy, move), including the above-mentioned renaming.
Let's look at some options in more detail. Let's say you are quite capable of opening access to this or that folder to the users and exactly those you want. Depending on the settings, they will be able to simply view the content or perform all actions (delete, add, edit files, etc.). To do this, click “Make folder public”, in the window that appears, enter the e-mail of a certain person known to you, determine the access level and click “Invite”:

You can enter as many addresses as you need. The selected folder will appear on the Drive of each user you invite, which will be shared with you. By the way, for convenience, on Yandex Disk all shared folders are located in a separate section, which can be found in the top menu. Now all invitees for the selected folder will be listed in the access settings window:

By the way, you are free to send a repeat invitation for each of the participants. In this case, move the cursor to the desired line, immediately the circular update arrow icon will change to an invitation button, which you should click on:

By the way, if you have your own Facebook account, you can invite all your friends at once. To do this, click on the icon of this social network at the very bottom of the access settings window. However, to implement this idea you will have to give the Yandex application access to your Facebook account data:

I think that Yandex can be trusted, which will not specifically disclose data, especially since most of it is not strictly confidential, so feel free to click OK. Unfortunately, this option currently only exists for Facebook. It is likely that other popular social networks will soon appear in this section on Yandex Disk. After all these movements, the entire list of participants who have access will appear on the right side of the shared folder:

In addition to setting up access for individual users, you can provide a link to public access to selected folders and individual files. For example, it is useful to do this on your website so that your readers, if necessary, can download the required file directly from Yandex Disk. Look at the screenshot four times above in the text. There is a button divided into two parts. Click on the left side, the inscription “ON” will appear. and a link to this file or folder will be available.
Copy and paste it anywhere, even on your website, or post it on social networks. By the way, if you immediately want to check how it works, copy the link, paste it into the address bar of your browser and press ENTER. Get a view that will be visible to everyone who clicks on this link.
I can’t help but mention the options for each individual file on Yandex Disk. For example, if you open a folder with images, then at your service, in addition to the functionality mentioned above, there will be a built-in photo editor, which is very rich in all sorts of useful things. To access this tool, click “Edit”, after which you will be transferred to a separate window where you can experiment a lot, showing your creativity.

In the photo editor, you can decorate a photo or picture beyond recognition by applying various effects, adding, for example, stickers or frames, changing the sharpness, brightness, contrast, color saturation, rotating or cropping. After all this bullying, click the “Done” button in the upper right corner of the editor and save the modified photo. Moreover, what is important, the original will remain in its original form:

In the same way, for each type or file format, you can perform certain actions. For example, listen to an audio recording or watch a video. To do this, open the desired folder and select the file, after which a tool for applying your intentions will appear in the right block of the interface.
New in version 2.78 (iOS) (23.07.2019):
- New, beautiful and more stable version of the application. Should work better than before.
New in version 4.21.0 (Android) (19.07.2019):
- In Drive, you can regularly travel back in time thanks to smart photo selections in the “Feed” section. With the updated Photo app, Memories have a new look. Inside the selection you will see the most successful photographs from your past, united by the time of shooting.
New in version 3.0:
The new Disk 3.0 combines the advantages of the classic version of Disk and the experimental Disk 2.0.
Selective Sync
Now you can choose what to store only on disk, and what to duplicate on your computer. For example, you can transfer the entire contents of your computer to Drive and synchronize only your working folder or individual documents.
Working with files without the Internet
The changes that you make to the file, even if you did not have the Internet at that moment, Disk will remember and, as soon as network access appears again, it will update the edited file in your cloud storage.
Clear and clear
To prevent you from deleting a file from your computer, thinking that it is already stored in the Cloud, we have made bright and clear icons next to each file and folder. Thanks to them, you can easily determine what is stored only in the cloud, what is synchronized with your computer, and what files are still being downloaded.
Feel free to delete files from your computer
Once your files are in Drive, you can safely delete them from your computer. They will remain in Disk, and if necessary, you can download the file back at any time.
Notes for Windows Users
If you work on Windows, then in addition to the above features, Notes are also available to you. This is still a beta version, but it already has everything you need, as well as a speech notes function based on Yandex SpeechKit technologies. Those. you dictate a note, and the program translates it into printed text.
The Yandex.Disk program can be installed on the following operating systems:
- 32-bit Windows XP Service Pack 3 (from version 0.8, support for Service Pack 1 and Service Pack 2 is included);
- 64-bit Windows XP Service Pack 2 (from version 0.8, support for Service Pack 1 is included);
- Windows Vista;
- Windows 7;
- Windows 8 (classic interface);
- Windows 10
- MacOS 10.11 or higher (El Capitan, Sierra, High Sierra).
Mobile devices
- Android version no lower than 5.0.
- iOS version no lower than 11.0.
- Windows Phone 7 and Windows Phone 8.
Console client for Linux
The console client can be installed on the following operating systems:
- Ubuntu Linux 8.04 and higher;
- Debian 5 and above;
- Fedora 9 and higher;
- Red Hat Enterprise Linux 6 and higher;
- CentOS 6 and higher.
Yandex.Disk is a free cloud service that allows you to store files on Yandex servers for free. You can work with files stored in Drive on any device connected to the Internet.
The Yandex.Disk program for Windows allows you to work with Disk files on your computer and automatically synchronizes all changes with Disk via the Internet.
You can also use applications for Linux, Mac OS X and Android mobile devices, iPhone, iPod touch and iPad, Windows Phone.
Key features of Yandex.Disk for Windows
Use in tray, Explorer and Start menuClick on the Yandex.Disk icon in the tray and select the “Open Yandex.Disk folder” menu. Yandex.Disk can also be accessed through the Explorer navigation bar and in the Start menu.
Move any file to the Yandex.Disk folder. After copying is complete, you will have access to the file from any computer or mobile device connected to the Internet. To do this, you just need to use the Disk web interface at the link disk.yandex.ru.
Share files with friends and colleagues
Multi-platform support for Yandex.Disk
Unite all your devices using the Yandex.Disk application so that the necessary files are always at hand. Supports Android, iPhone, iPod touch and iPad, Windows, Windows Phone, Mac OS, Linux.
Good day everyone! Today we are talking about a very convenient service that I have been using in my work for a long time - Yandex Disk. What kind of “beast” is this? - you might ask. I will talk about this in detail in the article below. If you have any questions, ask them in the comments, we will figure it out and look for answers! In the meantime, let's get acquainted with one of the most convenient file storages from the developers of the popular Russian search engine Yandex.
1. Yandex Disk: what is it
Yandex.Disk is a popular cloud storage that allows users to store various information (photos, videos, audio, texts and other files) in the so-called “cloud”, i.e. on a server on the network. Data stored on Yandex.Disk can be shared with other users, as well as accessed from various devices - other computers, tablets and smartphones. The basic version of Yandex.Disk is completely free and available to everyone. I remember that in 2012, registration was by invitation only, and I used an alternative service - Dropbox. But now I have completely switched to Yandex Disk Cloud. After all, free, and even accessible from everywhere, 10 GB is never superfluous.
2. Yandex Disk: how to use - step-by-step instructions
So, I convinced you, and you decided to install Yandex Disk on your computer. Now let’s take a closer look at how to use Yandex Cloud (also called Yandex.Disk, since it is a cloud data storage).
2.1. How to create Yandex Disk (registration in Yandex Cloud)
In order to start using Yandex.Disk, you need register and create a mailbox from Yandex(if you already have one, go straight to the second point).
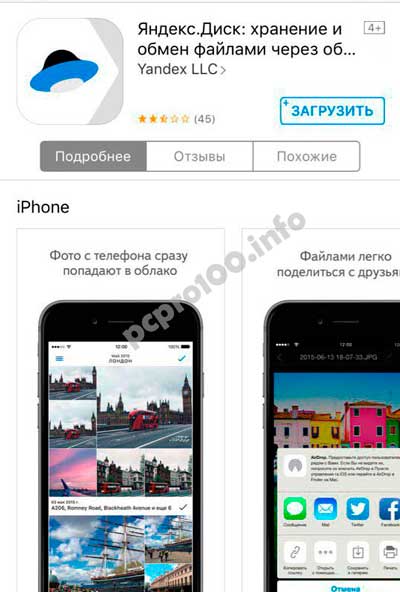
4. Installing Yandex.Disk on a smartphone. Free apps are available for iOS and Android, so you can easily download them from the App Store and Google Play. The application for iOS does not have a very high rating, there are some shortcomings, all of which can be seen in the reviews.
2.3. Yandex Disk: how much free space?
Immediately after registering and installing Yandex.Disk, you can access 10 free GB of space in the Cloud. This is quite enough for a start; it lasted me about six months. What to do if there is not enough space?
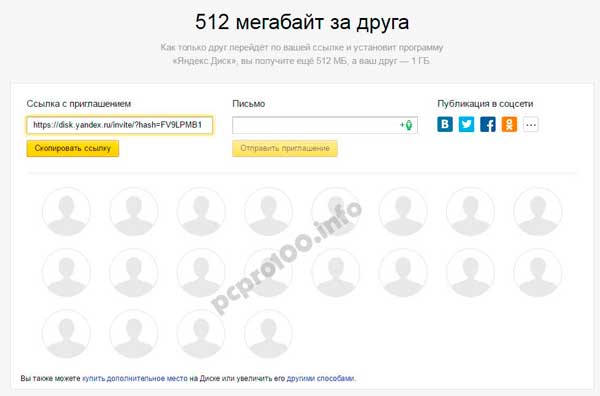
- Additional free 10 GB for inviting friends. You can get 512 MB of free cloud space for each friend you invite. Go here - https://disk.yandex.ru/invites and you will see your referral link, which you need to copy and send to your friends. After each user registers using your link, you will receive additional disk space, and the invited friend will receive an additional 1 GB.
- Additional up to 250 GB as a gift from Yandex partners. Various promotions are regularly held that will allow you to get additional gigabytes of free space. You can track current promotions on this page.
And of course, as you can expect from Yandex, additional space can be purchased. However, the pleasure does not come cheap:

If you need a lot of space in the Cloud, but don’t want to pay, you can create several mailboxes and create Yandex.Disk for each of them.
2.3. Login to Yandex Disk
Registration has been completed, the available space has been sorted out, the question arises - ?
You can view downloaded files in several ways:
1. Open the Yandex.Disk folder shortcut on the Desktop, if you did not delete it after installation.
2. Open Yandex.Disk in the My Computer folder.
3. Click on the Yandex.Disk icon in the taskbar, located in the far right corner of the screen.

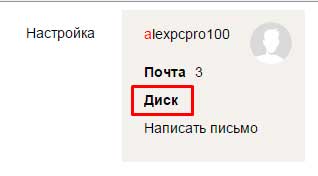
4. Log in to your Yandex mail through any browser and at the top there will be a link to the Cloud:
6. Go to the Yandex main page while logged in to your email. In the upper right corner there will be a link to Yandex.Disk:
2.4. How to upload files to Yandex Disk - 7 easy ways
Let us now consider the most important point, because of which we took all these actions -. Again, there are several ways to do this:
1. Via context menu. Select the file that needs to be uploaded to the Cloud, right-click on it and select the item: “Yandex.Disk: Copy public link”:

2. Copy the file to the Yandex.Disk folder(I wrote above how to enter it). By default, this folder is synchronized automatically, so when you copy there, all files will be immediately added to your Disk.
3. Upload files via mobile app iOS or Android. I can consider this method in a separate article, if you leave such a wish in the comments.
4. Upload a file to the Cloud via browser. To do this, simply drag and drop the selected files into a browser window with Yandex.Disk open:

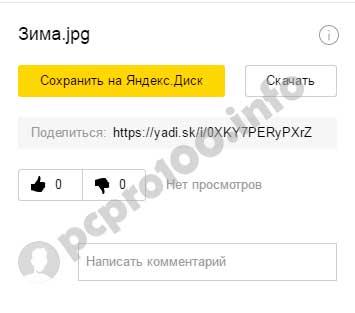
5. Copying other people's files. If someone shared with you a link to a file that is stored on Yandex.Disk, you can easily save it to your Cloud. To do this, you need to follow the sent link like https://yadi.sk/*** and click on the “Save to Yandex.Disk” button on the right.
They also often ask - how to upload a folder to Yandex Disk. The principle is the same as stated above in the files section. But there is one more additional advantage - the folder can be assigned to Shared access. This way, other users to whom you grant access rights will be able to view and download files in this folder, as well as upload their own files there.

How to upload a video to Yandex Disk?– is also a very popular question from Cloud users. This is due to the fact that video files are usually large, and many people worry that they simply won’t “fit” and cannot be stored there. This is not true, video files, just like photos, can be uploaded and stored on Yandex.Disk.
2.5. Yandex Disk: how to transfer files to another user

You can also remove access to the file by clicking the mouse and switching it to the OFF position.
If for some reason you need to remove Yandex.Disk from your computer, then you should do the same as with a regular application - use standard operating system tools.
Let's move on: Start -> Control Panel -> Programs and Features
In the window that appears, select Yandex.Disk (usually it is the last one in the list) and click the “Delete” button. The downloaded files will remain in your account; only the application will be deleted from your computer.

Hi all. At the user's request, I hasten to write an article about I am index.Disk. I will try to tell you as briefly as possible what I know.
I ndex.Disk allows you to store and exchange different files using devices that have access to the Internet.
So what do we need to know about cloud file storage Am I ndex.Disk? You will learn from this article how to access the Yandex.Disk service, how to set up and use it.
Why do we need cloud file storage?
In our life, nothing stands still; progress moves forward. We started with floppy disks, then people moved to disks, then to flash drives, portable hard drives, and now people store files on so-called cloud servers.
Cloud file storage allows you to store any files where you can access the files from any computer using a password. Now you don’t have to worry about forgetting a flash drive with important information. You can no longer be afraid and forget about scratches on CDs and DVDs, because you store your files for free on Yandex.Disk.
You can share your files with friends by providing a direct download link. I think you have already felt how convenient it is.
Why I ndex.Disk?
There are many similar services on the Internet, such as Google Drive, Dropbox, SkyDrive, etc.
I will tell you about them in the following posts.
Why did I choose I ndex.Disk? This is a matter of choice for each person, you may like Google Drive, Dropbox, SkyDrive, but I chose Yandex.Disk. Here are its main parameters:
- maximum file storage capacity is 10 gigabytes;
- has good protection;
- files are protected from DrWeb viruses;
- Yandex. The disc is available for all major platforms;
- low consumption of system resources;
- Russian-language interface;
- the maximum size of one downloaded file is no more than 3 GB.
I am index.Disk. Registration, settings and use of the service. Expanding disk space.
I think it’s time to write something that will help you use cloud file storage from Yandex.
So, in order to start using the cloud file storage Yandex.Disk, you just need to register or create an email account on Yandex. How to register a mailbox on Yandex, I wrote in detail with examples.
If you have a mailbox I am ndex or you have just registered, then follow this link https://disk.yandex.ru and do the following:
1). In the upper right corner, find the “Login” button.
2) The login and registration form will open. If you have an e-mail on Yandex, then simply enter your mail data.
– mail name
– email password
Click “Login”

3). When you log in to Yandex.Disk, the following window will open with the inscription “Your Yandex.Disk is connected!” Click “get started with Disk”.

4). When your disk is connected, you will see this picture:

If you want (and I know you want) increase disk space from 3GB to 10GB, then you need to follow three steps:
1-step. Download program Ya ndex.Disk for Windows. Click on “Install Yandex.Disk for Windows +3GB”.
2-step. Upload any two files to the service. Click the button “Upload a couple of files using the +2GB program”
3-step. Tell your friends about the service on social networks. Click on the “Tell a friend +2GB” button
5). After you have downloaded the program, install it on your computer. When the program is installed, “Log in” by right-clicking on the flying saucer in the lower right corner.

A new window will appear where you need to enter your email details.
– login or email name (vasa or [email protected])
– email password


6). To open the Yandex.Disk folder, right-click on the icon located in the lower right panel. The following menu will appear:

Or it can be done in another way. Open (Start => My Computer), you will see this icon:

7). Open I ndex.Disk. Ready-made folders with names will appear. Copy or move a couple of files to any of them. I moved the pictures to the Documents folder. But you can create additional folders and name them as you wish.


Class!!! We were informed about an additional 2GB bonus. So 3GB for downloading the Yandex.Disk program + 2GB for copying files through the Yandex.Disk program = 5GB. This means we already have 8GB. If you want another 2GB for complete joy, click on the “Tell a Friend” button.


If you go to Yandex mail and go to the tab (Files => Document), you can see your files.
Hello! Surely many of you have already heard the news that Yandex has launched a new service - a cloud service designed for storing photos, videos and other files. Today I will do a short review.
It is worth noting that the use of Drive is available from all devices with an Internet connection and will be a real competitor to the now popular Dropbox. I have already made a choice in favor of a new storage service for several reasons:
- 10 gigabytes of free disk space - free;
- free unlimited cloud for photos and videos in original quality when auto-upload from your phone is enabled;
- viewing and editing Microsoft Office files online;
- sharing files and folders;
- screenshot editor.

Personally, I like the current trends of market globalization. Having one single account, you can perform a whole range of work, and at the same time, the functionality expands each time, winning more and more new users.
Registration on Yandex Disk and downloading the application
Registration is not required if you already have an account on Yandex. Just go to disk.yandex.ru. Otherwise, complete a simple registration to gain access to numerous services.

After registration is completed, you can start working. The Disk web interface is in no way inferior to applications; it has all the necessary tools:
For the convenience of users, Yandex Disk has convenient applications for all modern platforms: Microsoft Windows, Apple macOS, Linux, mobile devices and even TVs with Smart TV function.
Go to the download page and select your desired platform. For mobile phones and tablets, the application is available in the Google Play and App Store.
Working with the Yandex Disk application for Windows
Now let's figure out how to use the application for working with Yandex Disk using the Windows operating system as an example. After downloading, run the installation file and perform the necessary operations. At the last stage of the installer, I recommend unchecking additional checkboxes to refuse installation of additional software and clicking Finish to complete:

When you first start the program, you must enter your username and password for your Yandex account, if you wish, remember the authorization and log in:

Next, we customize the program to your taste. I recommend checking the box next to launching the program at system startup, and also independently designating the destination folder for the location of the files. Carefully study all possible settings located on several tabs.

Access to the system folder for storing files can be obtained in the main Explorer window, and of course, by direct access to the folder that was assigned in the application settings:

An icon will appear in the tray; right-clicking on it will open a pop-up menu with basic functions and settings:

The Yandex Disk application for computer allows you to:
- free up space on your computer by transferring files to the cloud,
- write notes (text can be dictated or typed),
- take screenshots by pressing PrintScreen, draw arrows and other shapes, add comments.

Increasing the volume of Yandex Disk
The most obvious way to increase the amount of free space is to buy a Disk Pro subscription. There are several tariff plans with an increase of 100 gigabytes or 1 terabyte. Discounts apply when paying annually.

Subscription benefits:
- extended history of file changes,
- no advertising on Drive,
- priority support,
- unlimited downloading from public links.
Subscribers to the Yandex Plus service receive an additional 10 GB of free disk space.
Registration gives you 10 GB for storing files, but there are a few simple steps to get free space on Yandex Drive forever:
- enabling mobile startup +32 GB,
- mailbox birthday +1 GB every year.
I really liked the new Yandex cloud service for storing files, I will actively use Disk! By the way, do not forget that when auto-upload from your phone is enabled, photos and videos do not take up available space, and the storage of these files is not limited.