Yandex disk how to extract a file. Yandex Disk: how to use it, upload and download files, photos
Virtual file sharing systems are becoming increasingly popular, including Yandex.Disk. It can completely replace physical storage media and guarantees the safety of downloaded files. To fully use the capabilities of cloud storage, it’s worth figuring out how to upload photos to Yandex.Disk.
Uploading photos
You can add files to Yandex cloud storage from any device: Windows, Linux, Symbian, Android and iOS connected to the Internet. A web version of Drive and special applications for each PC system and mobile devices are available.
Working with the web version
You can go to the web version of Yandex Disk using the link: https://disk.yandex.ru/client/disk.
To upload photos to Yandex.Disk, just click the yellow button with an arrow and the words “Upload” (in the mobile version - only the arrow).

Note! To download a file larger than 2 GB from a computer, you will need to install the Yandex.Disk program.
In the window that opens, you can choose two ways to upload photos.
Method 1
From any open folder, just drag one photo or several selected ones by holding the left mouse button.

Method 2
By clicking the “Download” button, in the window that opens, you need to find the desired file from the device and click on it. Having marked the desired one, just click on the “Open” button, the file will be automatically sent to the cloud storage.

Important! Already during the download process, you can add files using the “Load more” button.

How to upload photos to Yandex.Disk in the mobile application
Note: This example describes the operation of the Yandex.Disk application for the iphon 5 device
To upload a photo in the mobile application, you need to open the menu: with three horizontal sticks.

Then we select a location on Yandex.Disk: where we will upload the photos. To do this, click on one of three menu items: “Disk”, “All photos” or “Offline”.

For example, we selected the “Disk” item. Select the folder into which we will upload photos

Go to the “Photos” folder and click on the plus, which is located in the upper right corner.

All that remains is to select the download source from the list that opens. For example, we will select “Photo from Gallery”

Then all that remains is to tick the photos that we want to upload to the “Photos” folder and click on “Done” in the upper right corner

You can enable the auto-upload option and no longer worry about the safety of each new photo. The next previously unloaded photo will be added to the Yandex.Disk cloud as soon as your device is in the wi-fi zone.
Connecting auto-upload of photos to Yandex.Disk
To enable the function of automatically uploading photos to Yandex.Disk, you must perform the following steps:
Go to the settings of the Yandex.Disk mobile application


Then, by moving the slider, in the “Auto-upload photo” item, enable auto-upload.

After connecting auto-upload, your pictures and video files will automatically go to the Yandex disk cloud storage.
We organize convenient file storage
To structure downloaded photos, you can distribute them into albums, move, add and delete. You can assign a name to the album and change it later. Set up access both for individual photos and for the entire photo folder.
To create an album you need to do the following:
In the Yandex.Disk menu, select the “Albums” menu item
 Then click on the “Create Album” button

In the gallery that opens, mark the photos that need to be saved to the album. We write down the name of the album (for example, I wrote “Computers”). Click the “Create” button.

After creating an album, we see the album cover, its name and photos.
Note! As a rule, the default cover is the photo marked first.

By default, all files that are uploaded to Disk are personal: they are available for viewing only through authorization of the account into which they were uploaded.
Access to an album can be changed to public simply by moving the toggle switch to the right of the sharing link (public link).
It is possible to see a separate photo of a public type even without registration, but only by following a key link. It is received and transmitted by the user of the account through which the file was downloaded.

Download photos
The next logical question after moving files to cloud storage will be how to download them. You can download the album to your own device by clicking on “Download as archive” in the upper right corner of the cover.

To download an individual photo, you will need to click the “Download” button under the photo.

Thanks to the web version and Yandex.Disk applications, you can quickly and easily upload photos for storage, share them with friends and publish them on social networks. The user-friendly storage interface helps you quickly master all the features and functions.
We present you with instructions for uploading files and folders to the most popular cloud file storage service, Yandex.Disk.
1. Download files via a web browser without additional applications:
Note! You can use the Upload File button to select individual files on your computer.
In the window that opens, you can click the “Load more” button if you need to select several files on your computer, or “Hide” if this is not necessary.
2. Upload files to Yandex.Disk via the computer application
- install the Yandex.Disk program on your computer, then enter the login and password for your account in the program window.
- To upload files to Disk, you just need to copy them to the Yandex.Disk folder, after which they will automatically appear on Yandex servers and you can either access them through a browser or share a link to the file with friends. The files will become available from any device on which the Yandex.Disk application is installed, regardless of the operating system. The storage period for files is unlimited.
Launch the application and go to the folder where you want to upload the files.
4. Upload files to Disk from an iOS smartphone
- Install the Yandex.Disk application from the AppStore.
- Launch the application and select the folder into which you will download the files, then press the + button in the upper right corner of the smartphone screen.
- Select an action from the available ones - select a photo from the gallery, take a photo now, or create a new folder
- Next, for example, when downloading files from the gallery, select the required files or the entire album, if necessary.
- As a result of clicking the "Finish" button, the files will be uploaded to Yandex.Disk.
Hi all! As it turns out, many people don’t even know how to upload a file to Yandex disk for downloading by other users. I was surprised, but not much. Still, you can’t keep track of everything today. Therefore, my article today will be devoted entirely to this issue.
Website (browser version)
Naturally, the easiest way to do this will be direct downloading through the browser. I hope that you have mail on Yandex. After all, this is exactly what you need to get yourself cloud storage.
But personally, I prefer to use the drag and drop method. That is, in Explorer you need to select one or more files, after which you need to left-click on them. And then, without releasing the mouse button, we transfer them to the Yandex disk window, and then release them. The effect will be the same.

And of course, don’t forget that you can create various folders on the disk itself to organize all documents by category. In the future, you will be able to transfer everything to your friends or anyone at all.
How can I create a link so that other users can download the file?

By the way, if previously the maximum allowable document size was only 2 GB, now users can upload files up to 10 GB.
Program
Also in Yandex disk it is possible to install the program directly on your computer. At the same time, you will have a new cloud folder that you can work with without going into the browser. Quite a handy thing.
To install the Yandex disk program on your computer, you need to log into your account and select "Install for Windows".

Now just download and install the program according to the instructions. There is nothing complicated there.

After this, a flying saucer icon will appear in the notification area. This will be our storage from Yasha. First, it will undergo synchronization, after which you will be able to work with them as in a regular Explorer. To do this, just click on this very icon and all your files will open right away.
I want to say right away that they don’t even take up space on your hard drive. But if you delete at least one document from this folder, you will no longer find it in your personal account in the browser. But don't worry. Even if this happens, it will not be deleted, but will be moved to the trash.

Well, uploading a file to Yandex disk for downloading is now no problem at all. Since this is essentially a folder, you can work in it in the same way. That is, we take any document from your computer, and then copy it CTRL+C. And then we go back to our flying saucer, that is, the Yandex folder. And already there we paste what we copied using the key combination CTRL+V. After this, the file will automatically appear in your browser version.

Well, just like in the previous option, you can simply drag the file from Explorer to the cloud folder. That is, select, hold and drag. It's simple.


Also, the undoubted advantage of the program is the maximum size of the downloaded file. Here you can insert any types of files up to 50 GB from Explorer. So at least upload movies to BlueRay. The program won't say a word to you.
Mobile applications
Well, where would we be without mobile technologies? After all, now with a smartphone you can do almost everything the same as with a computer. But for this we need a separate mobile application. It's available for free download on Google Play and App Store.

After installing the application, you will need to log into it and log in with your Yandex account. And then, I think, you will no longer have any difficulty understanding the program. Let me just say that to upload a file to Yandex disk you will need to click on the button with the plus sign.

After this, you will need to choose what exactly you want to upload to your cloud drive. For example, this could be a picture from the gallery, a new photo, files from the device, or even creating a new folder to organize documents. Well, then, depending on your choice, we choose what you need.

As you can see, there are many ways, and for all occasions. Of course, the absolute advantage of the mobile application is that you can enable unlimited adding of photos. I already mentioned this in my article when I talked about . So I would recommend that you all install this application on your smartphone so that cloud storage is always at hand.
True, I will tell you that to a greater extent I still use the Mail cloud. And all because at one time I grabbed 1000 megabytes of disk space on it for free. But I don’t stop using Yasha either. I always have it at hand.
Well, that's all for me. I hope you liked my article. So don't forget to subscribe to my blog on social networks. Then you will always be aware of everything new and interesting. I'm waiting for you again. Good luck to you. Bye bye!
Best regards, Dmitry Kostin.
Do you know how to upload files to Yandex disk? There are several ways to upload files to Yandex disk. See for yourself which one is right for you. If you have not yet created your account on Yandex, then do it now, at least in order to get a Yandex disk for your use. What it is? This is a kind of virtual hard drive or flash drive (whichever you prefer). You can upload your files (photos, books, tables, reports, coursework, diplomas, etc.) to it and work with them from any other computer.
Let’s say you didn’t have time to finish some report at work. Usually everyone downloads files onto a flash drive and works with them at home. But, as practice shows, not everyone knows how to work with a flash drive correctly, so often all the work goes to waste. In this case, Yandex disk is what you need.
Try it and you will see how convenient it is! You will never be able to work on a computer without this disk.
To get started, create your account on Yandex. To do this, you just need to open yours on it.
If you have mail on mail.ru, or in another place, then you can simply attach it to this mailbox on Yandex. Personally, I don’t trust mail.ru, after I accidentally got into someone else’s mail on it. And many Internet services do not even register with this email address. Draw your conclusions!
After you have created a mailbox, you can proceed to creating your own Yandex disk. This service is free. How to do everything correctly, read. And now we will install the Yandex disk on your computer and in your browser.
In order to easily upload files to disk, it is better to display the folder directly on your desktop or install a special application in the Google Chrome browser.
How to display Yandex disk on your desktop
Go directly from your mailbox to your virtual disk,


On the next page at the top, select the device on which we want to install the application (Computer, Tablet, Smartphone or Smart TV) and below click on the big yellow button.

Run the downloaded file YandexDiskSetupRu.exe

The disc will begin downloading to your desktop.

At the end of the installation, a window like this will appear. Uncheck all the boxes if you do not want to change your browser settings and click the " Ready».

You will be redirected to a page with Yandex disk settings. If you click on the blue link in the small window “ configure Yandex disk", a small window with settings will open.

You can change the location of this folder (Yandex disk), set up synchronization of all folders that you already have on the disk, or simply click the " Get started».
If you rarely use this folder, then it is better to disable synchronization of all folders and leave only working folders, otherwise your computer will slow down greatly.
I usually disconnect the disk in the tray, and when necessary, I simply open the disk folder on the desktop and synchronization is automatically turned on. You will see how to do this in the video below.
In addition to the folder, you will also have an icon for creating (screenshots).
You can take the disk installation file, transfer it to another computer and install your Yandex disk there. Then you can work with your files from another computer.
Files in this folder can be renamed, moved, deleted, sorted, etc. Everything is exactly the same as in a simple folder on your computer.
If the folder or file you are working with is constantly synchronized, then all changes to these files will be automatically saved directly on the Yandex server, because Yandex disk and all your files on it are not on your computer (although the folder is on your desktop), but on the Yandex server on the Internet.
Naturally, all computers on which you will work with this folder must be connected to the Internet, at least for the duration of file synchronization.
The folder is easy to work with. You don’t need to download anything from the Yandex disk and upload it back, like on a flash drive. You simply work as with the 1C program over the network. Accountants will understand me. Only here you don’t have to write your password all the time. Please keep this in mind if your files are not intended for prying eyes.
Extension forGoogle Chromefor working with Yandex disk
If you have the Google Chrome browser installed, then to quickly download files you can install a special extension on each computer where you are going to work with this disk.
To do this, go to your Yandex mail again and follow the link “ Disk» to your Yandex disk.

After this, a small window will appear asking you about installing the extension. Click the button below Install extension».

And a blue Yandex disk icon will appear at the top right of your browser.

Click on this icon,

A list of all your files and folders on the Yandex disk will open. If there are a lot of them, then move the list using the slider on the right of this window.
- Select any file in this window (click on any file with the left mouse button) and the “Download” arrow will appear on the right, clicking on which you will give a command to download the file.
- If you minimize the browser window so that the desktop is visible, you can simply drag and drop files onto the desktop.
- You can right-click on any file and copy it.
You can make small adjustments. To do this, click on the barely noticeable gear at the bottom.
How to upload a file directly from Yandex disk
Go to your Yandex drive and at the top right click the yellow button “ Download" A window will open for you to select a file on your computer. Select a file and upload it.

Large files (more than 2 GB) must be split into smaller files. If you use the disk through your computer, as described above, then there are no restrictions on loading, as long as there is enough disk space. And in order to have enough space, you need to delete unnecessary files and clean the “ Basket».

Good day!
To quickly transfer files to other people, and even between your PC, laptop and phone, it is very convenient to use Yandex disk (cloud file storage service). I uploaded photos to it once (for example) - and they can be viewed from all devices that have access to the Internet. In addition, you can significantly save space in your phone’s memory (many people often don’t have enough of it) by setting up automatic uploading of videos and photos to the cloud.
Add to this the ability to work with Word, Excel and Power Point documents online (without installing anything on your PC). It is very comfortable!
Not to mention that information on cloud drives is more reliably protected from various misunderstandings (viruses, file system problems, erroneous formatting, etc.) than on a classic HDD. Those. it makes sense to send some of the information to the cloud for backup (by the way, this can be done automatically, more on that later in the article).
Actually, in this article I wanted to show how all this can be quickly configured and used. I think the note will be useful to everyone who is still new to cloud disks.
And so, closer to the topic...
Registration and login to the drive [On Windows and Android]
In general, registration on the service is quite standard for such products. First, follow the link below to the official Yandex disk website and click the “Start disk” button (see screenshot below).

Next, you need to provide your details: first name, last name, login, password and phone number. By the way, if you already have mail from Yandex (or you use other products of this company), then registration is faster (just log into your account, the link will be located above the registration form).

After you register, you can start downloading applications for Windows and Android (to access and work with files on the disk).
For Windows

I won’t show the entire installation process, because... The installation is standard (like other programs) and does not contain anything complicated (interesting).

After installing the application, a characteristic “Yandex disk” icon will appear on your desktop and in the system tray, see the screenshot below. Clicking on it will open a window with all files, folders
The window for working with disk files is no different from the classic Explorer: all actions are the same. As a rule, creating, editing and deleting files and folders does not cause any difficulties even for novice users.

For Android
Installing the application on Android is also standard. Just go to Google Play (link above) and click the install button.

After installation, open the application shortcut, enter your username and password (specified during registration), set a PIN code (this is necessary so that no one except you can access the disk, even if you lose your phone), and woo-a-la - you're in the disk. See screenshots below.

How to increase free space on Yandex disk
In general, the allocated disk space is constantly changing (depending on different promotions, conditions, etc.): for example, several years ago I was given 10 GB during registration (it’s difficult to predict how much they will give you at the time of registration).
They also give extra as a bonus. space for using the mailbox (in my case 9 GB), and for installing the application on the phone (32 GB). In total, it turns out to be about 47 GB (which is quite enough for documents, photos, files).

If you need significantly more space, you can buy it for a small amount per month. In order to see the current rates: just open the Yandex Disk application and at the bottom of the window click on the “Buy more” link (see screenshot below).

For example, today “extra” 100 GB costs only 67 rubles/month. If you need much more, for example, 1 TB, you will have to fork out 167 rubles/month.

How to upload files and photos to disk
On Windows
This question is usually asked by people who have not yet worked with Yandex disk. In general, everything is actually very simple: first you need to open the disk (you can use the tray icon, see screenshot below).

After some time, the files will be downloaded: opposite them you will see small green checkmarks (synchronized). See example below.

By the way, it is not necessary to launch the Yandex Disk application: for example, in Explorer (Windows 10) there is a link to the folder with the disk. Just open the desired directory and copy files into it (if you have synchronization enabled in the application settings, the files will also be sent to the cloud).


To automatically upload photos to Yandex disk:
- launch the application;
- then in the menu open the “Settings” tab;
- enable auto-upload of photos via Wi-Fi (or even select the “Over any network” option if you use unlimited Internet on your phone);
- Now all photos will be automatically uploaded to Yandex disk. Even if something bad happens to your phone, you can quickly restore all your pictures. Reliable and convenient!

How to make files available for download by other users
Option 1
If you use the Yandex Disk application, this is done very quickly - just select a file or folder and click on the “Copy link” button in the menu.


Option #2


Option #3 (if we are talking about Android)
First, open the Disk application and go to the desired directory.


How to set up automatic copying of my documents to a cloud drive (backup!)
Everything is quite simple. I'll look at it step by step.
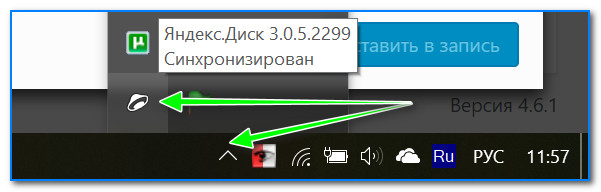
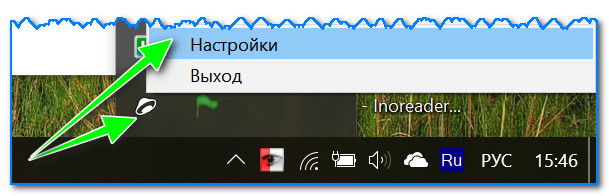
1) First, open the Yandex disk settings (to do this, you can use the tray icon next to the clock. See the screenshot below).
2) Next, I immediately recommend going to the “Advanced” tab and checking that synchronization is enabled (that is, all created and modified files in your folder on your hard drive will be immediately uploaded to the Yandex disk in auto mode (that is, duplicated) )).

3) In the "Basic" tab, check that the program starts automatically. Then open the folder location settings.

4) Look where the folder that will be synchronized with the cloud is located (if necessary, move it to another HDD partition).

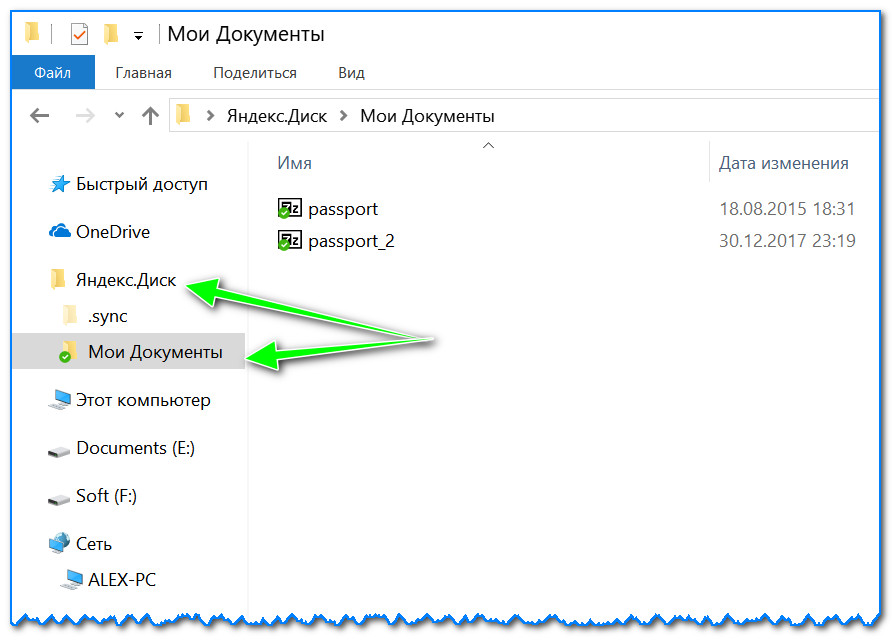
5) Now open Explorer, right-click on the system Documents folder and open its properties. Example below.

Open File Explorer and go to the properties of the Documents folder.
6) In the "Location" tab, click the "Move" button and move it to any of the folders located in "C:\Users\alex\YandexDisk" * (* the path is shown as an example, you will have your own directory - see point 4 just above, where we looked at directories in the application settings) . Those. We are moving our system folder "Documents" to a folder that will be synchronized with Yandex disk.

7) Personally, I named my folder “My Documents”, into which I moved the system “Documents”. Now all files (photos, documents, videos, etc.) that fall into this folder will be automatically duplicated to the cloud drive!

8) You can work with the transferred documents, both in the directory located on the HDD, and by opening the Yandex disk application. Comfortable!

Restoring a modified file
By the way, what else is captivating about Yandex disk: you can view the history of file changes. Just imagine, you edited a document incorrectly and saved it. And then they remembered that they had removed the unnecessary stuff from it... What should I do?

Additions are welcome...
That's all, good luck!