Xampp complete setup for production on windows. XAMPP - ready-made Web server kit
(Denver). In this lesson we will continue our discussion of this topic and will also install a local server, but based on the XAMPP distribution.
There are few big differences between the two distributions, and they both do a great job of running a web server on your local machine. Let us remind you that the main task of deploying a local server is the ability to develop a website on your computer, test and debug the site even without the Internet. In other words, the Denver and XAMPP assemblies contain all the most necessary tools to run a full-fledged web server, as on a regular paid hosting.
This toolkit includes, in particular: the Apache HTTP server, the PHP script interpreter, the MySQL database management system, the Perl language interpreter, and a host of other additional libraries.
XAMPP installation process
Download the XAMPP installer from the distribution download page: https://www.apachefriends.org/ru/download.html
After downloading, run the installer
When the antivirus is running, the installer will warn you that installation may take longer. If you have free time and/or a powerful computer, feel free to click Yes.
The next window prompts the user to select components to install.

Almost all of these components may be useful to you in the future, so it’s better to read a little on the Internet about each of the components, and proceed from the position of their need for you. For basic work you will need Apache, MySQL, and PHP programming language. It is also advisable to install it for more comfortable work with databases.
Click " Next" and in the next window you need to select the target folder of the installer. Leave it as is, or specify a different destination.
In the next window you will be asked to install Bitnami for XAMPP, i.e. a set of plugins and distributions for various CMS (e.g. Drupal, Joomla, WordPress). This option is designed to make life easier for beginners, but in practice everything turns out to be even more difficult. Therefore, you will not lose anything if you uncheck the box and click “ Next” to continue the installation.

The installation process itself

If you see a window like this,

This means the XAMPP installation process has been completed successfully.
Click on the button Finish" and you will automatically be taken to the server control panel:

To start working with the server, just click the buttons " Start» opposite the Apache server and MySQL database. Running services are highlighted with a green background and their “Admin” buttons become active.
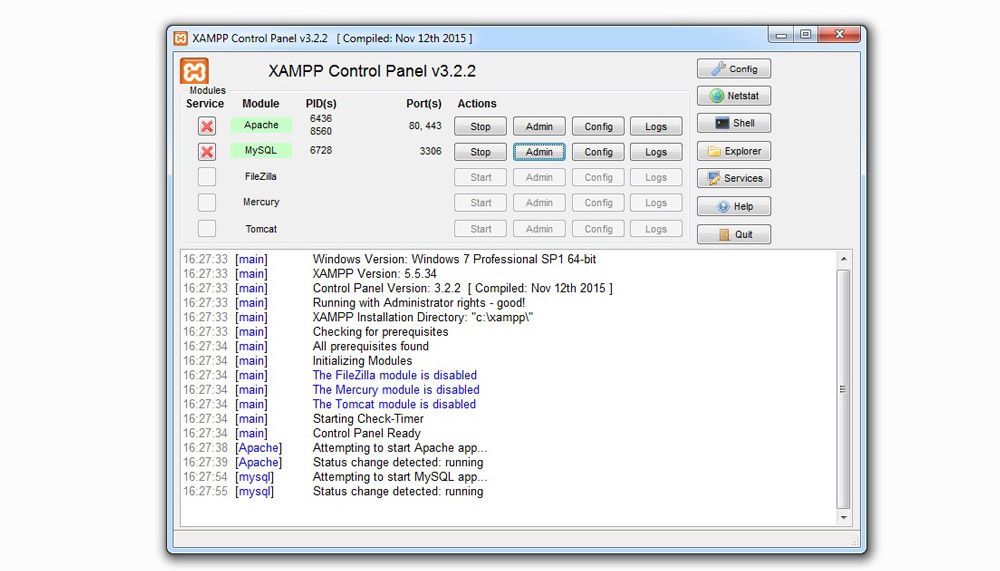
Apache "Admin" button opens the link http://localhost/dashboard/ in the browser; here you will find a set of useful data: questions and answers on XAMPP, documentation and running phpinfo (information about the current PHP settings and configuration). All this is only in English for now.
The MySQL “Admin” button launches phpMyAdmin, a database application.
Now you have yours local server based on XAMPP! What follows is a matter of technology and knowledge. Those. Next you need to figure out how to make websites. And XAMPP will help you test and display it.
If you have site files for the test, running it on a local XAMPP server is quite simple: copy all site files into a separate directory in the server folder selected during installation (by default this was the folder htdocs, the full path to it is C:\xampp\ htdocs\. If you changed the destination folder, then C:\selected_folder_during_installation\ htdocs\).
For example, you have a folder sait with site files. After copying to the local server, the path to the site files will be as follows: C:\xampp\htdocs\ sait\. And access to the site in the browser will be http://localhost/sait/. That is, by typing this path in the browser, you will “request” the local server for files in the folder sait, and the site index file will open for you (eg. index.html, or index.php etc.).
You can change the name of your site folder to any domain, such as google.com. Then the path to the site files will not be C:\xampp\htdocs\ sait\, and C:\xampp\htdocs\ google.com\. And in the browser you need to type http://localhost/ google.com/.
Presence of path in the address bar localhost a bit confusing, but serves to remind you that you are working on a local server and not on a remote host. And it will add a little stress to you when transferring the site to a working hosting (you will need to replace all static links in the files and/or database with localhost in the address), but this is a topic for a separate lesson.
After completing your working day and testing the site, do not forget to stop the local XAMPP server by clicking on the “Stop” button in the administration panel.
Some moments:
- A local XAMPP server is suitable for you if you do not have Windows installed, but for example Linux or Mac OS. Denver only runs on the Windows operating system.
- This is a rather controversial point, but loading and processing sites on complex CMS (for example, Magento) in XAMPP is a little faster than in Denver. This speed, however, is more influenced by the computer configuration - scripts and code are processed faster if you have a fairly powerful machine.
- The lack of Russian localization and documentation in Russian makes XAMPP not as popular as Denver in Eastern Europe.
- Conflicts are possible when Skype and XAMPP are running simultaneously due to the use of port 80 in Skype.
- XAMPP and Denver are free and open source, but you will need to register to download the Denver distribution.
Now, to install and learn this content management system, we will arrange local hosting. Of course, you can install Joomla directly on your Internet hosting, especially since current prices are affordable for everyone - you just need to choose a hoster. But... work on a website is not always limited to one day. What if your Internet connection is slow at this time? What if I made mistakes and the site “lies” in an unsightly state? It’s better to set everything up calmly at home, debug it, figure it all out, and only then transfer the site to a “production” server.
Installing XAMPP on Windows 7
The complete XAMPP package for Windows contains: Apache 2.4.10 web server with SSL support, MySQL 5.6.21 DBMS, PHP 5.5.19, Perl, FileZilla FTP server 0.9.41, Mercury Mail Transport System 4.63 (mail server), 4.2 .eleven. As you can see, this set meets the Joomla system requirements. There are even useful add-ons in the form of a mail server (useful for sending mail from a local website) and phpMyAdmin (for working with the MySQL database).
Download the distribution (143 MB) from the project website. Before starting the installation, disable UAC (User Account Control). This is done as follows. Go to the control panel and enter UAC in the search field located in the upper right corner.
Lower the slider to the lowest position and save the changes. That's it, UAC is disabled.
Now run the XAMPP executable file with administrator rights. In the welcome window, click “Next”. In the component selection window, select everything.
“Next” again. Uncheck the box - you can install Joomla yourself! And you can find out about the Bitnami project later.
We proceed to the next step, where it is reported that the program is ready for installation. Well, since the program is ready, let's start the installation. After a few minutes we receive a message about successful completion.
We uncheck the box - we will not launch the XAMPP control panel now. Reboot the computer.
After restarting the computer, launch the XAMPP control panel (Start->All Programs->XAMPP->XAMPP Control Panel). Let's take a quick look at the controls.
Click on the “Config” button in the upper right corner of the panel and call up the general settings of the control panel. The "Editor" field, by default, uses the Windows text editor, well known as Notepad. This is where the XAMPP module configuration files will be opened. But I would advise installing the Notepad++ text editor on the system. It is needed not only for editing XAMPP configuration files, in the future, it will be very useful to you when working with the site. Replacing one editor with another in the XAMPP control panel is done with a button with an image of a folder and indicating the path to the executable file.
In the XAMPP control panel settings window, you can enable options for automatically starting the necessary modules. Apache and MySQL are marked in the figure. Now, when you start the control panel, the marked modules will start automatically.
Below, there is another useful option - “Start Control Panel Minimized”. If it is checked, then upon startup, the XAMPP control panel will be immediately minimized to tray (lower right corner of the Windows taskbar).
If you click on the “Service and Port Settings” button, a window will open with settings for the port numbers used by a particular XAMPP module. Now nothing needs to be changed in it. This should be done, for example, in the case when any program installed on the computer uses the same port as one of the XAMPP modules, which creates a conflict.
We exit the general settings window and look at the control panel itself. On the left side there are buttons with a red cross. They allow you to run XAMPP modules as services. That is, the marked modules will launch along with the operating system and work in the background. On the one hand it is convenient. But these services will also work when you are not using your local hosting, and they will consume computer resources. So decide for yourself.
If the modules do not start automatically, you can start them using the corresponding “Start” buttons. To install Joomla you need to have Apache and MySQL running.
Now let's check the operation of local hosting. In the address bar of the browser, type localhost and go to this address. For the first time, you will see a window with a choice of language. There is no Russian language in the list, so we choose English. If after this you see the following page, then local hosting is working and you did everything correctly.
But that is not all. We need to make some changes. First, you need to set a MySQL password for the “root” user (superuser, administrator). The password is currently empty. This is very not good! Click on the “Security” link.
In the tab (window) that opens, follow the link http://localhost/security/xamppsecurity.php. Now in the “MYSQL SECTION: “ROOT” PASSWORD” section, enter and confirm the password for the “root” user. Leave the “PhpMyAdmin authentication” switch in the “cookie” position. Click the “Password Changing” button. Now it's good! Remember the password, you will need it when installing Joomla. Also, the credentials (login and password) of the “root” user will be needed when logging into phpMyAdmin - the web interface of the MySQL DBMS. You can log in to phpMyAdmin using the link located on the http://localhost page (almost at the very bottom) or by typing http://localhost/phpmyadmin in the browser address bar.
And the next article will describe installing Joomla!
More articles about Joomla 3
-
In the previous article about Joomla settings, we looked at a group of settings common to the entire site. One of the settings sets the CAPTCHA type on the site. But without some manipulations this will not be possible. This article describes how to enable and configure CAPTCHA on a site running...
-
Updated:
Start blogging on WordPress necessary on a local server, since it is on the local server that you can test and configure everything that you will need in the future when transferring the blog to the hosting server. I won’t recommend installing Denver, because, in my opinion, it’s better to choose another, more open server for use on your home computer. I chose XAMPP and I have never regretted it, since it is a very powerful server with all the necessary functions and easy installation.
Let's go to the site XAMPP and download the required version of the server on this page - http://www.apachefriends.org/en/xampp-windows.html. I will talk about installing and configuring the version 1.8.3 , since it is the latest at the time of updating this article. However, do not rush to download the latest version of the server. I'll explain why. It is very doubtful that your hoster will have all the latest versions of the necessary components installed, such as PHP And MySQL. Therefore, when transferring a blog to a hoster, certain problems may arise. This is understandable - if you have tested everything for PHP versions 5.5.9 , and the hoster has it installed PHP versions 5.2.17 , then compatibility problems are quite possible. If you know which versions PHP And MySQL installed by your hoster, then you can XAMPP, in which the components of the exact versions you need will be installed. If you don’t know which hoster you will host your blog with, then download and install the latest version of the server.
In fact, all versions XAMPP almost identical - only the versions of the components included in it differ. Therefore, this article will be relevant no matter what version XAMPP you will install. I still use the version server for personal needs 1.7.1 , since this version contains the most suitable components for me. But again, in the article I will look at installing and configuring the server XAMPP versions 1.8.3 .
I apologize for the large number of screenshots. Any more or less knowledgeable person will be able to install and configure this server on his computer, but this article is intended primarily for beginners and describes in great detail the entire process of installing and configuring a server XAMPP, and the engine WordPress.
Have you downloaded it? Let's launch the installer. If you have any antivirus running, you will see the following warning:
This message tells you that if the antivirus is running, the server installation may take a long time. If you have a powerful enough computer, then click on " Yes", without disabling the antivirus.
The following window will appear:

This is simply a welcome window informing you that the installation has begun. Click on the button " Next", after which you will see the window:

This is the selection of server components that will be installed. By default, all components are selected. But it is not at all necessary to install all components on the local server; it is better to limit yourself to the necessary minimum. Approximately as shown in the screenshot. Have you chosen? Click on the button " Next", now you need to select the installation folder:

I am using the folder " C:\server", you can install the server in another location. Have you chosen? Click further on " Next", the following window will appear:

Essentially, this is just an advertisement for plugins for XAMPP, with which you can automatically install many engines like WordPress And Joomla. Of course, this is convenient, but I do not recommend using them - a local server is also needed because you need to learn how to install the engines yourself. If an automatic installer does this for you, then what will you learn and why do you need a local server at all? So I advise you to uncheck advertising and click further on " Next":

This window tells you that everything is ready for installation. Click on " Next" and enjoy the installation process:

The installation process will end when this window appears:

Click on " Finish", after which the server control panel will launch:

When you see this panel for the first time, you may get confused, as there are too many buttons in it. But don't be alarmed, everything is simple here. All we need here is to press two buttons - start the server Apache and databases MySQL. Just click on the buttons " Start" opposite them. If everything started without errors, then the control panel will look like this:
Essentially, your local server is already running, now you need to configure it. To do this, open the link in your browser " http://localhost":
You will be automatically redirected to the language selection page:

Russian language in XAMPP no, so we choose English. Don't be alarmed by the lack of Russian translation; after a little server setup, you'll never have to come here again. After clicking on " English"The following initial welcome page will open:

It's simple - enter the password 2 times and press the button "Password changing". If your computer is connected to a local network, then you must also set a password for the directory XAMPP:
If you do not access the Internet through a public local network, then this setting can be neglected.
Actually, this is all about setting up the server itself XAMPP completed. Now let's start installing it WordPress. First we need to create a database MySQL, to do this, open the server control panel and click on the " Admin" against " MySQL":

Your browser will open the login page. phpMyAdmin:

As user enter " root", and as the password is the password you set to access MySQL. Entered - go to phpMyAdmin. Click on the button " Database" and create a new database called " wordpress" (required in encoding utf8_general_ci):

After pressing the " Create" a message will appear:

Now let's proceed directly to installing the engine WordPress. First of all, you need to download it. Go to the official website http://ru.wordpress.org and download the latest version of the engine there. Now go to the folder " C:\server\htdocs" and create a folder there with a name that will open your local blog. For example, create a folder there " blog" and copy the unpacked distribution files there.
That is, the engine files should be located along the path " c:\server\htdocs\blog".Not a folder" wordpress" should be on this path, and the engine files themselves. Be careful here:

Now open the file " wp-config-sample.php" in any text editor that supports saving text in encoding UTF-8 without BOM, such as Notepad++ () and edit it something like this:
| 1 2 3 4 5 6 7 8 9 10 11 12 13 14 15 16 17 18 19 20 21 22 23 24 25 26 27 28 29 30 31 32 33 34 35 36 37 38 39 40 41 | /** Database name for WordPress */ define ("DB_NAME" , "wordpress" ) ; /** MySQL username */ define ("DB_USER" , "root" ) ; /** Password for the MySQL database */ define ("DB_PASSWORD" , "123456789" ) ; /** MySQL server name */ define ("DB_HOST" , "localhost" ) ; /** Database encoding for creating tables. */ define ("DB_CHARSET" , "utf8" ) ; /** Matching scheme. Don't change if you're not sure. */ define ("DB_COLLATE" , "utf8_general_ci" ) ; /** Unique keys and salts for authentication. */ define("AUTH_KEY" , "%5hT>mnVWZ|chrP|Vx(Pt2DA9Yu_Iyntgii`") ; define("SECURE_AUTH_KEY" , "|;.%IZ-A_=qMtHCnrEA7Ka!F]s2~X:Y)XJ6d") ; define("LOGGED_IN_KEY" , "RL13)Io(/ToX-1/%`/]IDO(f,o*uqp`Q)`,G") ; define("NONCE_KEY" , "/85B~(l&&W.x:MeoNFB!2BQ$:hX4j|AHxA6o") ; define("AUTH_SALT" , "$V@EM>VGDoYB0:mJq%$Qh||A;V/w?T,BkT`") ; define("SECURE_AUTH_SALT" , "U>uPV|#D#o-FKwwKvHzAdiCh^F5S?o|v^;]u") ; define("LOGGED_IN_SALT" , "L142y.eKU/Ba>gjm5S0_%|2;I&Ou6&;AGu];") ; define("NONCE_SALT" , "OBve/86egiO_(=m#c9I!zSE5UgWZ-NsX5V)z") ; /** Prefix for tables in the WordPress database. */$table_prefix = "wp_" ; /** WordPress localization language, default English. */ define ("WPLANG" , "ru_RU" ) ; /** For developers: WordPress debug mode. */ define ("WP_DEBUG" , false ) ; /* That's all, no further editing. Good luck! */ /** Absolute path to the WordPress directory. */ if ( ! defined ( "ABSPATH" ) ) define ( "ABSPATH" , dirname (__FILE__ ) . "/" ) ; /** Initializes WordPress variables and includes files. */ require_once (ABSPATH . "wp-settings.php" ) ; ?> |
mnVWZ|chrP|Vx(Pt2DA9Yu_Iyntgii`"); define("SECURE_AUTH_KEY", "|;.%IZ-A_=qMtHCnrEA7Ka!F]s2~X:Y)XJ6d"); define("LOGGED_IN_KEY", "RL13)Io (/ToX-1/%`/]IDO(f,o*uqp`Q)`,G"); define("NONCE_KEY", "/85B~(l&&W.x:MeoNFB!2BQ$:hX4j|AHxA6o" ); define("AUTH_SALT", "$V@EM>VGDoYB0:mJq%$Qh||A;V/w?T,BkT`"); define("SECURE_AUTH_SALT", "U>uPV|#D#o -FKwwKvHzAdiCh^F5S?o|v^;]u"); define("LOGGED_IN_SALT", "L142y.eKU/Ba>gjm5S0_%|2;I&Ou6&;AGu];"); define("NONCE_SALT", "OBve/ 86egiO_(=m#c9I!zSE5UgWZ-NsX5V)z"); /** Prefix of tables in the WordPress database. */ $table_prefix = "wp_"; /** WordPress localization language, default English. */ define(" WPLANG", "ru_RU"); /** For developers: WordPress debugging mode. */ define("WP_DEBUG", false); /* That's all, no further editing. Good luck! */ /** Absolute path to the WordPress directory . */ if (!defined("ABSPATH")) define("ABSPATH", dirname(__FILE__) . "/"); /** Initializes WordPress variables and includes files. */ require_once(ABSPATH . "wp-settings. php"); ?>
Where do you specify the database name (mine is " wordpress"), username in MySQL(This " root") and password (the one you set, I have this 123456789 , but I hope that you did not use such a simple set of numbers as your password). Don't forget to set your own keys and salts for authentication. Save this file under the name wp-config.php. Mandatory encoding UTF-8 without BOM– remember that any engine files must be edited only in this encoding, otherwise your blog will simply stop opening.
Since I copied the distribution files WordPress to the folder " C:\server\htdocs\blog", then in order to continue the installation I must open the link in the browser http://localhost/blog/:
The installation page will open WordPress, nothing complicated:

Click on " Install WordPress" and after a few seconds we get:

Click on " To come in" and rejoice at the installed blog:

Server XAMPP installed, WordPress installed, you can start setting up your blog.
A few notes. The first is if you installed only those server components that I chose (that is, without Mercury Mail Server), then your server will not actually send mail. All outgoing emails will be saved in the format txt in folder mailoutput(that is, I have this folder " c:\server\mailoutput"). This is very convenient when you need to check the sending of emails by some plugin to different addresses - they are not actually sent, but you can still control the work.
Second, sometimes you need to configure XAMPP so as not to access your blogs through localhost. That is, not http://localhost/blog, A http://www.blog.ru– and even if no one except you can open such a URL, but you may need it. Let's say, if you are actively filling out a blog on a local server and do not want to manually change all localhost entries in the database after transferring the blog to the hoster (for example, all uploaded pictures on the local server will have an address through localhost). This is done through setting up virtual hosts and it is not too difficult to do.
First of all, create a separate folder somewhere. Let's say the folder " mysites" (the name doesn't matter). Let's say you created it in the root of the disk and now it has the path " C:\mysites\". In it, create a folder with the name of your domain, say " blog.ru"and there are also subfolders in it" www" And " logs". To folder " www" upload the engine files WordPress. Then you should have the following folder hierarchy:
Now you need to slightly adjust the server settings. You need to open the file httpd-vhosts.conf in folder " C:\server\apache\conf\extra" and add the following text at the very end:
| NameVirtualHost * :80< virtualhost * :80 > < virtualhost * :80 >CustomLog combined< directory "C:\mysites\blog.ru\www" >Require all granted |
NameVirtualHost *:80
Just remember to carefully adjust the paths to your own. A small nuance - this code will only work with those versions XAMPP, in which Apache versions 2.4 or higher. If in your version XAMPP Apache below version 2.4 , then for virtual hosts to work correctly you need to use the code:
| NameVirtualHost * :80< virtualhost * :80 >DocumentRoot "C:\server\htdocs" ServerName localhost < virtualhost * :80 >ServerAdmin webmaster@ blog.ru DocumentRoot "C:\mysites\blog.ru\www" ServerName blog.ru ServerAlias www.blog.ru ErrorLog "C:\mysites\blog.ru\logs\error.log" CustomLog "C:\mysites\blog.ru\logs\access.log" combined< directory "C:\mysites\blog.ru\www" >AllowOverride All Order allow,deny Allow from all |
NameVirtualHost *:80
Be careful here, otherwise you will spend half a day like me to understand where the error suddenly came from" AH01630: client denied by server configuration"and why virtual hosts are on the old version XAMPP work, but on the new server it constantly produces a configuration error.
After this setup you need to open the file hosts along the way" C:\Windows\System32\drivers\ets\hosts" and add the text there:
| 127. 0. 0. 1 blog. ru 127. 0. 0. 1 www. blog. ru |
127.0.0.1 blog.ru 127.0.0.1 www.blog.ru
Now restart Apache(button " Stop"and then again" Start" in the server control panel) and you can open your site via URL http://www.blog.ru. Nothing complicated, 5 minutes of work maximum.
The advantages of using virtual hosts are obvious - to transfer a blog to a hoster, you just need to copy the engine files and import a pre-made one via phpMySQL database dump. Well, perhaps you still have to change the passwords in the file wp-config.php for those that the hoster will give you. There are also disadvantages when using virtual hosts - after transferring the site to the hoster, you will no longer be able to simultaneously work with both the local version of the blog and the public one. To open the local version you will have to add the necessary lines to the file hosts, and to open a blog with the hoster you will have to delete these lines. Some have a shortcut to the file hosts placed directly on the desktop, since editing it becomes a fairly common task. Either way, virtual hosts are convenient.
At the beginning of the article I said that installing different versions XAMPP is the same. But in fact, in older versions of the server, the windows may look different, and some may be skipped altogether. But essentially, everything is the same. And it is configured in exactly the same way. If you have any problems, write about them in the comments - I will definitely help you.
And lastly, after installation and configuration WordPress Don't forget to install the required set of plugins for it. At a minimum, install a plugin for (Russian links are a bad idea!), a plugin for
What is a local server and why do we need it?
A local server is a set of programs that allow you to develop a website on your local computer without an Internet connection. It is similar to servers located at hosters. If you are creating a website using only html pages with CSS design, then you do not need any local server. But if the site is dynamic, i.e. created using Php, Perl, MySQL, scripts, etc., then you will need a local server to debug and test it.
Part 1: Installing XAMPP
I already wrote about what we will use as a local XAMPP server. Follow this link and select XAMPP for our platform. My operating system is Windows (yours probably does too), so click on XAMPP for Windows and we get to the page where we find the following block:

Select for download Installer. After the file is downloaded, run it. In general, the entire further installation process does not require any user intervention other than clicking the “Next” button, but still I will describe it in more detail. After we run the installer, the following window appears on our screen:

There is no Russian language in the installer, so we leave English and click “OK”.

Click “Next”.

Here we are asked to choose where we will install XAMPP; we leave it unchanged. Click “Next”.

Here we are asked to select the components to be installed. Leave it as is, click “Install”.

After a couple of minutes, the installation is complete. Click “Finish”. This window loads here, which is called the control panel, and the XAMPP icon appears on the desktop.

If the panel has not loaded, click on the icon to load it. Here we will start and stop the Apache and MySQL servers. To start the server, you must click on the “Start” button. Click and this is what you should get:

We will only run Apache and MySQL. As you can see from the screenshot, Apache uses 80 port. The same port is used by Skype by default, and if you have Skype loaded and port 80 is busy, then Apache will not load. Therefore, go to Skype: Tools->Settings->Advanced->Connection and uncheck “Use ports 80 and 443 as incoming alternatives”. Well, in conclusion, I would like to add that to stop the server we will press the “Stop” button. But for now we leave everything loaded. By the way, loading, stopping and rebooting XAMPP can also be done using special applications that are located in the C:\xampp\ folder. xampp_start.exe, xampp_stop.exe And xampp_restart.exe.
Setting up XAMPP
The installation should not have caused any difficulties. Let's move on to the settings. We start the Apache and MySQL servers and notice the button in the Apache line "Admin", click on it. The following window loads:

Unfortunately, the Russian language is not represented; we choose the English version as the most universal option. But you can choose another language you like. We get here:

This is the XAMPP web interface. Two points are important to us here. The first one is Security:

here are the security settings. If you follow the link http://localhost/security/xamppsecurity.php you can set a password for the MySQL database administrator and there you can set a password for the XAMPP directory to restrict access from the local network:

I won’t set passwords here for now, you can use your own discretion.
Create a MySQL database
The second important point for us is phpMyAdmin. We go and get to the following page:

This is why we fenced our entire garden. phpMyAdmin is a web application for administering MySQL, and MySQL is a database management system, and our future site is the very database that MySQL will manage. It seems that I have outlined everything clearly here, but you don’t need to delve into the details yet. We came here for only one reason - we don’t have a database yet, so let’s create one. Each database should have its own unique name, I have already come up with a name for our database, I suggest calling it site. Select the “Databases” tab, write site in the “New Database” window below, and select utf8_general_ci in the “Comparison” window - this is the encoding for our database. Click “Create”.
Create a MySQL database user
Now we need to assign a user to the newly created database. Let's go to "Privileges"

Click on "Add new user" and fill in the following fields:
Username- any word consisting of English letters
Host- Localhost
Password- any combination of English letters and numbers
For ease of remembering, many novice webmasters make both the password and username the same as the name of the database, in our case it would be site. This turns out to be a huge security hole. Therefore, when you create your own website, do not be lazy to come up with a different username, generate a password using the “Generate” button, print it and save it in a safe and secure place. Here is an example of such filling:

But since we have a training course, I will act like a real beginner webmaster, which, by the way, I am, and create a username and password site.
Assigning privileges to a MySQL database user
Now you need to assign privileges to the created user, in Global privileges Click “Mark all” and say “Ok”.
Part 2: Setting up virtual hosts
Editing the httpd-vhosts.conf file
What, not everything yet? - you ask, alas, no, we come to the most interesting part. In order for us to be able to view our website in a browser, we need to configure a virtual host. To do this, we will go to edit the file C:\xampp\apache\conf\extra\httpd-vhosts.conf. Open the file using Notepad++ or regular notepad. Now there is some information in this file, all lines of which begin with #. We do not touch it, but add the following code below:
NameVirtualHost 127.0.0.1
ServerName localhost
ServerAdmin admin@localhost
Here we specify the virtual host name and describe the local host. Now we need to add data to make our site work. Our site will be called the same as we called the database - site, but the names of the site and the database do not have to match. Of course, our site will have to be called something like www.site.ru, but we do not need to indicate the full name of the site, since this name will only be used on our local computer, and we do not need to write extra letters, so we will call it just site. Below the code we just added, add more code:
ServerName site
ServerAlias www.site
ServerAdmin [email protected]
DocumentRoot "C:/xampp/htdocs/site/www/"
ErrorLog "C:/xampp/htdocs/site/logs/error.log"
CustomLog "C:/xampp/htdocs/site/access.log" combined
AllowOverride All
Order allow,deny
Allow from all
ServerName site - The name of our site, which can be written without.ru
ServerAlias www.site - Alternative site name
ServerAdmin [email protected]
- Resource administrator email
DocumentRoot "C:/xampp/htdocs/site/www/" - Folder with site files
ErrorLog "C:/xampp/htdocs/site/logs/error.log" - Error log
CustomLog "C:/xampp/htdocs/site/access.log" combined - Visit log
When you want to create another site, all you need to do is copy and add the last code, replacing the site name with a new one.
Editing the hosts file
All that remains is to add our site to the domain name database of our Windows operating system. To do this, in Windows 7, go to the C:/Windows/ folder and find the file in it notepad.exe, select it and right-click, select “Run as administrator”, then File >> Open, select the folder C:/Windows/Sistem32/drivers/etc/ and enter the word in the “File name” field by hand hosts. If everything was done correctly, the hosts file will open. It will contain some information, also commented out with a #. Below we add the following structure:
127.0.0.1 site
If you create another site, say site2, do not forget to add to this file:
127.0.0.1 site2
Making a sendmail stub for XAMPP
In order to be able to view emails when testing the feedback form, you need to make a so-called mail stub. This is done as follows: open Notepad++, create a new document, select PHP syntax and UTF-8 encoding, then place the following code in this document:
//folder in which we will put mail
define("DIR","c:/xampp/tmp/sendmail/");
//get the body of the message from the stream
$stream = "";
$fp = fopen("php://stdin","r");
while($t=fread($fp,2048))
{
if($t===chr(0))
break;
$stream .= $t;
}
fclose($fp);
//Save to file
$fp = fopen(mkname(),"w");
fwrite($fp,iconv("UTF-8","CP1251",$stream));
fclose($fp);
//Function for naming a file
function mkname($i=0)
{
$fn = DIR.date("Y-m-d_H-i-s_").$i.".eml";
if (file_exists($fn))
return mkname(++$i);
else return $fn;
}
Save the file under the name sendmail.php to the folder C:\xampp\sendmail\. Then in the folder C:\xampp\tmp\ we create a folder sendmail.
In the php.ini file (C:\xampp\php) replace the line:
Sendmail_path = "C:\xampp\sendmail\sendmail.exe -t"
to the line:
Sendmail_path = C:\xampp\php\php.exe c:\xampp\sendmail\sendmail.php
Restart XAMPP. If you did everything correctly, all sent emails can be viewed in the C:\xampp\tmp\sendmail\ folder. But we don’t have feedback yet, so we’ll check it when we create it.
Creating a folder for our site
We have already done so much, came up with a name, even wrote down the paths to our site, but still haven’t even created a folder for it. The time has come to do this.
We will place all the sites that we will create in the folder C:/xampp/htdocs/. Theoretically, it is not necessary to use this particular folder, you can use any other, but for this you will need to change the paths in the httpd-vhosts.conf file. But we will not deviate from traditions. Let's create our folder site in folder htdocs. Now let’s create two more folders in the folder C:/xampp/htdocs/site/: www And logs. The www folder will contain all the files of our site, which we will then transfer to the hosting. The logs folder will contain two files - an error log and a visit log.
Well, that's all. This concludes our first lesson. I timed the time it took me to do everything described in this tutorial. It took me about 10 minutes. Let's add time to download the XAMPP distribution, well, let's say 5 minutes. In total, it turns out that we completed our first lesson in 15 minutes. I don’t take into account the time it takes to get acquainted with the material, since our slogan is “A website in one day!” does not mean learning this process in one day, but the time during which we will create a website. See you in the next lesson.
The popularity of the server is due to the quality of the product, a large number of tools, and good information support. In practice, the XAMPP build, for unknown reasons, is more popular among Western developers.
System requirements for installing XAMPP
There are no pitfalls to be expected from XAMPP. Everything here has been refined to the smallest detail. XAMPP can be installed on a local machine with operating systems: Windows 2008, Vista, Win 7, Win 8. There is even an option for XP SP3.
What's included in the XAMPP build?
The XAMPP acronym means that this assembly can be installed not only on Windows, but also on any other axis. This is indicated by the first letter [X]. The letters AMP stand for the classic Apache+MySQL+PHP, but the last letter [P] stands for the Perl programming language. This is why XAMPP is called a cross-platform local web server build.
XAMPP local server and Bitnami
The XAMPP developers went further than others and created the Bitnami cloud server. Bitnami for XAMPP makes it much easier to develop PHP applications on top of Apache. Using Bitnami you can easily install popular open source CMS: WordPress, Drupal and Joomla! and so on.
Where to download XAMPP
There is no need to search for a XAMPP local server on forums and other resources. There is an official website with a free download of the release. XAMPP official website: https://www.apachefriends.org/ru/index.html. Download .
Download XAMPP
On the official website we download the version for Windows 7. First you need to decide which version of PHP you need to work with. There are three PHP variants: 5.6.30, 7.0.15, 7.1.1. The lower version of php changes periodically. I choose: xampp-win32-5.6.30-0-VC11-installer.
For information: On the same page you can download XAMPP for Linux and OS X.

Installing XAMPP on Windows 7 step by step
As you can see from the name of the release, XAMPP is downloaded with an installer, which greatly simplifies its installation.
For peace of mind, we check the downloaded file with an antivirus. After checking, run the installation as administrator.
Step 1.

Step 2.

Step 3.

Step 4.
We skip Bitnamy, so we open the check side.

Step 5.

Step 6.

The installation process is quite long, please be patient.
Step 7. Finish

Launch XAMPP
We work on Windows 7.
XAMPP is installed, it's time to launch. XMAPP is launched with the “XMAPP Control Panel” shortcut.
 XAMPP open panel
 When you open the program, XAMPP checks the computer system. If the system meets the XAMPP requirements to run modules, there will be no errors. Errors will be visible in the information window and highlighted in red.

Here is an example of a screenshot with errors. In the example, I see that port 80 is busy and Apache cannot start.
XMAPP, port 80 busy: how to release port 80
The inability to start the Apache module due to port 80 being busy is one of the common Windows errors. If you see information like this, it means you won't be able to start Apache. Your task is to release this port or run XAMPP on another port.
Windows port 80 release example
When I was preparing this article and reinstalling XAMP, I received an error that port 80 was busy. When I try to open the address in the browser: http://localhost I see this picture.

To do this, go to the Control Panel tab>>>All small icons>>>Programs and Features>>>Turn Windows components on and off and disable IIS and reboot the computer. All port 80 is free.

This is just an example of several possible scenarios why port 80 is busy. You can even run XMAPP on another port, for example 8080. Link to corrections up in the text.
XAMPP Panel
Let's get acquainted with the XAMPP panel.
- Launch XAMPP as administrator;
- We look for the absence of errors;

The XAMPP panel contains all the access to work with platform modules and all the necessary Windows tools.
- Buttons on the right: XAMPP settings and Windows tools
- We see the columns: Start, Admin and Config.
- Start, also known as Stop, start and stop modules. Mercury is a mail server.
- Admin. These are access buttons to the administrative panels of the modules.
- Config. Great buttons. On the Config buttons you will find access to all configuration files of system modules.
XAMPP Settings
- Netstat- An excellent button that will show all the ports that are currently used by the system. This button will help you, “without dancing with tambourines,” see what is hanging on port 80.
- Shell- command line.
- Explorer- will simply open the XAMPP local server installation directory. Analogue Computer>>>Disk C.
- Service- a pop-up window with a list of all running services on the axis. Analogue: Control Panel>>>All elements small icons>>>Administration>>>Services.
- Help and Quit no comments.
- Buttons on the left: start/stop modules
- Buttons on the left: administration
Notice the admin button column. This is the entrance to the module administration panel. Let's check their work using phpmyadmin as an example.
XAMPP phpmyadmin panelWe see a standard phpmyadmin panel with which you can work without dancing with tambourines, such as in Denver.
Note: If XAMPP were in Russian, there would be no price for it.
How to run XAMPP
After correcting all errors, you can launch XAMPP. Launching XAMPP is the start of the modules necessary for operation: Apache, MySQL.

Checking XAMPP is working
To check the operation of XAMPP in the address bar of the browser we write http://localhost.
If everything was done correctly and everything works correctly, we see the server panel with control buttons.


Conclusion
In this article, I showed how to install XAMPP local server on Windows 7. I introduced you to the panel and configuration of XAMPP, launching the modules necessary for work and gave a link to fixing the error.