Winsetupfromusb does not see the xp image. Convert to MBR and PBR
The WinSetupFromUSB program and, in fact, how to install the “seven” using it? I want to hear answers on your site. The fact is that WinSetupFromUSB has been updated to the final version and now it can even create a bootable UEFI Windows flash drive 7, 8. In addition, WinSetupFromUSB has learned to create a multiboot flash drive containing two operating systems Windows 7 and Windows 8 at once, and nothing has been written about this yet!
Could you describe in detail:
1) How to create a bootable USB flash drive for Windows 7 in the WinSetupFromUSB program.
2) How to create a multiboot flash drive containing two operating systems: Windows 7 and Windows 8!
3) How to configure the UEFI BIOS for Windows installations 7 from flash drive to HDD GPT style as well as a simple MBR hard drive? After all, some users will want to install Windows 7 from a flash drive on a simple computer or laptop with a regular BIOS, and others on a computer with a UEFI BIOS and a hard drive with GPT partitioning.
How to create a bootable USB flash drive for Windows 7
Hello friends! There is already an article on our website using command line, as well as various programs: UNetBootin, UltraISO, Microsoft Windows 7 USB/DVD Download Tool. You can also create a bootable USB flash drive for Windows 7 using the utility (a separate article has been written).
But just recently the final version was released programs WinSetupFromUSB, with its help you can easily create a bootable UEFI flash drive for Windows 7 and Windows 8; the created flash drive can be used for installation either on a GPT style hard drive with a UEFI BIOS, or on a simple MBR hard drive. And what is also important, WinSetupFromUSB can create a multiboot flash drive containing both Windows 7 and Windows 8 operating systems for installation.
Note: Who doesn’t know what UEFI BIOS is and the format standard for placing partition tables on a hard drive? GPT disk, read our article, which is called . Don’t forget that if your computer, laptop or netbook has USB 2.0, as well as USB 3.0 ports and you decide to install Windows 7 on it with bootable flash drive, then you need to know that you need to connect the flash drive to a USB 2.0 port, since Windows 7 does not support USB 3.0 (ports are usually colored blue).
In the recent past, a beta version was posted on the official website of the WinSetupFromUSB program, which I didn’t quite like and used, but now the program has been updated and what the final version of the program can do cannot be compared with the beta version. Let's make sure of this and create a bootable USB flash drive for Windows 7 and Windows 8 with the WinSetupFromUSB program, and at the same time look at the UEFI BIOS settings.
How to create a bootable USB flash drive for Windows 7 using WinSetupFromUSBWe go to the official website of the WinSetupFromUSB program and select WinSetupFromUSB-1-3.exe (22 MB; 385673 downloads), the WinSetupFromUSB program is downloaded to our computer.

Extract the program files to a folder. If we are going to make a bootable USB flash drive for Windows 7 64 bit, then we run the file WinSetupFromUSB_1-3_x64.exe.

Attention: Friends, if you need Bootable UEFI USB flash drive with Windows 7, which means you will have to format the flash drive to the FAT32 file system, which means that the image of your Windows 7 should be less than 4 GB, since the FAT32 file system does not work with files larger than 4 GB. WITH just go to the very end of the article, there is detailed information for you there.
Most users do not need a UEFI flash drive, but rather a regular bootable flash drive with the Windows 7 operating system, which means the image of your Windows 7 may well be more than 4 GB, in which case the bootable Windows 7 flash drive we created will be in NTFS format!
In the main window of the WinSetupFromUSB program you can see the name of our connected flash drive.
Check the box Auto format it with FBinst and check the NTFS box
Check the box Vista/7/8/Server 2008/2012 based ISO and click on the button on the right that opens the explorer window,

If your flash drive is formatted in the FAT32 file system, then this warning will appear, click OK.

Explorer opens, find ISO Windows image 7 64 bits, select it with the left mouse and click “Open”.

Press GO

A warning will open, click Yes.

Here we also click Yes.

The process of creating our bootable USB flash drive begins, which ends successfully.

Click OK.

A bootable Windows 7 USB flash drive has been created!
Now the most important thing is friends. How to actually install Windows 7 from this flash drive.
If you are installing Windows 7 on a laptop or computer with a UEFI BIOS and you want to convert your hard drive to the GPT partition table format standard, then you need to configure the UEFI BIOS itself accordingly; how to do this, read our article.
If you are installing Windows 7 on a laptop or computer with simple BIOS, you simply boot your device from the Windows 7 bootable USB flash drive we just created. Perhaps at this stage some of the users will find our article useful
If you have correctly set the priority in the BIOS to boot your computer from a flash drive or simply selected your flash drive in the laptop boot menu,
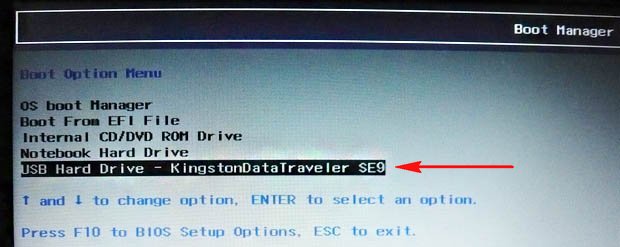
Then the first window will be the menu; in our case, you don’t need to select anything in it and it will disappear within a few seconds.

Next, the GRUB4DOS bootloader window appears, which the WinSetupFromUSB program uses as a bootloader. Select the first option using the arrows on the keyboard 0 Windows NT6 (Vista/7 and above) Setup,

what does installing operating systems mean? Windows Vista, Windows 7 and higher. Press Enter. In the next window, select Windows 7 SP 1 x64

and the process of installing the operating system begins from our bootable Windows 7 USB flash drive.
Further.
Here you can download WinSetupFromUSB and updates of the tools included.
Please do not hotlink files, use this page if you want to post a link to the program. If you need to link to a specific version, you could use version number like this:
http://www.site/downloads/#1-8
Note: A few antivirus programs keep detecting a couple of the included files as viruses. This is false positive. These vendors were informed numerous times and the serious companies such as DrWeb and Kaspersky, update their signatures to remove the false detection within a few hours after being informed. Others, such as McAfee, despite all the efforts and contacts, don’t do anything to update their signatures. For a few unknown ones, which use third party signatures, there is no way to contact them or they simply don’t respond. This program will never knowingly distribute any kind of malware.
(24 MB; 2170976 downloads)
Changes from version 1.7
- fixed issue with Windows 10 and recovery option not shown
- fixed issue with persistence file size not set correctly and tooltip for using persistence
- updated some of the tools to their latest version- BootIce, ImDisk, WimLib
1) Windows 10 – single should work. Dual are NOT supported not
(24 MB; 1387969 downloads)
Changes from version 1.6
- disabled superfloppy check due to issues with latest Windows 10 builds
- increased input timeouts to 45 seconds
- fixed issue with Swedish locale and bcdedit
- added check if imdisk is an old version
1) Windows 10 – single ISOs created by Microsoft Media Creation Tool or downloaded from Microsoft should work. Dual ISOs made by the same tool (x32 and x64 in a single ISO) are NOT supported yet due to the changed structure. Such source can still be added using the previous versions which dump entire contents as they are, 1.0 beta8 for example. Limitations- such source needs to be added first, and any other sources of the same type,but not the same x32+x64, has to be added using 1.6 beta 2 or later.
(24 MB; 1085288 downloads)
Changes from 1.6 beta2
- updated imdisk package for compatibility with latest Windows 10 versions
- Added Windows 10 in all GUI elements
1) Windows 10 – single ISOs created by Microsoft Media Creation Tool or downloaded from Microsoft should work. Dual ISOs made by the same tool (x32 and x64 in a single ISO) are NOT supported yet due to the changed structure. Such source can still be added using the previous versions which dump entire contents as they are, 1.0 beta8 for example. Limitations- such source needs to be added first, and any other sources of the same type,but not the same x32+x64, has to be added using 1.6 beta 2 or later.
2) If program is run on latest Windows 10 builds, seconds source can no longer be added due to incorrectly detected superfloppy format of the USB disk. This is due to changed by Microsoft WMI call results or structure. Fix is being worked on and will be released as soon as it’s ready.
(24 MB; 395407 downloads)
Changes from 1.6 beta1
- Fixed missing EFI boot menu for Windows 10 sources
Note: Windows 10 – single ISOs created by Microsoft Media Creation Tool or downloaded from Microsoft should work. Dual ISOs made by the same tool (x32 and x64 in a single ISO) are NOT supported yet due to the changed structure. Such source can still be added using the previous versions which dump entire contents as they are, 1.0 beta8 for example. Limitations- such source needs to be added first, and any other sources of the same type,but not the same x32+x64, has to be added using 1.6 beta 2 or later.
(24 MB; 214399 downloads)
(23 MB; 58852 downloads)
Changes from 1.5
- Added support for Windows Vista/7/8 and above sources larger than 4 GB and FAT32 for EFI compatibility- credits. In other words, now is possible to use FAT32 formatted USB drive and add larger than 4 GB source, say Windows 10, to be able to boot in EFI mode. As this is new feature not yet fully tested, the first version is released as a beta. Any feedback is appreciated.
(22 MB; 1916875 downloads)
(22 MB; 541846 downloads)
Changes from 1.3
- added better handling of illegal characters for Linux/Other ISO source file name
- added advanced option for adding persistence partition for Linux sources. Each source has its own persistence space associated with it
- added better handling for Kon-Boot , source is to be added as ISO file using the Linux/Other ISO option
- added advanced option to add custom folder with boot critical drivers for NT6 sources (Vista and later). These drivers are added in boot.wim and loaded with DrvLoad before start of Setup, scratch space is increased accordingly. Only drivers for present devices will be loaded. Use it to add USB, SATA/SCSI or Chipset/USB drivers for example. Loaded drivers will be staged and available to the OS being installed. For non boot-critical drivers (Lan, WLan, Video etc.), have a look
- added internal check for NT6 sources with multiple boot.wim, only default osloader entry in BCD store and the corresponding boot.wim will be added
- fixed errors when USB disk was initially prepared with the auto-format option, and on next run of the program it may complain about missing MBR and partition table
(22 MB; 295000 downloads)
(22 MB; 69119 downloads)
Changes from 1.1
- Fixed bug where program running on Windows localized in other than English language would not add NT6 source
- Improved handling when program is placed and run from directories which contain special characters- ` #$%^&()-+=,; Single quote – ‘ is not supported in program directory path and there is a check for that
- Added an advanced option for NT6 (Vista and later) sources to add Q-Dir File Explorer , which starts before Setup. This is useful to quickly browse disk contents and backup and restore files before launching Setup, rather than booting first in another OS to perform the same task. When Q-Dir is closed, Setup starts.
- BootIce updated to version 1.3.2.1
(22 MB; 198950 downloads)
(22 MB; 39387 downloads)
Changes from 1.0
- (U)EFI support for Windows Vista x64 SP1 and later 64 bits Windows. USB disk must be formatted in FAT32 as per EFI specifications to boot under EFI. To prepare USB disk running the program under Windows XP or 2003, which do not include bcdedit.exe, an active internet connection must be present in order to download it
- default auto-format file system has been changed to FAT32 for EFI compatibility
- Firadisk driver is now added to each XP 32 bits source, but disabled by default. A new option in DPMS and custom F6 floppy menus activates it. This should help loading SATA/AHCI/RAID drivers from virtual floppy on problematic machines
- NT6 sources boot menus are now handled by BOOTMGR
- fixed recognition of Windows 8.1 sources which contain INSTALL.ESD instead of INSTALL.WIM
- added check in boot menu for Linux sources to warn if PLoP is loaded. Linux sources would not work with PLoP loaded as it supports only read mode
- removed the ZIP archive as it seems some users tend to launch the program directly from the Windows zip folder view, rather than extracting all files and folders. A self extracting SFX archive is added instead
- updated wimlib to 1.5.3 which would also fix with the first 1.0 versions (downloaded before 14.Nov.2013) and NT6 sources
- various small bug fixes
(37 MB; 710826 downloads)
(22 MB; 65542 downloads)
Windows Vista and above Setup/PE may not start, command prompt may appear saying:
“A winpesh.ini file is present, but no commands were successfully launched. This could be caused by incorrect formatting or an invalid executable name.”
or simply restarts. Please refer to for details and fix, or re-download the program if you downloaded it before 14.Nov.2013.
Changes from 1.0 RC4
- custom boot menu name when Linux/Other ISO is added
- when XP/2003/2000 source is added and incorrectly the i386 folder is pointed as source directory, program uses its parent directory
- other small fixes and improvements
Previous versions
(37 MB; 48788 downloads)
(22 MB; 41530 downloads)
Changes from 1.0 beta8
- Ability to add multiple Windows Vista, 7, 8, Server 2008/2012 sources from ISO file. Use the same option to add PE2 (Vista/Server 2008) and above based utility. Thanks to synchronicity for his amazing
Everyone knows that it is possible to reinstall the operating system or replace it with another distribution. But many don't know how to do this. And this is done through a bootable USB flash drive. The article will talk about the WinSetupFromUSB program: how to use it and what functions it has. It is this program that will help us create that same bootable USB flash drive, which we subsequently need to use to install a new operating system.
Where to download the program
Before we talk about WinSetupFromUSB and how to use it, it’s worth talking about where to download this program. Indeed, despite all the awareness about the correct downloading of applications from the Internet, the user often allows gross mistakes. Now let’s figure out exactly how and where to download the program.
By entering a search request for this program into the search engine, you will be given a bunch of links to choose from where you can download it to your computer, but this does not mean that you need to do this from the first resource you come across. Firstly, most likely, on such a site you will be confused which Download button to press. Before you download WinSetupFromUSB, you can download a bunch unnecessary programs. Secondly, the program itself may contain some kind of malware, and a bunch of useless ones will be installed along with it.

To prevent this from happening, it is recommended to download from the official website of the developers - www.winsetupfromusb.com/download. At the moment, the latest version is WinSetupFromUSB 1.6, dated November 28, 2015. This is exactly what we will consider.
Installation and launch
While talking about WinSetupFromUSB (how to use the program), you also need to tell us how to install it. The fact is that this process is slightly different from the more usual one using the installer. Now let's take a closer look.
By downloading the file from the official website, an archive containing program files will be downloaded to your computer. Once you launch it, a window will appear in which you can select a folder for unpacking, start the process, or cancel all actions. Everything is simple here. In the Extract to line, specify the path to download the files. In order not to enter it manually, you can use the "..." button, which is located to the right.
Once you have selected a folder, you can safely click on the Extract button. After this, the unpacking process will begin. It won't last long. After that, by going to the folder you specified, you should find a new one named WinSetupFromUSB-1-6. Enter it. The WinSetupFromUSB program is launched by opening one of the files attached to this folder. If you have a 64-bit system, then run the one with this number after the name; if you have a 32-bit, then without the marking.
Creating a bootable USB flash drive
We have already explained where to download the program from and how to install it. Continuing the conversation about WinSetupFromUSB, instructions for creating a bootable USB flash drive will be provided right now.
To get started, you will need to have only two things with you - the flash card itself and an image of the downloaded operating system from the Internet. Make sure the extension is ISO. If you have this, then we can get started.

- First of all, insert the flash card into the computer. In the program window, select its name. If the flash drive is not found, try updating the information by clicking the Refresh button.
- Now we need to determine operating system, which will be recorded on this flash drive. To do this, check the box next to the appropriate version of the distribution and, by clicking the "..." button, specify the path to the downloaded ISO image.
- All that remains is to press the GO button to start recording the WinSetupFromUSB bootable flash drive.
We figured out how to burn a flash drive, now let’s move on to the special function that this program provides.
Creating a multiboot flash drive
We continue to talk about WinSetupFromUSB. You already know how to use this program, but I would like to tell you about some of its features and functions. We'll start by creating a multiboot flash drive. Let's describe the process itself and tell you what it is.
As you may have already noticed, in the Add to USB disk column, there are several checkboxes that can be checked; accordingly, it is possible to select several operating system images at once. This function is quite functional and involves creating a multiboot flash drive. After recording it, when installing the OS, you will be given a choice of which OS you will work with in the future.
Working with various distributions
I would also like to talk about the choice of items in this menu. There are five options. Now let's talk about each one separately.
- Windows 2000/XP/2003 Setup. In WinSetupFromUSB Windows can be written starting from version 2000. To do this, you need to specify the folder in which the Windows distribution itself is located. But since most often you can only find an ISO image of the system on the Internet, you can use some tricks. Using the Daemon Tools program, mount the image and specify its letter. Or use an archiver to extract all files from the ISO image.
- Windows Vista/7/8/10/Server 2008/2012 based ISO. Everything is simple here. This item must be selected if you want to record one of the listed versions of Windows. To do this, you need to specify the path to the downloaded ISO image of one of the distributions.
- UBCD4Win/WinBuilder/Windows FLPC/Bart PE. This item is intended for boot disks based on WinPE. In this case, you will need to specify the path to the folder where the folder called I386 is located.
- LinuxISO/Other Grub4dos compatible ISO. This item is needed if you want to install Linux distributions. In addition, by selecting it, you can record a number of programs by type Kaspersky Rescue Disk, RBCD, Hiren's Boot. To start recording, you need to specify the path to the ISO file.
- SysLinux bootsector/Linux distribution using SysLinux/IsoLinux. Also necessary for recording Linux distributions, but for those that are installed using the syslinux bootloader. To start recording, you need to specify the path to the folder, which contains a folder called SYSLINUX.
Having dealt with all the components of this category, you can safely select distributions and start recording them on a flash drive.
Additional options
You might also notice three options just below: Advanced options, Test in QEMU and Show Log. Let's also talk about them in a little more detail.

- Advanced options. The most extensive option. Its essence is to make some adjustments to the process of writing to a flash drive. By checking the box next to it, a window will appear in which you can mark a number of adjustments to be made. So, Custom menu names for Vista/7/8/Server Source will make sure that all OS menu item names are standard. And Prepare Windows 2000/XP/2003 to be installed on USB to properly prepare the selected distributions for recording.
- Test in QEMU. Everything is simple here. By checking this box, after finishing recording the flash drive, the program will check it for errors.
- Show Log. It's even easier here. A window will appear summarizing all your actions within the program after opening it.
As you can see, these three options can be very useful, so don't hesitate to use them.
The process of formatting a flash drive into a USB Flash Drive
Now let's talk about how to format a flash drive in the WinSetupFromUSB program. Instructions included.

- In the program window, in the USB disk selection and format tools column, click on the FBinst Tool button.
- In the window that appears, click on the Boot tab in the top panel. Select Format option from the menu.
- Now, in the window that appears, check the boxes next to zip and force. Then click the Format button.
- As you can see, a file called PartitionTable.pt will appear. You need to enter the program folder in Explorer and go to the files folder. Find the grub4dos file there. Use the mouse to drag it into the program window where PartitionTable.pt is located.
- Now on the top panel, click Fbinst Menu. You should see three lines: 1st - "default 0", 2nd - "timeout 0" and 3rd - "menu F1 grldr "grldr"". If this is not the case, then enter them manually.
- Press Ctrl+S to save changes.
That's all, you now know how to format a USB flash drive Flash Drive using the WinSetupFromUSB program.
Format conversion process
Now we will figure out how to convert the flash drive format to MBR. This operation should be done if the flash drive is very old. The fact is that in this case its format will be GPT, which will cause conflicts when installing the OS.

So, to carry out the conversion, you will need to click on the Bootice button, which is located next to the FBinst Tool. After clicking, a window will open. In it you need to go to the Physical Disk tab. On it you should see a number of buttons, among which should be Process MBR. By the way, if your flash drive already has this format, it will not be highlighted. As you might guess, to convert your flash drive to MBR, you will need to press this very button.
In the window that appears, select which MBR type you want and click the Current MBR Type button. That's it, your flash drive has now been transformed.
RMPrepUSB program
You may have found the RMPrep USB button next to the previous two buttons. If you are wondering why it is needed, then you will find out below in the text. But the list of its functions is so large that it will take an inordinate amount of time to explain each of them, so we won’t go into detail.

By clicking on the button, a window will open in front of you. Please note that of the entire program, only this is in Russian. If this is not the case, you can change it in the upper right corner.
This program provides the following tools:
- recovering deleted data from a flash drive;
- changing or creating a new file system (you can select all known file systems that currently exist);
- unzipping files directly to a flash drive;
- creating ISO images;
- testing;
- cleaning the flash card;
- copying system files.
And this is not the entire list of this utility, so if you are an experienced user, be sure to check it out.
Where can I get the Russian version?
We have looked at almost all the functions of the program, now let's step aside a little and talk about the Russification of WinSetupFromUSB. There is no Russian version. It’s worth pointing this out right away, because that’s how it is. Of course, you can find pages on the Internet where they will claim the opposite, but, most likely, this is a canard, and by downloading such a program, you will introduce a virus to your computer. Moreover, at the very beginning of the article it was said that the program must be downloaded from the official website of the developer, but as you can see, this site is on English language, and you can’t switch it to Russian. Accordingly, all versions of the programs will also be in English.
When entering in a search engine: WinSetupFromUSB RUS, do not believe sites that offer you to download a program in Russian or use a Russian language. In general there is no need. After all, this article described all the processes of this program. Simply following them, you can burn a bootable USB flash drive. And over time, you will hone your skills to such an extent that you won’t even need instructions.
Free program WinSetupFromUSB designed to create a bootable USB flash drive. After you have recorded an image of the Windows Vista/XP/7/8.1/10 operating system using the programWinSetupFromUSB to a flash drive, you can later use it to install the operating system on your computer.
Program WinSetupFromUSB works on all versions of the Windows operating system. This program has an English interface, but understanding it will not be difficult. DownloadWinSetupFromUSB can be found on the developer's website. this link. Installation of the program is not required, unpack the archive and launch the program.
Good afternoon, dear visitors of my blog, in today’s article we will look at another way to create a bootable flash drive using the WinSetupFromUSB program. I have already written several articles on the blog on the topic of creating bootable flash drives, you can read it or.
Creating a bootable USB flash drive using WinSetupFromUSB:
Insert the flash drive into the USB port of your computer or laptop, and then launch the program. In the main program window, select the flash drive on which the Windows operating system image will be written, then check the “AutoFormat it with Finest” checkbox, the flash drive will automatically be formatted and will be ready to record the operating system image. Then select the file system in which you want to format the USB drive.
Now you need to specify the path to the Windows operating system image. For example, I create a bootable USB flash drive for Windows 10, to the left of the “Windows Vista/7/8/10/Server 2000/2012 based ISO” checkbox, then select the operating system image by clicking the button with the ellipsis to the right of the field. Click “GO”.

In the next window, click on the “Yes” button, then click “Yes” again, the flash drive will be automatically formatted, after which you need to click on the “Ok” button. The process of creating a bootable USB flash drive has started.

After the process is completed, click on the “Exit” button. The creation of a bootable USB flash drive is completed. Using the free WinSetupFromUSB program, you can create a bootable USB flash drive of any operating system for further installation on your computer.
Sincerely,
M multiboot flash drive, equipped with a distribution kit of several operating systems, antivirus Live-disk, necessary programs that work autonomously from bootable media - this is a universal tool for solving various problems and computer tasks that ordinary users have to deal with every now and then. What can we say about IT-specialists, most of whose professional life is restoring the functionality of computer equipment.
Flash drive, which brings together various self-booting software solutions, will replace a bunch of different optical boot disks. A single multiboot flash drive can be used to neutralize viruses that block the computer from starting, and to reinstall the operating system, and to restore it from a backup, and to allocate space on the hard drive, and to solve other problems. Ready-made images are available for download on the Internet Live-disks with a selection of various software for solving computer problems. But, naturally, it is better to prepare a universal rescue tool yourself, selecting the contents of the bootable flash drive to suit your individual needs and preferences.
The program can create flash drives with various bootable software WinSetupFromUSB for Windows. It can complete a selection of bootable media based on the bootloader Grub4dos . This is what we will use to create a multiboot flash drive. And, accordingly, we will consider this entire process in detail below.
1. Contents of a multiboot flash drive
The first step is to prepare a distribution kit for a multiboot flash drive. In our case, we have a flash drive with a small volume by modern standards - just 8 GB. Therefore, it will be equipped only with the necessary tools. And this is the distribution Windows versions 8.1 , 10 and old XP , antivirus Live-disk from Avira, disk space allocation manager and free backup. Prepare for recording to a flash drive ISO-images of bootable media of the selected software and installation disks of operating systems.
2. Download WinSetupFromUSB
WinSetupFromUSB – free program. On the official website you need to download its latest version. At the time of writing this article, the current version is 1.6 . WinSetupFromUSB works portablely, without installation into the system. All you need to do is unpack the downloaded archive and launch the program shortcut in accordance with the bitness of the current Windows.
Download the WinSetupFromUSB program from the official website:
http://www.winsetupfromusb.com/downloads/
3. Formatting a flash drive
Next stage - formatting a flash drive. This process can be done as regular means Windows (team "Format" in the context menu called up on the flash drive in Explorer) , and inside WinSetupFromUSB. Let's consider the last option.
In the program window at the top, select the desired flash drive if there are several of them connected to the computer. Activate the option checkbox "Auto format it with FBinst". After which its additional options will open. Of these, it is only necessary to decide on the future file system flash drives - NTFS or FAT32. If the distribution kit prepared for writing to a flash drive contains files whose weight exceeds 4 GB, you need to select a file system NTFS. If not, leave it FAT32 default.
The FAT32 file system must also be left if the multiboot flash drive is also intended to work with computers based on BIOS UEFI. In this case, you will not need to disable the function Secure Boot, and the distribution contained on the flash drive 64 -bit Windows 8.1 And 10 will be installed on GPT-disk partition.
WinSetupFromUSB prepares a universal bootable USB flash drive - and for computers with a regular BIOS, and for devices based on BIOS UEFI. But the interface UEFI sees only bootable flash drives formatted in FAT32. Some programs can bypass such restrictions and create bootable UEFI-flash drives with file system NTFS, but WinSetupFromUSB, alas, is not one of them.
So, decide on the file system and click the button below "Go".
In the warning window about erasing data on the flash drive, click "Yes".

And we press again "Yes" in another warning window.

In a few seconds we will see the inscription "Job done"- Job is done. Click "OK".

Now you can start adding the contents of the multiboot flash drive. The order in which you add images of installation disks of operating systems and bootable media for programs is not important. It is only important to adhere to the corresponding column in the central part of the window WinSetupFromUSB.
4. Adding a Windows distribution
Adding a Windows distribution kit is possible in two forms of the program window. One of the forms is designed to add images of Windows installation disks, starting with version Vista , the other is for installation files Windows XP and older versions of the system. In our case, we first add an image to the corresponding form Windows 8.1. We put a tick on this form and use the browse button to indicate the path to ISO-image. The set of a multiboot flash drive is formed in stages: each distribution is added and written in a separate order. Press the button "Go".

We wait for the process to complete and click "OK".

Now we activate the same form with a checkmark and use the browse button to add another Windows distribution. In our case, this is the installation disk Windows 10. For the same version of Windows, you can add its different editions one by one - 32 - And 64 -bit. Add, click "Go", wait for the process to complete.

5. Nuances with Windows XP
Presence of an installation disk on the flash drive Windows XP It may be necessary in rare cases to reinstall the operating system on very old PC builds. But the process of creating a bootable USB flash drive with this version of the system using WinSetupFromUSB there are some nuances. In the program interface, the top form is intended for adding a distribution kit of Windows XP and earlier versions of the system.

This form's review button does not add the usual ISO-distribution image. Before contents ISO-the image must be opened in virtual disk drive. In systems Windows 8.1 And 10 this is done using standard means - on ISO-file, the context menu is called and the command is selected.

IN Windows 7 and more earlier versions mounting systems ISO-images are possible through third-party programs such as Alcohol 120% or Daemon Tools. Contents of the connected ISO-the image is transferred to a separately created folder.

And this folder is already added to the program window during the process of creating a bootable flash drive WinSetupFromUSB.

The next step is to accept the license agreement.

And only then start recording.

Another nuance is the need to integrate drivers for SATA-controller in the distribution kit Windows XP, if it does not initially contain them.
6. Adding bootable media for programs
ISO- operating system distribution images Linux , Live -disks based Linux And WinPE, bootable media various programs using the browse button are added to the active form "Linux ISO/Other Grub4dos compatible ISO". After adding ISO-a small window will appear in the image "Boot menu name", in which you can specify a name like bootable media will be displayed in the bootloader menu Grub4dos. In our case, we indicate the path to the antivirus image Live-Avira disk. Press the button "Go" and wait for the recording to complete.


And then the image.

7. Testing the flash drive
One of the advantages of the program WinSetupFromUSB is built-in BY for emulation hardware computer - QEMU. By using QEMU You can immediately, without leaving your current operating system, test a flash drive - either a regular bootable one or a multiboot one. At the bottom of the WinSetupFromUSB window, check the options box and click "Go".

A QEMU window will open, in which everything the same will happen as on the monitor screen after booting from the flash drive. The first thing we will see is the bootloader menu Grub4dos. Using the navigation keys or numbers according to the software serial numbers in the list, we can select one or another bootable media, Live-disk or operating system installation process.

The Windows installation disks will be combined into two partitions. One will contain distributions Windows XP and older versions of the system, in the other – versions of Windows starting from Vista. Each section leads to a window additional menu download the corresponding versions and editions of Windows.
