Windows 10 won't boot after Anniversary Update. Video: returning to factory settings
Hi all! If the computer is working properly today, this does not mean that the next time you turn it on or restart it everything will be fine. Users often encounter a situation where, when they turn on a computer or laptop running Windows 10, it does not load.
A blue screen appears on the monitor with messages in English, and after several attempts, everything ends in failure. If Windows 10 does not start, it means the OS has crashed. In today's episode, we will look at the causes of such failures and how to eliminate them. So let's go...
Problems starting the OS - what is the reason?
Startup failure can be software or hardware. A software failure is a malfunction that occurs due to an error in the system itself. A hardware problem occurs when the computer’s hardware fails. Often, users encounter software errors that they can fix themselves. If the cause is a hardware error, then you need to contact a service center for help.
Why won't Windows 10 start?
The main causes of startup problems are as follows:
A virus or file from unverified sources entered the system. Files from unverified sources are no less dangerous than viruses, since they can contain various applications that will damage the computer not only in software, but also in hardware.
A system update, after which the user began to detect various system failures and errors. After the update, the computer may not boot, which could be caused by incompatibility of the new files that were downloaded to the PC when the system was updated.
At incorrect removal programs and applications from your computer.
If the computer hardware is severely clogged, as well as mechanical impact on him. Most often, the hardware cause of the OS loading problem is the failure of the hard drive.
Incorrect shutdown of the computer. This can happen if this shutdown is repeated very often.
Installing new programs on your computer that were downloaded from unknown sources.
There are a lot of reasons for problems with starting Windows 10, and most of them are almost impossible to identify. To get your computer back up and running, you need to approach the problem from the right angle.
Recovery methods if Windows 10 does not start
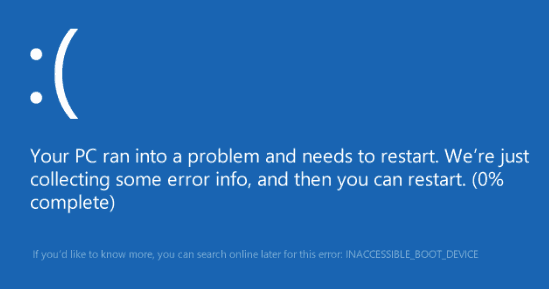
Be that as it may, there are two ways to get your computer back up and running - restoring the system or reinstalling it. The last method is used only when recovery attempts have not made it possible to restore the computer's functionality. Usually, the “ten” tries to recover on its own, so wait until a window appears with the appropriate notification about successful or unsuccessful recovery. If the recovery process was successful, a corresponding message will be displayed on the screen, after which the computer will boot. If unsuccessful, a window with text will appear on the screen, as in the screenshot below.

We choose the first method, and to implement it you will need to initially get into the recovery environment. To do this, after the notification window appears, select “Advanced options”.

After this, we proceed according to the scheme:
Select the “System Restore” item, as in the screenshot above.
In the window that opens with a notification about the possibility of fixing the problem, you need to click on the “Next” button.

Now, from the proposed options, you need to select a rollback point. Here you need to strain your brain and remember what could have caused the failure. If you remember that you installed a program or updated the system, and after rebooting the computer stopped booting, then feel free to select the nearest rollback point. After selecting the rollback option, you need to click on the “Next” button, and then “Finish”.

After restarting the computer, the OS will be loaded to the specified location. In 60% of cases, it is possible to restore the system through a rollback. If a “black screen” appears after a reboot, then this case is more complicated, and you can try to recover using a bootable USB flash drive.
This is interesting! To use a bootable USB flash drive, you need to portable media a 32 or 64 Bit OS distribution was pre-recorded. This distribution is called MSDart. You can download it from the Internet, buy it on the official website, or use it if you have a licensed OS.
If this distribution does not exist, then it will help solve the problem reinstalling Windows 10.
Bootable USB flash drive for system recovery
Let's look at the process of restoring a system via a flash drive. To do this, the device is inserted into the computer, after which it is rebooted. During the reboot process, you need to press the F8 or F2 button, which depends on the computer. If everything is done correctly, a blue “BIOS” screen will appear on the screen.
Initially, you need to set priority for the USB drive that was inserted into the computer. You can see it by its name, as in the screenshot below.
As soon as the priority media is selected, click on the “Exit” button. The mouse does not work in Bios, so all manipulations must be performed only from the keyboard. To exit, press the ESC button.
After the computer restarts, a window will appear on the monitor in which the computer prompts you to select a language.

After selection desired language, click on the “Next” button. A window will open in which you need to select “Install”, and in the menu that opens you need to select “Troubleshooting”. In the “advanced options” menu, select the “System Restore” section.

In the next window, select the date and time of the restore point. If recovery checkpoints are not saved, then the menu item cannot be used. If the images are not saved by the user, which happens in 80% of cases, then it will be impossible to restore the system. If there is a backup copy, then we move on.
In the window that opens, you need to specify the storage path backup copy, and click on the “Next” button. Again, I repeat that in my previous articles I have already touched on the topic of recovery many times. Use the search and find the section of information you need.
Such actions will entail automatic replacement broken files to serviceable ones.
Additional system recovery methods
If the problem with starting Windows 10 is due to formatting, compression, or additional installation operating system, then you can try to restore it by selecting the “Startup Repair” command.

If a licensed version of the operating system is installed on your computer, then the “Return to previous build" Only this method has a drawback - all files that were created after the update will disappear from the computer.
You can resolve the problem using the command line, but this is the most the hard way. If the above manipulations caused difficulties, then it is not recommended to enter the command line section. Sometimes it's easier to reinstall the system than to try to understand the command line section. We will look at how to restore Windows 10 OS via the command line.

Command line for recovery
After this, in the window that opens, you need to enter the following command: BCDbootC:\Windows. The letter C denotes the address to the system disk on which the OS is installed.
So, in the end, I would like to add that in most cases such actions are enough to restore the system. If all attempts are unsuccessful, then it is recommended to reinstall Windows 10 yourself. This is much easier to do than trying to recover. If there is no C drive left important information, then you can safely reinstall the operating system right away, which will significantly save your time.
The performance and capabilities of a system are determined by its complexity. The more complex the structure, the more component mechanisms it contains, and this entails the appearance various problems. Each of the gears is potentially vulnerable, and if one fails, the system will not function normally and failures will begin. Windows 10 is a prime example of how the entire OS reacts to any minor problem.
For what reasons may Windows 10 not boot (black or blue screen and various errors)
The reasons why Windows 10 may not start or “catch” a critical (semi-critical) error are very varied. This can be caused by anything:
- unsuccessfully installed update;
- viruses;
- hardware errors including power surges;
- low-quality software;
- various kinds of failures during operation or shutdown and much more.
If you want your computer or laptop to work correctly for as long as possible, you need to blow off dust particles from it. And both literally and figuratively. This is especially true for the use of old system units with poor ventilation.
Software reasons
Software causes of Windows crashes are the leaders in number possible options. Errors can appear in every area of the system. Even a minor problem can lead to serious damage.
The most difficult thing is to get rid of the consequences of a computer infection with viruses. Never click on links from unfamiliar sources. This is especially true for emails.
Viruses can re-encrypt all user files on the media, and some can even cause hardware damage to the device. For example, infected system files can command the hard drive to operate at a speed higher than intended. This will result in damage to the hard drive or magnetic head.
Installing another operating system
Each Windows operating system has one or another advantage over others. Therefore, it is not surprising that some users do not neglect the possibility of using several operating systems on one computer. However, installing a second system may damage boot files first, which will lead to the impossibility of launching it.
Fortunately, there is a method that allows you to recreate the boot files of the old OS, provided that Windows itself was not damaged during installation, was not overwritten or replaced. Using the “Command Line” and the utility in it, you can return the necessary files to the loader service:
Video: How to change the boot order of operating systems in Windows 10
Experimenting with disk partitions
Loading problems can also result from various types of manipulations with hard drive partitions. This is especially true for the partition on which the operating system is installed.
You should not perform actions related to volume compression with the disk on which the operating system is installed, as this may lead to failures
Any actions related to shrinking a volume to save space or enlarge other partitions can cause the OS to experience malfunctions. The action of reducing the size is not welcome, if only because the system may need much more space than it currently occupies.
Windows uses the so-called paging file, a tool that allows you to increase the amount of RAM at the expense of some hard disk space. In addition, some system updates take up a lot of space. Compressing a volume can cause the volume to overflow, which can lead to problems when querying files. The consequence is problems during system startup.
If the volume is renamed (replaced letter), all paths to OS files will simply be lost. The bootloader files will literally turn into nothing. The situation with renaming can be corrected only if you have a second operating system (the instructions above are suitable for this). But if only one Windows is installed on the computer and it is not possible to install a second one, only flash drives with an already installed boot system can help with great difficulty.
Unqualified editing through the system registry
Some instructions on the Internet suggest solving some problems by editing the registry. In their justification, it is worth saying that such a solution can really help in certain cases.
But the trouble is that the Windows registry is a delicate area of the system: one incorrect deletion or editing of a parameter can lead to dire consequences. The paths in the registry are virtually identical in their names. Getting to the file you are looking for and correcting it correctly, adding or removing the desired element is almost surgical work.
Imagine the situation: all instructions are copied from each other, and one of the authors of the articles accidentally specified an incorrect parameter or an incorrect path to the required file. The result will be a completely paralyzed operating system. Therefore, it is not recommended to make changes to the system registry. The paths in it may differ depending on the version and bit depth of the OS.
Using various programs to speed up and decorate the system
There is a whole market cluster of programs that are created to improve the performance of Windows in many areas. They are also responsible for the visual beauty and design of the system. It is worth admitting that they do their job in most cases. However, if, in the case of decorating the system, standard textures are simply replaced with new ones, then to speed up the work, such programs disable “unnecessary” services. This can have different consequences depending on which services have been disabled.
If the system needs optimization, then it must be carried out independently in order to know what exactly was done and why. In addition, knowing that you have disabled it, you can easily turn the service back on.

As a result, disabled services will stop starting and working. This will save CPU and RAM resources and your computer will run faster.
List of services that can be disabled without harming the performance of Windows:
- "Fax machine";
- NVIDIA Stereoscopic 3D Driver Service (for NVidia video cards, if you are not using 3D stereo images);
- "Service public access to Net.Tcp ports";
- "Working folders";
- "AllJoyn Router Service";
- "Application Identity";
- "BitLocker Drive Encryption Service";
- "Service Bluetooth support"(if you are not using Bluetooth);
- “Client License Service” (ClipSVC, after disabling, Windows 10 Store applications may not work properly);
- "Computer Browser";
- Dmwappushservice;
- Geographic Location Service;
- "Guest Shutdown Service (Hyper-V)";
- "Pulse Service (Hyper-V)";
- "Session service virtual machines Hyper-V";
- "Hyper-V Time Synchronization Service";
- "Data Exchange Service (Hyper-V)";
- “Hyper-V Remote Desktop Virtualization Service”;
- "Sensor Monitoring Service";
- "Sensor Data Service";
- "Sensor Service";
- “Connected user functionality and telemetry” (This is one of the items to disable Windows surveillance 10);
- "Internet Connection Sharing (ICS)." Provided that you do not use Internet sharing functions, for example, to distribute Wi-Fi from a laptop;
- "Xbox Live Network Service";
- Superfetch (assuming you are using an SSD);
- "Print Manager" (if you don't use printing features, including Windows 10's built-in PDF printing);
- "Windows Biometric Service";
- "Remote registry";
- "Secondary login" (assuming you are not using it).
Video: How to manually disable unnecessary services in Windows 10
Incorrectly installed Windows updates or PC shutdown while installing updates
Material on the topic of Windows updates can be measured in gigabytes. The reason for this is the ambiguous attitude of users towards system updates. Microsoft actually forces users to update Ten, in return guaranteeing system functionality. However, updates do not always lead to improvements. Windows operation. Sometimes an attempt to make an OS better results in major problems for the system. There are four main reasons:
- the users themselves, who ignore the message “Do not turn off the computer...” and turn off their device during the update process;
- low-volume equipment fails: old and rare processors on which Microsoft developers simply cannot simulate the behavior of updates;
- errors while downloading updates;
- force majeure: power surges, magnetic storms and other phenomena that may affect the operation of the computer.
Each of the reasons described above can lead to a critical system error, since updates replace important components. If the file was replaced incorrectly or an error appeared in it, then attempting to access it will cause the OS to freeze.
Viruses and antiviruses
Despite all the protective measures and constant warnings to users about Internet safety rules, viruses are still a scourge in the operation of all operating systems.
In most cases, users themselves introduce malicious software into their devices and then suffer. Viruses, worms, Trojans, encryptors - this is not the entire list of types of software that threatens your computer.
But few people know that antiviruses can also damage the system. It's all about the principle of their work. Defender programs operate according to a certain algorithm: they search for infected files and, if they are found, try to separate the file code from the virus code. This does not always work, and damaged files are often isolated when an attempt to cure them fails. There are also options for deleting or transferring to anti-virus software servers to clean up malicious code. But if viruses damage important system files, and the antivirus has isolated them, then when you try to restart the computer, there is a high probability of receiving one of the critical errors, and Windows will not boot.
“Damaged” applications in autostart
Another cause of problems with loading Windows is low-quality or error-prone startup programs. Only, unlike damaged system files, startup programs almost always allow you to start the system, albeit with some time delays. In cases where the errors are more serious and the system cannot boot, you must use “Safe Mode” (BR). It does not use startup programs, so you can boot the operating system and remove bad software without any problems.
If you cannot load the OS, use “Safe Mode” using the installation flash drive:

After logging into BR, remove all dubious applications. The next computer reboot will proceed as normal.
Video: how to enter Safe Mode in Windows 10
Hardware reasons
Hardware reasons for Windows not starting are much less common. As a rule, if something breaks inside the computer, you won’t even be able to start it, let alone load the OS. However, minor problems with various kinds of manipulations with equipment, replacement and addition of some devices are still possible.
Changing the boot media polling order in the BIOS or connecting the hard drive to a different port on the motherboard (INACCESSIBLE_BOOT_DEVICE error)
During superficial home repairs, cleaning the computer from dust, or adding/replacing a RAM board or hard drive, a critical error of the INACCESSIBLE_BOOT_DEVICE type may occur. It may also appear if the order of media for booting the operating system has been changed in the BIOS menu.
There are several methods to combat the above error:

The problem should go away after the Bug Finder finishes its work.
Video: how to set boot order in BIOS
RAM fault
With the development of technology, everyone separate element The “stuff” of the computer is becoming smaller, lighter and more productive. The consequence of this is that parts lose their rigidity, become more fragile and vulnerable to mechanical damage. Even dust can negatively affect the performance of individual chips.
If the problem concerns the RAM sticks, then the only way to solve the problem is to buy a new device
RAM is no exception. DDR sticks keep falling into disrepair and errors appear that prevent Windows from loading and working in the correct mode. Often, failures associated with RAM are accompanied by a special signal from the speaker motherboard.
Unfortunately, almost always memory stick errors cannot be repaired. The only way The solution to the problem is to change the device.
Failure of video subsystem elements
It is very easy to diagnose problems with any element of the video system of a computer or laptop. You hear the computer turn on, and even the operating system loads with characteristic welcome sounds, but the screen remains deathly black. In this case, it is immediately clear that the problem is in the computer’s video sequence. But the trouble is that the video information output system consists of a complex of devices:
- video card;
- bridge;
- motherboard;
- screen.
Unfortunately, the user can only check the contact of the video card with motherboard: Try a different connector or connect a different monitor to the video adapter. If these simple manipulations If they didn’t help you, you need to contact the service center for a deeper diagnosis of the problem.
Other hardware problems
If you think about it, any hardware problems inside the computer will lead to errors. Even disruptions such as a broken keyboard can cause the operating system to fail to boot. Other problems are possible, and each of them is characterized in its own way:
- problems with the power supply will be accompanied by a sudden shutdown of the computer;
- Complete drying of the thermoplastic and insufficient cooling of the system unit elements will be accompanied by sudden Windows reboots.
Some ways to deal with software reasons for Windows 10 not starting
The most the best way Windows recovery points are System Restore Points (SRP). This tool allows you to roll back the OS to a certain point in time when the error did not yet exist. With this action you can both prevent the problem from occurring and return your system to normal operation. initial position. In this case, all your programs and settings will be saved.
Restoring the system using TVS
To use system restore points, you need to enable them and set some options:
- Call the context menu of the “This PC” icon and select “Properties”.
Call the context menu of the “This PC” icon
- Click on the “System Protection” button.
The “System Protection” button opens the recovery point setup environment
- Select the disk labeled “(System)” and click the “Configure” button. Check the box for “Enable system protection” and move the slider for the “Maximum usage” setting to a value that is convenient for you. This setting will set the amount of information used for recovery points. It is recommended to select 20-40% and at least 5 GB (depending on the size of your system drive).
Enable system protection and configure the permissible amount of fuel assembly storage
- The “Create” button will save the current system configuration in the fuel assembly.
The “Create” button will save the current system configuration in the TVS
Apply the changes using the “OK” buttons.
As a result, we have a fixed working OS that can be restored later. It is recommended to create restore points every two to three weeks.
To use TVS:

Video: how to create, delete a restore point and roll back Windows 10
System Restore using sfc /scannow
Taking into account the fact that system restore points are not always convenient to create, and they can also be “eaten” by viruses or disk errors, it is possible to restore the system programmatically- the sfc.exe utility. This method works both in system recovery mode using a bootable USB flash drive, and using “Safe Mode”. To launch the program for execution, launch the “Command Line”, enter sfc team/scannow and run it Enter key(suitable for BR).
The task of finding and fixing errors for the Command Prompt in recovery mode looks different due to the fact that more than one operating system may be installed on the same computer.

It is necessary to monitor the drive letter if the OS is not installed in the standard directory of drive C. After completing the utility, restart the computer.
Video: how to restore system files using Command Prompt in Windows 10
Recovering using a system image
Another opportunity to restore Windows functionality is to restore it using an image file. If you have the Tens distribution kit stored on your computer, you can use it to return the OS to its original state.

Restart your computer and enjoy working system, in which all damaged and ineffective files have been replaced.
Video: how to create a Windows 10 image and restore the system using it
Ways to deal with hardware reasons for Windows 10 not starting
Only a service center specialist can provide qualified assistance with a hardware failure of the system. If you do not have skills in handling electronic equipment, it is strongly not recommended to unwind, remove, or solder anything.
Fixing a hard drive problem
It should be noted that most hardware reasons for non-startup are related to hard drive. Since most of the information is saved to it, the hard drive is often attacked by errors: files and sectors with data are damaged. Accordingly, accessing these places on the hard drive causes the system to freeze, and the OS simply does not load. Luckily, Windows has a tool that can help in simple situations.

Cleaning your computer from dust
Overheat, bad contacts connections between buses and devices can be caused by an abundance of dust in the system unit.
- Check the device connections to the motherboard without using excessive force.
- Clean and blow out all the dust you can get your hands on, using soft brushes or cotton swabs.
- Check the condition of the wires and tires to see if they have any defects or swelling. There should be no exposed parts or plugs not connected to the power supply.
If cleaning from dust and checking the connections did not produce results, or restoring the system did not help, you need to contact a service center.
Video: how to properly clean the system unit from dust
Windows may not start various reasons. Both software and hardware errors are possible, but in most cases neither one nor the other is critical. This means that they can be fixed without the help of specialists, guided only by simple instructions.
And so, you spend a pleasant evening at the computer - play, chat, surf the Internet, and Windows promptly carries out your commands. Everything is fine! Idyll! However, you should not think that this will always be the case. Know: the insidious Windows is preparing a dirty trick for you. She is just waiting for the moment when some urgent matters overtake you in order to... show you nothing. More precisely, it won’t boot.
Crash Windows downloads- an ordinary phenomenon, but according to the law of meanness, it usually happens when a computer is really needed. So that the situation does not take you by surprise, it is important to prepare for it in advance. Let's talk about what to do if Windows 10 won't boot, why this happens, and what every user should have to solve this problem as quickly as possible.
Why won't it load?
The reasons for the “dozens” being unbootable can be software or hardware. Software related to the deletion (damage) of boot and system files and/or registry sections responsible for launching. They are usually to blame for:- Installing another operating system on another partition of the drive (the new OS replaces the old bootloader with its own).
- Experiments with disk partitions - compression, merging, partitioning, formatting, etc. Common mistake, which is precisely a consequence of this, – “” ( boot loader compressed).

- Unskilled manual editing of the system registry.
- Using various “tweak cleaners” to speed up and decorate the system, which “accidentally” change the registry keys responsible for startup, patch files, etc.
- Windows updates installed incorrectly or the PC shuts down during the installation of updates.
- Viruses and antiviruses. Don't be surprised, the latter can cause no less harm than the former if used thoughtlessly. It's like swallowing pills indiscriminately, hoping that the right one will be among them.
- Faulty hardware drivers. Booting in such cases is usually interrupted by a blue screen of death, sometimes indicating the name of the driver that caused the problem.
- "Clumsy" applications in autostart. The failure occurs in the late stages of loading - shortly before the desktop appears.
Hardware reasons for Windows 10 not starting:
- Changing the boot media polling order in the BIOS (the computer searches for the Windows boot loader not on system disk, and, for example, on flash drives).
- Connecting the drive to a different port on the motherboard than it previously worked on - if the failure occurs after removing and reinstallation hard drive to the computer. It appears as an INACCESSIBLE_BOOT_DEVICE error on the blue screen of death.
- Faulty or poor connection of the system drive. Often appears with the message “ ” (bootloader unavailable) on a black screen. Sometimes - stops, restarts, BSoDs at any stage of loading.

- RAM malfunction. As with disk problems, it manifests itself with reboots and blue screens at any stage of startup.
- Failure of video subsystem elements. Windows may boot, but you won't see it because the screen will remain black. Sometimes you can tell that the system has booted only by a characteristic sound.
- Other hardware problems, such as motherboard, peripherals, etc.
It's better to prepare for the worst in advance
Since 80-90% of cases of Windows 10 not starting are due to software failures, today’s article is devoted to methods of dealing with them.So to restore normal start Windows, the computer needs to be booted into the recovery environment. If you have previously used Windows 7, then you know that this very environment is installed on the disk along with the main system. And to enter it, you need to open the menu additional ways boot (by pressing F8 after turning on the computer) and go to the “ Troubleshooting».
The “top ten” also has a recovery environment, but since its loading time has significantly decreased compared to Windows 7, the interval when you can call boot menu, also became much shorter. Chance to click at this time the desired key(more precisely, the combination of F8 and Shift) remains only in one case: if the system is installed on an MBR hard drive and the fast startup option is disabled in the power settings of the PC or laptop. If the system is on an SSD or GPT hard drive, you will need bootable media.
For disaster recovery It is optimal to keep Windows 10 on a DVD or flash drive with its official distribution, and the same bit size as installed on the PC. As an alternative, you can use the downloadable utility package MS DaRT 10 (Microsoft Diagnostic and Recovery Toolset for Windows 10 ).
MS DaRT distributions (formerly called "ERD Commander") are officially distributed only through paid subscription, but they are easy to find online. For example, on torrent trackers. Windows 10 images are available for download from .
As an example, I will use the home edition of Ten, recorded on a bootable USB flash drive, since it has everything you need.
Booting into the Windows 10 recovery environment
If the download fails, the “ten”, as a rule, tries to self-repair. When she succeeds, the user does not receive any notifications; it just takes longer to start the computer than usual. If unsuccessful, a message may appear on the screen, as in the screenshot below, but more often it will just be a “Malevich square” with or without a cursor, or a blue screen of death with a sad emoticon.
The failure option shown in the screenshot can be considered relatively favorable. By clicking, " Extra options"You will be taken to the recovery environment installed on your hard drive, and you will not have to boot into it from external media. But we will consider a more severe case, when the system does not show any signs of life.
Connect the media to your computer, reboot, and make it the first boot device.
The window that you will see first after booting from a flash drive (DVD) will prompt you to select the system language. If Russian is selected, click " Further».

You will then be prompted to proceed to installation or Windows recovery. Click " System Restore».

On the screen " Action selection» click « Troubleshooting" Here you are.

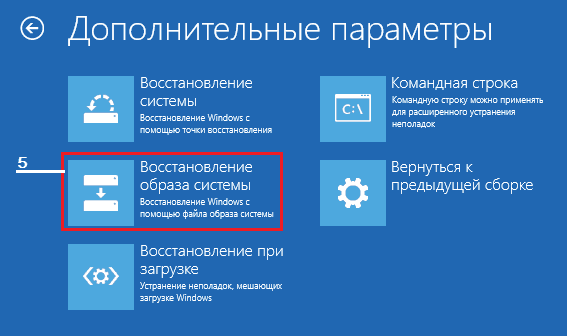
Tens launch recovery options
In the recovery options section (screen " Extra options") there are 5 subsections:- System Restore. When you select this option, a standard Windows utility is launched. rstrui.exe, the purpose of which is to roll back the system to one of the saved checkpoints.
- Restoring the system image. Launches the Windows Deployment Wizard from a backup created by the OS's own tools.
- Boot recovery. Corrects errors in boot files and partitions.
- Command line. Allows you to run various system utilities.
- Return to the previous build. Rolls back to earlier installed version OS if it has been updated to Windows 10.
Rollback to a checkpoint
To return to the recently created control point - the best remedy first aid for all types of system failures, including when you do not know their cause.
Clicking on the first item most likely launches the recovery utility you are already familiar with. All you have to do is select the date and time you want to rollback to and follow the on-screen instructions.

To use this option, you must have at least one saved checkpoint and a properly functioning system restore function. If the latter was disabled before the failure, skip this step and try other methods.
Startup Recovery
This option effectively helps in case of damage or deletion of boot files, for example, when installing an additional OS on another disk partition after Windows 10. And also in case of accidental formatting or other manipulations with the “System Reserved” partition.
Command line
The command line itself does not restore anything, but it makes it possible to launch other tools. So, with its help we can open Windows Explorer to see the installation location (partition letters in the recovery environment and during normal system booting usually do not match), run the system file error fixer, registry editor and bootloader recovery utilities.
If rollback to a checkpoint and auto-recovery at startup (first and second options) did not give desired result, a console utility often helps to increase the loading of “tens” BCDBoot. It recreates the hidden “System Reserved” partition and copies boot files from the Windows directory to it.
For correct operation BCDBoot needs to specify the location of the Windows folder on your hard drive. To find out, you can use the utility Diskpart, but I think it’s more convenient to do this through Explorer.
So, to get into Explorer, open the command line and run Notepad in it ( notepad).

While in notepad, go to the menu “ File", select " Open" and go to the folder " This computer" Next, let's go through the disk partitions and determine which of them contains system directory. In my example this is drive D.

Next we return to the command line and execute the instruction:
BCDboot D:\Windows

Please note that your path to the system folder may be different.
In 80% of cases, this is enough for the “ten” to start normally. But in about 20% of cases the command does not work correctly - it does not restore all boot files. To help the utility a little, before executing the instructions on the command line, you need to format the reserved boot partition (in my example, drive C) in FAT32. This can also be done with using diskpart, but I think it’s more convenient through a conductor.

The following two console commands recreate the boot records of the entire drive (MBR) and the system partition (VBR). They are used to solve problems with running Windows on MBR disks.
Execute commands one after another in this order:
bootrec/fixmbr
bootrec/fixboot

If you accidentally run them on GPT disk, nothing bad will happen.
In some cases, startup problems arise due to damage not to boot files, but to the main system files, for example, after virus attack. As you may know, Windows has a way to fix them. special utility Sfc.exe. So, thanks to the command line, you can also run it in the recovery environment.
The command to find and fix errors in protected system files in the recovery environment looks like this:
sfc /scannow /offbootdir=D:\ /offwindir=D:\

Parameter offbootdir determines the location of the main boot partition(in my example, as you remember, this is drive D), and offwindir– path to the system folder.
Using the command line, you can also fix registry errors on an unbootable system. But, unlike previous instructions, this requires certain experience and qualifications, because the user needs to know exactly what to correct and what erroneous entries should look like normally.
I will not dwell on registry errors that lead to Windows 10 boot failure, since this is the topic of a separate large article. I will only describe the method for launching the editor RegEdit.exe in the recovery environment and open the registry files in it so that you have the opportunity to fix the errors that you are aware of.
So, to launch the editor, write the word on the command line regedit and press Enter.

You will see that in the utility window that opens there is already some kind of registry, but not the one you need. Before us is our own registry of the recovery environment, and we are interested in the main system.
To load files into RegEdit Windows registry 10 select the section in the left half of the editor window HKEY_LOCAL_MACHINE or HKEY_USERS, open the menu “ File" and click on the item " Load bush».
In the Explorer window that opens after this, go to the folder D:\Windows\System32\Config(your drive letter may be different) and select the desired file.
Files without an extension in the \System32\Config folder are the components (hives) of the Windows 10 registry. The main ones are circled.
Give the hive any meaningful name (it will be temporary until you unload it) and click OK.

Next, we will open the section into which we loaded the bush, and here it is - in front of us, available for editing. In my example this is the registry file software, which I temporarily renamed to soft_win_10.

After making the edits, go back to the editor menu “ File" and click " Unload bush».
Return to previous build

When reverting to a previously installed build personal files the user's files will remain untouched, but everything done after the update will be undone.
Restoring a system image
Restoring an image from a backup helps to restore the system to functionality in case of any problems, but the problem is that almost no one creates these images.If you are an exception to the rule and the happy owner of a relatively recent backup copy, select the item marked in the screenshot from the list of parameters,
Tell the recovery program where to store the image and follow its instructions.

All data from the inoperative OS will be replaced with working copies from the archive. If it contains user files, this will also affect them.
Happy recovery!
Also on the site:
Windows 10 won't boot: why this happens and how to restore startup updated: April 23, 2017 by: Johnny Mnemonic
If you are faced with the fact that Windows 10 will not boot, do not rush to reinstall the system. In most cases, the problem can be solved on your own. Let's consider all possible cases of problems with turning on Windows 10 and ways to solve this problem.
Why Windows 10 won't load or takes a long time to load
Before you start troubleshooting the problem, remember what you did before it appeared (played a game, installed new program, ran an antivirus scan, reinstalled drivers, cleaned the hard drive, and so on). This will help you quickly identify exactly how to proceed to fix the system.
Reasons why Windows 10 takes a long time to load when turned on:
- Incorrect computer shutdown. Often, instead of turning off via the Start menu, users prefer to unplug the computer from the outlet. Also, incorrect shutdown can occur when the computer's battery is low. Because of this, system files may be damaged;
- In another partition of the drive another operating system was installed. If you have not created your own hard drive for the additional OS, problems will arise when you turn on the computer, because one boot loader is replaced by another and the computer “does not understand” which OS to turn on;
- Previously have you performed operations with hard memory disk– formatted or archived data. The operating system loader may have been archived. In this case, instead of the start screen, a window with the text “ BOOTMGR is compressed";
- Editing the system registry;
- Using programs to speed up the system. As a rule, they cause serious harm to the computer, including the need to reinstall the OS;
- Driver failure equipment;
- Computer infection by virus software;
- Too much a large number of programs in startup. In this case, the desktop loads, but then an error window appears and the system freezes.
If you are faced with a situation where Windows 10 does not load and the download is spinning, most likely, updates are simply being installed on the system. This state may even last for several hours, and the progress bar icon may not appear.
Ways to restore Windows 10 boot
All software failures that prevent Windows 10 from turning on can be resolved using a comprehensive approach. We recommend the following methods. If one of them cannot be repeated, move on to another, and so on until you solve the problem.
Removing blue screen on reboot
You can often find a case where Windows 10 takes a very long time to load, and as a result. A message appears on the screen indicating that a reboot is required, but every time restart the problem repeats itself.
To fix the error, follow these steps:
- Check the boot order in BIOS. The system may first launch the boot utility for the second OS installed on the computer;
- Disconnect as many peripheral gadgets as possible from the device - keyboard, mouse, speakers, gamepad, and so on. Restart your PC;
- Turn off the laptop and remove its battery. If you are using a desktop computer, we recommend cleaning the cooler. Often the cause of the appearance blue screen death at startup is severe overheating processor.
If your computer won't boot into Windows 10 and you don't remember what you did before the problem occurred, try a force reboot. In 90% of cases, this method helps solve a one-time system bug.
Press the "Power" button to start the OS. In the first few seconds after switching on (before the Windows screensavers) press the key ESC . The “Boot Options” window will appear on the screen. In it, open the “Advanced options” - “Boot options” field and click on “Restart” at the bottom.
As a result of performing the action, the system will launch automatic analysis and troubleshooting in the background. The computer will be turned on.
Notice! This method will only work if the failure occurred as a result of a one-time fatal error in the operation of the game or program. If the cause of the problem is a failure of updates or virus software, a forced reboot will not help.
Disconnecting the network card patch cord

If you encounter a black screen and Windows 10 does not load, the cause of this bug may be an unsuccessful attempt to connect to the Internet. The system may be trying to install automatic updates, or one of the installed programs requires a network connection.
You can solve the problem by disconnecting the patch cord (Internet cable). If you are using a wireless connection, unplug your router Wi-Fi and restart your computer.
Launch in safe mode
Safe Mode is special option OS download, with which you can turn on Windows even after a serious failure. The system turns on with a minimum set running programs and devices.
Windows 10 won't boot after updating, you need to enable Safe Mode. Follow the instructions:
- Using another computer, download the image from the Microsoft website Windows 10 which matches your build (eg Home Edition, Professional, Enterprise and so on);
- Create a bootable Windows disk using a disk or USB -storage and programs Live CD, Alcohol or Daemon Tools;
Attention! If you already have a Windows installation disk 10 skip the first two steps.
- Change the boot queue in the BIOS, putting your boot media first. The order in which the remaining modules are loaded is not important;
- Save the changes, turn off the computer and connect the USB flash drive (disk). Click on the "Power" button;
- As a result of the PC booting, a window will appear Windows installations 10. In it, click on the “System Restore” field, as shown in the figure below;
- In the window that opens, select “Command Line”;

- In the line, enter the command bcdedit /set (default) safeboot network - this will allow you to boot the OS next time already in safe mode. At the same time, the connection to the network will be maintained.

All that remains is to restart the computer. It will automatically enable safe mode. The desktop will appear with a black splash screen.

Now you need to perform actions that will solve the problem of the system taking a long time to turn on. First of all, go to the device manager and update the configuration of all connected equipment:

NET services and others).

Go to the All Settings window and run utilities to automatically diagnose and fix problems.

After completing the above steps, turn off your PC. Remove the boot drive, change the boot queue in the BIOS (the installed OS comes first). Restart your computer. The system should start without braking.
Please note that safe mode does not always solve the startup problem. After trying to start in standard mode, the problem may recur. In this case, we recommend scanning the system with an antivirus installed on the boot disk.
Checking your computer for viruses
Despite successful attempts in the fight against viruses, Microsoft developers are still far from success MacOS . Windows malware is still one of the most widespread in the world.
When viruses are detected, a package with updates is sent to your computer within 1-2 days that can fix the problem. If you have disabled the function automatic update or your computer was infected before the release of services that destroy the virus, you need to remove the malicious program yourself.
Even if Windows 10 won't boot, you can still create a bootable disk with portable version antivirus. Do this using a flash drive, another computer, program Live CD and a portable antivirus installer.
We recommend using Dr. Web, Norton Avast or Kapersky. Their portable builds work great with malicious files, which affect the Windows system boot loader.
Follow the instructions:
- After creating the boot disk, go to the BIOS menu on your computer and change the boot queue so that the first place is not the operating system, but USB ;
- Now connect the USB flash drive to the device and restart the computer;
- As a result of activation, an antivirus window will appear on the screen;

- Open the built-in scanner and run a detailed scan of all system files. It is not recommended to use a quick scan, as it almost never accesses the bootloader data and does not detect problems. The procedure can last up to an hour. It all depends on the number of files on the system and the performance of your computer.
After detecting infected files, delete them (if you do not need them) or click on the “Disinfect” button if these files are part of the system directory or standard programs.
We also recommend checking the free space on your hard drive using an antivirus. Windows 10 often won't boot after low memory is detected. Remove apps you don't use. IN Dr. Web You can open the memory cleaning mode using the “Tools” tab.
Restoring from a system backup
If you previously created a backup copy of the operating system, you can make a backup of Windows 10 to resolve the startup problem. All your settings, installed programs and files that were created after saving the backup copy will be deleted. At the same time, you will receive a fully working system.
You need to run a boot disk Windows 10 and open the “Recovery” tab. In the window that appears, select “System Image Restore”.


It is important that the backup creation date coincides with the date normal operation systems. Otherwise, the error will repeat. Click on the "Next" button to begin the recovery process. The computer may reboot several times, and on average after 15-20 minutes the desktop will turn on.
Reset Windows 10
The last and most effective solution to the error is full reset system, that is, its rollback to its original state. The disadvantage of this method is that no data will be saved. You will receive an absolutely “clean” copy of the operating system.
Follow the instructions:
- Launch the boot disk;
- Click on “Install”;
- In the window that opens, click on “Delete all”;

- Now press the “Reset” button and wait for the action to complete. The computer will restart automatically.

If after restoring or resetting you again encounter slow loading computer, the cause of the breakdown is a hardware malfunction. We recommend that you contact a service center for assistance.
Now you know how to solve the loading problem Windows 10. Please note that the methods discussed above only apply program reasons malfunctions. If your laptop is dropped and the OS stops turning on, or you suspect there is another hardware problem, contact a service center for professional advice.
Write what types of problems you have turning on Windows 10 you encountered and how you managed to solve the error.
Windows 10 is an imperfect system and problems are common, especially when installing updates. There are a lot of mistakes and ways to solve them. First of all, it all depends on at what stage the problem arose and whether it was accompanied by code. We will consider all possible cases.
The computer froze during the update process
If your computer freezes when updating Windows 10, you need to find the cause of the problem and fix it. To be able to do this, you need to interrupt the system update.
First you need to make sure that the computer is really frozen. If nothing changes at all within 15 minutes or some actions are repeated cyclically for the third time, the computer can be considered frozen.
How to abort an update
If the update starts to install, you most likely won't be able to simply restart your computer and return it to normal condition: Installation will be retried every time you reboot. This problem does not always occur, but it is very common. If you encounter it, you must first interrupt the system update, and only then eliminate the cause of the problem:
- Restart your computer using one of the following methods:
- press the reset button;
- hold down the power button for 5 seconds to turn off the computer, and then turn it on;
- turn off the computer from the network and turn it on again.
- When you turn it on, immediately press the F8 key.
- Click on the "Safe Mode with Command Prompt" option on the system boot option screen.
Select "Safe Mode with Command Line Support"
- Open the Start menu after the system starts, type cmd and open Command Prompt as an administrator.
Open Command Prompt as an administrator after the system starts
- Enter the following commands in sequence:

- Restart your computer. The system will start in normal mode.
- After eliminating the cause of the problem, enter the same commands, but replace the word “stop” with “start”.
How to eliminate the cause of freezing
There can be many reasons for being stuck receiving updates. In most cases, you will see an error code message after 15 minutes of inactivity. What to do in such cases is described at the end of the article. However, it happens that no message appears, and the computer continues to endlessly try. We will consider the most popular cases of these.
Stuck at the “Getting updates” stage
If you've been seeing the "Getting Updates" screen for about 15 minutes without any progress, you shouldn't wait any longer. This error is caused by a service conflict. All you have to do is disable Windows Automatic Updates and start checking for updates manually.
- Press combination Ctrl keys+ Shift + Esc. If Task Manager opens in a simplified view, click More Details.
If Task Manager opens in a simplified form, click More details
- Go to the “Services” tab and click on the “Open Services” button.
Click on the "Open Services" button
- Find the Windows Update service and open it.
Open Windows Update service
- Select the startup type “Disabled”, click on the “Stop” button if it is active, and confirm the changes made. After this, the updates should install without problems.
Select the startup type “Disabled” and click on the “Stop” button
Video: How to disable Windows Update service
Stuck at 30 - 39%
If you are upgrading from Windows 7, 8 or 8.1, updates will be downloaded at this point.
Russia is big, but there are almost no Microsot servers in it. Due to this, the download speed of some packages is very low. You may have to wait up to 24 hours for the entire update to download.
The first step is to run the Update Center diagnostics to prevent an attempt to download packages from a non-working server. To do this, press the Win + R key combination, enter the command msdt /id WindowsUpdateDiagnostic and click OK.
Press the Win + R key combination, enter the command msdt /id WindowsUpdateDiagnostic and click OK
Also try upgrading your current version of Windows (without upgrading to Windows 10). Once complete, try upgrading to Windows 10 again.
If this doesn't help, you have 2 options:
- install the update overnight and wait until it finishes;
- use alternative way updates, for example, download the Windows 10 image (from the official website or torrent) and update from it.
Video: What to do with the endless update to Windows 10
Stuck at 44%
Update 1511 was accompanied by a similar error for some time. It is caused by a conflict with the memory card. The bug in this update package has been fixed for a long time, but if you somehow encountered it, you have 2 options:
- remove the SD card from the computer;
- update via Windows Update.
If this does not help you, free up 20 GB of free space on the system disk.
Computer froze after update
As is the case with problems during the update process, you will most likely see one of the code errors, the solution to which is described below. But this does not always happen. In any case, the first thing you need to do is get out of the frozen state. You can do this in the same way as if you get stuck during the update process: press F8 when you turn on the computer and select “Safe Mode with Command Prompt Support.”
If you haven't seen the error code, try all the following methods in turn.
Getting error information
Before fixing the problem, you should try to find out some information about the error that occurred:
- Open Control Panel. You can find it by searching in the Start menu.
Open Control Panel from the Start menu
- Select the "Small Icons" viewing method and open the "Administration" section.
Open the "Administration" section
- Open Event Viewer.
Open Event Viewer
- In the left pane, expand the category " Windows logs" and open the "System" log.
- In the list that opens you will find all system errors. They will have a red icon. Pay attention to the "Event Code" column. With its help, you can find out the error code and use an individual method for eliminating it, which is described in the table below.
Errors will have a red icon
Video: Event Viewer and Windows Logs
Resolving Conflicts
The most common cause of freezing is incorrect transfer of Start menu settings and Windows Search service from the previous one. Windows versions. The result of such an error is a conflict with key system services, which prevents the system from starting.
- Open the Start menu, type “services” and open the utility you found.
Open the Services utility
- In the window that opens, find Windows service Search and open it.
Open Windows Search
- Select the startup type "Disabled" and click the "Stop" button if it is active. Then click “OK”.
Disable Windows Search service
- Open Registry Editor. You can find it by searching “regedit” in the Start menu.
Open Registry Editor from the Start menu
- Copy the path HKEY_LOCAL_MACHINE\SYSTEM\ControlSet001\Services\AppXSvc into the address bar and press Enter.
Go to the path HKEY_LOCAL_MACHINE\SYSTEM\ControlSet001\Services\AppXSvc
- On the right side of the window, open the Start option.
Open the Start option
- Set the value to "4" and click "OK".
Set the value to "4" and click "OK"
- Try restarting your computer normally. Perhaps the steps taken will help you.
Change user
Start menu settings and Windows Search are the most common causes of conflicts, but there may be others. Search and correct each possible problem there is not enough strength or time. It would be more intelligent to reset all changes, and the easiest way to do this is to create a new user.
- Go to the "Options" window. This can be done through the Win + I key combination or the gear in the Start menu.
Go to the Options window
- Open the "Accounts" section.
Open the "Accounts" section
- Open the “Family and other people” tab and click on the “Add user...” button.
Click on the “Add user...” button
- Click on the “I don’t have data...” button.
Click on the "I don't have data..." button
- Click on the “Add user...” button.
Click on the inscription “Add user...”
- Specify the name of the new account and confirm its creation.
Specify the name of the new account and confirm its creation
- Click on the created account and click the “Change account type” button.
Click the "Change account type" button
- Select the Administrator type and click OK.
Select "Administrator" type and click "OK"
- Try restarting your computer normally. If all is well, you will see a selection of accounts.
Video: how to create an account with administrator rights in Windows 10
Uninstalling an update
If changing the account does not help, you will have to roll back the updates. After this, you can try to update the system again.
- Go to Control Panel and open Uninstall a program.
Open "Uninstall a program" in "Control Panel"
- On the left side of the window, click on “View installed updates.”
Click on “View installed updates”
- Based on the date, remove the latest installed updates.
Uninstall the latest installed updates
Video: How to remove an update in Windows 10
System Restore
This is an extreme way to solve the problem. It is equivalent to a complete reinstallation of the system.
- Press the Win + I key combination to open the Settings window and open the Update and Security section.
Open the "Settings" window and open the "Update and Security" section
- Go to the “Recovery” tab and click “Start”.
Go to the "Recovery" tab and click "Start"
- In the next window, select “Save my files” and do whatever the system asks you to do.
Video: how to reset Windows 10 to system settings
Black screen problem
The problem of the black screen is worth highlighting separately. If the display shows nothing, this does not mean that your computer is frozen. Press combination Alt keys+ F4 and then Enter. Now there are 2 options for the development of events:
- if the computer does not turn off, wait half an hour to prevent a delayed update, and proceed to restore the system as described above;
- If the computer turns off, you have a problem playing back the picture. Do all the following methods in turn.
Switching between monitors
The most popular reason for this problem is incorrect identification of the main monitor. If you have a TV connected, the system can set it as the main one even before downloading the necessary drivers for its operation. Even if there is only one monitor, try this method. Before downloading all necessary drivers errors can be very strange.
- If you have multiple monitors connected, turn off all but the main one and try restarting your computer.
- Press the Win + P key combination, then the down arrow key and Enter. This is switching between monitors.
Disabling Fast Startup
Accelerated startup involves delaying the activation of some system components and neglecting preliminary analysis. This may cause an "invisible" monitor.
- Restart your computer in safe mode (press F8 while turning on).
Restart your computer in safe mode
- Open Control Panel and go to the System and Security category.
Open Control Panel and go to the System and Security category
- Click on the “Customize the functions of the power buttons” button.
Click on the button "Customize the functions of the power buttons"
- Click on the inscription “Change settings...”, uncheck the Quick Launch box and confirm the changes made.
Click on the inscription “Change parameters...”, uncheck the Quick Launch box and confirm the changes made
- Try restarting your computer in normal mode.
Video: How to turn off Fast Startup in Windows 10
Resetting an incorrect driver for a video card
It might be Windows 10 or you may have installed the wrong driver. There can be many variations of errors with a video card driver. You need to try several ways to install it: by removing the old driver, manually and automatically.
- Restart your computer in safe mode (how to do this was described above), open “Control Panel” and go to the “Hardware and Sound” section.
Open Control Panel and go to Hardware and Sound
- Click on "Device Manager".
Click on "Device Manager"
- Open the "Video Adapters" group, click right click mouse on your video card and go to its properties.
Right-click on the video card and go to its properties
- In the “Diver” tab, click on the “Rollback” button. This is driver removal. Try restarting your computer normally and check the result.
In the “Diver” tab, click on the “Rollback” button
- Install the driver again. Open Device Manager again, right-click on the video card and select Update Driver. Perhaps the video card will be in the “Other devices” group.
Right-click on the video card and select "Update Driver"
- First, try automatic driver updates. If the update is not found or the error persists, download the driver from the manufacturer’s website and use manual installation.
First, try automatic driver update
- At manual installation you just need to specify the path to the folder with the driver. The checkbox for “Including subfolders” should be active.
When installing manually, you just need to specify the path to the folder with the driver
Video: how to update the driver for a video card in Windows 10
Code errors, their causes and solutions
Here we will list all the error codes that are associated with updating Windows 10. Most of them can be solved quite simply and do not require detailed instructions. The last resort, which is not mentioned in the table, is to completely reinstall Windows 10. If all else fails, use it and install the latest version immediately to avoid a problematic update.
Instead of "0x" the error code may read "WindowsUpdate_".
Table: Update related errors
| Error codes | Cause of occurrence | Solutions |
|
|
|
| No internet connection. |
|
|
|
|
| 0x8007002C - 0x4001C. |
|
|
| 0x80070070 - 0x50011. | Lack of free space on the hard drive. | Free up space on your hard drive. |
| 0x80070103. | An attempt was made to install an older driver. |
|
|
|
|
| Difficulty reading the package. |
|
| 0x800705b4. |
|
|
|
|
|
| 0x80072ee2. |
|
|
| 0x800F0922. |
|
|
| Incompatibility of the update with the installed software. |
|
|
|
|
| 0x80240017. | The update is not available for your system version. | Update Windows via Update Center. |
| 0x8024402f. | The time is set incorrectly. |
|
| 0x80246017. | Lack of rights. |
|
| 0x80248007. |
|
|
| 0xC0000001. |
|
|
| 0xC000021A. | Sudden stop of an important process. | Install the KB969028 patch package (download from the official Microsoft website). |
| Rollback to previous version system for one of the following reasons:
|
|
Complex solutions
Some of the methods listed in the table are complex. Let's look at those with which difficulties may arise.
Reconnecting the problematic component
To disable, for example, the Wi-Fi module, it is not at all necessary to open the computer. Almost any component can be reconnected through the “Task Manager”.
- Right-click on the Start menu and select Device Manager. It can also be found through search or in the Control Panel.
Right-click on the Start menu and select Device Manager
- Right-click on the problematic component and select “Disable device.”
Disconnect the problematic component
- Turn the device back on in the same way.
Turn on the problematic component
Clearing lists of scheduled tasks and startups
If an unwanted process is included in the startup list, its presence may be equivalent to the presence of a virus on your computer. A scheduled task to start this process can have a similar effect.
Regular Windows tools 10 may be useless. It's better to use CCleaner right away.
- Download, install and run CCleaner.
- Open the “Service” section and the “Startup” subsection.
Open the “Service” section and the “Startup” subsection
- Select all processes in the list (Ctrl + A) and disable them.
Select all processes in the list and disable them
- Go to the “Scheduled Tasks” tab and cancel all of them in the same way. Then restart your computer.
Select all tasks in the list and cancel them
Video: How to disable autorun applications using CCleaner
Disabling the firewall
Windows Firewall - built-in system protection. It is not an antivirus, but it can prevent some processes from accessing the Internet or limit access to important files. Sometimes the firewall makes mistakes, which can result in one of the system processes being restricted.
- Open Control Panel, go to the System and Security category and open Windows Firewall.
Open Windows Firewall
- On the left side of the window, click on the inscription “Turn on and off...”.
Click on the inscription “Turn on and off...”
- Check both “Disable...” and click “OK”.
Check both “Disable...” and click “OK”
Video: How to disable the firewall in Windows 10
Restarting the Update Center
As a result of the Update Center operation, critical errors may occur that will interfere with the main processes of this service. Restarting the system does not always solve the problem similar problem, it would be more reliable to restart the Update Center itself.
- Press the Win + R key combination to bring up the Run window, type services.msc and press Enter.
In the Run window, type the command to call the services and press Enter
- Scroll to the bottom of the list and open the Windows Update service.
Click "Fix flagged"
Video: how to clean the registry manually and using CCleaner
Alternative update methods
Due to various circumstances, updating Windows 10 in the usual way may not be possible. Among the methods that can help in such cases, two can be distinguished:

DNS check
The cause of the connection problem with the Microsoft server is not always the Internet connection. Sometimes the error lies in broken DNS settings.
Select "Obtain DNS server address automatically" and click "OK"
Activation of the "Administrator" account
An “Administrator” account and an account with administrator rights are two different things. There is only one “administrator” on the computer and it has more capabilities than an account with administrator rights. The Administrator account is disabled by default.
- Open the Start menu, type lusrmgr.msc and press Enter.
Uncheck the “Disable account” checkbox and click “OK”
Video: how to activate the Administrator account in Windows 10
Windows 10 update freezing is a common event, but this problem can be solved quite simply. Not all cases are clear cut, but in extreme cases everything can be corrected simple removal updates.