Get iPhone out of dfu mode tinyumbrella. How to get your iPhone out of recovery mode using Tenorshare ReiBoot
Recovery Mode is convenient tool For . Let's figure out what it is, how to work with it and what methods to solve problems that arise.
This article is suitable for everyone iPhone models Xs/Xr/X/8/7/6/5 and Plus on iOS 12. Older versions may have different or missing menu items and hardware support listed in this article.
What is Recovery Mode and what is it for?
Recovery Mode or recovery mode is a special mode designed to restore the functionality of the iPhone. This feature will come in handy if a critical software error occurs, the device malfunctions, or an unsuccessful Jailbreak.
However, do not confuse a software problem with a frozen iOS loading indicator. Often the slowdown in this process occurs due to writing or reading large quantity files. It may seem that the device is frozen, although it is not. Check iPhone performance can be pressed on any button. In this regard, when updating/resetting the device, you should not use Recovery Mode.
Recovery mode should be used in the following cases:
- without loading indicator
- The screen displays "Connect to iTunes"
- iTunes does not recognize iPhone correctly
How to Enter Recovery Mode on iPhone
To successfully enter Recovery Mode you will need:
- Windows or Mac computer
- Last iTunes version
- Complex lightning cable(or high-quality analogue)
Connect your iPhone to your computer, turn on iTunes, and restart your smartphone.

Increase
- For iPhone 6s and older models: Hold the Home and Power keys
- For iPhone 7/7 Plus: hold down the Volume Down and Power buttons
- For iPhone 8/8 Plus and X: Press and quickly release the Volume Up and then Volume Down key. Next, hold down the power button
After this, you should wait until the iTunes logo appears on the smartphone display. At this time, the computer will show a message about restoring the iPhone.

Increase
How to exit recovery mode
To get your iPhone out of Recovery Mode, you should take the following steps:
- Disconnect iPhone from computer
- Turn off your smartphone by pressing the power button (side)
- Turn on your smartphone
If this operation does not help, try forced reboot described in the previous paragraph.
Cannot exit recovery mode - reasons and what to do
There are situations when the iPhone cannot log out recovery mode. This situation is called Recovery Mode Loop. Its appearance is due to the fact that during recovery a complete diagnosis of the system is performed. Whenever iPhone errors restarts the Recovery Mode procedure and so on ad infinitum. The reasons for the appearance of Loop are most often associated with software errors. For example, with installation interruption.
A similar situation is also possible when trying to roll back to a lower version of the system. Most often, Apple closes this option and downgrading is not possible. But in exceptional cases, Cupertino allows you to rollback (iPhone 4S and iPad 2). You can check your iPhone for supported iOS on the website.

Increase
You can exit recovery mode through iTunes. You should connect your iPhone to your computer and see if the device is detected. If yes, then restore your smartphone. Please note that as a result of this procedure, all user data will be erased and the latest version of iOS will be installed on the device.

Recovery Mode(recovery mode) - one of two emergency modes Apple technology. Recovery Mode makes it possible to restore functionality to the i-gadget if, due to a software glitch or as a result of an unsuccessful jailbreak, the device turns off, does not want to boot and generally does not respond to button presses.
Recovery Mode And DFU Mode – modes provided by Apple, so their use does not entail loss of warranty. The differences between them have been discussed in detail in this article. In short, Recovery Mode more “soft” in terms of impact on mobile device and at the same time less effective - many problems are too much for him to handle. DFU Mode operates in iOS bypass and creates all files from scratch. resort to DFU It is recommended only in critical situations and only when the recovery mode has already been tried.
Before entering the gadget into Recovery Mode, take the USB cable and connect it to the PC port. Do not connect the cord to the device itself yet.
Step 1. Turn off your smartphone by long pressing the " Power» — wait until the screen goes dark. If the device is already turned off, you can skip this step.
Step 2. Hold down the " Home" and insert the cord. The iPhone will boot - you will see an image on its screen USB cable and logo iTunes. This is another difference between recovery mode: in DFU The iPhone just has a black screen - the user can understand that the mode is activated only by message in iTunes.
Step 3. A few seconds later in iTunes the following window will appear:

You need to click " OK». Then you can reset, restore or reflash the gadget.
How to get iPhone out of recovery mode
You need to exit recovery mode using the following algorithm:
Step 3. Click " Recovery Fix"and wait until the gadget boots up in normal mode.
The Recovery Fix button becomes available only when the iPhone connected to the computer is in update mode.
You can also “break the loop” using iTunes. Just connect the gadget to your computer, go to device management mode and click “ Restore iPhone».

Why wasn't this method mentioned earlier? Because this way the user will lose all the data that was stored on the iPhone. In addition, the device will be updated to latest version iOS, and there will be no option to return to the previous one (which the owner of the gadget was probably 100% happy with). Using special utilities there is a chance to get a device with the same operating system and content.
Conclusion
Recovery mode helps eliminate many iPhone problems, however, it is extremely important to enter the iPhone into recovery mode Right, otherwise there will be even more problems. If, for example, the user is in a hurry and disconnects the gadget from the PC before the update procedure is completed, the iPhone will fall into a recovery loop, from which the device can only be recovered by using special programs.
Probably every user iPhone phone, iPad tablet or iPod player touch at least once during use I saw a black screen with a picture of a USB cable and the iTunes icon. If you see a cable and iTunes on the screen of your iPhone, this means that the phone is in recovery mode (in English – Recovery Mode). This same recovery mode can be turned on forcibly; if you are interested in how this is done, read the note about how to do it manually.
Sometimes a screen with a USB cable and the iTunes icon appears as a result of unsuccessful updates or flashing iOS, and when connecting to iTunes, a notification appears with the text:
iTunes detected your iPod, iPhone, or iPad in recovery mode. You must restore this device before using it in iTunes.
Sometimes such unpleasant moments happen: the iPhone does not turn on, i.e. turn on, it turns on, but iOS does not load.
WITH similar problem We recently encountered this too. After trying to update the firmware to iOS versions 7 our iPhone stopped turning on after an unsuccessful update. The same thing happened with iPod touch– the same cable and iTunes, plus several different unknowns.
.
When connecting both the iPhone and iPod to the computer, iTunes offered us only to restore the devices, only then they would work again and iOS firmware will launch, and many people think so. But the fact is that by restoring an iPhone or iPod in iTunes, we will lose all the information in the device’s memory, and we can’t lose it, especially since we don’t have backup copies. So we decided to try to return the iPod and iPhone to the way they were before. working condition. It turns out that this can be done by exiting recovery mode.
There are several ways to exit Recovery Mode:
- Method No. 1 – While the USB cable and iTunes are displayed on the screen, do this by holding down the Home + Power button and without releasing these buttons for 10-15 seconds. Then press the Power button again.
- If the first method did not help, then you are in, to exit recovery mode, use special programs: TinyUmbrella, iReb or RecBoot.
There is a third way to get rid of the annoying black screen with the image of cable and iTunes - restore to iTunes, but we are not considering it, since it will erase all the content, which in our case cannot be allowed.
The first way to exit Recovery mode Mode didn't work for us, but it did work when we previously specifically put the iPhone into recovery mode. The iPod and iPhone still showed the USB cord and the Tuna icon. Then we decided to use the TinyUmbrella program, which is installed on the computer, keep it - in Windows, for operating Mac systems OS program TinyUmbrella also exists.
After downloading TinyUmbrella for OS Windows program At first she refused to start, but we persuaded her, read the details at the link in the startup instructions above.
Exiting Recovery Mode with TinyUmbrella
TinyUmbrella started working, and the first thing we did was try to exit recovery mode on the iPhone. Connected iPhone to computer using standard cable, and launched the TinyUmbrella program on the computer.

On the left side of the program we saw a section - Recovery Devices, in which there was a device with number - 1114116
, next to it was an icon with question mark. This is our device. To exit Recovery Mode, perform two steps:
- Click on the unidentified device, in our case – 1114116
- On the right side of the TinyUmbrella program, click the button - Exit Recovery.
As soon as we pressed the Exit Recovery button, our iPhone rebooted and we saw the good old firmware 6.1.3. Thus, we still managed to exit recovery mode and return the iPhone to its previous working state.
If TinyUmbrella does not detect the device when you connect your iPhone or iPad, then install iTunes on your computer and repeat the steps described above.
In conclusion, it must be said that everyone can use the TinyUmbrella program iPhone users, iPad and iPod facing cable image and iTunes programs on the device display and not wanting to lose all the information. If you were unable to launch TinyUmbrella, then try, which also takes you out of recovery mode.
If you also manage to restore your device to its previous state, you can use it to transfer information from iPhone to computer, and also create backup copy. Well, we will try to complete it without losing data. We wish you successful exits from Recovery Mode.
We are sure that many have encountered a freeze in the recovery mode after iOS updates 12/11/10.3/10.2.1/10.2/10.1/10/9, especially iPhone X/8/7/7 Plus, SE, 6s/6s Plus/6/6 Plus, 5s/5c/5 phone users, 4S, iPad or iPod touch. When you see a USB cable and iTunes icon, this means that the iPhone is in recovery mode. Today I will tell you about how to get your iPhone out of recovery mode, how to solve iphone stuck in recovery mode.
Solve stuck in recovery mode with Tenorshare ReiBoot (Free and one click)
First download and install Tenorshare ReiBoot on your computer. Connect your iPhone/iPad/iPod touch to your computer using a USB cable. After Tenorshare ReiBoot recognizes your device in recovery mode, click the “Exit Recovery Mode” button. Wait a bit and the device will reboot safely. Do not disconnect the device during this process.

Of course, Tenorshare ReiBoot can quickly and easily solve your freezing problems and get your iPhone out of recovery mode. If your iPhone is still stuck in recovery mode or after a while the system went to the screen and did not respond, it may be due to damage file system, then fix the operating system to restore it completely without data loss.

Other ways to get iPhone out of "Recovery Mode" (Difficult and data loss)
The way to exit Recovery Mode is to force a reboot by holding down the Home + Power button and holding these buttons for 10-15 seconds. After this, your device will reboot.

If this doesn't work, there is a second way to get rid of the black screen with cable and iTunes - restore to iTunes. But it will erase all the content, so create a backup before using it.
- Download and install iTunes on your computer.
- Open iTunes, connect your device to PC using a USB cable.
- Wait for it to appear on the screen iPhone images with cable connected.
- Click the “Restore” button in iTunes. The device will start working as usual again.

What is Recovery Mode?
Recovery Mode open mode when the device is turned off and USB connection actively. It is through this mode that flashing and “Update” occurs. If you connect your iDevice to iTunes in this mode, you will see a message that the program has detected a “Device in recovery mode.” A USB cable and an iTunes icon will appear on the screen.
Reasons why iPhone stuck in recovery mode
iPhone freezes in recovery mode, there are several phenomena. May be:
- hardware and software failure
- after/during jailbreak
- after/during iOS 12/11/10.3/10.2.1/10.2/10.1/10 update
- file system corruption
With Tenoshare Tenorshare ReiBoot, you can quickly and easily solve problems including stuck on apple logo/black screen/during startup/on blue screen death, delay in DFU mode / in recovery mode / in the Home button, errors (iTunes had an error in synchronization / update / restore iOS devices) to iPhone/iPad/iPod, without data loss or damage. Welcome to use our products.
02.01.2018
Hello, I have come across many users who do not know how to enter recovery mode or DFU mode. So, in this article I will tell and show how to enter an iPhone or iPod into these modes and how to output it.
To begin with, I will write simply in text, many will understand it like this:
1.
2
. Press and hold the Home button while holding it and plug in the USB.
3
4
You basically get multiple full backups for the cost of a full backup and modified blocks. Backing up to a network share is as easy as backing up to a local volume. The main difference is that a Volume Shadow Copy Service snapshot cannot be created remote volume. As a result, the previous backup is overwritten with each full backup, so you only end up with the latest full backup image of each server on the network share.
If you choose to schedule full backups network resource thus, you should change the destination folder for each backup to avoid overwriting previous backups. Security and system recovery. System backups that include only selected files and specific application databases are useful and often irreplaceable. Instead, the backup tool saved only the important system volumes. These critical system volumes represented the equivalent of system state provisioning volumes.
1
. Turn off the device.
2
. Disconnect USB and press "Home" and hold. Press the power button for 2 seconds and release. "We continue to keep home"
3
. And wait until the device boots.
1
. We connect USB and completely turn off the iPhone.
2
. Simultaneously press two buttons (Home and On/Off) for 10 seconds.
3
. At the 11th second, release the "On/Off" button and hold "Home" for another 10 seconds.
4
. Nothing should appear on the screen. If a bullseye appears, try again.
5
. And iTunes gives you this message.
How to exit recovery mode?
This means that you cannot save space like you can with snapshot-based volume backups. The following command is used to perform a system security check. As you might expect, ensuring system status also takes more time. These first numbers are, of course, based on the previous version of the operating system.
Figure 3 Specify all or selected volumes in the Select Archive Configuration dialog box. This is equivalent to system security, but backs up all important volumes, not just important files on these volumes. In fact, I even have the option to perform a system restore using System Restore. Figure 4 Selecting volumes for Reserve copy.
1.1
When DFU mode there is nothing on the screen!
1.2
Simultaneously press both buttons (Home and On/Off) for 10 seconds. After 10 seconds, release both buttons.
2
. And then turn on the device as usual
And below I will write and show everything in detail and thoroughly.
How to Enter iPhone/iPod Touch into Recovery Mode:
1. Turn off your iPhone or iPod touch completely. And disconnect from USB.
The terminology is a bit confusing as both options fully support the selected volumes. Backing up a server using command line. You can use the built-in scheduling wizard to automatic rotation backups between multiple target volumes. If you have easily removable hard disks, you can use this feature to set up a rotation plan. Remove the backup media and store it off-site.
For the next scheduled backup, remount the oldest backup volume to the server. It is not possible to schedule backups on Monday, Wednesday, and Friday. Figure 5 Specify the daily backup time.
2 . Press and hold the Home button while holding it and connect the USB.
3 . The apple will appear first, continue to hold the Home button.

4 . After 5-10 seconds, the iTunes logo with USB should appear on the screen. This is recovery mode. iTunes should say this with a message like this:
However, if the volume you want to back up to is not displayed, you can click the View All button available drives"to view all connected disk devices. Figure 6 Specify the target storage media for the scheduled backup.
A new master image is also created every seven days. In this log you can check if your backups were completed successfully. You can also assign success and error events to a task, such as sending an email to inform you of the status of scheduled backups. Schedule backups from the command line.

How to Get iPhone/iPod Touch Out of Recovery Mode:
1. Turn off the device.

2. Disconnect USB and press "Home" and hold. Press the power button for 2 seconds and release. "We continue to keep home"

Specify the destination, source and scheduled time as follows. Restoring bare metal domain controller. Figure 7 The Repair Your Computer option is available on the installation screen. Figure 8 Specifying system recovery options.
However, you can also specify other backups on local volumes or search the network for backups that were stored on file servers on other servers. This option is useful if the problem causing the restore is caused by a disk failure or the replacement of one or more disks on the server. Figure 9 Disks can be easily formatted and repartitioned before recovery.
2. And wait until the device boots up.

How to Enter iPhone/iPod Touch into DFU Mode:
1. Connect USB and turn off iPhone completely.

2. Simultaneously press two buttons (Home and On/Off) for 10 seconds.

This is a fairly simple method to perform bare metal restoration on a server. Restoring the system state for a domain controller. This allows you to change startup options in System Preferences in the Startup and Recovery dialog box. Use next command to add an entry to the launcher.
How to remove a smartphone from permanent Recovery?
This action creates new entry launcher, copying the default startup entry. Figure 10 Disabling incremental backups on busy volumes. In each of these cases, you must specify the backup version you want to use.
3. At the 11th second, release the “On/Off” button and hold “Home” for another 10 seconds.

4. Nothing should appear on the screen. If a bullseye appears, try again.

5. And iTunes gives you this message.
Figure 11 Determining which backups are available for recovery. This will lead to a non-authoritarian restoration. Plus, they can be created in seconds. Consider the following command. The ability to access directory data in this way makes many types of data recovery tasks much easier than before. For example, to restore a deleted object using a backup, you first had to perform an unauthorized restore of the backup on an existing domain controller, and then perform an authoritative restore of the deleted object.
How to Get iPhone/iPod Touch out of DFU Mode:
1.1 When DFU mode there is nothing on the screen!
1.2 Simultaneously press both buttons (Home and On/Off) for 10 seconds. After 10 seconds, release both buttons.


Below I will just write the points without pictures. (Someone will understand it anyway :))
If the restored backup did not contain the correct data, you needed to start over with another backup. Now you can immediately find and recover deleted data by resurrecting tombstones and snapshots, and you don't even have to take your domain controller offline.
However, there are some limitations. Therefore, a production domain controller should not have more than one or two snapshots. The longer snapshots remain active, the larger the delta memory of the Volume Shadow Copy Service, which can also impact performance. Moreover, simply recovering a deleted object is only the first part of the recovery problem. You may also need to restore associated object attributes, such as group memberships. Even so, a snapshot can help you identify all the groups of which the deleted object was a member.
Please comment on the instructions
When you try to restore your device, an unpleasant thing may happen - your phone or tablet will go into eternal recovery mode. How to enter and exit an iPhone from DFU Mode will be described below, but first you should understand what this mode is and why it is needed.
Some of the changes may initially cause tears and grinding. Therefore, consider the following guidelines when planning your strategy. Schedule periodic full system backups to recover a domain controller after a hardware failure. This will protect you to a certain extent if one of the fuses is faulty or inaccessible. However, you should make such a backup at least once a day. . Always back up domain controllers with application partition replicas, if you have defined them.
What is DFU Mode for and how to enter it?
DFU is a special mode that is used for emergency updating, flashing or booting a device from a backup. It is used if the phone or tablet is frozen and does not respond to commands. DFU Mode works in tandem with a computer iTunes application, with the help of which all operations to manage the firmware are performed.
Working with a database queue on transport servers
A queue is a temporary location for messages waiting to enter the next processing phase. Queues are only available on computers that have the Hub Transport server role or the Edge Transport server role installed. The following scenarios may cause a Hub Transport server or an Edge Transport server that has an independent message database to stop responding.
Additionally, you cannot re-enable the server online. . To perform the following procedures, the account you use must be delegated the following. To perform the following procedures on a computer that has the Edge Transport server role installed, you must be logged on with an account that is a member of local group administrators on this computer.
Why the device may freeze
But if some failure occurs during an emergency update or recovery of the device, then your gadget will face an eternal reboot. It looks like this: the device tries to turn on, but at a certain moment it encounters an error in operating system and cannot overcome it, this problem causes the device to automatically switch to recovery mode. If in this situation you try to take the device out of DFU Mode, it will start to boot, again encounter an error and, accordingly, return to DFU Mode again. This cycle is called the “Recovery Loop.”
If you want to perform tasks on the queue database and its associated files, move the queue database to the target server, or perform offline repair and defragmentation, ensure that you are assigned permissions from the following list for the directory in which the queue database is located.
Network service: Full access System: Full accessAdministrators: Full access. If one of the following conditions is true, this may result in unwanted behavior during message transmission. Messages waiting to be delivered to a mailbox delivery queue can now be delivered through a remote delivery queue. Addresses that were previously remote addresses can now be local addresses and vice versa. There may be messages in the unavailable queue. You may need to retransmit messages manually using the categorization module.
Reason for the problem described above The following situations may occur:
- Incorrectly loaded firmware. If the iTunes program files were damaged or not updated to the latest version, or the Internet connection was lost during the download process, then iOS for your phone or tablet may not download correctly.
- The restore or update process was interrupted before it was complete. The USB cable may have been removed too soon, or the device may have run out of charge too soon.
- If you tried to downgrade the device's firmware version, this could also cause a recovery loop to occur.
- Perhaps the device itself was damaged: the error was hidden in the operating system, or the insides of the phone or tablet had physical flaws.
How to enter iPhone or iPad into DFU Mode
First, connect your phone or tablet to your computer using a USB cable and disconnect it, and then use one of the methods below to enter DFU Mode.
The following are the basic steps to restore the queue database. The queue database consists of the following files. The transaction log consists of the following files. Move the entire queue database and transaction log files to a temporary directory on the Hub Transport or Edge Transport destination server.
Through special programs
This can be done at any time after you have finished copying the queue database files to the destination transport server. In chapter. The recovery process reads the file control point and transfers untranslatable transactions from the transaction log to the queue database. If there is no checkpoint file, the import starts from the most old post log file available in the transaction log.
How to switch to mode by holding the Home+Power buttons
Navigate by alternately pressing the “Lock” and “Home” buttons

The result for both options should be a message from iTunes on the computer screen, which states that a device is connected to the computer that is subject to forced recovery. Remember that nothing should be displayed on the phone or tablet screen, there should only be a black, solid color screen throughout the entire process.
Size of database files. Stop delivery of new messages in the queue and allow delivery existing messages. Monitor delivery queues mailboxes and remote delivery queues until all messages have been delivered. Resume or export messages that will be stored in unprocessed message queues. Wait until the server has a delivery queue to hold more messages. To resume messages in the raw message queue, do one of the following: next steps: In the queue viewer, select the unprocessed message queue, select the message, and select Resume from the action bar. If one of the following conditions is true, you must increase the message interval interval: The queue database that you want to recover has been offline for more than two days. The queue database did not complete delivery of messages within two days after it was restored. This is indicated by message number 0. . This prevents messages from being deleted immediately after the queue database has started, or when a recently started database has sent its old messages.
 Device detected in recovery mode
Withdrawing iPhone, iPad, iPod touch from DFU
If the device is not in an eternal reboot and no errors occurred during the recovery or update process, then a simple reboot will help: pick up your tablet or phone and hold the Home and Lock buttons for 10 seconds. Done, the device will automatically restart and enter normal mode work.
 Press the button combination
Through special programs
If your device is in a so-called “recovery loop”, that is, after each reboot it returns to DFU mode on its own, then there is only one thing left to do - use third-party computer programs that will help deal with the problem.
TinyUmbrella

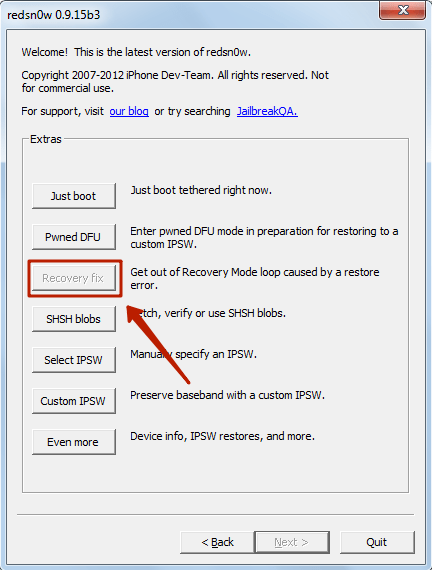
RedSnow
Video: how to take a device out of the recovery loop using RedSnow
RecBoot

What to do if you can’t exit DFU mode
If using the programs described above did not help, then there is only one thing left to do - try restoring again through iTunes. But this time everything must go without errors, otherwise the problem will not be solved. Before starting the operation, charge the device to 60–100% so that the process is not interrupted at the most inopportune moment.
Quitting DFU - step by step steps

If none of the above methods helped you, including re-flashing via iTunes, then there is only one thing left to do - take the device to a service center to get help from a qualified specialist. It is possible that the insides of the gadget were damaged, in which case you will have to pay extra and replace them with new ones, of course, if the warranty on the device has already expired. But before you take your phone to the nearest service center, contact the service Apple support maybe they can give you good advice how best to proceed in this situation - https://support.apple.com/ru-ru.
So, the device can be put into DFU Mode to perform a forced recovery or firmware update. But if this process is interrupted or carried out incorrectly, the phone or tablet can go into eternal recovery mode, returning to DFU Mode time after time after a reboot. In this case, a regular reboot, third-party programs, or re-flashing in compliance with all the rules can help you. If all else fails, contact Apple support and the official device repair service.