Uploading printed forms and reports.
29.05.2017
How to transfer a 1C information base with all credentials from the 1C:Fresh cloud service to a local computer
Get access to the 1C:Fresh cloud for free for 30 days!If for some reason you need to copy or transfer a working database with all credentials from the 1C:Fresh cloud service to your local computer, then it’s very easy to do!
We remind you that the release of the 1C configuration in the 1C:Fresh cloud from which we are downloading data must correspond to the release of the 1C configuration on the local computer into which the data will be downloaded.

In our example, the 1C:Enterprise 8.3 platform (8.3.10.2299) and the Enterprise Accounting configuration (3.0.50.19) are installed on the local computer, which fully corresponds to the parameters of the database in the 1C cloud.
Please note that most of the applications used in the 1C:Fresh cloud service correspond to the PROF versions of boxed deliveries, i.e. The appropriate 1C programs and PROF versions must be installed on the local computer. The only exception is the "1C:Entrepreneur" application, data from the information base of which can be downloaded if you have basic versions of the 1C:Accounting 8 Basic version, 1C:Simplified or 1C:Entrepreneur software products on your local computer.
So, on the local computer we launch an empty working database of the appropriate configuration and the required release, into which we need to load the data.

In the "Administration" section, select the "Download data from service" item.

In Explorer, select the file that was saved at the upload stage (data_dump.zip by default).
You can also check whether the existing user list should be transferred to the local computer.


When the data is loaded, the program itself will start in user mode. If you unloaded users, then you will need to select a user to log in (login without a password).


After which the restructuring of the database can begin.

The familiar configuration interface "1C: Enterprise Accounting" edition 3.0 is loaded, in which you can continue to work on your local computer in the same way as you previously worked in the cloud.

The appearance and functioning of the program are identical, all that remains is to check the correctness of the loaded data.
How to download data from the data_dump.zip file in other typical 1C:Enterprise system configurations
The command for downloading data from the service to the local computer in the interface of most standard configurations is located in the "Administration" > "Downloading data from service" section.In the interface of some configurations, the location of the download command may differ:
If everything worked out as it should, then like the article on social networks or share the link on your favorite forums))).
Online Company, 2017
How to download data from the 1C:Fresh cloud service to a local computer, Saving a 1C information database from the cloud to your computer, How to download a database from the 1C:Fresh cloud service to a local computer, Transferring a database from the 1C:Fresh cloud to a local computer, How to download a database data from the 1C:Fresh cloud service to a local computer, Uploading data from the 1C:Fresh service to a local computer, How to download a 1C information base from the 1C Fresh cloud to your computer, Transferring data from the 1C:Fresh cloud to a local computer, How to download data from cloud service 1C:Fresh to a local computer, How to transfer a database from a cloud service 1C:Fresh to a local computer, Uploading data from a cloud service 1C:Fresh to a local computer, How to transfer all data from a cloud service 1C:Fresh to a local computer, How to save information database from the 1C:Fresh cloud to your computer
Tags: How to download data from the 1C:Fresh cloud service to a local computer, How to download a database from the 1C:Fresh cloud service to a local computer, How to download a database from the 1C:Fresh cloud service to a local computer, How to download from data_dump.zip
1. Find in the “Accounting” section the “Data upload to 1C: Accounting” tab.
2. The data upload form has opened - fill in the “Organization” and “Upload period” fields. Check the box next to the documents required for uploading.

3. Are all required fields filled in? Click “Upload data” - the file will begin downloading to your computer in “xml” format. Save it to your computer.

Now you need to upload the file to your 1C: Accounting. To do this, refer to one of the instructions below.
Important Note
After uploading the files to 1C, counterparties will be automatically created by TIN, if they have not been created previously. You must add the organization yourself.
Smart Logistics specialists cannot use your 1C to download a file from Smart Logistics - they do not have access to this.
Loading from “Smart Logistics” to “1C: Accounting” of the Russian Federation
1. Open in 1C: Enterprise Accounting 3.0. In the toolbar, click the arrow and click Add or Remove Buttons. Check the box next to "Options".

2. In the same toolbar, click on the "Options" button and turn on "Show all functions". Save "Ok".

3. Click on the triangle at the top right and select "All features".

4. In the form of all functions that opens, expand the “Processing” list and launch “Universal data exchange in xml format” from the list.
5. A section has opened for downloading a document file from Smart Logistics. Go to the "Data Loading" tab.

6. Select "Client-based" operating mode from the list.

7. Click on the “Download data” button and select the xml file downloaded earlier from Smart Logistics. The file is called simply "Upload File".

Documents created in Smart Logistics are located in the Sales and Purchases sections.
You have uploaded documents created in Smart Logistics to your 1C:Accounting.
Loading from “Smart Logistics” to “1C: Accounting” Kazakhstan
1. Find the “Administration” tab in “1C: Enterprise Accounting 3.0”.

2. In the “Service” section, click “Universal Data Exchange in XML Format”.

3. Add the upload file to the “File name to upload on server” field and click “Upload data”.

4. If the file is successfully downloaded, a message about the number of downloaded documents will appear at the bottom of the page, for example “Objects downloaded: 19”.

You have uploaded documents created in Smart Logistics to your 1C:Accounting.
In the last lesson we looked at.
However, the most common example is the exchange between accounting and payroll. These bases are not subordinate to each other and may not even be connected initially.
All we need is to periodically unload from the salary to the accounting department.
Let's consider the process of downloading data from 1C.
Principles of uploading and downloading 1C data
In Accounting, the document Sales of goods and services can have 30 fields. This is accounting, it has its own goals, many fields are devoted to the chart of accounts and subaccounts.
In Trade Management, the same document Sales of goods can have 25. This is operational accounting, it has its own goals. But the accounts from the chart of accounts are not indicated there.
The names of the fields in these two databases may be different. Then how to upload one document from one database, and load another into another database?
To describe how a document must be converted so that it can be loaded from one database into another, there are exchange rules.
They are a file with an XML extension. To create it, there is a special 1C configuration called “Data Conversion”.
For exchange between standard configurations, there are standard rules for data exchange, which are embedded in standard exchange settings (Service/Exchange with xxx) or are supplied separately with.
Unload BU-ZP 1C
From the standard configuration Salary and personnel management to the standard configuration Accounting usually periodically upload information about the results of payroll, including for the payment of taxes.
In order for this to be possible, you must first upload the settings from Accounting to the payroll.
To upload 1C from 1C Accounting to 1C Salary - select the menu item Service/Data Exchange with Salary/Upload Data in Accounting.

When uploading 1C for the first time, do not forget to check the box “Information for uploading 1C to a new information base.”

How to upload initial information to Salary - see the next article Uploading 1C.
Unload ZP-BU 1C
After the initial information from the Accounting Department is loaded into the Salary, you can upload accruals from the Salary to the Accounting Department.
In Salary, select the menu Service/Data exchange/Download data into an accounting program.

On the 1C upload settings form, by default, you only need to select the period and path where you want to upload the data file.
The 1C upload format is displayed as a hyperlink - in blue text. You can change it by clicking on the hyperlink and selecting a different accounting configuration.

Unload BU-UT 1C
To upload 1C from Accounting to Trade Management, you need to create exchange settings. This will allow you to do not only one-time 1C uploads, but also set up a full-fledged periodic exchange, as in.
To make settings, select the menu item Service/Data exchange with Trade management/Set up data exchange in Accounting.

Settings are created using a “wizard”.

We will not take the easy route, and will control all the settings ourselves; for this you need to select the Expert operating mode.

Since we are creating a setup from scratch, we will select “Create an exchange setup” (accordingly, you can “continue” if you interrupted the wizard earlier or change if the wizard was completed).

This exchange setup is done in two databases - first in one, then in the other.
Accordingly, we will select “Create using file” if you started making a new one from scratch in Trade Management, and here you need to complete the setup (similarly, if you start in Accounting, you will need to complete it in Trade Management).

The settings for “via file” exchanges are simple and are not shown here in the pictures. But for a “direct” COM connection there are examples here.
Example, if Trade Management is “file” - it is located on disk. .

Example, if Trade Management is located on the 1C server. The name of the server and database is .

The path to the file database, as well as the server and the name of the database on the server, are displayed in the database selection window in 1C.

Here you need to indicate whether you plan to download something from Trade Management. If so, then this is a “two-way” exchange.

We can specify filters for uploaded documents. For example, in terms of organizations.

The next page indicates the period from which the exchange is expected, as well as the list of documents that will be uploaded.

This completes the first part of the setup. Based on its results, 1C creates a settings file. Now you need to go to the Trade Management and continue the setup there, selecting the “Continue using file” option and specifying this file.

After setting up the exchange from both databases, 1C offers to perform an initial upload of 1C directories and compare objects. This is an analogue of the primary unloading of 1C for the further normal functioning of the exchange.
Pay attention to this point, if Trade Management is not an empty database, it has its own directories, especially if they have been maintained for a long time.
If you are not sure about this point:
- Make backups of both databases (especially if the exchange is two-way)
- Ask users not to work in these databases while you are doing the initial unloading of 1C (weekends and evenings :)
- Unload 1C, check that the directories are not duplicated
- If something is wrong, go back to the backup.

Unload UT-Retail 1C
The typical 1C Retail configuration is often used in conjunction with the Trade Management configuration. Typically, UT is used in retail stores, and Retail in the office.
We are looking at an example of setting up the exchange of UT edition 11 with Retail.
Select Administration in the interface, then Data Exchanges, Add/Create Exchange with Retail configuration.

Setting up the exchange is done in two databases - first in one, then in the other.
Accordingly, we will select “Continue” if you started making a new one from scratch in Retail, and here you need to complete the setup (similarly, if you start in Trade Management, you will need to complete it in Retail).

On this tab, you select the method of transferring information between two databases - through a file (share). Skip this page if you want to use another option.

On this tab, you select the method of transferring information between two databases - via a file (FTP). Skip this page if you want to use another option.

Final settings page. To specify clarifications, click the “Configure restrictions” button.

Here you can specify the date from which documents will be uploaded, as well as selections (filters) by organizations, warehouses, etc.

On the correspondence tab, you can configure the correspondence of some directories (stores = departments and cash desks).

This completes the first stage of setup. As a result, a settings file was created. You need to complete the setup in the Retail database by specifying Continue using the file.
Very often you need to obtain data from 1C 8.3 and save the information to an external file, in other words, download it from 1C enterprise. The task is almost always possible without the involvement of 1C programmers.
Let's look at a number of useful tips with which you can upload data from 1C to an external information system.
In 1C there are several methods by which you can obtain information without the involvement of specialists:
- Uploading the entire database from 1C 8.3 - for subsequent loading on another computer
- Save reports and printables in Excel, Word or PDF
- Uploading tables from 1C
- Retrieving Information Using the Query Console
More details about them:
How to download the entire database from 1C 8.3 (to a .dt file)
To do this, you will need to go to the configurator mode, then in the main menu select “Administration” - “Upload information base”:
Then you only need to indicate the name of the future file and its location on the disk.
To subsequently upload to another database, click on the “Load information base” button and select the previously uploaded file.
Uploading reports and printed forms from 1C to Excel
This method is universal and very simple. To do this, it is enough to open a printed form or report.
For example, open the TORG 12 printable form, press ctrl+S (or in the File – Save As menu) and select the file type and its name:

The same system applies - the report is downloaded in two clicks:

Get 267 video lessons on 1C for free:
Saving in the main formats is available - excel, word, pdf, html, txt, etc.
Uploading tables from 1C 8.3
Often there are such trivial tasks as “get a list of payments for the current year”, “unload a book of purchases or sales” or “unload goods from invoice No. 256”. Solving such problems is quite simple.
For example, I need to receive all receipts from the counterparty “Vector” with an amount greater than 1000. Let’s open the list form and set the necessary selections in the list:


The system will offer an output option - to a spreadsheet document or a text document, select tabular. The 1C program will display the information in the following spreadsheet document, which, like reports, can be saved in the format we need:

Similar actions can be performed for almost any tabular part in 1C 8.2. For example, we needed to unload a list of goods from receipt No. MSK00003, no problem. This is done very simply - open the document, call the context menu and after a couple of clicks we get the desired upload in the required format:

Uploading a journal of transactions from 1C to Excel:
Retrieving Information Using the Query Console
However, not all information can be found in the simple tabular part of 1C 8.2. Sometimes you need to collect data from several data sources and connect them using some fields.
This method is suitable for technically savvy people who know the basics of query language. It consists in obtaining the result of the request using and saving it in the format we need.
For example, you need to get all supplier counterparties and their phone number. To do this, we will write the following query:

The resulting table can also be downloaded into the desired file format:

You can load the received data into another 1C database using “ “. Watch the video instructions using the nomenclature as an example:
Despite the fact that 1C is the most popular, convenient and reliable information system, which has in its line a set of solutions for automating and processing absolutely all business processes in enterprises of any size and field of activity, users still have a daily need to download data from 1C to third party programs or files. In this article we will look at what unloading from 1C is and we will show how to unload from 1C and what problems may arise during this process.
Data that can be downloaded from 1C
1C of any configuration normally supports uploading such data as:
- Printing forms;
- Reports;
- Tables and lists.
Uploading data from 1C 8.3 is possible in many popular formats:
- Microsoft Excel;
- Microsoft Word;
- Upload to CSV;
- HTML and others.
Uploading printed forms and reports
Any printed form or report in 1C can be saved in the desired format. To do this, you will need to open the form or report, then select from the Main menu File - Save As.
After this, a file saving window will open, indicating the file name and type:

Possible problems when unloading from 1C

This is because the printable form or report is not currently active. To make the printed form available for saving, you just need to click the mouse anywhere on it:

Upload to Excel
Processing data in the most popular tabular format requires appropriate uploading. In order to save the necessary data in Excel format, you must specify the Sheet type Excel2007-...(*.xlsx) in the file save dialog. Less often it is necessary to save data in the old Excel Sheet format (*.xls):
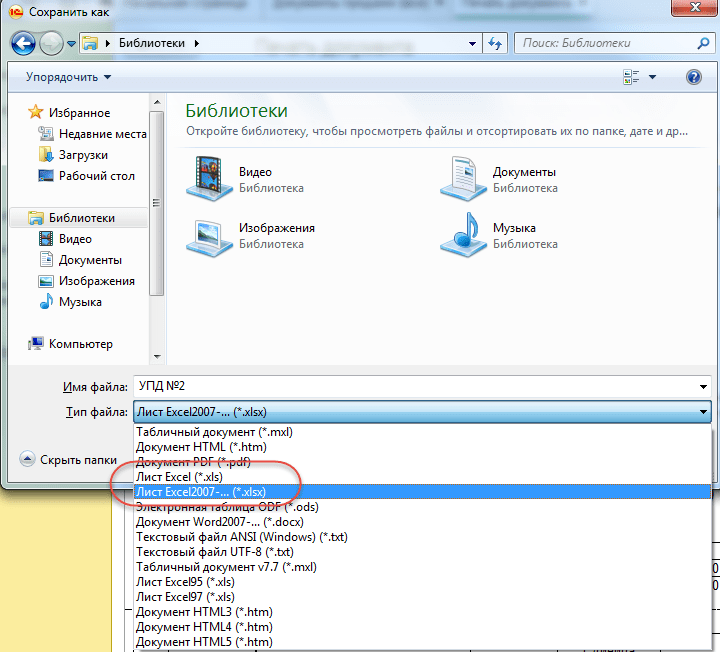
Similarly, by choosing the desired format, you can upload from 1C to PDF, from 1C to WORD, from 1C to CSV, and also to other formats.
Uploading arbitrary tables from 1C
This section will show you how you can upload any data, provided that you have the rights to do so.
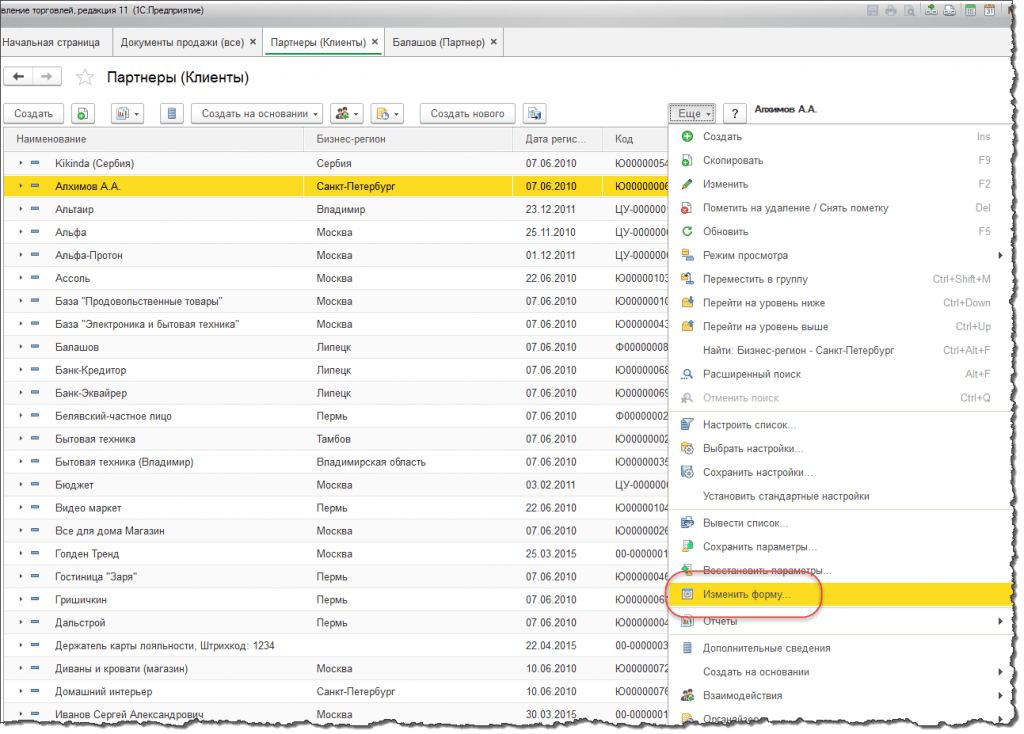
1C has developed a standard mechanism that allows you to upload any list (for example, a list of documents or directory elements). To do this, in the command panel of any list, in the group "More" command available "Get a list":


The information will be displayed in a special spreadsheet document. This document looks the same as any other report in 1C, and it can be uploaded in the same way using the command File - Save As:

How to upload data that is not visible in the list
Often, the task of unloading a list is accompanied by the need to add columns that are definitely in the document (directory), but for some reason they are not visible in the current list. Example: in the “Clients” list, add the “Phone” field for uploading, which is displayed only in the additional panel on the right:

In order for the phone to be unloaded from 1C, it must first be added to the list. To do this you need to call the command "More - Change Shape." Next, we need to find the one we need in the list of columns. There is one trick here: developers of standard configurations almost always add a field "Link". If you stand on it and then press the button then we will see all possible fields of this directory. Finding the field "Telephone" and check the use box.

After this, the customer database with telephone numbers can be uploaded to a file using the standard command "Get a list" and sell to competitors.