Everything you need to know about Apache Basic authorization. Setting up a connection to AD
Transparent authorization theme in OTRS using Active Directory always popular. And since the native environment for OTRS is a *nix environment, the first item on the list is setting up transparent authorization by the Apache web server of users from the AD domain. Due to the recent update of the system and its transfer to another server, I had to go through a thorny path again. As it turned out, there is a significantly shorter and simpler way than described in the links in my. All actions are performed from the server console with Apache and do not require any file exchange, copy-paste with a domain controller and other garbage. I am recording it for memory and to help colleagues.
Attention! These actions solve the problem of transparent authorization of users from the AD domain to Apache web server in Ubuntu 16.04 environment. I don’t know whether they solve any other problems (for example, authorization in the console using an account from AD), I haven’t checked. I don’t know if the solution will work on another Linux, I haven’t tested it.
So, let's go.
Initial position
- Freshly installed Ubuntu Server 16.04. Server name ubuntuadmember, the DNS entry is present.
- Installed Apache and Perl packages (including the Perl module for Apache)
- Apache is configured to execute Perl scripts
- All the commands listed below are executed as root, so as not to create permanent sudo
To check that everything is ready, place this script, for example, in /var/www/cgi-bin/test.pl, and configure it so that it can be accessed at http://ubuntuadmember/cgi-bin/test. pl. The script displays all server variables, and the first line specifically displays the REMOTE_USER variable, even if it is empty. It will come in handy later.
#!/usr/bin/perl use strict; use warnings; print qq(Content-type: text/plain\n\n); print "REMOTE_USER -> $ENV(REMOTE_USER)\n\n"; foreach (keys %ENV)( print "$_ -> $ENV($_)\n"; )
If everything works correctly, you will get something like this:
Please note that the REMOTE_USER variable is empty (it is not in the general list at all), i.e. The connection is not authorized for the server, anonymous. We will eliminate it.
Install the required packages
We will need packages krb5-user to support Kerberos authorization in the system, libapache2-mod-auth-kerb to support Kerberos authorization in Apache and msktutil to create a computer account and everything related in AD. Let's install them:
Apt-get install krb5-user libapache2-mod-auth-kerb msktutil
Setting up a connection to AD
Initial data about AD:
- A domain, for example, with the name lab.local
- Domain controller 1 with name dc1.lab.local
- Domain controller 2 with name dc2.lab.local
You need to edit the /etc/krb5.conf file and add lines to the following blocks:
Default_realm = LAB.LOCAL LAB.LOCAL = ( kdc = dc1.lab.local kdc = dc2.lab.local default_domain = lab.local admin_server = dc1.lab.local ) .lab.local = LAB.LOCAL lab.local = LAB .LOCAL
Yes, that's right, respecting the case of letters. In principle, the original contents of /etc/krb5.conf are not needed, but I left them. Superstition?
Create a computer account in AD
Initial data
- You have an account with rights to create new computer accounts. Let it be called [email protected]
- There is no computer account in AD
- You plan to use an address that matches the server name to work with OTRS. In our case, the server name ubuntuadmember, OTRS address http://ubuntuadmember/otrs/index.pl
Warning. In other cases it may be necessary additional actions, and I don't know which ones exactly.
Login to AD using your account [email protected]
Kinit-V [email protected]
If there are no errors, check:
Create a computer account
Msktutil -c -s host -s HTTP -s HTTP/ubuntuadmember / --computer-name ubuntuadmember --server dc1.lab.local
Let's look at this command in more detail:
- The -c switch specifies that you need to create a computer account.
- The -s switches specify what values are needed in the servicePrincipalName attribute of the computer account. If you do not specify anything, then the necessary lines with the HTTP prefix will not be there.
- The --computername switch specifies the name of the computer account. You can skip it, then the name will match system name server.
- The --server key specifies the name of the domain controller on which to create Account. You can skip it, then an attempt will be made to determine the name yourself.
!!! Attention!!! Attention!!! Attention!!!
The msktutil utility has the –verbose switch, which is designed to make the output of the utility’s output on the screen more “human-readable”. However, the x64 version of the tool contains a bug in which launching with the –verbose key stops with an error, but without it it works correctly! It seems like there is no bug in the x86 version. Don't fall for this cheap trick, don't waste your time like I did.
If everything worked, an account should appear in AD in the Computers container, in our case, ubuntuadmember.
We'll exhibit necessary rights to a file with keys
Chown root.www-data /etc/krb5.keytab chmod 0640 /etc/krb5.keytab
Let's configure Apache for authorization
Warning. The following settings enable Kerberos authentication for the entire default site. If you need to turn it on more subtly, smoke manuals.
Let's edit the file /etc/apache2/sites-enabled/000-default.conf and add before next block:
Marked in red:
- /etc/krb5.keytab— default path to the key file. If you want to change, don't forget to move the file too
- HTTP/ [email protected] - must exactly match the computer name and domain
After making changes you need to restart Apache
Service apache2 restart
Setup complete
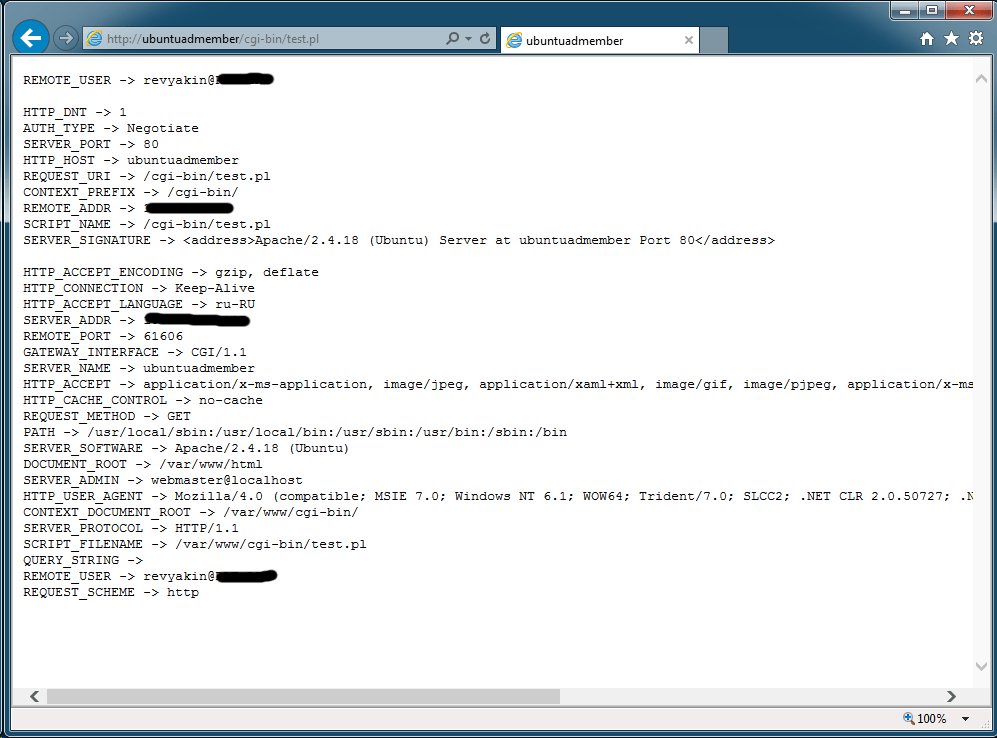
If everything worked, calling http://ubuntuadmember/cgi-bin/test.pl should show a picture like this (a screenshot from a real server, so censorship). Pay attention to REMOTE_USER, there is a domain account in the username@DOMAIN format. If you make a call from a domain machine and from domain user, and the browser is configured (the site is in the Intranet zone), then authorization will pass transparently without unnecessary questions. Otherwise, a standard request to enter your login and password will simply appear.
Damn, I wanted it to be shorter, but it still turned out long. I will try again:
### install modules apt-get install krb5-user libapache2-mod-auth-kerb msktutil ### edit /etc/krb5.conf for your AD nano /etc/krb5.conf ### login with AD admin permissions kinit - V [email protected]### create computer account msktutil -c -s host -s HTTP -s HTTP/ubuntuadmember / --computer-name ubuntuadmember --server dc1.lab.local ### change permissions on keytab file chown root.www-data / etc/krb5.keytab chmod 0640 /etc/krb5.keytab ### edit apache config nano /etc/apache2/sites-enabled/000-default.conf ### restart apache service apache2 restart ### USE and ENJOY
Wow, that's much better! Write comments/questions/additions in the comments.
It is often necessary to restrict user access to certain areas of your site. For example, to the administrative part. This is often done by creating your own authorization mechanism. However, there is a way to protect areas of the site using built-in server and browser tools. Simplest authorization is called Apache Basic authorization. This will be a long article, so be prepared for a lot of reading. But it will contain everything you will ever need to work with this type of authorization.
How it works
First, we put the .htaccess file on the server. In it we indicate which zone (or specific file) we want to password protect. It might look something like this:
AuthType Basic #authorization type
AuthName "Name" #authorization name
#location of the password file
AuthUserFile /usr/host/mysite/.htpasswd
#skip any user,
#who entered the correct username and password
require valid-user
In addition, the site may contain a password file. It has a simple structure:
login:encrypted password
login:encrypted password
...
The path to this file is specified in htaccess.
Conversation with a server under a magnifying glass
Now let's assume that someone typed in the address of a password-protected directory. What will happen? Here's what:
1.
The browser asks the server for a page at http://site/secret.
The server sees that this page is protected. It sends the browser headers:
WWW-Authenticate: Basic realm="My Realm"
Status: 401 Unauthorized
HTTP Status: 401 Unauthorized
Here it must be said that the zone (realm) - important parameter. If you need to guide the user through several password-protected zones, not all of which the user should have access to, then the name of the zone will determine whether the user is logged in to this place or not.
2. Having received these headers, the browser draws a login and password request form on the screen. If the user clicks "Cancel", the browser displays all the data that followed these headers.
3. If the user has entered a login and password, they are sent to the server. He goes into the file with passwords and looks at the following pair there. If it finds it, it sends back the page that the browser requested at the very beginning. If not, it sends authorization headers again.
4. If the user entered the correct login and password, and the server responded with the requested page, the browser remembers the entered login and password for this zone.
5. Then, if the browser sends any (!!!) request to the server, it attaches a pair to it - login and password. It looks like this:
Authorization: Basic base64(login:pass)
That is, the login-password pair is encrypted in base64. Let me draw your attention once again - the login and password are now sent with any browser request. For pictures, style files, scripts, favico and everything else. Essentially, to receive each file, you go through authorization. Only the browser does this for you.
6. When the server receives a request, it checks to see if it also comes with a login and password. If they do, they immediately check for authorization.
Authorization request in Perl and PHP
Now it’s time to figure out how to display the Apache authorization window not using htaccess, but using a script in Perl or PHP. I specifically put these two solutions on two different languages under one heading. Because now, knowing the mechanics, we can quickly come to the conclusion that in order for the authorization request window to appear, we only need to send necessary headers. This is what we will do.
#Perl
print "WWW-Authenticate: Basic realm=\"My Realm\"\n";
print "Status: 401 Unauthorized\n";
print "HTTP-Status: 401 Unauthorized\n";
print "Content-type: text/html\n\nCancel";
#PHP
header("WWW-Authenticate: Basic realm=\"My Realm\"");
header("Status: 401 Unauthorized");
header("HTTP-Status: 401 Unauthorized");
print "You clicked Cancel";
The result in both cases will be an authorization request form.
Intercepting authorization in Perl
Let's say the user has entered a username and password. They are sent to the server. But here a problem arises. The fact is that when Apache receives a login and password, it wants to check them in the password file. But what if logins and passwords are stored not in a password file, but in a database? In this case, you need to authorize the script before Apache does it.
A difficulty arises: Apache does not pass the entered login and password into environment variables. That is, accessing them from Perl is problematic. But probably. The simplest solution is to use mod_rewrite. Add the following lines to the htaccess file:
RewriteEngine on
RewriteCond %(HTTP:Authorization) ^(.*)
RewriteRule ^(.*) —
They will add a new environment variable. From Perl it will be visible as $ENV(HTTP_CGI_AUTHORIZATION). It will contain a login-password pair encoded in base64. Of course, you'll have to tinker a little to recode them back, but that's something. Moreover, there is, in fact, not much fuss there:
$ENV(HTTP_CGI_AUTHORIZATION) =~ s/basic\s+//i;
my ($REMOTE_USER,$REMOTE_PASSWD) = split(/:/,decode_base64($ENV(HTTP_CGI_AUTHORIZATION)));
Now we have two variables $REMOTE_USER and $REMOTE_PASSWD, with which you can authorize using the script, checking the login and password with whatever your heart desires.
Intercepting authorization in PHP
Session support in Perl and PHP
Among other things, after authorization is successful, the environment variable will contain the login of the authorized user, which calls the executable script. That is, you will always know who exactly launched the script. The login is contained in the variables:
#perl
$ENV(REMOTE_USER)
#php
$_SERVER
That's it
The article turned out to be great, as I promised. But it examines the basic principles of how Apache base authorization works, and also contains solutions to some problems that may arise when working with it. To be honest, I spent more than one hour looking for answers to some of the questions resolved in this article. I hope it will help save time for other programmers.
Related links
- htaccess and htpasswd - how to authorize only Apache
- htaccess.net.ru - a site dedicated to the possibilities of server management using htaccess files
The first thing I tried to do was to use the Apache authnz_ldap_module module, on the use of which there is a lot of information on the Internet. At first I was faced with the fact that authorization failed and the server responded to the page request internal error. After some digging, I realized that it was all about the encodings: my locale is koi8-r, and AD, as you know, uses utf8. Having sketched a small script in perl, I converted the Apache config to utf8 encoding. After this operation, I was able to authorize any domain user (Require valid-user), a specific domain user (Require ldap-user), but for some reason I could not authorize by group. After spending n amount of time, I realized that the user must be in the same OU as the group. This surprised me very much, since it is not entirely clear why such a strange authorization is needed. Maybe I did something wrong, but in the end I decided to stop using the authnz_ldap_module module and do authorization on approximately the same basis as Squid authorization, using Samba and the auth_ntlm_winbind_module module.
I’ll say right away that I didn’t find a ready-made package for FreeBSD and had to use what I found on the Internet, but more on that below.
To successfully solve the problem, I needed to install Apache, heimdal, Samba 3 from the ports and find an archive on the Internet with the auth_ntlm_winbind_module module. So, in order.
The first is Apache installation. There is nothing complicated or terrible about this, especially when installing ports: make config and make install clean.
Now we manipulate the configuration files. Let's first understand Kerberos by creating a /etc/krb5.conf file, filling it with approximately the following content:
ticket_lifetime = 24000
default_realm = DOMAIN.RU
dns_lookup_realm = false
dns_lookup_kdc = false
DOMAIN.RU = (
kdc = server1.domain.ru:88
kdc = server2.domain.ru:88
}
.domain.ru = DOMAIN.RU
domain.ru = DOMAIN.RU
pam = (
debug = false
ticket_lifetime = 36000
renew_lifetime = 36000
forwardable = true
krb4_convert = false
}
I have two domain controllers, respectively, so in the realms section I specified two kdcs. It should also be noted that the case of letters in this file is very important.
The next file is the Samba settings file. I don't need all Samba functionality, so I renamed the default configuration file to smb.conf.old and created a new /usr/local/etc/smb.conf:
workgroup = DOMAIN
netbios name = svn
realm = domain.ru
server string = svn
hosts allow = 192.168 127.0.0.1
winbind separator =+
winbind use default domain = yes
winbind uid = 10000-20000
winbind gid = 10000-20000
winbind enum users = yes
winbind enum groups = yes
template homedir = /tmp/winnt/%D/%U
template shell = /bin/bash
max log size = 50
security = ADS
auth methods = winbind
password server = server1 server2
passdb backend = smbpasswd
case sensitive = no
Now you need to obtain a Kerberos ticket using the kinit command:
kinit –p administrator
Now add Apache autostart (if not added before) and Samba daemons to the /etc/rc.conf file:
apache22_enable="YES"
smbd_enable="YES"
nmbd_enable="YES"
winbindd_enable="YES"
And we try to start smbd, nmbd, winbindd manually. Now we check the operation of winbindd using the wbinfo –p command, to which the correct response is “Ping to winbindd succeeded on fd 4”.
The next step is to add the machine to the domain. This simple operation is performed with the following command:
net rpc join –S server1 –w DOMAIN –U administrator
So, our machine is now a full member of the domain.
As I said above, it was not possible to find a module for FreeBSD, but a module for Debian was found. The most important thing is that the found archive contains the mod_auth_ntlm_winbind.c file, which needs to be compiled and installed. We do it this way:
/usr/local/sbin/apxs -DAPACHE2 -c -i mod_auth_ntlm_winbind.c
Now we proceed to the last stage - setting up the configuration Apache file. Before this, we create a test directory /usr/local/www/apache22/data/test, in which we create a test file index.html with any content. So, we add the loading line for our module to the config /usr/local/etc/apache22/httpd.conf:
LoadModule auth_ntlm_winbind_module libexec/apache22/mod_auth_ntlm_winbind.s o
and the rules for accessing our test directory, in the form of this block:
Options Indexes FollowSymLinks
AllowOverride None
Order allow,deny
Allow from all
AuthName "NTLM Authentication"
AuthType NTLM
NTLMAuth on
NTLMAuthHelper "/usr/local/bin/ntlm_auth --helper-protocol=squid-2.5-ntlmssp --require-membership-of= SID"
NTLMBasicAuthoritative
AuthType NTLM
require valid-user
Where SID is the SID of the group that needs access to this folder.
And finally, I’ll show you how to PowerShell help quickly get the SID of the group we need:
$sid = (new-object system.security.principal.NtAccount("gro up_name "))
$sid.translate() | Format-List Value
Using standard Apache modules, it is possible to prompt a user for a login and password when attempting to access a specific page or directory. Access will be allowed if the login and password are present in a special file.
Creating a password file
The credentials file is usually called .htpasswd and is located in a directory to which access must be restricted. By default, Apache denies access to all files that begin with .ht, so the file with passwords is like the file .htaccess, cannot be read by any visitor to your site.
Each line of the file stores data about one user. The login and encrypted password are separated by a colon. Example:
Admin:YFC5nYLiUI2ig vasya:bnqw1eZHP2Ujs
A utility is used to encrypt passwords htpasswd, which comes bundled with Apache. To create a new file with data about
user admin, enter the command:
$ htpasswd -c .htpasswd admin
To add to already existing file The command used is:
$ htpasswd .htpasswd vasya
After launch, the utility will ask you to enter the password twice and, if they match, the user data will be added.
Access limitation
Now, to enable the authorization request when attempting to access, you need to make changes to the configuration file or to the file .htaccess. I remind you that the use of files .htaccess undesirable, as it reduces server performance.
You will need to change the directory path (Directory), the path to the password file (AuthUserFile) and the prompt string (AuthName) that is displayed to the user when prompted for a password. You can find out the meaning of other directives from the Apache documentation.
After making changes to the configuration file, be sure to restart Apache.
Notes
IN in this example The simplest option for restricting access is given. In general, the capabilities of the Apache authentication system are much broader. For example, users can be divided into groups, passwords are stored in a database or requested via a special protocol from other servers. We recommend that you familiarize yourself with all the features in the Apache documentation.
The example shows simplest type authentication - Basic. You should be aware that in this case the password is transmitted from the client to the server in clear, unencrypted form. If this does not suit you, you can use another type of authentication or the HTTPS protocol.
|Almost every website has sections to which you need to restrict access. Web applications typically provide their own authentication method, but if this option is not suitable for some reason, the web server itself can be used to restrict access.
This tutorial shows you how to set up password-based authentication on the Apache web server on Ubuntu 14.04.
Requirements
To complete this tutorial, you need a non-root user account with sudo rights. To create such an account, please refer to this.
Installing Apache utilities
To create a file for storing passwords, you will need the htpasswd utility. It is included in the apache2-utils package, which can be found in the Ubuntu repository.
Update the list of packages and install the necessary utilities and Apache server 2 using the following command:
sudo apt-get update
sudo apt-get install apache2 apache2-utils
Creating a Password File
The htpasswd command is now available on the server, which allows you to create a password file, required by the server Apache for user authentication. Create a hidden .htpasswd file in the /etc/apache2 directory.
When you run this utility for the first time, you need to use the –c flag, which will create required file. Specify the username at the end of the command to create new entry in file:
sudo htpasswd -c /etc/apache2/.htpasswd 8host
Note: Replace the conditional username apache 8host authorization setup with your name.
The program will prompt you to create and confirm a password for this user.
To add other users to the password file, use the htpasswd command without the –c flag:
sudo htpasswd /etc/apache2/.htpasswd another_user
The password file contains usernames and their passwords in encrypted form:
cat /etc/apache2/.htpasswd
8host:$apr1$lzxsIfXG$tmCvCfb49vpPFwKGVsuYz.
another_user:$apr1$p1E9MeAf$kiAhneUwr.MhAE2kKGYHK.
Setting up Apache authorization
So, the necessary password file is ready. Now we need to configure Apache to check this file before serving private content. This can be done in two ways.
First method: edit Apache settings and add password file information to virtual host. This method is usually more productive because it avoids reading common configuration files. If you are using virtual hosts, it is recommended to use this configuration method.
The second method is more suitable for users who do not have the ability to edit the virtual host. In this case, you can restrict access to certain sections of the site using the .htaccess file. The Apache server uses .htaccess files to set up certain configuration elements in the directory that stores content. The disadvantage of this method is that the Apache server must re-read all these files every time a request is made to this directory, which can negatively impact performance.
Select the most appropriate setup method and follow the instructions in the appropriate section.
Setting up authorization via a virtual host
Open the virtual host file for the site whose access you want to restrict. This example uses standard file 000-default.conf containing the default virtual host.
sudo nano /etc/apache2/sites-enabled/000-default.conf
The uncommented file looks like this:
DocumentRoot /var/www/html
Authorization in Apache is configured by directory. To do this, find the directory section to which you want to restrict access in the block
/etc/apache2/sites-enabled/000-default.conf
ServerAdmin webmaster@localhost
DocumentRoot /var/www/html
ErrorLog $(APACHE_LOG_DIR)/error.log
CustomLog $(APACHE_LOG_DIR)/access.log combined
In the block of this directory you need to indicate the authorization type, in in this case– Basic. In the AuthName parameter, specify the name of the data area that will be displayed when prompted. Use the AuthUserFile directive to specify the password file you created earlier. Set the Require directive to valid-user to restrict access to content to only authorized users.
ServerAdmin webmaster@localhost
DocumentRoot /var/www/html
ErrorLog $(APACHE_LOG_DIR)/error.log
CustomLog $(APACHE_LOG_DIR)/access.log combined
AuthType Basic
Require valid-user
Save and close the file. Restart Apache to update the configurations.
sudo service apache2 restart
Now access to the content located in this directory is password protected.
Setting up authorization using the .htaccess file
First, you need to configure Apache to support .htaccess files. Open Apache configurations:
sudo nano /etc/apache2/apache2.conf
Find the block
. . .
Options Indexes FollowSymLinks
AllowOverride All
Require all granted
. . .
Save and close the file.
Then you need to add a .htaccess file to the directory to which you want to restrict access. Again, in the example, access will be limited to the document root directory, /var/www/html (that is, the entire site). To restrict access to another directory, amend the code accordingly.
sudo nano /var/www/html/.htaccess
In this file you need to specify the authorization type, in this case it is Basic. In the AuthName directive, specify the name of the data area that will be displayed upon request. In the AuthUserFile directive, specify the Apache password file you created earlier. For the Require directive, set the value to valid-user to allow access to the content only to users who can be authorized.
AuthType Basic
AuthName "Restricted Content"
AuthUserFile /etc/apache2/.htpasswd
Require valid-user
Save and close the file. Restart the web server to update its settings.
sudo service apache2 restart
Authorization testing
To ensure that the required directories are password protected, try accessing restricted content in a web browser. An authorization form should appear on the screen prompting you to enter a username and password:
Authentication Required
The server requires a username and password. The server says:
Restricted server.
User Name:
Password:
Please enter valid credentials to access the content. If incorrect credentials are received, the server will return an “Unauthorized” error.
Conclusion
The site content is now password protected. Please note that password protection must be combined with SSL encryption, otherwise the credentials will be sent to the server as plain text, and this is a very serious security vulnerability.
Note: To learn how to create an SSL certificate for Apache, read this.
Tags: ,