Recovering windows 10 using swm files. I'll add an important note
Reading owner reviews Dell laptop 7720 from pre installed Windows 8 about the difficulties in deploying this very Windows 8 from the Recovery partition of a laptop hard drive to SSD drive and, more precisely, the inability of the Dell utility Backup and Recovery to deploy the factory image to the SSD, the goal was to restore the system to the SSD disk from the image file manually. It turns out to be an interesting situation - people, having bought a laptop, paid for pre-installed Windows 8, but they cannot transfer it to an SSD, they cannot update it from there to Windows 8.1 for free.
The recovery image file on the Recovery partition is divided into 4 parts: Install.swm, Install2.swm, Install3.swm, Install4.swm.
Let's roughly divide the whole process into stages:
- Building a factory image file Install.wim of four parts into which it is divided: Install.swm, Install2.swm, Install3.swm, Install4.swm.
- Preparing the SSD disk, creating partitions for system deployment.
- Install.wim to the prepared section.
- ESP(EFI System Partition) partition.
Building the factory image file Install.wim
To build the file, it is perhaps most convenient to use the installed OS: this can be additional system on a laptop or system at home desktop computer. I will not describe how to put the Install.swm, Install2.swm, Install3.swm, Install4.swm files there.
The most troublesome thing will be Windows owners 7, because To merge the file, they will have to download and install a package on the system Windows AIK for Windows 7 weighing approximately 1.2 GB: download (the package is installed entirely and its main weight is wim images for building WinPE), or package Windows ADK for Windows 8 weighing 2.5 GB: download. This is an on-line installer. Here full set on the torrent tracker. It has a custom installation and you can install only 40 MB by checking only the second item from the top. I gave links to the download as an example, you can search for them on the Internet and download them yourself.
Place the files Install.swm, Install2.swm, Install3.swm, Install4.swm. to the root of drive C. Why exactly to the root of the disk? Yes, it’s just that the commands entered will be shorter, specifically to the root of the C drive, because some have only one C partition and others don’t.
Windows AIK for Windows 7, then run the deployment tools command line as administrator and use imagex collect the file by entering the command imagex /export c:install.swm 1 c:install.wim /ref c:install*.swm

As you can see from the screenshot, building the file took more than 2 minutes at the size final file more than 13 GB (the image was collected on another SSD).
If you have Windows 7 and have installed Windows ADK for Windows 8, then run the command line of the deployment and imaging tools environment as an administrator, and using DISM collect the file by entering the command


If you have Windows 8, then you are the luckiest: there DISM already built into the system, you don’t need to download anything additional, just run the command line as administrator and run the previous command to build the file dism /Export-Image /SourceImagefile:C:install.swm /SWMFile:C:Install*.swm /SourceIndex:1 /DestinationImageFile:C:Install.wim

That's it, the file is collected. This is Install.wim in the root of drive C. Which of the three proposed methods you will proceed with is up to you to decide. Surely there are other ways.
Preparing an SSD disk, creating partitions for system deployment
Preparing an SSD disk includes creating ESP(EFI System Partition) partition where the download files will be located and create a partition for future system. Because There is always not enough space on the SSD, so we will not make any recovery partitions, MSR We will also not create a (MicroSoft Reserved) section as it is unnecessary - we only need the system. By the way, MSR section 128 MB in size is present on the vast majority of GPT disks, and their owners do not even know that they have 1 partition more than they think: it is not visible in disk management, does not see it and, for example, Acronis Disk Director.
Launch the command line. To do this, we boot from the WinPE4 disk. You can connect the SSD to a working Windows system 8 and call the command line from it.
I booted from a WinPE4 disk, i.e. on Windows based 8.
Next I will write the commands, briefly explaining each one. Commands can be written in capital letters, and not like mine. I will also write commands without abbreviating words (sel, lis, dis, part, vol), i.e. completely, to make it more meaningful (select, list, disk, partition, volume).
diskpart(called the partition manager)
list disk(a list of disks will be shown, you need to remember the number of the SSD disk: 0, 1, etc. Let our SSD be disk 0)
select disk 0(select SSD disk)
clean(clear it completely)
convert GPT(convert it to GPT)
create partition EFI size=100 offset=1024(creating a 100 MB ESP partition with 1 MB offset)
format quick fs=FAT32 (quick formatting it in FAT32)
assign letter=R(we temporarily assign any letter to the ESP section, for example, R)
create partition primary(creating a partition for all remaining space)
format quick fs=NTFS(quickly format it to NTFS)
assign letter=S(we assign any letter to the created NTFS partition, for example, S. I don’t know, maybe the letters C, D, E, etc. are already taken by you, so I took a letter from the middle of the alphabet. Don’t worry, the deployed system will be on drive C , as intended by the manufacturer, and these letters: R and S are given to partitions temporarily, for copying download files (to in this case from S to R).
exit(left diskpart)
Deploying a system from a factory image Install.wim to the prepared section.
- Select tab Application(Apply).
- As Source(Source) select the merged file Install.wim.
- As Recipient(Destination) indicate the section we created with the letter S.
- Press the button Apply(Apply).


Copying system boot files to ESP(EFI System Partition) partition
The command below is executed on the command line: either boot disk WinPE based on Windows 8, or on a Windows 8 system (this is if you have attached an SSD to it). Do not attempt to run this command from the installer. Windows disk 7 and bootable WinPE made on its basis! Launch the WinPE4 disk command line and enter the command bcdboot S:Windows /l ru-Ru /s R: /f UEFI(let me remind you that the letters S and R were assigned by us earlier)
exit (exit command line)
The whole process, all 4 stages, took about 15 minutes. That's all, you can boot from the SSD disk, accept license agreement, choose names for yourself and the computer, and here we are greeted by pre-installed Windows 8.
I'll add an important note
If at step 2 you chose to boot from a WinPE4 disk, then perform all the remaining steps from it without rebooting. Otherwise, all assigned letters will be lost. If you connected an SSD drive to a computer with Windows 8 installed, then also perform steps from two to four without rebooting.
Added a video to this article.
I hope it will be clearer this way. The video shows all stages except the first (gluing the system image file).
Note: You can buy an inexpensive branded ahd DVR at any time convenient for you by simply visiting the online store https://www.arax-cctv.ru/vregistrators/videoregistratory-ahd/". We recommend this company for cooperation!
That's all! Thank you for your attention and see you again on the pages of the site site
To replicate a standard configuration on several computers, it is rational to use an image of a once installed operating system.
Detailed instructions are available on the Microsoft website: Creating and using Windows images
Since with a large set of additional software, the partition image file can easily exceed 4GB, then write such a distribution to DVD disc it won't work. However, this is not required to install the OS. It will be enough for us to obtain an image of the partition on which the OS is installed. It can then be included in the boot distribution Flash disk or just transfer to new computer, booting from any live-CD/DVD/USB. In this article we will look at both options.
Having prepared the partition once, we will be able to deploy a working OS with all installed software, connected peripheral devices and necessary shortcuts on new computers in less than half an hour.
According to Microsoft: "When creating an image, be aware that the partition layouts on the source and destination computers must be identical. For example, if the Windows image is stored on drive D, then you must deploy this image to drive D of the destination computer, and must also match following parameters sections():
- Partition types (primary, secondary or logical) must match
- If a partition is made active on the reference computer, it must also be active on the target computer."
However, if we add a prepared partition to the distribution, then these restrictions do not matter.
Step-by-step instructions for deploying Windows 7 from an image
1. We do a template installation of Windows in audit mode
5. Write the created partition image to the local hard drive
E:\tools\imagex.exe /apply E:\images\win7image.wim 1 C: WITH:- the section where we will deploy the image 1 - number (or name) of the image, default = 1If the OS images are located on a network resource, then connect it first with the command:
Net use E: \\server\share /user: domain_name\username password
6. Completion
If you created a separate system partition, then you need to transfer boot files to it system files(assuming the OS is located on the C: drive):
Bcdboot C:\Windows
Exit Windows PE:
or close the window Windows installer 7. The computer will reboot. We take out the CD/DVD disk and boot from the newly installed OS.
7. Complications
- If you encounter problems loading the transferred OS, you can try restoring the bootloader. To do this you need to boot from Windows distribution 7 (you can open the console by pressing Shift+F10) or Windows PE and run the command:
Repository of various Windows images
You can create several images of partitions with different sets of software using the same template OS, then place them in one place, for example on a flash drive, and each time install exactly the image that will be suitable in each individual case. The process of adding software can be carried out sequentially by doing new image section after installing each required set. The algorithm is as follows (see details above):
- Loading the OS in audit mode
- Install/remove software, connect printers, create shortcuts, etc.
- We prepare the system for deployment using sysprep and turn off the computer
- Booting from live CD or Windows7 distribution, go to console
- Create a partition image using imagex by placing it on a flash drive or network resource
- We repeat the above until all the necessary sets have been created.
Creating your own Windows distribution
Having an image Windows partition(wim file), you can create your own distribution, that is, an installation DVD/Flash disk. To do this, it is enough to replace the \sources\install.wim file in the original distribution with your own image, renaming it accordingly to install.wim.
To automate the installation, you can prepare an autounattend.xml answer file by creating it using WIAK and placing it in the root of the distribution.
The development of technology, the emergence of new generations of components that work much faster and are more economical, makes it possible to extend the life of computers and delay the need to purchase a new, more productive model. One of the options for such modernization could be replacing the traditional hard drive its solid-state counterpart.
Considering the excellent speed characteristics of such drives, using them as system drives is a The best decision. ABOUT possible problems that may arise during transfer system partition from a classic hard drive to an SSD, we'll tell you. We will talk about the Windows 8 system installed on a Lenovo laptop, and similar issues of modernization, repair, and computer setup Apple We'll leave it for another time.
Wim image binding
Windows 8 has a factory reset mode when problems occur that cannot be fixed by any other means. This will result in the loss of everyone installed programs, settings, personal data, etc., but all the shortcomings in the work will disappear, and the system will return to its original form.
When replacing a disk and after the accompanying procedure of transferring a system from an old disk to a new one, it happens that the connection to the system environment is broken Windows recovery 8 wim OS images with factory settings. It is contained in the hidden Recovery section. The result of violating this binding is the impossibility of rolling back the system to factory settings.
Next, we will describe the process of how to restore the wim image binding. Used for example Lenovo laptop with UEFI BIOS. The algorithm of action will be similar for devices from other manufacturers. The difference may lie in the names of menu items and some other little things.

If you don’t have confidence in your abilities, and what is described below looks too complicated, then it would be best to go to the launch.rf workshop computer repair in Otradnoye and find out when they can help you with this problem.
You need to go to the Disk Management utility. There we will see that all partitions, including the hidden Recovery, are on system disk intact.

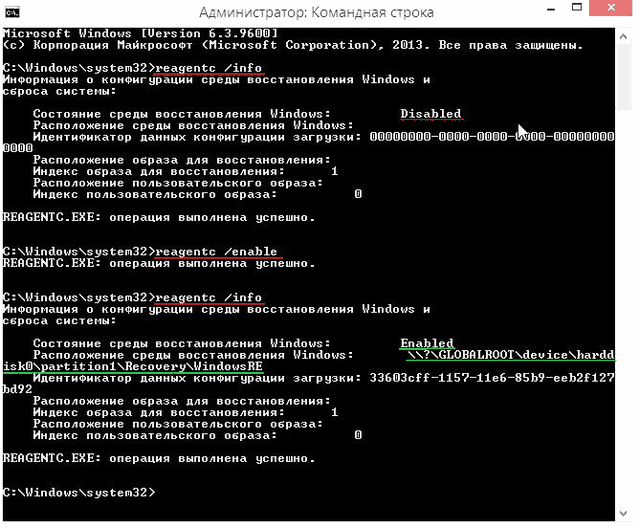
First of all, make sure that the recovery environment is enabled by entering “reagentc /info” in the command line.
In response, we will receive a message that the recovery environment is disabled. This happened after migrating the system from an old hard drive to an SSD. You need to turn it on. The command “reagentc /Enable” is intended for this.
The REAgentC program will report that the recovery environment (Winre.wim file) is enabled, and its standard location is in the hidden first partition of the disk - \\?\GLOBALROOT\device\harddisk0\partition1\Recovery\WindowsRE. The problem is that the location of the recovery image is unknown. This means that if you use Push-Button Reset Overview, the Windows installation DVD will be used as the image.
Previously, we established that we have all the necessary partitions, including the hidden Recovery with the wim image, and the problem is the missing connection between this image and system environment recovery. Let's start restoring the connection. You will need a command line where you need to enter several commands in sequence:
- "Diskpart".
- “lis vol” – a list of all disk partitions is displayed.
- “sel vol 4” – select the section containing the desired image recovery.
- “assign letter M” – assign the letter “M” to section 4.
- “exit” – exits the Diskpart utility.

Now you should open “Explorer”, in which the “M” drive will appear. To control, you can check that the “install.wim” file containing the factory image of the system is located on this drive.

Let's return to the command line and continue working. “M:” – with this command we go to the “M” drive.
The next directive is “attrib /s /d”. With its help, the full paths of files located in the directory and subdirectories on this disk and their attributes. We see that the “Factory” subdirectory we are interested in has attributes S “system”, H “hidden”, R “read only”, which we do not need and need to be cleared.

To do this, enter the commands:
- “cd OKRBackup\Factory” – change the current directory to L:\OKRBackup\Factory.
- “attrib -s -h -r /s” – remove the listed attributes from all files in this directory.
- “attrib /s /d” – control that attributes have been removed.

“C:” – goes to the system drive.
Now we bind the wim image with the command “reagentc /setosimage /path M:\OKRBackup\Factory /index 1”. If everything went well, now when you roll back to the original settings, information from the desired section disk (from wim image). To verify this, you can run the command "reagentc /INFO".

Push-Button Reset Overview (one-button system reset)
Just in case, we will briefly describe the procedure for returning to factory settings. You need to go to “Options”.


Click the “Start” button in the “Remove all data and reinstall Windows” item.

A warning window will appear telling you what action will be taken. You need to click the “Next” button.

The system rollback procedure to factory settings will begin.
If the OS does not start
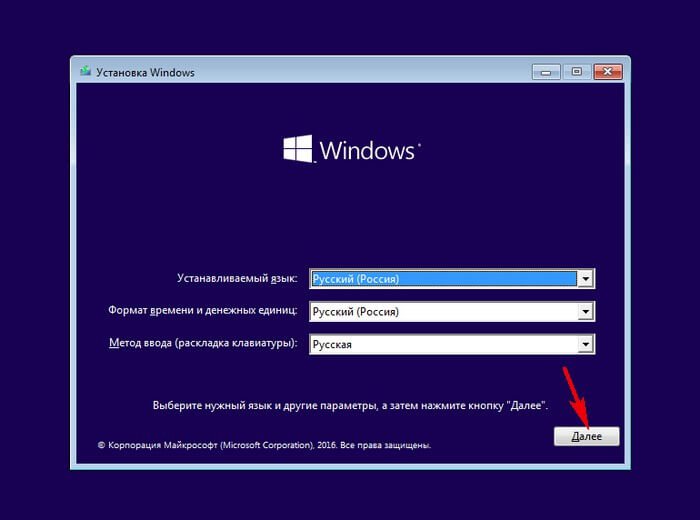
You need to boot from the installation Windows media 8, click “Next”.
Click "System Restore".

In the “Select action” window that opens, click “Diagnostics”.

Select the “Return the computer to its original state” mode.


Then select “Windows 8.1”.

The last window will open, in which you can click the “Return to original state” button.

The process of restoring the system to factory settings will begin.

If the computer's performance has decreased significantly, but the SFC utility could not solve the problem, then you should use system tool DISM for recovery Windows image.
Windows 10 includes useful utility command line called Deployment Image Servicing and Management (DISM). This tool appeared back in Windows Vista. In Windows 10 and Windows 8.1, the DISM tool is installed by default.

The utility can be used to restore and prepare Windows images, including the Windows Recovery Environment, program Windows installations and Windows PE. DISM can also be used to repair a system recovery image using the current OS installation and even for maintenance virtual hard disk.
If errors keep appearing on your computer and you begin to notice problems during boot, you can use the System File Checker ( System File Checker, SFC) to analyze the integrity of system files and replace damaged or missing files with a working copy.
If SFC utility cannot fix the problem, then most likely the tool was unable to obtain the necessary files from the Windows image, which could also be damaged. In this situation, you can use DISM to repair the Windows image, and then re-use SFC to fix damaged files.
In this guide we will introduce step by step instructions on using DISM to return stable and working condition systems.
Warning: Before you start working with the DISM utility, it is recommended to make a full backup of your system or create a system restore point. In case something goes wrong, you can return the system to its original state.
How to work with DISM commands in Windows 10
When working with DISM, there are three main options for restoring a Windows image: and RestoreHealh. It is important to use them in this order.
Using the CheckHealth option in DISM
The DISM command allows you to detect image corruption. This command is used only to find damage, but does not perform any repair operations.
Command line because running DISM requires device administrator rights.
DISM /Online /Cleanup-Image /CheckHealth

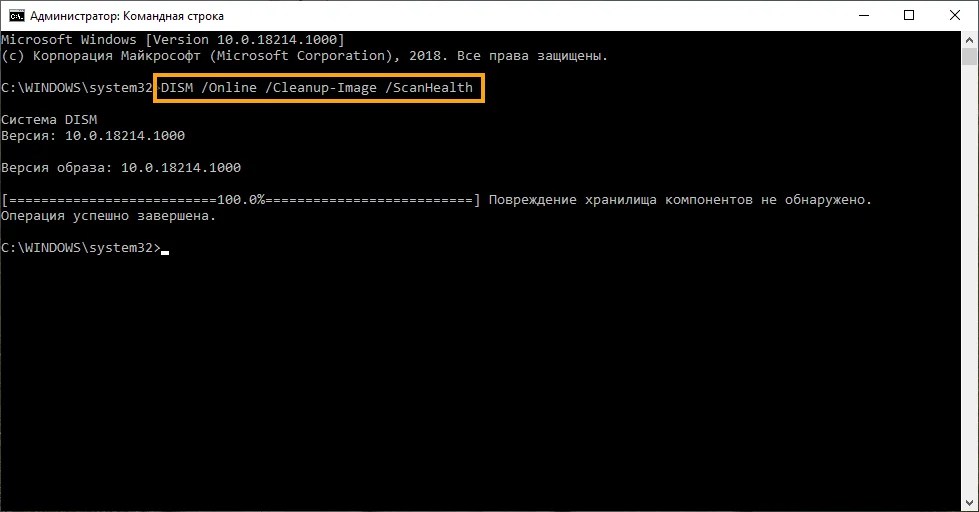
Using the ScanHealth option in DISM
The command in DISM allows you to scan the Windows image for any damage. Unlike /CheckHealth, the /ScanHealth check can take up to 10 minutes.
To start it this command do the following steps:
1. Search for Start menu Command line, press right click click on the link that appears and select Run as administrator.
2. B Command line enter next command and press Enter:
DISM /Online /Cleanup-Image /ScanHealth
Using the RestoreHealth option in DISM
The command in DISM allows you to automatically carry out the procedure for restoring damaged Windows images. Unlike /ScanHealth, the /RestoreHealth scan can take up to 10 minutes.
To run this command follow these steps:
1. Search for Start menu Command line, right-click on the link that appears and select Run as administrator.
2. At the Command Prompt, type the following command and press Enter:
DISM /Online /Cleanup-Image /RestoreHealth

Note: When running /RestoreHealth or /ScanHealth, you may notice the procedure hangs between 20% and 40% - this is completely normal behavior.
When you run the /RestoreHealth command, DISM will try to use Center Windows updates to replace damaged files. However, if the problem has spread to Windows Update components, then you need to specify an alternative source of working versions of the files to restore the image.
You can specify a new location for working versions of files using the operator /Source next to /RestoreHealth.
Before you can use the repair commands, you need to prepare a copy of the install.wim file from another computer, installation media Windows 10, or ISO file Windows 10. It is also very important that the source of the working versions of the files corresponds to the same version, edition and language of the operating system that is used on the computer.
You can download Windows ISO image 10 instructions below:
Note: Don’t forget to replace “repairSource” with the path to the source of the working versions of the files. For example: E:\Sources\install.wim .
Now you can run the command to repair the Windows image:
1. Search for Start menu Command line, right-click on the link that appears and select Run as administrator.
2. At the Command Prompt, type the following command and press Enter:
DISM /Online /Cleanup-Image /RestoreHealth /Source:repairSource\install.wim

DISM /Online /Cleanup-Image /RestoreHealth /Source:repairSource\install.wim /LimitAccess
DISM /Online /Cleanup-Image /RestoreHealth /Source:wim:repairSource\install.wim:1 /LimitAccess
The command will run a Windows image restore using the working versions of the files included in the install.wim file from the Windows 10 installation media. It will not use Windows Update as a download source necessary files recovery.
Additionally, not only can you provide a path pointing to install.wim, but you can also use the file install.esd, which is an encrypted version of the Windows image.
If you upgraded to Windows 10 from previous version operating system, setup files may still be stored on the C drive: this means you may have a source of good files.
To use the install.esd file to restore a Windows image to your computer, follow these steps:
1. Search for Start menu Command line, right-click on the link that appears and select Run as administrator.
2. At the Command Prompt, type the following command and press Enter:

You can use the following command to limit usage Windows services Update:
Alternatively, you can use the following command to perform the same task:
If the install.esd file is located on a different drive, use the following command:
DISM /Online /Cleanup-Image /RestoreHealth /Source:repairSource\Install.esd
Note: Don’t forget to replace “repairSource” with the path to the source of the repaired versions of the files. For example: E:\Sources\install.esd .
The Deployment Image Servicing and Management utility always creates a log file at %windir%/Logs/CBS/CBS.log that contains all fixed and detected issues.
How to fix problems with Windows 10
The instructions described above apply only to restoring a system image. To fix problems in Windows, use the SFC System File Checker.
1. Search for Start menu Command line, right-click on the link that appears and select Run as administrator, because for launch SFC Device administrator rights are required.
2. At the Command Prompt, type the following command and press Enter:
Sfc /scannow

Note: It may take up to three SFC runs to resolve the issue.
The SFC utility will scan and repair damaged system files in Windows 10. To learn more about the capabilities of the tool, read the instructions.
Found a typo? Highlight and press Ctrl + Enter
Sometimes Winre.wim and other errors system errors WIM may be related to issues in the Windows registry. Several programs can use the Winre.wim file, but when those programs are uninstalled or modified, sometimes "orphaned" (incorrect) WIM registry entries are left behind.
Basically, this means that while the actual path of the file may have changed, its incorrect former location is still recorded in the Windows Registry. When Windows tries to look up these incorrect file references (file locations on your PC), Winre.wim errors can occur. Additionally, a malware infection may have corrupted registry entries associated with Microsoft Windows. So, these corrupted WIM registry entries need to be fixed to fix the problem at the root.
Manually editing the Windows registry to remove invalid Winre.wim keys is not recommended unless you are PC service professional. Mistakes made when editing the registry can lead to inoperability of your PC and cause irreparable damage to your operating system. In fact, even one comma placed in the wrong place can prevent your computer from booting!
Because of this risk, we highly recommend using a trusted registry cleaner such as WinThruster (Developed by Microsoft Gold Certified Partner) to scan and repair any Winre.wim-related registry problems. Using a registry cleaner, you can automate the process of finding damaged registry entries, links to missing files (for example, causing the error Winre.wim) and broken links within the registry. Before each scan, a backup copy, which allows you to undo any changes with one click and protects you from possible damage to your computer. The best part is that eliminating registry errors can dramatically improve system speed and performance.
Warning: Unless you are an experienced PC user, we DO NOT recommend manually editing the Windows Registry. Using Registry Editor incorrectly can cause serious problems and require Windows reinstallation. We do not guarantee that problems resulting from misuse Registry Editor can be eliminated. You use Registry Editor at your own risk.
Before manually restoring Windows registry, you need to create a backup by exporting a portion of the registry associated with Winre.wim (eg. Microsoft Windows):
- Click on the button Begin.
- Enter " command" V search bar... DON'T CLICK YET ENTER!
- While holding down the keys CTRL-Shift on your keyboard, press ENTER.
- A dialog box for access will be displayed.
- Click Yes.
- The black box opens with a blinking cursor.
- Enter " regedit" and press ENTER.
- In the Registry Editor, select the Winre.wim-related key (eg. Microsoft Windows) you want to back up.
- On the menu File select Export.
- On the list Save to select the folder where you want to save the backup Microsoft key Windows.
- In field File name enter a name for the backup file, such as "Microsoft Windows backup copy".
- Make sure the field Export range value selected Selected branch.
- Click Save.
- The file will be saved with extension .reg.
- You now have a backup of your Winre.wim-related registry entry.
Next steps when manual editing registry errors will not be described in this article, as they are likely to damage your system. If you want to receive more information about manually editing the registry, please see the links below.