Installing windows 7 from a flash drive on a lenovo laptop. Lenovo service center
The buyer of a Lenovo laptop can get one of three operating systems: Free Dos, Linux, or Windows, which is limited in terms of functionality.
Usually this situation does not satisfy the user, and he installs a full-fledged and familiar version of Windows. You can cope with the task on your own, eliminating the need to hire third-party computer specialists and avoiding unnecessary costs.
You will learn how to do this as you study the information below. The instructions are relevant for modern Windows versions. Reinstallation differs from installing from scratch in that in the first case, at the appropriate stage of work, it is strongly recommended to format the partitions in order to avoid confusion and reduced performance in the future.
 After completing the preparatory steps for the laptop for sale, it is configured to boot from hard drive. The main problem with installing the OS on Lenovo is the security enabled in the BIOS. Your task comes down to setting up the BIOS on the hard drive and booting from a CD or flash drive.
First turn off the laptop, if it is turned on, and do the following:
press the power button; 
wait 1-2 seconds (until the display shows startup screen– the inscription LENOVO on a black background), after which we press the key on the keyboard several times to enter BIOS menu. IN modern models Lenovo laptops are responsible for the same keys: the F2 button opens directly service menu, F12 button – boot device selection section.
Might also work Delete button or a combination of Fn and keys from the “F” group – to be specified for specific model and is usually determined experimentally;

We study navigation (information is given at the bottom of the display). The task is as follows: open the Security (Secure) section, from there go to the category Secure Boot and press the Enter key;

set Secure Boot to Disabled mode, i.e. disable protection;

click keyboard key Esc to return to the main BIOS menu. From there we move to the Boot (Startup) section;

in the Boot section, the task comes down to setting up the laptop to boot from a CD (CDROM) or flash drive. To do this, move the appropriate option to the top of the list. Typically, you use the +/- keyboard buttons to change positions, but there may be differences depending on the specific version. Please check this point in the navigation information (shown at the bottom of the menu BIOS settings);

press Esc, find the UEFI/Legacy Boot item and configure it to Legacy Only mode (in some cases this action must be performed before performing the manipulations from the previous paragraph, check individually). Press the F10 button and confirm the desire to save changes made by pressing Enter.
Preparing a distribution kit for installing Windows on Lenovo
 It is assumed that you have original disc with Windows operating system. IN in this case Just insert the disk into the drive, restart the laptop and follow the bootloader's further instructions.
But if you have to install the operating system from a flash drive, or if the original disk is lost, you will have to make a boot image yourself. There is nothing complicated about this. Pre-download/save the required version Windows on a working computer and let's get started.
To create bootable flash drive do the following:
- download the UltraISO program from the official website. If desired, use another program with similar functionality - the procedure will remain identical. UltraISO is the most popular and convenient option;
- after waiting for the package to download, run the installation file and follow the bootloader’s recommendations;
- click on the shortcut installed program right click mouse and launch the software as administrator by selecting the appropriate item, or you can directly launch the ISO image itself;
in the program menu that opens, click the “File” button, then “Open”;

We find the previously saved image of the operating system, select and open the “Boot” section. There we select the item “Record image of a tough disk";

the program will open a pop-up window. We make sure that removable storage correctly identified. If an error is found, we make the appropriate changes.

Important! When choosing a recording method, be sure to set the mode to –USB-HDD+.

press the “Record” button. In the “Hint” window that opens, the program will prompt us to delete everything from the flash drive. Let's do it. We are waiting for the creation of the bootable flash drive to complete.
In a similar sequence using UltraISO programs a bootable CD or DVD is created.
Windows installation
The BIOS is configured and the boot device is prepared. Let's proceed directly to installing Windows. To do this, insert a disk or flash drive into the laptop and reboot the device. The laptop will independently “understand” how it needs to boot. As a rule, no additional actions is not required on the user's part. Some models “ask” to press any key to boot from a removable drive - we do this.

We wait until Windows unpacks the files, then select “ Full installation».

- If hard drive initially divided into partitions and the file system is formatted in NTFS, we proceed to further installation;
- if the system is CDA, delete it first sections of hard disk. To do this, click the “Disk Setup” button and delete partitions one by one.

Here we can share free space into several sections. To do this, click the “Create” button, indicate the desired size (preferably 30–60 GB for the system) and confirm your actions. We repeat until we have allocated all the available space on the hard drive.
Select the partition reserved for installing the operating system and click on installation. There will be no further features that require detailed individual consideration. You need to follow the installer's instructions.
The computer will reboot several times. However, there is no need to “touch” it - the system will do everything itself. All you have to do is select the desired language, set the date/time settings, and set a username and password.
Common problems when installing Windows
The most common among users are two typical mistakes, the admission of which in the process of preparing for the installation of Windows can make the successful implementation of the upcoming event impossible.
Firstly, wrong choice format at the stage of formatting the flash drive.
You need to choose either FDD or HDD.
The note was given in the instructions for creating bootable media. When using other programs, be guided by the situation - the recommendations remain relevant.
Secondly, using the wrong boot image. Installation Windows drives are divided into two categories:
- Bootable – designed for a “clean” installation of the operating system;
- non-bootable - used primarily to solve various problems and work only from the Windows interface.
To cope with the installation of the operating system according to the above sequence, the user must correctly emulate the image onto the disk/flash drive.
To do this, check the settings in the program for creating boot drive, for compliance with the presented requirements.
Thus, in self-installation There is nothing super complicated about Windows on Lenovo: you just need to consistently follow the relevant recommendations. Follow the instructions you have studied, be careful at every stage, and everything will definitely work out.
Good afternoon.
Let's set the priority loading BIOS. Now I will show you in pictures (more precisely, photos) how you can configure the UEFI BIOS and possible pitfalls, which are rare, but occur.
Well, let's start setting up the BIOS of the Lenovo B590 laptop.
First, we will have to go into the BIOS itself. We press the power button on the laptop, as soon as the laptop display lights up, or rather the matrix backlight turns on, we immediately press the F12 key (if I’m not mistaken, it is the key to enter the BIOS).
P.S.: In new models (revisions)/BIOSes this key was changed to F1. For example on Lenovo b590 20206.
Once you have done everything written above, the BIOS will appear in front of you.
This is what it looks like on the Lenovo B590.
And so, go to the Security tab. Why? I'll explain later. Next we go to Secure Boot.

Secure Boot visible

If you have Enabled, then even if you set it to boot from a flash drive or drive, the laptop will not allow you to boot from it, because This is a security system and therefore needs to be disabled.
This is the pitfall in the UEFI BIOS, because... having configured Bios laptop still won't boot from your chosen device.
We do it as shown below, that is, we disable this function.

Let's go to BOOT.

Once we switched to BOOT, we see the following.

Here we set the boot priority, be it a flash drive or a drive.
P.S.: To select a priority, select a flash drive or drive, and use the + (increase) or - (lower) keys to prioritize the device.
Press Esc and change the UEFI/Legacy Boot line from UEFI Only to Legacy First.
P.S.: You may need to restart the laptop because the BIOS mode changes (that is, new functions will be added).

Use the F10 key to save the BIOS settings and the laptop automatically reboots.
Congratulations! We set up the BIOS of the Lenovo B590 laptop and sorted out certain nuances, without which it would not have been possible to start the laptop from a drive or flash drive.
Windows 7 - popular operating system, which is characterized by speed, improved security system, and user-friendly interface, customizable to your taste. Many owners of laptops and computers prefer Windows 7 to other versions of the operating system.
On Lenovo laptops there are certain features when installing Windows 7, primarily related to BIOS settings. In order to install Windows 7 on a Lenovo laptop, you need to prepare the computer in advance by correctly setting up the BIOS, and also complete all the steps of installing the operating system on your PC.
Quick navigation through the article
Preparation
Before installing the operating room Windows systems 7 you need to prepare your computer. This requires:
- Copy all important files from hard drive C:;
- View the desktop and copy the necessary documents;
- Save information from the desktop and hard drive C: to D:, CD, DVD or flash media.
BIOS setup
You can install Windows 7 on a Lenovo laptop only after correct settings BIOS.
Login to BIOS
- Turn on the laptop;
- Insert the boot disk with the OS into the drive;
- Turn off the laptop;
- Remove the battery;
- Unplug the power cord;
- Insert the power supply into place;
- Start the laptop with the “NOVO” button located next to the power button. The service menu will open;
- Set the parameters “Russian language” and “Russian keyboard layout”;
- Select the “Diagnostics” section;
- Go to the “Additional parameters” subsection;
- Click on the item “UEFI Firmware Settings”;
- Restart your computer. After rebooting the laptop, the BIOS menu will open;
Changing BIOS Settings
- Go to the “Security” section;
- Select the line “Secure Boot” using the arrow keys;
- Press the “Enter” key;
- Select the value “Disabled”;
- Return to the main BIOS menu using the “Esc” key;
- Go to the “Startup” section;
- Select “Boot”;
- Press the “Enter” key;
- Using the “+” and “-” keys, sort the list of devices so that the drive is in first place in the boot list;
- Return to the “Startup” section menu by pressing the “Esc” key;
- Select “UEFI/Legacy Boot”;
- Change the “UEFI Only” parameter to the “Legacy Only” value;
- Save changes using the “F10” key;
- Confirm saving with the Enter key.
Installing Windows 7
By changing BIOS settings You can start installing Windows 7. To do this you need:
- Reboot the device;
- Wait until the laptop finds the boot device and opens the installation menu;
- Select the system language;
- Click on the “Next” button;
- Click the “Install” button;
- Accept the license terms by checking the appropriate box;
- Click on the “Next” button;
- Click on the line “Full installation”. A list of sections will open;
- Select the partition on which Windows 7 will be installed;
- Click on the line “Disk Settings”;
- Click on the “Format” button;
- Confirm formatting by clicking on the “Ok” button. After formatting is completed, click the “Next” button;
- Wait until the installation of Windows 7 OS is completed;
- Configure the system (enter a user name, set the time zone, etc.).
Creating partitions
An unpartitioned hard drive can be divided into several partitions during installation. To do this you will need:
- Select “Full installation”;
- Go to hard drive;
- Click on the line “Disk Settings”;
- Delete all partitions on the disk;
- Click the “Create” button;
- Choose right size memory;
- Click on the “Ok” button;
- Create a second partition with the remaining memory;
- Select the partition on which Windows 7 will be installed.
Lenovo has long been known to the vast majority of users as a manufacturer of high-quality and inexpensive laptops. Laptops are quite good technical characteristics. However, incidents happen with this manufacturer too. No one is immune from this. For example, installing Windows 7 by default on the model was not possible. Why did this happen and how to install the “seven” on this laptop if it just came from the store? This is what we will look into now.
Why did this happen?
Lenovo didn't have any second thoughts. It’s just that this laptop model was developed and sold in 2013. Let's remember what they were doing at Microsoft at that time? Right. They used every possible means (at times quite aggressively) to promote their new operating system - Windows 8. Some manufacturers were forced to somehow limit the ability to install Windows 7 on their devices. On the company's official website Lenovo models B50-30 Windows drivers 7 are missing altogether.
The most interesting thing is that updating the BIOS did not solve the problem in any way (although it should have). Curses and all sorts of disasters were rained down on the company. But all this did not last long. Craftsmen quickly solved the problem. The problem turned out to be in the BIOS settings. By default, the manufacturer had preinstalled options that made installing the “seven” impossible. And if you consider that for most users BIOS is a dark forest, then this kind of “trick with the ears” worked quite well on the Lenovo B50-30. How to install Windows 7 on this model? It couldn't be simpler. And now you will see this.
BIOS settings for installing "seven"
The first thing you need to do is go into the BIOS settings. To do this, when loading the laptop, you need to press the key combination FN and F2. Now you should go to the General Settings tab. Here you need to select Load Default Settings and click OK. Next, go to the Boot tab and in the OS Optimized Defaults line, select Other OS. Now all that remains is to exit the BIOS, remembering to save all changes.

In some cases (especially complex ones) you will still have to install the "eight" and update it with its help. Sometimes this is necessary, since the stock BIOS does not always give the user the opportunity to change the operating system in the boot options. But after the update everything should be fine. Next, you can reboot your Lenovo B50-30. Installing Windows 7 is now possible.
Installation process
It is not much different from the standard one. In fact, it's no different at all. But it's better to describe it all. So, the algorithm for installing “seven” after all the manipulations with the BIOS:
- Insert a flash drive or disk with installation files Windows.
- During boot, hold down the FN and F12 key combination. A dialog box will appear.
- In the window, select the media (CD-DVD for a disk or USB-HDD for a flash drive). After this, the system installer will begin downloading.
- In the next window, select the installation language and country of location. Click "Next".
- Now select “Windows installation only” and create a disk partition. We remember that “seven” is only placed on NTFS partition. The remaining partitions can be adjusted after installing the system.

- Click the "Next" button - the installation process begins. The laptop will restart several times.
- After the last reboot you will be prompted to enter your username and password.
- Click the "Next" button and wait. After some time, the installed system will start.
You have completed your Lenovo B50-30. Windows 7 installation is complete. However, before using the system, you will have to configure a few more things. Because after installation, you will have a “bare” operating system in front of you, which cannot really do anything, since there are no devices installed in it. This means that you will have to install drivers.
Device Drivers
What is the problem WiFi Drivers(Windows 7) or any other drivers for the "seven" are not available on the official website. And Wi-Fi is critical. After all, without the Internet you won’t be able to download other drivers. There are several options here. You can download drivers from G8. In some cases they are suitable. Or you can go to the component manufacturer’s website and download the latest version from there. But in any case, you will need a second computer with Internet access.

Sometimes on the websites of equipment manufacturers there is no software for the Lenovo B50-30 model. However, there will be a driver for Wi-Fi in any case. It's worth installing just that. A further problems can be solved through the "Device Manager" in the installed OS. It allows you to update hardware drivers from official Microsoft servers. As long as the "seven" is officially supported, they will not go anywhere. The main thing is to get the Internet on this piece of hardware. Once you do this, life will immediately become easier.
Conclusion
Undoubtedly, this article will be useful for those who are “lucky” to purchase a Lenovo B50-30 laptop. Installing Windows 7 on it is possible, although the process is somewhat unusual. For some inexperienced users, it may seem unrealistically complicated. But in reality there is nothing difficult about it. The main thing is to update the BIOS and change its settings a little. After this, it will be possible to install even “Seven”, even “Linux”, or “MacOS” on this laptop.
Question from a user
Hello.
Not long ago I bought a Lenovo B70 laptop with Windows 10 pre-installed. Honestly, I would like to reinstall the system; I prefer Windows 7. But my laptop stubbornly does not see the bootable USB flash drive, I tried to create it in 2 different utilities. Perhaps something needs to be “turned” in the BIOS for everything to work.
How to install on a new one Windows laptop 7, and is it possible? I saw the drivers on the manufacturer's website for Windows 7...
Good day!
I should note that even experienced users experience certain difficulties when installing Windows 7 on new laptops. Most often, the problem concerns drivers: they need to be found and downloaded from the manufacturer’s website, since the old ones that came with your laptop will not work (they are new Windows 8/10)! Also, some difficulties may arise with writing a bootable USB flash drive and setting up the BIOS. In general, much of the above can be solved; more on that below.
In the article, by the way, I will consider the process Windows installations 7 on a Lenovo B70-80 laptop (for laptops of other brands and manufacturers - many of the steps will be similar, except that you will have to “understand” the BIOS settings separately).
It is not at all necessary to delete and format the entire disk with your Windows 10 OS in order to install Windows 7. I would even recommend just installing another system, and when loading, select the one you want to use (a menu with a choice of Windows OS will appear automatically upon loading!).
Why 2 systems are better:
- firstly, it is unknown how Windows 7 will behave, perhaps Windows work 10 will be more stable and productive;
- secondly, you will have more stable system: if something happens to one OS, you will be able to boot into the second;
- thirdly, some games and programs may not work on one system, while on another, everything will be fine.
In principle, if you do not plan to install 2 OS, you can skip this step. In it I will talk about disk partitioning.
Article on how to partition a hard drive -
(on Windows without installing additional software)
First, let's open disk management .
To do this, you need to call the "Run" window (a combination of buttons Win and R), then enter the command in the “open” line diskmgmt.msc and click OK.

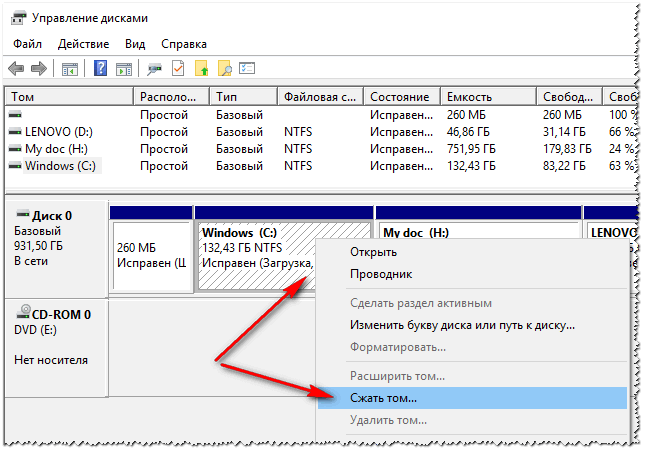
Shrink volume - drive C:\
Then specify the size of the compressed space (in my example I indicated 30,000 MB, which is about 30 GB).

And you have another partition - it is marked in black and there is an inscription on it: “Not distributed” (note: the partition of the disk from which we “took” part free space- became smaller by 30 GB).
This section cannot be used for now, as it is not formatted. To format it, right-click on it and select the option.
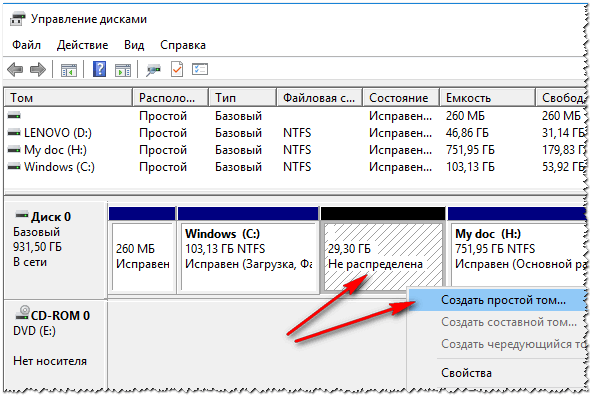
Now enter sequentially:
- size simple volume (don’t change anything at all - leave it as default, see screenshot below);
- drive letter - you also don’t have to change it;
- file system(NTFS), cluster size, volume name - you can also leave everything by default;
- the last step is to agree to the settings and click "Finish" (all actions correspond to the numbers on the screen below) .

Actually, now you should have another one local disk- you can now copy files and folders to it, and work like with any other disks (we will install Windows 7 into it).

In general, now you can start preparing bootable media.
Creating bootable media
When installing Windows 7 on new laptop(the same Lenovo B70) - there is one problem: the fact is that in the standard Windows installer 7 there are no built-in drivers for USB 3.0 port. While in all modern laptops- he is. And even if you connect a flash drive to a USB 2.0 port and start installing Windows 7, the OS still won’t see it, because a driver is required for the universal serial bus controller (for the USB ports 2.0 and USB 3.0).
How to get out of this situation:
- find and download an ISO image with Windows 7, which has built-in drivers for USB 3.0 and SATA. There are quite a lot of such images, however, there are also many that are made “crookedly”. Next, this image needs to be written to a flash drive or disk;
- use a DVD for installation and burn a regular ISO image with Windows 7 onto it.
Important! I recommend downloading in advance the drivers for the network adapter (or the 3 DP Net utility - installs drivers on almost any network adapter without an Internet connection) and the universal serial bus controller (and copying them to your hard drive). Otherwise, there is a risk that after installing Windows 7, neither your USB ports nor the Internet will work.
It would also be a good idea to have on your hard drive ISO disk 10-12 GB image with drivers (for example, Driver Pack Solution or Snappy Driver Installer). The link is below.
Programs for updating drivers (there are 3 DP Net, Snappy Driver Installer, Driver Pack Solution) -
Flash drives (using WinSetupFromUSB)
One of best programs to create bootable flash drives- this is WinSetupFromUSB. It is here that I will show you how to quickly and easily create bootable media.
WinSetupFromUSB
Main features of the utility: supports most versions of Windows (32 and 64 bit); the ability to record several operating systems on one flash drive; creating a USB drive that can boot into both BIOS and UEFI; pop-up tips at all stages of work; There are a number of programs for working with disks: MULTIpartitionUSBstick, Grub4DOS, SysLinux.
And so, insert the flash drive into the USB port and launch the program WinSetupFromUSB. Next you need:
- select a flash drive to write an image from the OS to it (see number 1 in the screenshot below);
- then check the box next to "Auto format it with Fbinst" (attention! All data on the flash drive will be deleted);
- specify the file system (for our laptop, you can use both FAT 32 and NTFS. If you select FAT 32, the flash drive will be written under UEFI - almost all laptops now follow this standard);
- then in the "Windows Vista/7/8..." column we indicate the bootable ISO image with Windows 7 (note: and built-in USB 3.0 drivers);
- then press the GO button.


Then the program starts recording the media. This procedure is quite lengthy in some cases. On average it takes 5-20 minutes. At the bottom of the program window the recording status is shown (green bar). If the flash drive was successfully written, at the end you will see a small “Job Done” window (job done).

DVD (using UltraISO)
To write to disk ISO image With Windows 7, in my opinion, it is best to use the UltraISO program.
Ultra ISO
One of the best programs for working with ISO images. Allows you to write them to disks, flash drives, edit (add and delete files from them), emulate them, etc. In general, an indispensable thing for everyone who often has to deal with ISOs.
After launching the UltraISO program, the first thing you need to do is open the image with Windows 7 in the program itself. To do this, press the key combination Ctrl+O, or click File/Open.


Insert the disc into the drive tray and press the record button. In principle, there is no need to enter or change any settings.

The recording time of a standard DVD is about 10 minutes (a green bar will be displayed throughout the recording process with the progress status).
Installing Windows 7
Calling the boot menu (Boot-menu) and starting the installation
And so, the bootable media is ready, the drivers are pre-loaded, the backup is made. Now you can start installing...
Windows 7 (as mentioned above) does not see USB 3.0 ports (they are marked in blue). Therefore, insert the flash drive into USB port 2.0 (the difference is shown in the photo below).

Next on Lenovo B70 laptops there is special button to enter the BIOS and call boot menu(Boot-menu). It is located next to the power plug, on the left side of the device. Click it (photo below).

By the way, on some laptops this button may be next to the power button (photo below).

For those who have a different laptop from the one in question, I recommend reading the article about calling the Boot-menu -

Then select the device from which we will boot. In our case, this is USB DISK 2.0.
Please note if you have created bootable DVD, then you need to insert it into the drive tray, then turn off the laptop and turn it on using the button to enter the BIOS (see photo above). Otherwise your boot disk- it simply won’t be in the list of devices and you won’t be able to select it.

If you used a flash drive (and it is written correctly) - You should see the download begin Windows files"Windows is loading files..." (installation has started...).
For those who install from a disk, don’t miss the moment when there is only one message on the screen “Press any key to boot from CD or DVD...” - at this moment you need to press a key to start installing the OS!
IMPORTANT!
For those who experienced an error at the beginning of the installation or the flash drive/disk is simply not visible in the boot menu
In most cases, the problem lies in the BIOS settings (support for older operating systems that do not support secure boot). Therefore, you need to go into the BIOS settings - on a Lenovo B70 laptop, you can use the same arrow button on the device case for this (only when the menu appears, do not select Boot Menu, and Bios Setup).
Instructions on how to enter the BIOS -
(for those who didn’t succeed, or another laptop model)
Boot menu button
In the BIOS you need to open the BOOT section and set the following parameters:
- Boot Mode (boot mode) - (support for older OS);
- Boot Priority - - boot priority;
- then go to the Exit section and click the "Exit and Save" button (save and exit, the same can also be achieved using the F10 button).

After that, call again, select boot from a flash drive (disk) and start the installation. I think there shouldn't be any problems now...
Further installation process (setting parameters)
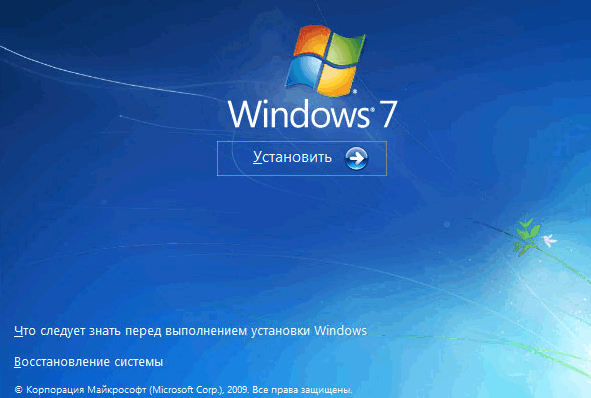
After the files have been downloaded, the first welcome window with the Windows 7 logo should appear in front of you. This is a window with the choice of language for further installation. By default, it should be Russian - click the "Next" button.

Now click on big button in the center of the screen - “Install” (screenshot below).

Next, specify the drive on which the installation will be performed. Be careful in this step: do not delete or format partitions if you do not fully understand or are not sure of your actions (otherwise you will lose all the information on your hard drive).
If you have prepared a partition for Windows 7 in advance (as recommended above), then all that remains is to select it (note: in the first step of the article I made it 30 GB) and click the “next” button.
If you don't need any information at all on your hard drive: you can delete all partitions. Then create two partitions: one for 50-100 GB for the system, and the second for all the remaining space - for files. Then format the partition for the system and continue installing Windows into it.

After the reboot, the installation will continue and you will be asked to provide a computer name and username. You can set them in any way, the only thing I always recommend is to write them in Latin (to avoid the “cracked” in some programs when they give an error if there are Russian characters in the path to documents).
You will also be asked to enter a password for account. If you are not working on a PC alone (or there are curious friends in the house), I recommend installing it.


Setting the date and time - I think it won’t cause any problems: select your time zone, specify the time and date (in principle, when you set up the network, this data is corrected automatically through the update center).

The last stage is setting the location of the computer. In most cases, it is optimal to select " Home network", and set the remaining parameters in Windows itself.

Actually, after a few moments you should see a desktop (on which there will be only one basket for now). In general, the installation is complete!

PS
Now the Lenovo laptop is running Windows 7, which means my mission is complete...
If you have previously downloaded drivers for USB 3.0 and network adapters(as recommended) - then there should be no problems.
After installing these, everything else can be downloaded online or copied from USB drives (flash drives).