Installing win 10 on laptop ssd. Enabling the TRIM command
For experienced computer users, installing an operating system is a simple matter. However, if a beginner is at the PC, it is unlikely that he will be able to complete this operation the first time. In this case, it is better to first familiarize yourself with all its stages, especially if the system unit contains a non-standard hard drive. This article will talk about SSD. In addition to a simple analysis of all the actions, the topic of extending the service life of the drive will also be touched upon and recommendations on its use will be given.
How to install Windows 10 on an SSD drive
The entire installation process will be divided into steps to make it easier for the user to understand everything. Before we start talking about each of them, it is worth recalling that you must first prepare a flash drive with a capacity of 8 gigabytes. Although the more the better.
Step 1: prepare a bootable USB flash drive
You will need a flash drive to write the installation image of the system onto it. This process is quite simple, although the average person can easily get confused, so we recommend that you pay attention to each step of the instructions in order to avoid mistakes.
Before installing Windows 10 on the SSD in the M2, you need to prepare a bootable USB flash drive. We will do this with the help official program from Microsoft MediaCreationTool. Accordingly, you can download it from the official website of the company. Once done, run the following actions:
- Launch the program and accept the terms in the first window license agreement. To do this, just click the "Accept" button.
- When asked “What do you want to do,” answer “Create installation media.” To do this, just set the switch to the appropriate position and click the “Next” button.
- In the next window you will need to specify the parameters of the system to be installed. In the "Language" field, select "Russian", in "Edition" - the version of Windows 10, and in the latter, determine the architecture of your processor. If your computer is modern, select "64-bit (x64)".
- At this point, insert the USB drive into your computer, select "USB flash memory device" and click "Next".
- Now you will be provided with a list of all connected drives, select the flash drive and click “Next”.
Immediately after completing all the steps, the creation of a bootable USB flash drive will begin. Wait for it to finish and proceed to the next step.
Step 2: enter BIOS
Before installing Windows 10 on a new SSD (although it does not have to be new), you need to configure some option in the BIOS and set the priority disk there for booting the computer from it. But first, let's figure out how to enter the BIOS.
Unfortunately, there are no universal instructions; this is done differently on each computer. But the essence remains the same - you need to press special button when you start the computer. Here is a list of these keys:
- Delete.
Try pressing these keys. Although it is worth saying that when you start the computer, it is usually written which key you need to press.
Step 3: enable AHCI mode in BIOS
In the BIOS, the first thing you need to do is enable AHCI mode. This is necessary in order to unlock the full potential of the SSD drive. In the example, BIOS will be used on motherboard MSI A68HM, however the instructions are common for all other versions. This action is performed as follows:
- Go to the settings called "SETTINGS".
- In the menu, go to the "Advanced" section.
- After that, open the Embedded Peripherals option.
- Find the "SATA Configuration" section and left-click on the slot in which your SSD is inserted.
- In the menu that appears, select the "AHCI" mode.

It is also worth noting that this mode is often installed by default in most modern computers. But if you had Windows XP installed before, then it’s still worth double-checking the settings.
Step 4: set the priority in the BIOS and run the installer
Before installing Windows 10 on an SSD, you need to set the priority boot drive in the BIOS. Accordingly, you need to choose a flash drive with recorded installation file. Each BIOS version does this differently, but we will tell you using the most popular ones as an example.
First of all, let's look at Award, since it stands on the majority modern computers.
- Go to the "Integrated Peripherals" section.
- In the list of all parameters, set "Enabled" on all USB controllers.
- Exit back to the main menu.
- Go to "Advanced BIOS Features".
- Select the line " Hard Disk Boot Priority" and press Enter.
- In the list that appears, select the name of your flash drive.

In the AMI BIOS, this setting is performed a little differently:
- Go to the "Boot" tab.
- Next, select "Hard Disk Drives".
- Click Enter key at the "1st Drive" point.
- Select the name of your flash drive.

As for other versions of the BIOS, the previous instructions are also suitable for them, the main thing is to follow the algorithm of actions: enter the BIOS, enable the operation of USB devices, select a flash drive from all drives as priority.
After the flash drive has been selected as the priority drive, you must save all changes and restart the computer. You can do this using hotkey F10. Click on it and confirm your actions by pressing the Enter key.
Step 5: let's start partitioning the disk
Now you can proceed directly to the instructions on how to install Windows 10 on an SSD with GPT or MBR, although the first option is desirable. After completing the steps above, your computer will launch Windows Installer after restarting.

Before installation, you need to partition the disk. This procedure complicated at first glance, but with the instructions you will figure it out. So, to complete the task you need to do the following:
- In the operating system language selection window, select the one that suits you and click “Next”.
- After that, click on the “Install” button.
- The text of the license agreement will appear; you must accept it to continue with the installation. To do this, check the box next to “I accept the terms” and click “Next”.
- Now you have two installation options to choose from: “Update” or “Custom”. You must select the second item. Just click on it with the left mouse button.
- The layout menu will appear. If Windows was previously installed on your disk, then you need to erase all disks. To do this, click the "Delete" button until only one line remains - "Unallocated disk space." If your disk is new, then skip this step.
- After that, click the "Create" button and agree that Windows will add additional sections.
- Once all partitions have been created, click Next.

Often after this, another window appears in which you must agree to all changes by clicking the appropriate button. Although it does not always appear.
Step 6: Final Installation Stage
If you have reached this step, then congratulations, because you now know how to install Windows 10 on an SSD drive. All that remains is to wait for the installation of all system components from the flash drive to disk to complete. You can watch this process directly on the screen. By the way, the computer will reboot several times - this is normal.
You can also watch the video below, which clearly shows how to perform all the steps in the instructions described above.

Is it worth installing Windows 10 on an SSD?
Having completed all the basic steps, you can proceed directly to thinking about whether it’s worth installing operating system on SSD. And in general, what is the difference between an SSD and installed Windows 10 from the same hard drive HHD?
Firstly, it’s worth saying right away that the installation process on both the SSD and the HDD is the same and practically no different. Secondly, the harm from installing Windows 10 on an SSD is minimal. Let's look at this in more detail now. The fact is that 10 is a relatively new operating system, so when developing it, all the nuances of working on a solid-state drive were taken into account. Accordingly, you will not need to make many system adjustments after installation to extend the life of your drive.
But this is about Windows 10, now let's talk about Windows of previous versions on SSD, for example, XP. Here you need to immediately understand that this version is very old and was released at a time when there was no talk of SSDs. Based on this, you can guess that it is not optimized for the operation of a solid-state drive, so it will last an order of magnitude less time.
If you just need Windows XP, for example, to run some old software, then there is an excellent alternative. You can easily install it on virtual machine eg VirtualBox. By doing this, you will get all the same functions and features as on original Windows XP.

How to avoid damaging your disk
We figured out how to install Windows 10 on an SSD, now let's talk about how to extend the life of this drive. First of all, let's figure out why the SSD fails. The whole point is that this disk has a limited number of rewrite cycles, after a critical number of which is exhausted, the device can simply be thrown away. But we hasten to please you: there are so many of them that when correct use The computer drive will last more than 10 years.
So, to increase the “life” of an SSD, you must adhere to the following rules:
- Don't defragment the disk. On Windows this option is disabled out of the box, so don't try to do it with third party programs.
- Avoid formatting the disk. If you want to change the file system, it is better to do this in fast mode. But it’s even better to abandon this idea.
- Do not erase information using NSA, DOD, or Gutmann techniques. This is simply pointless, since they are only effective with hard drives.
Conclusion
So we figured out how to install Windows 10 on an SSD. As you can note, all actions are not much different from installing regular hard computer disk. The only difference is in choosing the right one AHCI mode in the BIOS, however, this setting could also be skipped. We hope the article helped you understand the topic, and you installed the operating system without much difficulty.
Currently, an ever-growing number Windows users and other operating systems as the main drives in personal computers and laptops choose SSD. This is due to the large number of advantages of this technology:
- high speed of functioning of the Windows operating system and applications in comparison with conventional HDDs;
- low power consumption and noise even at maximum load;
- high fault tolerance under overloads and adverse external conditions;
- optimization of the latest versions of Windows and non-Windows-like systems for working with SSDs.
But besides the obvious advantages, there are also some disadvantages of this type of media:
- high cost compared to the price of classic HDDs;
- limited number of rewrite cycles, which reduces the “lifetime” of the device;
It is obvious that this type of media will become increasingly widespread. Therefore, we provide a detailed sequence of steps for installing the Windows operating system on an SSD.
Preparing your computer and media for installing Windows
 Before using SSD disc, make sure that its antistatic packaging is not damaged. Otherwise, the static voltage generated during operation can not only damage the stored information, but also damage the media. Avoid touching connectors or exposed parts of the drive.
Update your motherboard BIOS to the latest available version and check that SATA mode was exhibited at AHCI. At this point, the preparatory stage of setting up the system moves to the next stage.
Installing media into your computer
 When installed in a personal computer case desktop computer It is necessary to take into account the fact that the SSD drive has a 2.5-inch form factor. This means that there must be a suitable compartment in the rack design system unit or the use of special mounting brackets-screws. It’s worth adding right away that unstable fixation of the SSD is highly discouraged, because Strong vibration can reduce the life of the device.
If you own a laptop, the mounting process will become much easier, since compact devices use storage media of exactly this form factor. So installing a new SSD will be limited to switching contacts from an already used disk.
 In any case, after fixing the disk, you need to connect it. Two cables are used for this. The first is the power cable and comes from the power supply. For user comfort this cable is equipped with a mount with a recess, which will reduce the likelihood Not correct connection. If your system does not have a suitable wire, you can purchase an inexpensive “adapter”.
The second cable is a signal cable and is used for data transmission. Most modern SSDs use a SATA connector, which is also equipped with a notch for proper connection. One end of the cable is plugged into the data carrier connector, the other into the motherboard. Before purchasing an SSD, make sure your motherboard has SATA connectors as there are no data cable adapters available. 
Connect the power cables and turn on the computer. At startup, the BIOS recognizes the media and you can proceed to the next step of the instructions. Otherwise, check that all steps have been completed of this algorithm. If after reconnection the media is not recognized by the system, then there is a high probability that the device is incompatible with your motherboard or a malfunction of one of their devices.
Installing Related Software
You can proceed directly to the installation of the Windows operating system. Features of this process from installation software products on HDD practically does not exist. The steps are almost the same, starting from formatting the disk, etc. The only important thing is correct setting BIOS settings. After the computer starts and the system recognizes all components, you must select the device from which information will be read before installation. It can be like a CD or DVD, bootable flash drive. To select, you can use the BootMenu (keys F10-F12 depending on the brand of the computer) or select the required SSD media as the first device in the BIOS settings. 
Next, we carry out the standard steps when installing Windows or another operating system - step by step we follow the instructions of the installer program (formatting the media, selecting regional settings, etc.). Important point: if you install the system on completely new disk, then it will not be divided into logical sections. In this case, you need to think in advance about how best to do the partitioning and perform this operation in the installer at the stage before formatting.
More interesting for the user may be the option of cloning an existing operating system onto a new medium. This method very convenient because SSD media have high integration with the system and will allow the operating system to start without problems. Latest versions tools allow you to clone a large set of versions of Windows and other systems. To carry out this operation it is convenient to use a tool such as Acronis® True Image HD.
To run it, you need to use a boot device, but the operating algorithm itself is very simple. Select on the “Tools and utilities” tab > Click the “Clone disk” button (Quick cloning in some translation options) > Select “Automatic (recommended)” to activate the quick system cloning mode. During operation, the program will automatically format the media. For more accurate copying, it is recommended to specify the operating system type, up to the Windows version. Select the source disk (HDD) > Click the “Next” button, then select the target disk (SSD) > Click the “Next” button. After rebooting the system, you can start Windows from the solid-state drive.
Notes for various operating systems
Modern users pay great attention not only to Windows, but also to other operating systems. Let's look at the features of installing them on solid state SSD storage device.
- MacOS. While holding down the Optoins button in the menu item, open the system boot window. To run installation on an SSD, you may need to additionally specify the target media type. In some driver versions, this media type may be recognized as FDD or HDD. Therefore, it may not be selected as the first device. The disk will be formatted before installing the OS.
- Unix systems. When installing the operating system, you will be prompted hard formatting disk. Therefore, if you switch from Windows, it is recommended to copy important information to a third-party independent medium.
Related posts:

Installing an SSD – one of the most effective methods, capable of breathing “second life” into a computer even with not the latest configuration. The operating system accesses files faster and becomes much more responsive to user actions. At the same time, it is absolutely not necessary to install and configure the OS from scratch and software. In this article we will talk about how to transfer Windows 10 to an SSD without losing data.
Microsoft does not provide special tools for cloning in the system. However, built-in Windows features 10 allow you to perform this operation.
Media preparation
According to official recommendations technical support company we will need an additional, third, hard drive. Unlike those connected via USB, SSDs intended for internal placement are not pre-formatted. As a result, they are detected by the computer, but are not displayed in the OS. To clone Windows, you first need to make all drives visible.
- We mount the drive in the PC and turn it on. Opening file manager, we see that the OS has recognized only the system partition.

- Using the Win + X key combination, call up the “Power User menu”. Let's move on to the designated point.

- The Disk Management Manager opens with an initialization window. At this point, the user must select a partition table. For x32 bit systems, only MBR is needed. Users of x64 bit versions Windows is better GPT will do.

- Having decided on the partition table, let's format it. Both drives must have a file NTFS system. By clicking on the unmarked area we call context menu. Select the item marked in the screenshot.

- The creation wizard is activated simple volumes. Further actions We will do it following his instructions.

- We do not change the volume size, but create one using the entire available volume.

- The letter is assigned automatically. Since the placement of disks in the system is temporary, only for the period of cloning, we will leave it unchanged.

- At this stage we set a text label. For convenience, let’s give the intermediate HDD the name “Backup”.

- On last step The wizard displays the parameters specified for the drive in the form of a list. We complete the work by clicking on the “Finish” button.
 We perform a similar operation with the new SSD, giving it the name “NewSSD”. By opening Explorer, we make sure that all of them are visible from under the OS.

At this point, the preparation of media for cloning can be considered complete.
Intermediate copying
The next step in allowing you to move Windows to a new “location” is to create an intermediate copy.
- The tool we need is located in the classic control panel. Let’s run it by entering “control” in the “Run” system menu. To do this, press Win + R.

- Open the element indicated in the screenshot.

- In area quick transition select “Create a system image”.

- The wizard that launches prompts you to determine the storage location. Using the drop-down menu, we specify the intermediate hard drive, which we named “Backup”.

- At this stage, the system shows us what data will be included in finished image. We agree and move on to the next step.

- We complete the wizard by clicking the “Archive” button.

- An image of the system HDD is being created.

- The operation is not accompanied by time stamps. Its duration depends on the amount of data being stored. Once complete, we will be prompted to create a rescue disk.

If you have Windows 10 installation media, you can skip this step. Otherwise, you will need a flash drive with a capacity of at least 8 GB.
Transfer to SSD
At the last stage old HDD can be removed from the computer, leaving the drive with backup copy and a new SSD prepared for transfer.
- Loading is done from installation media With Windows distribution. After checking the language settings, move on.

- At this stage, instead of installation, select recovery mode.

- In the action selection window, go to the marked item.

- In the Advanced Options area required section framed. Having selected it, we launch the recovery wizard. Since we are performing a full migration, the next step is to validate the solutions offered by this mode.

- Having received the last warning, we activate the recovery procedure.

At the final stage, the computer will automatically reboot and the operating system will start from the solid-state drive. Reactivation performed without user intervention after checking the hardware configuration.
Disk cloning programs
As we saw in the example given, it is possible to clone Windows 10 using system tools, but the procedure is lengthy and labor-intensive. Sometimes it is faster and easier to reinstall the OS from scratch than to look for a suitable one for intermediate Reserve copy disk.
Against this backdrop, applications specifically designed to facilitate migration look great. The average user does not need disk cloning on an industrial scale. In most cases, this is a one-time operation. For this reason, we will only consider software that has free versions or allowing you to perform the necessary operations during the trial period.
Macrium Reflect
The program is published by Macrium Software in several editions. Free Edition allows you to transfer the OS directly, without intermediate media.
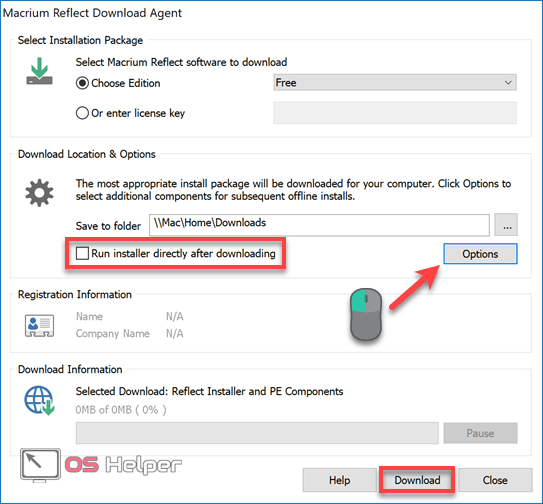
- Installation is performed with using Download agent. The user can first select necessary components using the "Options" button. By clicking “Download” we begin the download. The circled “Run installer” box has a check mark by default. If you do not remove it, the program will begin to install automatically after the components are downloaded.
- We check the correctness of the architecture: it must correspond to the bit capacity of the installed OS. Select a “clean” installation from the drop-down list. Such a distribution will not include tools for creating a boot disk and disaster recovery.

- Main window of the installed Macrium Reflect displays the disk structure available on the PC. The boxed option opens cloning options.

- At the top is the original datum disk. At the bottom of the window, select the target SSD. The section marked “3” contains advanced copy settings.

- You don't have to change anything here. The default smart copy option is suitable for any user. During the transfer process, the file system will be checked and the TRIM function will be automatically enabled.

- After checking all the options, click the highlighted button to copy the existing structure to the new drive.

- By clicking “Next” we launch Migration master, which will give us detailed technical information about each partition of the disk being created.

- At the final stage, remove the crossed out check mark. She is responsible for creating a recurring schedule, while ours is a one-time operation.

- Before the transfer begins, Macrium Reflect will warn you that the data on the drive specified in the window will be completely destroyed. We agree and wait for the process to complete.
 As a result of the actions performed, we receive a valid license copy of Windows on a new medium.

You can remove the old disk and start working on the SSD without reinstalling the system.
Acronis True Image
Another program worthy of attention is Acronis True Image. It differs from other products of this company in the ability to perform cloning operations during the trial period. Eg, Acronis Disk Director allows you to do this only after purchase full version. True Image is limited by the need to use intermediate media.

The declared on-the-fly cloning option becomes available in the full version of the program.
- You can use any suitable sized USB drive as an intermediate one. We connect this to the PC and specify it as a storage location.

- We start the procedure for creating a backup copy.

- Go to the “Recovery” tab. Select the target disk in the window and press the button marked “3”.

- To perform cloning, open additional options.

- Check the source – a backup copy of the current disk. Select the destination disk from the drop-down menu – new SSD. We start the transfer process.

The operation is performed in background, its progress is displayed in the system tray. When the transfer of Windows 10 to SSD is completed, the program automatically makes adjustments to the bootloader.
Manufacturers' software
Samsung, one of the leaders in the production of solid-state drives, has created its own software to make it easier for users to migrate the system. The proprietary utility is free, but only works with manufacturer’s disks. The list of supported SSDs can be found on the official page where Samsung Data Migration available for free download.
Transfer issues
There are no system restrictions for working with SSDs. Microsoft provided full support for SSDs with the release of Win 7. However, the transition may be difficult for laptop users. Manufacturers are reluctant to allow changes to the factory configuration.
As a result, some top MSI and ASUS models do not allow HDD replacement. The user will not be able to install a cloned SSD into it, since the laptop refuses to work with it. The only way out is to contact the manufacturer's technical support in order to find out in advance the possibility of an upgrade and supported drive models.
Finally
Features that the user receives when using free programs cloning is enough for a one-time system transfer. In terms of functionality, they are somewhat inferior to professional tools such as Paragon Migrate OS to SSD, but they get the job done.
Video instruction
For those who want to learn more about how to use programs for migrating to an SSD, below is an overview video.
SSDs are much faster than their older counterparts and are becoming increasingly popular. The operating system installed on such a disk starts up and runs faster, increasing the performance of the entire computer. If you want to get the most out of your SSD, you'll need to spend a little time setting it up.
Should I optimize my SSD?
According to manufacturers, modern operating systems do not require solid-state memory drives at all. additional settings or optimization. Any manual settings, in my opinion Microsoft, can only slow down your disk or cause system problems.
However, quite often a situation may arise when an SSD with Windows 10 installed does not produce the performance result that the user wants to expect. The reasons for this can be completely different. In such a case, users have to intervene and optimize the disk themselves.
There are some tips to help improve SSD operation and extend its service life:
- Always leave about a sixth of the disk free: free place required for stable operation disk without performance degradation;
- if you have several disks, install your operating system and heavy programs that you often work with on the SSD;
- try not to change the standard SSD settings: disk optimization and other system functions were developed together with solid-state drive manufacturers and are the most optimal;
- do not defragment the SSD: it is not only useless for them, but also shortens the service life of the drive;
- Update your drive's firmware periodically, but don't do it too often: new firmware comes out all the time, and it doesn't make much sense to install each of them.
SSDs have limited quantity cycles of rewriting information, and therefore defragmentation reduces their service life
Automatic SSD setup
At connecting SSD conducts to a Windows 10 computer self-configuration disk. This setting includes:
- disabling disk defragmentation;
- SSD power optimization;
- enabling TRIM and Superfetch functions;
- disabling the ReadyBoot function.
Some users may find that the SSD is automatically defragmented from time to time. The reason for this is that Windows 10 does defragmentation and disk optimization using the same tool. What you might think of as defragmentation is another process that benefits your SSD.
Manual SSD setup
As is the case with hard drives, there are several ways to speed up your SSD. However, these methods involve refusing certain functions of the system, which may not suit some users.
It is worth disabling the paging file only if your computer has a large number of random access memory. But even then it is a controversial decision. Disabling the paging file can increase the life of your disk: there will be much less calls to it from the system to constantly overwrite files.
- Open Control Panel. It can be found through search.
Open Control Panel
- Open the System and Security category. Open the System and Security category
- Go to the "System" section.
Go to the "System" section
Press " Extra options systems"
- Next to the “Performance” inscription, click on the “Options” button.
Click on the "Options" button
- Open the “Advanced” tab and click on the “Change...” button.
Click on the "Change..." button
- Uncheck the box “Automatically select paging file size”, check “Without paging file” and confirm the changes made.
Disable the page file
Disabling hibernation
Hibernation is used for quick start computer. When entering hibernation mode, the computer does not turn off completely: information about all running programs remains in active processes. Disabling this mode will have a positive effect on the lifespan of your SSD, but may cause inconvenience for some users.
- Open Control Panel and go to the Hardware and Sound category.
- Go to the "Power Options" section.
Go to the "Power Options" section
- First, you should remove hibernation from the computer shutdown buttons. Click on “Power button actions”.
Click on “Power button actions”
- Click on the inscription “Changes to settings that are currently unavailable”, uncheck the hibernation mode and confirm the changes made.
Remove hibernation from power buttons
- Now let's disable auto-switching to hibernation mode. Return to the “Power Options” section and click on the inscription “Setting the power plan” next to the mode you are using.
Click on the inscription “Setting the power plan” next to the mode you are using
- Click on "Change advanced power settings."
Click on "Change advanced power settings"
- Go to Sleep, then Hibernate After, and change both to Never.
Disable auto hibernation
Indexing files for search
Enough heavy load Indexing affects system and SSD performance. It is necessary to quickly search for files on disk. Indexing means that an additional record is created in the system for each file on your disk. Disabling file indexing will increase the speed of your drive, but will significantly reduce the speed of searching for files.

Disabling system protection
The System Protection feature is used to create restore points. Every time you install something, your computer's current state and status installed programs are saved in the computer's memory. Disabling the system protection feature will increase the life of the SSD, but it will become more difficult to troubleshoot any problems with the system.
- Right-click on the “This PC” icon and select “Properties.”
Go to computer properties
- Click on "Advanced system settings".
Open Advanced System Settings
- Open the “System Protection” tab and click on the “Configure…” button.
Click on the “Configure…” button
- Select "Disable protection" and confirm your changes.
Disable system protection
Switching the drive to ANCI mode
ANCI mode designed for hard drives, can be useful for SSDs too. It should improve computer performance and reduce energy consumption.
As you begin to enable ANCI mode for your SSD, remember that you are going beyond the limits installed by the system settings and risk damaging your SSD.
You can make sure that ANCI mode is not enabled in Device Manager.

Enabling ANCI mode is done in your computer's BIOS. Since the BIOS and the ways to get into it are different on all computers, each case must be considered individually. In the BIOS you will need to find the disk settings and change its operating mode. It is better to find out how to correctly enable ANCI mode on the manufacturer’s website.
Even if your SSD's ANCI mode is already activated, the system will not use it. To fix this, you need to change several settings in the system registry.
- Find regedit through the Start menu search and open Registry Editor.
Reset the parameter value to zero and click OK
- In the same way, reset the following parameters:
- start parameter at “HKEY_LOCAL_MACHINE\SYSTEM\CurrentControlSet\Services\storahci”;
- parameter 0 at "HKEY_LOCAL_MACHINE\SYSTEM\CurrentControlSet\Services\iaStorAV\StartOverride";
- parameter 0 at "HKEY_LOCAL_MACHINE\SYSTEM\CurrentControlSet\Services\storahci\StartOverride".
Firmware update for SSD
The SSD drive has its own firmware (complex system programs, which are similar in principle to drivers). If there are any problems with the firmware or it is very outdated, you may notice a slowdown in the disk. The appearance of any errors or conflicts with the system may also be due to outdated firmware of the solid-state drive.
Specific methods for flashing a disk depend on its manufacturer. Most often, a special program is offered for this. In other cases, it is enough to simply save the firmware to disk and restart the computer. And sometimes the user will have to do everything manually via command line. Detailed instructions for the disk firmware you will find on the manufacturer's official website.
Here are some general tips before flashing a disk that you should follow in any case:
- save the most important information to another drive;
- study the installed firmware version: read the official developer forum or user comments on latest updates. Sometimes new firmware contains a number of shortcomings that will only be corrected in next versions. In this case, you should pay attention to the latest stable version;
- do not install every new firmware update: if everything works stably for you and there are no problems, you can hold off on updating the firmware;
- check the operation of the SSD drive after installing the firmware to make sure that the firmware did not introduce new errors. Good decision will use special programs to check the disk.
Video: SSD setup
Special programs for SSD optimization
Most of the actions that are done special programs to optimize SSD - the same as we described above, but in automatic mode. All such programs are extremely simple and identical, so we will consider only two of the most popular.
SSD Mini Tweaker is a very small and easy-to-use program that allows you to fully prepare your system for working with solid-state drives in a few minutes. It does not require installation.
All you need to do in the program itself is to tick the boxes you need and click “Apply changes”. When the process is complete, restart your computer.
Select the required options and click "Apply Changes"
SSD FRESH 2017
SSD FRESH 2017 is very similar to the previous program: the same settings and the same operating principle. A more visual interface allows you to evaluate how much your disk optimization has changed. However, the veracity of this assessment is rather conditional.
Now you know which SSD disk settings are made automatically by Windows 10, and which you will have to configure yourself. Keep your drive up to date and keep it in good condition so it will serve you for a long time.
One way to avoid losing data, system settings, software products and documents is to transfer the installed Windows 10 OS from the HDD (hard drive) to a more mechanically resistant and fast SSD drive. The transfer is performed not only for the purpose quick recovery files, but also for the purpose of replacing HDD drive on SSD. Therefore, it makes sense to understand in detail how to competently transfer the Windows 10 operating system from a hard drive to an SSD drive.
We use built-in functionality
SSD drives are silent, have a large buffer for faster PC performance, and have no moving parts for durability. But SSD drives, unlike HDDs, have a limited number of overwrites, so before you save Windows 10, you need to understand the process. It will not be possible to repeat the procedure endlessly.The easiest way, which gives the least number of errors when migrating the OS, is using the built-in functionality. The rewrite operation is performed as follows:
Important! The image recorded on the media is used to restore the system. If, while working with a PC, the user adds important software products or changes system parameters, the procedure should be repeated and overwritten the old image. You should not use an SSD drive to store photos and other frequently updated files. Repeated rewriting will exhaust the limit, but on average the disk resource lasts for 7 – 10 years.
Migration Tools Available for SSD Drives
Large manufacturers of solid-state drives Samsung or Seagate, for example, produce special software products for data cloning along with disks:DiscWizard- software released by the Seagate brand for transferring information to SSDs of its own production. A very capacious program that covers virtually all the user’s needs: deleting confidential information, cloning a system, transferring OS settings and software products, restoring files, etc.;

Data Migration- the software is designed to work with manufactured SSD drives Samsung. The program helps optimize the disk's potential, searches for drivers, clones the system, etc.

The listed software products are comprehensive packages that are used to backup all data from the HDD to SSD drives or only the necessary sections of the main disk. With their help, you can clone the operating system and create disks for booting the system.
Important! Using software products native to the SSD reduces the risk of errors during the cloning process.
There are also universal programs. Acronis has released free True Image software for backing up the OS to SSDs of any brand: Kingston, Samsung, Seagate, etc. You can find a lot of paid and free analogues- Paragon Drive Copy, Macrium Reflect, etc. To start the process, you need to download the software from the manufacturer’s website and install it on your PC. Installation is performed using the classic method.
How to transfer using Acronis True Image
The True Image program is considered the most popular and easiest to use. It is equipped with a Russian-language interface, but requires activation during operation (you can bypass the procedure). This is done by registering on the network. After installing the software, you should not immediately start cloning. SSD drives are not as capacious as hard drives, so system C should be streamlined:- Clean partitions, or only system C (System). Remove all unnecessary traces without traces;
- Defragment the system space;
- Fix system errors.
- go to menu " Tools»;
- select program block " Cloning...»;
- put a dot next to automatic mode. Manual configuration of the transfer process is used if it is necessary to clone only the system space or select a list of important partitions;
- select the cloned space. In automatic mode there will be only one object; manual mode there will be as many objects as the number of disks the hard drive is divided into;
- select target media - connected external storage. At this stage, the program will ask you to exclude those files that do not require cloning;
- checking the selected data. If something is selected incorrectly, you can use the menu " Before" And " After»;
- press " Get started" and confirm rebooting the PC.
What do we get?
The user's actions after completing the cloning process depend on the purpose of migrating Windows 10 from HDD to SSD. In 8 out of 10 cases, the operation is performed to replace the hard drive with a faster drive. To do this, you just need to select it as the main one in the BIOS. The OS will always boot from a high-speed storage medium. Since OS files are static and are not overwritten as often as those used by the user, SSD installation as a primary drive it offers a lot of advantages: The freed HDD can be safely used to store photos, videos, etc. In other cases, the cloned data is used to restore the system. The procedure for transferring a data package is simple, so follow the instructions and remember the overwrite limit.