Installing Windows 7 from USB. Preparing a USB drive for installing the OS
Almost all modern laptop computers (except Apple) use an operating system from Microsoft. Sometimes a situation arises in which it is necessary to reinstall the OS, so it would be useful to know how to reinstall Windows 7 on a laptop or netbook. You can use several options for launching the program.
How to reinstall Windows 7 on a laptop using built-in tools
A situation arises when there is a need to reinstall Windows 7, but there is neither a licensed DVD nor a flash drive on hand to which you can copy the system files. On all laptops, be it Acer, Asus or Lenovo, you can run a recovery or OS installation using a disk image. It can be created in advance or found on the Internet, but it must be stored on the computer, and the laptop itself must be turned on.
Reinstalling Windows 7 on a laptop requires special programs that are capable of recognizing images, these include:
- Diamond tools;
- UltraISO.
To do this, mount the image into this program and run the file with the .exe extension. If windows is simply archived, then there is no need to unpack it. Open the vault with winrar programs or winzip, find the same again executable file with the ending .exe. After clicking on it it will start standard process reinstallation operating system.
How to reinstall Windows 7 from a flash drive or disk
In cases where the laptop cannot boot the OS on its own, you should use another computer to create the installation media. Before installing Windows on a laptop from a flash drive, you need to find an image and prepare the drive for writing files. If you have a licensed DVD, the process is much simpler, but there is an option that allows you to create it yourself.
Preliminary preparation of software for OS installation
To make from a DVD or flash drive bootable media, it is not enough to simply copy files or an image to it. To do this you should prepare required version Windows itself, using utilities, make an installation CD or flash drive. For the whole process you will need:
- Herself Windows program 7.
- DVD or flash drive minimum 4 GB.
- ImgBurn utility or Windows 7 USB-DVD Download Tool.
Creating a bootable USB flash drive or disk
If you have a DVD-rom, reinstalling Windows 7 on your laptop can be done through it. You will need a Windows image and ImgBurn utility, which can be easily found on the Internet. The creation process is as follows:
- Insert a blank DVD.
- Launch the ImgBurn program.
- In the window, select “Browse” and specify the path to the OS image.
- Do not put it maximum speed for recording, it is better to choose the minimum one.
- After recording, a window will appear, you need to click “Ok” and the finished disc will jump out of the device.

In many modern models laptop computers, netbooks no longer use CD-ROM, so it is useful to be able to reinstall Windows 7 on a laptop with using usb flash drives. Process of creation installation media next:
- Insert the drive.
- Run Windows program 7 USB-DVD Download Tool.
- In the window, select the path to the system image file.
- Next, the program will prompt you to select from the menu what you need to create: DVD or USB Device. Choose the second one.
- Specify the path to the drive.
- The utility will warn you that all data from the media will be lost. Agree and creation will start installation flash drive.
BIOS setup
To restore or reinstall Windows 7 on a laptop, you need to change some settings in the BIOS. To begin, restart your computer to home screen load, press “del” (works for most models, but sometimes F8 works). The mouse does not work in this system, so all actions must be performed using the arrow keys on the keyboard. When going into BIOS, do the following:
- In the "Boot" section, find the "Boot Device Priority" section. This setting will indicate where to start the system from.
- In the menu, make sure that USB DEVICE is first in the list in order if you are using a flash drive or your CD-Rom if it is a disk.
- Press F10 and confirm that you want to save the changes.
Installing Windows 7
After all the steps described above, the installation will begin. The developers tried to make sure that the user does not experience any inconvenience and the whole process occurs as automatically as possible. The person will be offered several parameters that he must determine independently, but there are no difficulties with them. The entire installation, search for drivers for mother card, the processor will be executed independently by the system, they will be built into the OS and will be immediately installed with it on the hard drive. When reinstalling, the laptop must be connected to power.
Installing Windows 7 from a disk or removable storage device has one algorithm. The user will need to follow these steps:
- Wait until the program copies everything necessary files. How long this will take depends on your PC configuration.
- Next, a license agreement will appear; you must confirm it.
- In the next window you will be offered a choice of restoring the system or performing complete reinstallation. It is worth choosing the second option.
- At the next stage, you need to select a partition on which the OS will be installed. As a rule, select section C; all personal data from it will be deleted.
- Confirm your choice, and then the system reinstallation process will begin.
- During the reinstallation, the computer will reboot several times; after the first time, you will need to remove the bootable media and then reinsert it.
- At the end there will be several parameters that need to be set: time zone, if desired, set a password for account, enter license key.
- The utility will carry out all other actions independently.

OS setup
All further windows settings 7 is that you need to install additional drivers; as a rule, they are included with the computer. Please note that all programs that were previously installed will not work. When reinstalling, you can leave all drives untouched except drive C, this will allow you to save some of the data, but if you wish, you can format the entire hard drive. This is relevant if the cause of the problem is viruses, malware, which could not be found and deleted.
Video instruction: how to install Windows 7 on a laptop
Proper setup and precise actions will help you perform quickly and efficiently. Loading updated version can be produced from a CD-ROM, DVD-ROM or flash drive.
Basic Input-Output System. (BIOS)
- the basis motherboard, it is an input/output base (hereinafter referred to as I/O), located on the motherboard. The existence of BIOS guarantees the ability to configure and adjust the computer.
The I/O system for each PC depends on the motherboard.
You can determine the BIOS settings for a specific motherboard by looking at them in the motherboard datasheet.
Important! Incorrect BIOS settings can damage your computer or reduce its power rating.
Information for management.
How to install Windows via BIOS, booting from DVD, USB, HDD depends on several Boot Menu keys:

You need to get into the system: restart the PC and enter “Setup” - the software that is responsible for the initial boot of the computer.
During the reboot, carefully monitor the inscriptions on the monitor screen; you must not miss the line that appears at the bottom with the following text:
"Press ____ to enter SETUP."
The program tells you how to get into the BIOS, you need to press the key that is written on the screen, it can be:
F1, F2, F3, F10, Del, Esc – on different computers they differ depending on BIOS version.
Hold down the key until the system redirects to Basic Input-Output System. A list of tabs will appear on the screen; you need to select the one that talks about loading devices - “Boot devices” or “Advanced BIOS Features”.

If you fail to complete the prescribed steps the first time, do not despair; you need to repeat all the steps a couple of times.
We select a tab; in order to enter, you need to press the “ENTER” button. After that, find the “Boot Sequence” tab in the drop-down list and check the correctness of your choice with the information that appears on the right side of the monitor screen. It should say that the selected tab is responsible for the device boot priority.

After the boot tab has been determined, using the enter keys, you need to set the priority so that the first one in the list is “CD-ROM” or that boot device.
With the help of which the whole process will be carried out. To do this, you need to select “First Boot Device” in the list and then the hard drive.


You need to confirm that your choice is correct and click OK.

So all settings BIOS systems to download and reinstalling windows ready. This was all done so that the next time the PC is rebooted, the OS itself will redirect Windows boot from the previously selected drive.
If you are experiencing difficulties or have a special BIOS version, you can call computer technician, which will do everything for you:
In order to start the download, you must restart your computer.
Loading Windows via USB flash drive.
To install Windows via the Basic Input-Output System from a flash drive, in fact, the entire procedure is similar to that described above, but you need to select from the list of proposed tabs in the I/O BIOS system or in the OS when simple version“Overlay” versions select the appropriate menu item.

The Windows installation process from a flash drive does not start and a black screen is shown on the monitor:
- Included ;
- The flash drive is formatted in NTFS;
- BIOS I/O only supports NTFS partitions, UEFI - FAT 32.
With a new version of the system to boot from a flash drive, it asks for permission to auto mode. It is best to refuse such an offer, otherwise the OS may be installed on the wrong partition or some of your personal files may be deleted.
Before setting the BIOS settings, you must select using “+” or “-” and click on the “Boot” tab.
When selecting settings, you must save them. To do this, you will need to press the “F10” - “Save and Exit” key. This action can also be performed by pressing the “->” key – “Exit Saving Changes”, i.e. “exit and save changes.”

After the approved and selected option and device boot priority, you need to select the F10 option, and then restart the computer.

For novice users who need reinstalling Windows via BIOS Experts have developed some tips for a competent and quick process.
For a successfully configured BIOS system, you should pay special attention to these recommendations:
- PC requirements (subject to Windows 7):
- Memory – at least 1 GB;
- Processor – minimum 1 Hz;
- Video card – minimum DirectX 9.
- Time to work in the BIOS.
- PC requirements (subject to Windows 7):
How long does it take to set up and configure a new version of Windows? It all depends on technical parameters PC:
- Performance “Clock Speed”;
- Number of cores “Cores”;
- Trunk frequency “800/1066/1333/1600 MHz”.
On average, to install windows via BIOS it will take one hour.
Clean and simple Windows installation processes
A clean installation is a launch of a disk with the system in manual mode, while starting the computer. After this, start, press any button, after the inscription “Press any key” appears on the tap.
If you are unable to install Windows yourself via BIOS, then use the service of a computer technician visiting your home:
The BIOS indicates the location of the new OS, for example, on a CD/DVD or hard drive, so that the old version is not used at all or is deleted. Clean option used for any OS: Unix, DOS, Windows XP, as well as Linux, Windows 8 and Windows 7.
Simple is rarely used and is not recommended. This is because a new version runs from CD/ DVD disc and an old OS already installed. So easy installation is more like an “overlay” process, since the new version is overlaid on the old version.
Installation Process Difference
Easy installation of Windows:
- Starting the computer;
- Operating system;
- Installation.
Clean installation:
- Starting the computer;
- Installation.
- Clean installation.
Operating system hard disk partitions.
Often during clean install, all partitions are formatted and old versions and files are deleted. In case it is necessary to reinstall a system with several divided disks where important files, you can leave the information unchanged.
It is not necessary to format drive D, however, drive C with old files Windows versions will be formatted.
Analysis of the hard drive during installation.
Before starting the Windows installation (if the OS is not working, crashes and glitches) you need to try to use the last chance of recovery and cleaning from malware.
If there are obvious problems with the operation of your PC, you must first check state of hard disk, analyze the operation of the segments, otherwise, even during system installation, the formatting process may freeze or become unstable.
Saving personal information.
Personal data and information is a very important component that cannot always be restored if deleted or damaged, so before reinstalling anything, you need to take care of their safety.
To save information and personal data when reinstalling Windows, you need to copy and transfer everything necessary files on portable media(disk, flash drive, etc.). It is also very important to save passwords; for this it is recommended to use the Backup program or do it the old-fashioned way, manually.
By following the rules and advice exactly, you can understand how to install windows via BIOS on a computer even to a person, without special skills and experience, in such situations.
The main requirement for correct installation is the accuracy of execution step by step guide proposed in the article above. Detailed Photos, accompanying the installation steps will help you navigate the I/O BIOS system.
If you need Windows installation dows 7 from a flash drive via BIOS, then our article will be an excellent assistant for you.
Installing a new operating system on your computer is enough common problem, which can occur due to the slightest malfunction of the system or the actions of an inept PC user.
This issue also became relevant in connection with the statement by official representatives of Windows about the suspension technical support XP operating system.
Today, almost all users have completely switched to the so-called seven.
Our step-by-step instructions will help you quickly and easily bring your computer back to life.
Preparing the computer to reinstall Windows
Before you start working on new software, you need to properly prepare your PC. First you need to remember what important information is stored on your computer and save it to a portable storage device.
Particular attention should be paid local disk C, this is where it is saved greatest number information. Almost all users store their media files (photos, videos) in the “My Documents” folder or directly on the desktop.
These files are often located on the disk along with the already installed OS. You can also use free space another local drive.
Very important before reinstalling Windows check if the PC has drivers for network card.
If you install new system via USB, and then it turns out that the distribution does not have drivers for the network card, then you will not be able to configure the drivers and Internet connection.
For your own confidence, it is better to once again make sure that the drivers are available. Also, be sure to check if you have drivers for your sound card, audio card, video card, etc.
Preparing a flash card for software installation
To install an operating system from a flash drive, we recommend following these rules:
- The minimum size of the flash drive must be 4 GB. This is the amount of space required to save all important components and files;
- Mandatory training Windows 7 distribution for recording and saving its image (*iso format);
- Selecting a program to create a disk image.
Advice! One of best utilities UltralSO is considered to create a disk image. Latest version located on the developer's website
We install and run the utility on the PC, and then select a pre-selected disk image from it. Step-by-step instruction using the program will help you quickly understand all the intricacies.
- Launch
2. Now the main working window opens in front of you
3. Go to recording image of a tough disk
4. Now you need to connect the flash memory and enable formatting. When the flash drive formatting process is completed, you can start recording.
5. After recording is complete, the space on your flash drive will contain Windows, with which you will perform the reinstallation.
Comment! To create a flash drive for installing the system via BIOS, you can use the toolsWindows.
Setting up Bios to work with a bootable USB flash drive
One connection of the installation flash drive to the PC to install a new one software It’s not enough, you need to pre-set up your computer so that when you turn it on, it starts booting from it.
All settings are made in Bios. Any laptop or computer has a Bios that stores important settings, including remembering the order in which devices should boot. It is this setting that we now need for further fruitful work.
To start the Bios, you need to hold or press a certain key on the keyboard when you turn on the computer.
You can find out which key we need from the information on the monitor. Typically these keys are Esc, Delete, F2. If you have entered Bios, one of the following screens will appear in front of you:
If your login attempt fails, restart your computer again and try starting the BIOS again. To make things easier for you, we have placed a table with the main options turning on Bios.
Keyboard combinations for logging inBIOS depending on manufacturerBIOS
Basic key combinations for launchingBIOS depending on laptop and computer manufacturers
After you get into the Bios, you need to find the option that is responsible for loading devices. Usually it is in the menu and its name contains the word BOOT. Other options are not excluded; you may even have to look.
Here are some examples:
As a rule, selecting the main device to boot is done by pressing the arrows on the keyboard, although sometimes there are other control methods. If you can’t figure it out yourself, then refer to the help that appears in the BIOS.
In our case, the first boot device is a USB-HDD (there may be another name). After selecting it, you need to exit the Bios and save all settings using the Save and Exit Setup item.
After this step, the computer should reboot and we will move on to the main stage for which we are here.
Installing Windows 7 using a bootable USB flash drive
If everything was correctly written to the flash drive space, and the correct settings were made in the BIOS, then you will see the following message on the monitor screen, which says that you should press any key to activate the boot.
If there is no such inscription, then you will have to check your actions. To do this, go to Bios and make sure that the boot from flash drive setting is saved. If there are no errors in the BIOS, then most likely you were unable to create bootable USB flash drive and you need to repeat the whole process again.
If there is an inscription, then congratulations, your installation Windows new The version via BIOS has started. Some installation images in addition to the operating system itself, they also contain various additional programs, then you will have to select the required item from the menu.
It is also worth saying that some disks perform most of the settings described below by default. There is no need to worry about this, since all settings can be changed after the software installation process is completed.
A welcome screen appears in front of you, on which you select the necessary data. After the setup has been completed, click on the “Next” button, and then “Install”.
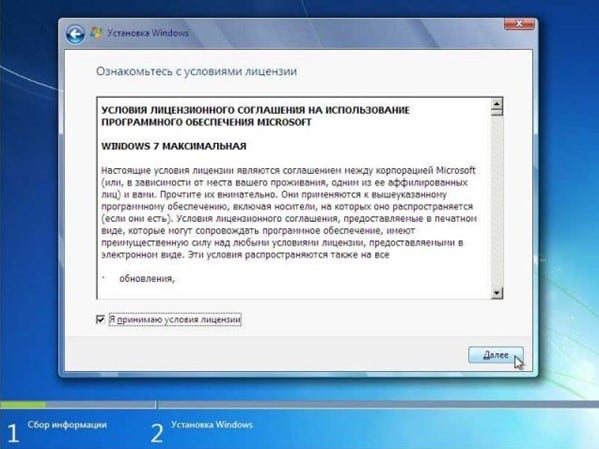
Conditions appear in a new window license agreement, which you, of course, read very carefully, and then agree by checking the box in the specially designated box and clicking the “Next” button.
The final stage of installation
In a new window you will have to select what type of installation we require. We need full type. Next, you will have to do a little work with the disk on which the new version of the software will be written.
To do this, select the required disk partition in the menu and click on the “Disk Setup” button, after which we start formatting.
We have already described how this is done above. Here you just need to change from USB-HDD to the name of your disk. This is a very easy action that should not cause you any difficulties.
Once the reboot is complete, Windows installation will continue.
- Enter names for the computer, laptop and users.
- Set a password, if necessary.
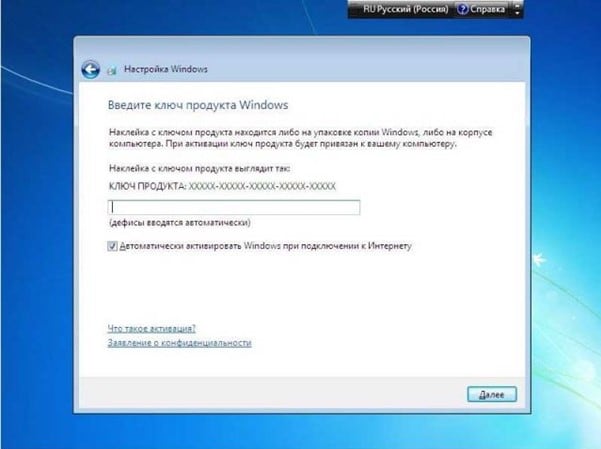
- Enter the name of the license key, if you have one (you can skip this step).
- Selecting security settings (“Recommended settings”).
- We set the date and time.
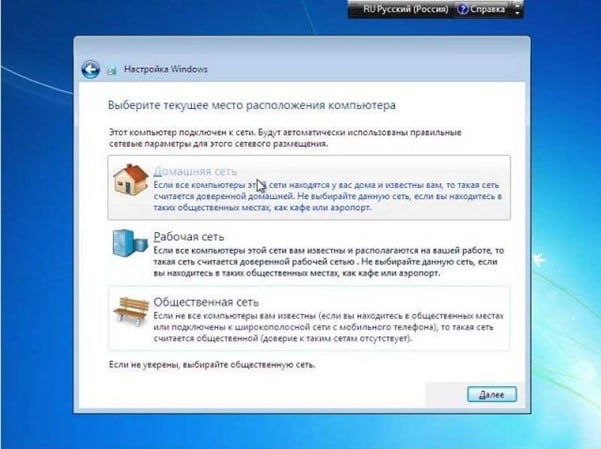
- We configure the network.
Thanks to these simple steps, you can install Windows 7 through the BIOS using a flash drive.
If you download ISO image With Windows distribution and even burning it correctly onto a DVD disc or creating a bootable flash drive using the same UltraISO is almost no problem for anyone. Many people have difficulties with the second stage, directly installing the operating system from a disk or flash drive on a PC.
I know of three ways to start installing Windows.
1) the simplest and most unreliable is to open the image with Windows already running using virtual drive and start the installation, but there are many factors that can interfere and give an error at some stage of such an installation.
2) Insert the flash drive we created into USB connector or a DVD with Windows into your drive, no matter what version, Windows 7, Windows 10, even Win95. This works for everyone. Then, when you turn on the PC, call BOOT menu, this is a list with the media from which we need to boot, select the media we need and press ENTER. You can read more about how to install Windows via the BOOT menu here.
3) It differs from method 2 only in that we indicate what we want to boot from not through the boot menu, but in the BIOS of our device.
In this article we will talk in detail about how to install Windows from a flash drive via BIOS or boot Windows 7 from a BIOS flash drive.
Booting Windows 7 from a BIOS flash drive
Installing Windows from a flash drive via BIOS starts with calling BIOS menu or also called Setup, this is most often done with the Delete button immediately after turning on the laptop or computer, press continuously until you see blue screen with some text, but sometimes it happens that you need to press another button, this is F2 or F10 or Esc. You can try all the options until you see it desired result, or you can read in the welcome window of the motherboard firmware a text like “Press DEL to run Setup”, it tells us that in order to get into the BIOS you need to press DEL.
And so, after we got into the BIOS SETUP UTILITY, we look for the Boot tab and use the arrows to go there. We need the Boot device Priority line
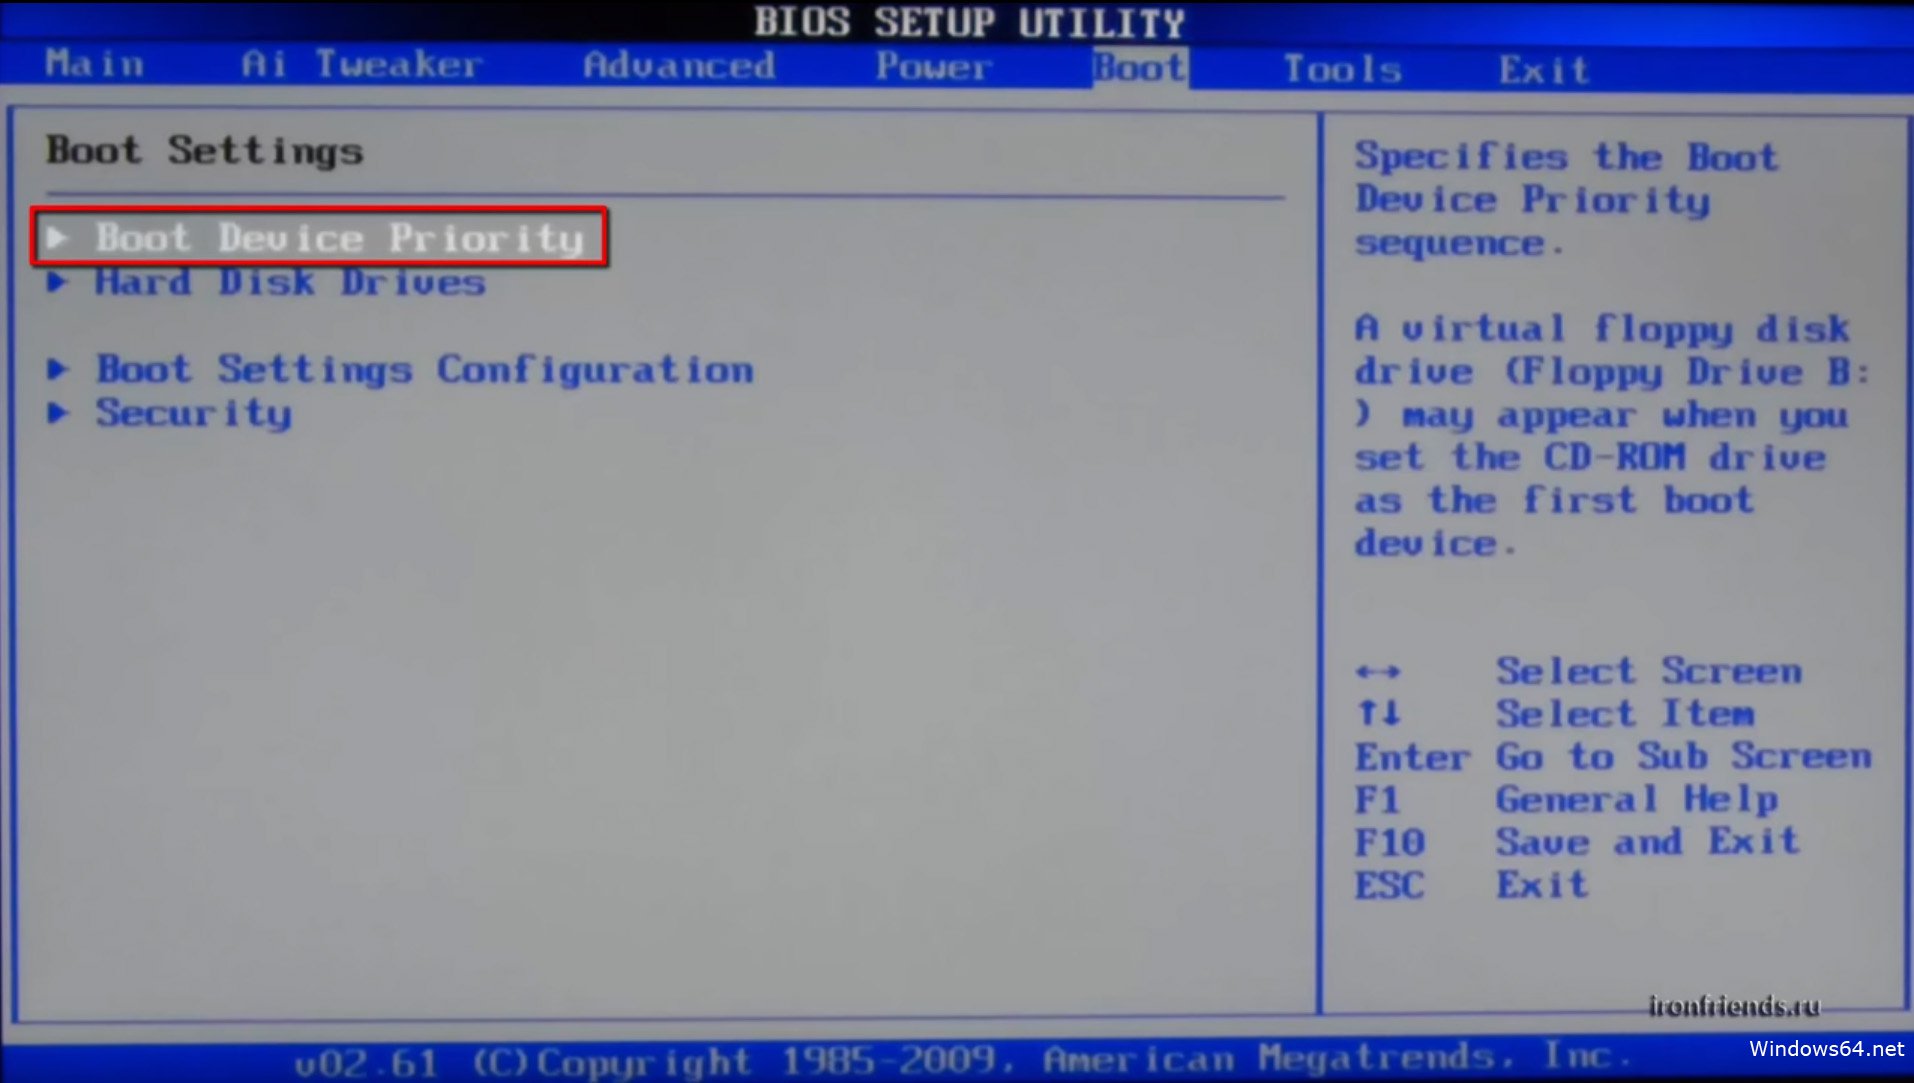
The logic here is simple: the higher the device is in the list, the higher the priority in the download queue. That is, the top one in the list is loaded first, and so on in turn until the system boots.

And so, using the arrows, select the first drive in the list and press ENTER, we see a list of all possible devices from which the computer can boot.

If we want to select loading the BIOS via a USB flash drive, then select USB interface, this is Removable Dev or something with the text “USB” included, or if the flash drive is already inserted, the name of the flash drive manufacturer will be written. If you need to select a DVD drive, then as a rule this line begins with the words CDROM: or DVDROM: or it can also be written by the manufacturer of the DVD drive.
If you have made your choice, press ENTER and in the same way select the second device in turn, the second on the list should be yours HDD on which Windows will be installed. If the BIOS does not see the flash drive, then try inserting the flash drive into another USB connector and do everything all over again.
In order for all changes to be saved in the BIOS Setup, before leaving, you need to go to the Exit tab and select the Exit & Save Changes line and press ENTER.

After this we can Windows bios install via USB flash drive or dvd drive. Not everyone has a bios with a blue screen anymore. In 2017, you can increasingly see a new generation BIOS, it is more graphically thought out, there are pictures of icons for a clear association, if you are not good at English, so as not to make a mistake. But essentially all the settings are the same.
Attention!- after our changes to the BIOS, now the computer will always boot first from the flash drive, then from the hard drive, so it is important when installing Windows after the first installation stage, when the laptop or PC reboots, YOU NEED TO HAVE TIME TO PULL THE FLASH DRIVE FROM USB connector, or remove the disc from DVD-Roma. Otherwise, the first installation stage will be repeated endlessly.
Now we know how to configure the BIOS to install windows from a flash drive. And having with you a bootable USB flash drive with WINDOWS way 7 or 10, we can install or reinstall the OS on any device without any problems.
The Windows installation process can hardly be called something complicated. However, there are many myths circulating among PC users about this incredibly difficult process. While installing an operating system from a disk may seem like something traditional, performing exactly the same actions from a flash drive terrifies many. Mainly due to simple ignorance that the USB input can be used as a full replacement for a CD\DVD drive. There can be a huge number of reasons for this:
- Initial lack of a disk drive (netbook, ultrabook).
- Drive failure.
- Disk failure.
- Infection with a virus that prevents the device from reading disks, etc.
Having and installing Windows from a so-called bootable USB flash drive can become full replacement boot disk. As a rule, the win 7 installation process consists of several main steps:
- Preparing the computer for installing the operating system.
- Preparing a USB drive.
- Changing BIOS settings.
- Installation of the operating system itself.
Each stage has its own nuances and features. Therefore, we strongly recommend that before you start installing Win 7, you read the article carefully to the end, or better yet, print it out or download it to your mobile device.
Windows installation can be complete or partial. It depends on what goals you plan to achieve by reinstalling it. Full formats both of your disks (the one on which the OS is located and other additional ones) if you have them, of course. Partial allows you to reinstall only system files. Helps if you accidentally deleted system files or folders (for example, win 32 or *. dll files), but you simply don’t have the time or ability to transfer all the information from your computer.
In any case, before installing the operating system from a disk or flash drive, always reset important information to other media or cloud services. If you plan to perform a partial installation of Windows (and you have 2 disks, “C” and “D”), you can move all the important information to a disk that is not a system one. This is quite easy to do.
How to find out which drive the OS is installed on
To understand which of your system drives The operating system is installed, just open the “start” menu and launch “my computer”. Or go to your computer settings from the shortcut on your desktop. After you start the “computer”, you will see everything hard disks, which you have, as well as connected flash drives. Where Windows is installed, a small win icon will be drawn.

If for some reason this method does not work, then there is another way to find out the location of the OS on the computer. For this:

To avoid this need in the future, try to install the operating system on the “C” drive, and also create an additional directory for storing files.
Copying files
Once you have determined which of your drives is the system drive, you can, if necessary, copy all your information to an additional drive (in my case, drive “D”). It is advisable to carry out this procedure in advance before installing Windows. Especially if you have a habit of not organizing your files. Therefore, immediately check the main directories related to system disk C, by default it refers to:
- Desktop.
- Library (images, documents).
If you are going to perform a partial reinstallation of wines, then create additional disk new folder and copy all important files there (do not try to copy installed programs, they still won't work!). If the installation of Windows from a flash drive is complete, then copy your data to other USB drives, external hard drives and cloud services.
The main thing a computer is used for is storing information. Therefore, the most important thing here may be saved passwords, details, and so on. Don’t forget to write down all important logins and passwords (as well as files for WebMoney Keeper) from your browsers, because after reinstalling Windows, this information cannot be returned. Of course, if your computer is completely new and you just want to install another Windows version, then it obviously won’t contain important information.
Driver preparation
The next point that also needs to be taken into account before installing Windows is the availability of all the necessary drivers. As a rule, some of them are located in the operating system distribution itself and are installed along with Windows. Sometimes it happens that they are installed incorrectly or are completely absent in the installation package(it is assumed that the user has a disk with all the necessary drivers).
The main thing that needs to be provided is the presence of a fresh network driver. It is necessary for correct operation Internet and Wi-Fi adapter. Therefore, it is not necessary to download absolutely all drivers to an additional disk or flash drive. If you have a network driver, you can easily download the rest from the Internet.
Preparing USB media and BIOS
The stage of preparing a flash drive for installing wines represents its immediate creation. As a rule, this is a rather long and labor-intensive process with many nuances. It includes:
- Preparation Windows image, which is supposed to be installed on the computer using additional software or command line.
- Formatting USB flash drives and copying to it system files.
Therefore, this article assumes that you have already created a bootable USB flash drive and are ready to install Windows itself. However, to start this process, it is not enough to simply insert a flash drive into a USB port.
Default BIOS settings displayed in such a way that, if available, disk drive disk, the computer booted from it. If at the moment Windows boot V USB input there is a flash card, this fact is ignored by the system, and loading occurs as usual. To start installing Windows from a USB flash drive, you need to change these settings.
How to enter BIOS
To change the boot priority of devices, just go into the BIOS and set the necessary parameters. For this:
- Insert your bootable USB flash drive into the USB port.
- Restart your computer.
- Immediately after the screen turns on, press the button to enter the BIOS settings (most often this is delete).
If you did everything correctly, you will see the BIOS main menu. It looks something like this:


If you pressed delete button several times, but the BIOS did not appear, then perhaps your laptop or computer model uses a different default key to call this menu. To find out exactly how to enter the BIOS from your computer, use the search or method random dial(try F2, F12, Escape and so on).
Changing BIOS settings
After you manage to get into the BIOS, you need to change the boot order of the devices. Management in this menu carried out using the “arrows”, the “confirm” key - “enter”, back - backspace or escape. Once you open the BIOS, the control buttons will be marked on the screen.
The next thing you might notice when you get into the BIOS is that it is not Russified. Therefore, to change the boot priority of devices, you will need to know the simplest terms in English that will help you find and correctly change the necessary parameters. So follow these steps:

After you correct the necessary parameters, you can exit the BIOS menu. However, do not forget to save all changes made. Therefore, when exiting, be sure to select Save and Exit. After this, your computer is completely ready to install Windows from a USB flash drive. However, you still have time to copy some files or work on your computer.
Installation does not occur
Once you have prepared the BIOS, the USB flash drive and the computer itself, you can start installing win 7. To do this, insert the bootable USB flash drive into the USB port and reboot the device. An inscription should appear on the screen prompting you to press any button to boot the system from a flash drive or disk. If such a boot screen does not appear and the computer starts up as usual, then you may have configured the BIOS incorrectly, or you forgot to save the changes you made. Therefore, open the BIOS again, and then make the necessary changes again. If you are sure that you have configured the BIOS correctly, then the problem may lie in the image itself, the flash drive, or even a malfunction USB port. In this case, you may need another USB drive or wine distribution.
Installing Windows 7
After the required loading screen appears, follow the system’s recommendations and press any button to continue the installation.
It should be immediately noted here that depending on the version and build of your operating distribution win systems, installation various parameters may be a little different. There may be additional settings or the absence of those that will be mentioned in the article. In any case, don't worry about it. If you encounter such a situation, just carefully read the information that win offers you to choose and mark the parameters you need. As a rule, for such cases, the Win 7 system explains that in the future all the parameters you select can be changed or offers a choice of “default” settings (if you don’t know what to choose).
The first thing you will be asked to select is the operating system interface language, date and time settings, and keyboard layout. After selecting the settings you need, click the “next” button.

Let's start the installation
An information screen will appear on which you can familiarize yourself in detail with the procedure for reinstalling win 7, after which you can click “install”.
 The Windows 7 installation wizard will prompt you to select one of the operating system versions. It all depends on which image distribution you copied to the flash drive. If you originally downloaded from internet win 7 Home Edition or Professional, this window will not appear. If you have downloaded a collection of various packages, then from the list select the one for which you have a license key (it can be found in the laptop box or on back cover). If you cannot find it or are in doubt, you can enter this information later, within 30 days. Therefore, select the required version and click “next”.

Read the license agreement in detail, accept its terms and continue installation by clicking “next”.
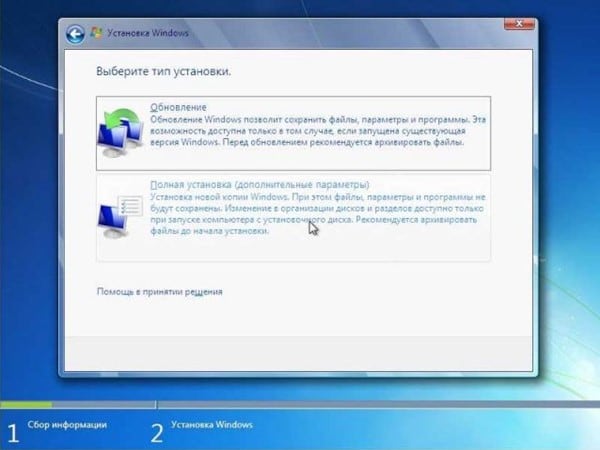
Win 7 will prompt you to select an installation type:
- Partial (updating system files, saving information on an additional drive “D”).
- Complete (all user information will be permanently erased).
Depending on the purpose of installation, select the desired item. If you are in doubt about making a decision, you can read more detailed information in the "decision aid" menu. Basically further actions won't be much different. The article assumes full installation Win 7, then we will consider the parameters that are equivalent for the selected “full installation” item.
Then you will be asked to select the disk on which the Win 7 operating system will be installed. Select the required right click mouse and click on the “disk settings” line.

Select the partition in which Windows 7 will be installed and click “Disk Setup”. If you have never installed an operating system, then this is where you may have difficulties.
Hard drive setup
Usually, in addition to the main disk partitions, which are visible to the user (the so-called drives C, D, etc.) there are so-called hidden partitions. This is especially common with new laptop models. Usually the so-called recovery system, which allows you to return the operating system settings to factory settings. There may also be a special section created by win 7. It is necessary for data encryption settings system settings. Therefore, it is better not to change this parameter during OS installation. And if the need arises, then change it using third-party utilities.
In the same “disk setup” menu, format each partition.

This procedure will remove all custom settings. But since you have previously saved all the important information, this procedure is absolutely not scary. The data formatting procedure must be carried out without fail. Therefore, we confirm the removal of all data from the computer.

After the system completes the removal, you can exit the disk settings menu and click “next”. Will begin automatic installation Win 7.

Configuring operating system settings
After the system finishes installing Windows 7, you will be prompted to enter the computer name and username.

Here you can also configure other administration settings (password, additional accounts).
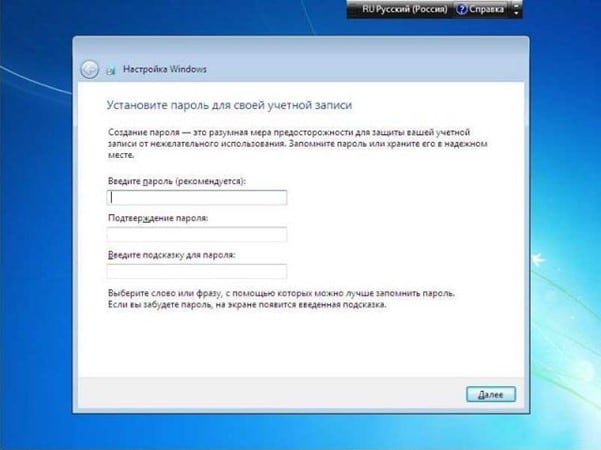
Then you will be asked to enter the license key (depending on the distribution build, this item may be missing altogether). You can also skip this step and install trial version win 7 and enter the activation key within 30 days.
Now select settings windows security. Let's celebrate the most top line, automatically check and install updates.

The next item is setting the date and time (time zone). Here you can enable or disable automatic transition systems for summer or winter time. Plus, you can always change your time zone settings at any time.

If the win 7 distribution had built-in network drivers, the computer will automatically detect your network connection and prompt you to select security settings. Otherwise, this window simply will not appear.

After you have checked all the parameters you need, the installation of Windows 7 from a flash drive can be considered successfully completed. You can immediately start working on your computer, as well as download and install everything necessary drivers and programs.
In contact with