Installing and configuring phpMyAdmin: step-by-step instructions and recommendations. Installing and configuring phpMyAdmin in Ubuntu environment Phpmyadmin how to add files
Hello, dear readers of the blog site. Today I want to talk about a script (program) PhpMyAdmin, which helps in a convenient graphical form (without entering SQL queries) on the MySQL server. Depending on the user's access level, using this server script you can manage both individual databases and the entire MySQL server.
I don’t plan to go deeper, because... firstly, I’m simply not familiar with the full functionality of this free utility, and secondly, you’re unlikely to need it when working with your website.
However, the PhpMyAdmin program became the same for me. True, although I use it constantly, as a rule, for a very limited number of operations. Mainly, when I want to create a website database, optimize database tables, and in rare cases, it helps me make changes to all article texts at once, which significantly saves time.
Installation and configuration of PhpMyAdmin
It goes without saying that PhpMyAdmin has much more capabilities, but this is quite enough for me. Although, when I studied Popov’s video course on PHP and MySQL, I used this program to create my own databases and to create the necessary tables with the necessary fields in these databases.
In general, in this video course, Evgeniy talks about writing his own CMS (not as complex and sophisticated, of course, as, for example, but still having an admin panel) using PHP and the MySQL query language. Along the way, you naturally learn the basics of these languages, which will come in handy and will be useful when working with your own website. The course is very large and voluminous, but, in my opinion, useful, especially for beginners in this matter.
PhpMyAdmin will be installed on the vast majority of hosting sites (at least on the RuNet) to provide webmasters with the ability to work with their databases. Databases are created, as a rule, using the hosting control panel itself (), but working with an already created MySQL database for almost all hosters is left to PhpMyAdmin, and this is correct, because it is very well suited for this, and the script itself is familiar to many .
That. You most likely won’t need to install and configure this program itself, but I will still, just in case, briefly tell you where you can download the script and how to install and configure it. By the way, this program can be used not only on the hosting server, but also on a local server with MySQL installed. The script is already included by default.
In general, it’s hard for me to imagine a situation where you might need to install and configure PhpMyAdmin yourself, although I’ve encountered such a situation. A year and a half ago, the blog site was hosted by, where at first this script was not installed and I had to download and install it myself, although there is nothing complicated about it.
Download PhpMyAdmin with support for the Russian language, you can from this page, although you can also download a version of the script with support for only the English language from there. The latest current version is 4.0.5 and will be compatible with PHP 5 and MySQL 5.
Version 2.11.11.3 is compatible with older versions of PHP 4+ and MySQL 3+. After downloading the program archive, you will need to unpack it and connect to your website via FTP, for example, using .
Create a directory in the root folder (usually either PUBLIC_HTML or HTDOCS) of your site with any name you understand, for example, “myadmin” (if you use capital letters in the name of the directory, then when accessing it from the address bar of the browser you will have to take into account character case).
Well, now, using FileZilla, copy the contents of the archive with the script into the created directory (the whole bunch of folders and files from the distribution can be selected at once by pressing Ctrl+A on the keyboard) and click on the “Upload to server” item, selecting it from the context menu:

Once the files are copied (this is install PhpMyAdmin) you need to pre-configure this script. The easiest way to set this up is to rename the file "config.sample.inc.php" (from the "myadmin" folder you created) to "config.inc.php".
After this, open the resulting file “config.inc.php” for editing and proceed with the settings, which consist of setting an identifier that helps encrypt your password for accessing PhpMyAdmin in the browser cookie. To do this, in the line:
$cfg["blowfish_secret"] = "";
Enter at least 10 characters between single quotes, like this:
$cfg["blowfish_secret"] = "sjkdflscokdkld";
You do not need to remember the entered sequence. Actually, the preliminary setup of PhpMyAdmin can be considered complete. Although, you can also change the default login method, which is specified in the line:
$cfg["Servers"][$i]["auth_type"] = "cookie";
In this case, you will have to enter your username and password each time to log in, which can be remembered in a cookie using the browser. But you can replace this line with this code:
$cfg["Servers"][$i]["auth_type"] = "config"; $cfg["Servers"][$i]["user"] = "your_logint"; $cfg["Servers"][$i]["password"] = "parol_odnako";";
In the second and third lines of this code, you set the login and password to enter the program, which now you will not need to type (automatic login). But this login method is less secure than the default one, although if you are working with the site on local host, then this login setup will be preferable.
Export and import database via PhpMyAdmin
After you finish setting up, you can try to log in. To do this, you need to type in the address bar of your browser the path to the folder where you installed the PhpMyAdmin distribution files. That is, for example, for my blog this address would look like this:
Https://site/myadmin/index.php
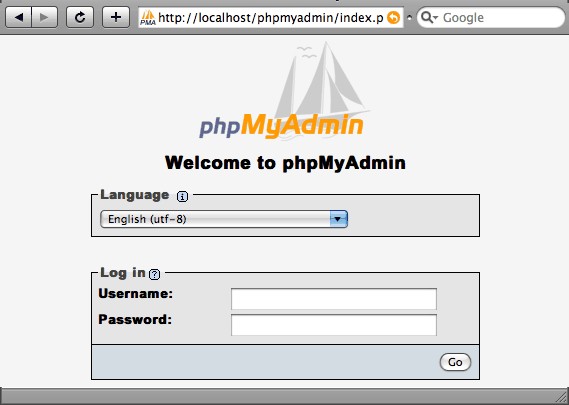
If you installed and configured the script correctly, a window will appear prompting you to enter your login and password to enter the program:

To login, you can use the username and password that your host gave you. If you install PhpMyAdmin on your server, the login will be “root” by default, and the password is the one you specified when installing MySQL. As a result, you will be taken to the main page of the script:

The house icon will always allow you to return to the initial page of the program. Let's look at the actions that users most often perform - creating and restoring a database backup. In general, of course, you can create a database backup in many ways, but backups made through Php My Admin have never failed me.
There are scripts and extensions for various CMSs that can create database backups on a schedule and without your participation at all, but I personally prefer to use manual backups (I feel safer that way). The database of various CMS contains the most valuable thing that you have on your site - the articles you wrote, the loss of which would be irreplaceable.
In the left column of the PhpMyAdmin interface, select the database you want to backup, then go to the “Export” tab from the top horizontal menu of the main program window:

This program can archive a backup copy of the database on the fly, so at the very bottom of the page that opens it makes sense to check the “gzip” box, thereby reducing the volume and time of downloading. In the “Export” column, by default, all tables from the database you need will be selected and the format for saving it as “SQL” will be selected.
If you want to copy only some tables, then select only them. To create a backup in PhpMyAdmin, you just need to click on the “ok” button and select a location on your computer to store the archive. Actually, everything is quick and simple. The only thing you need to do is remember to repeat this procedure after adding new materials to the site.
Now let's think back to that sad moment when you may need restore database from a previously created backup. First, it is better to delete all existing tables in the database being restored. To do this, click on its name in the left column of the program and, under the list of all database tables, click on “Mark all” and select “Delete” from the drop-down list:

After that, you go from the top menu of the main PhpMyAdmin window to the “Import” tab, click on the “Select file” button and start scouring your computer in search of the latest up-to-date backup copy of the database you need.
The program will take some time to extract and restore all database tables from the archive, after which you can again enjoy a fully functional site. Everything is also very simple and fast, which is good news.
Creating a new database and user in PhpMyAdmin
If you are creating a website on your own server (local, virtual or dedicated), then you may need create a new database, which can be easily done in this program. To do this, on the initial page you will only need to enter its name in the “Create a new database” field and click the create button. That's it, a new database has been created in PhpMyAdmin.
Now we will need to create a user for this database - on the initial page, follow the “Privileges” link:

And in the window that opens you need to follow the link "Add new user":

- Username - enter the desired name in Latin (it will be your login when logging in)
- Host - usually enter localhost
- Password and Confirmation - come up with a more complex password so that the enemy does not guess
In the “Global Privileges” area, select the capabilities that will be provided to the user you create. For a local server, it would be best to click on the “Mark all” link:

Well, we also successfully created a new user in PhpMyAdmin.
Other ways to use PhpMyAdmin
I once had a case when, after moving my site to another server, it began to generate a database error. Having opened the program, I saw a message that one of the tables in my database was damaged.
But this problem was solved quite simply and quickly using PhpMyAdmin itself. To do this, I checked the damaged table and selected the “Restore table” option from the drop-down list below.
In addition, quite often I use the option on table optimization who need this optimization. To do this, just click at the very bottom of the list of tables on the “Mark those requiring optimization” link and select the “Optimize table” option from the drop-down list:

Well, I also sometimes use this opportunity to run SQL queries on certain database tables. It's very convenient when you need change something in the texts of all articles on your website. If the number of articles has exceeded a hundred, then doing this manually is simply not possible. The same can be done by installing the necessary extension on your CMS, but you can get by with PhpMyAdmin alone.
Attention!!! Before you perform the following steps , be sure to make a backup database in the manner described above.
In WordPress, articles are stored in a table called “wp_posts”, so to make changes to the texts of all articles you need to click on the name of this table in the left column of the program window, and in the central window go to the “Browse” tab from the top menu:


A separate window will open in which you will need to type SQL query text, making changes to all articles on the site. This text will look something like this:
UPDATE wp_posts SET post_content =REPLACE(post_content, "what_needs_change", "what_needs_change");
The last time I changed the heading levels inside articles (I removed h4 level headings, replacing them with h3) and sequentially executed the following SQL queries through PhpMyAdmin:
UPDATE wp_posts SET post_content =REPLACE(post_content, "
", ""); UPDATE wp_posts SET post_content =REPLACE(post_content, "
", ""););
To the right of the SQL query input area in the PhpMyAdmin window, you can select only those fields in which you want to make changes. Article texts in WordPress are written in the “post_content” field:

There are many more ways to use this program to perform day-to-day database operations.
If you know any other useful features of PhpMyAdmin, then post a link in the comments, or explain the essence of the matter in words.
Good luck to you! See you soon on the pages of the blog site
You might be interested
 Windows clipboard and saving its history in Clipdiary
  Dropbox - how to use cloud data storage, as well as working with the Dropbox program on a computer and mobile Programs for promotion on Instagram
  KeePass is a complex password manager and generator, as well as the best program for storing and conveniently using passwords
  Punto Switcher - free keyboard layout switch and other features of the Punto Switcher program
  How to put a password on a folder (archive or otherwise password protect it in Windows)
  Gzip compression to speed up site loading - how to enable it for Js, Html and Css using the .htaccess file
  How to check a site for broken links - Xenu Link Sleuth, plugin and online service Broken Link Checker, as well as search engines
  Artisteer - a program for creating and editing templates for Joomla and themes for WordPress
  Notepad++ - free Html and PHP editor with syntax highlighting, overview of features and the best plugins for Notepad++
Click on the title to open/close a detailed description of the process
We will need to create a new database - click on the tab "Database". In the subsection text field "Create Database" enter phpmyadmin, press the button "Create".

Let's create a new user - click on the tab "Users".

At the moment we have a single user created with the name root. Click on the link "Add user",
in the pop-up window that opens, in the section "Account Information" to text field "Username:" enter "pma". To text field "Host:" enter "localhost". In field "Password:" enter the password (any one that comes to your mind). In field "Confirmation:" Confirm the password entered above.

Scroll the window to the section "Global Privileges", click on the link "Select all".

Click on the button "Add user".

A new user named pma will be created.

Now, you need to import data into the created database. In the left column select phpmyadmin(click on it with the mouse).

In the top menu, click on the tab Import.
In the subsection Imported file: Click the review button.

In the context menu that opens, select the file create_tables.sql which is in the folder examples, located inside the phpMyAdmin root directory (in my case the full path looks like this: c:\Program Files (x86)\Apache Software Foundation\Apache2.2\htdocs\phpmyadmin\examples\create_tables.sql).
At the very bottom of the page we find and press the button Ok. The database has been imported.
Let's make changes to the configuration file.
Open the file in notepad config.inc.php. Looking for a string $cfg["Servers"][$i]["controlhost"] = "";, uncomment it (remove the double slash), enter it in quotes localhost(the line will look like $cfg["Servers"][$i]["controlhost"] = "localhost";).
Find and uncomment the line $cfg["Servers"][$i]["controlpass"] = "pmapass";, in quotes, change the password to the one that was assigned when creating the user pma.
Find and uncomment the following lines:
$cfg["Servers"][$i]["controluser"] = "pma";
$cfg["Servers"][$i]["pmadb"] = "phpmyadmin";
$cfg["Servers"][$i]["bookmarktable"] = "pma_bookmark";
$cfg["Servers"][$i]["relation"] = "pma_relation";
$cfg["Servers"][$i]["table_info"] = "pma_table_info";
$cfg["Servers"][$i]["table_coords"] = "pma_table_coords";
$cfg["Servers"][$i]["pdf_pages"] = "pma_pdf_pages";
$cfg["Servers"][$i]["column_info"] = "pma_column_info";
$cfg["Servers"][$i]["history"] = "pma_history";
$cfg["Servers"][$i]["tracking"] = "pma_tracking";
$cfg["Servers"][$i]["designer_coords"] = "pma_designer_coords";
$cfg["Servers"][$i]["userconfig"] = "pma_userconfig";
$cfg["Servers"][$i]["recent"] = "pma_recent";
$cfg["Servers"][$i]["table_uiprefs"] = "pma_table_uiprefs";
We save the changes to the file, exit and enter again phpMyAdmin. The warning has disappeared.
As an alternative (if you really don’t want to dig into the code) - replace the entire contents of the file config.inc.php to the code below
< $cfg["blowfish_secret"] = "a8b7c6d"; $i = 0; $i++; $cfg["Servers"][$i]["auth_type"] = "cookie"; $cfg["Servers"][$i]["host"] = "localhost"; $cfg["Servers"][$i]["connect_type"] = "tcp"; $cfg["Servers"][$i]["compress"] = false; $cfg["Servers"][$i]["extension"] = "mysqli"; $cfg["Servers"][$i]["AllowNoPassword"] = false; $cfg["Servers"][$i]["controlhost"] = "localhost"; $cfg["Servers"][$i]["controluser"] = "pma"; $cfg["Servers"][$i]["controlpass"] = "пароль для пользователя pma"; $cfg["Servers"][$i]["pmadb"] = "phpmyadmin"; $cfg["Servers"][$i]["bookmarktable"] = "pma_bookmark"; $cfg["Servers"][$i]["relation"] = "pma_relation"; $cfg["Servers"][$i]["table_info"] = "pma_table_info"; $cfg["Servers"][$i]["table_coords"] = "pma_table_coords"; $cfg["Servers"][$i]["pdf_pages"] = "pma_pdf_pages"; $cfg["Servers"][$i]["column_info"] = "pma_column_info"; $cfg["Servers"][$i]["history"] = "pma_history"; $cfg["Servers"][$i]["table_uiprefs"] = "pma_table_uiprefs"; $cfg["Servers"][$i]["tracking"] = "pma_tracking"; $cfg["Servers"][$i]["designer_coords"] = "pma_designer_coords"; $cfg["Servers"][$i]["userconfig"] = "pma_userconfig"; $cfg["Servers"][$i]["recent"] = "pma_recent"; $cfg["UploadDir"] = ""; $cfg["SaveDir"] = ""; ?>
Don't forget to write in the line $cfg["Servers"][$i]["controlpass"] = "password for user pma"; in quotes the password that was set for the user pma and in the line $cfg["blowfish_secret"] = "a8b7c6d"; increase the inscription in quotation marks to at least 10 characters
This article will describe in great detail how to properly install and configure phpmyadmin, which will help us manage our website databases more efficiently and visually than through the terminal.
We will install on Ubuntu 14.10. But the article will also be relevant for others deb-base d distributions, in some cases with minor amendments. First, let's look at the installation and configuration phpmyadmin to the apache2 web server.
Installation via GUI
Open the Application Center of our distribution and enter phpmyadmin in the search bar. The application we need will immediately be displayed below. Select it with the mouse and click “Install”

Ubuntu Application Center
Before starting the installation, we will be asked to enter the administrator (superuser) password to continue the installation. Enter the password and press Enter

During installation we will need to answer some questions. In the first window, select the web server for automatic reconfiguration. Place a check mark next to it apache2 and press the button "Forward"

Next we are asked whether to configure the database for phpmyadmin using package dbconfig-common. The default is checked. We don't need to reconfigure the databases. Uncheck the box and click "Forward"

and wait for the installation to complete.
Installation via terminal/console
Installation through the terminal/console is similar to installation through the application manager.
Open the terminal with the combination CTRL+ALT+T and enter the command
sudo apt-get install phpmyadmin -y
sudo apt - get install phpmyadmin - y |
The installer will ask for a superuser password. Enter it and click Enter. The password will not be displayed when entered.
Next, as with the GUI installation, we need to select a web server for automatic reconfiguration. The mouse does not work in the pseudo-graphical interface. To select a checkbox, press the Spacebar. Celebrating apache2 and click Enter.

In the next window we answer in the same way as when installing in graphical mode. Select with the cursor " <Нет> " and press Enter.

We are waiting for the installation to complete.
Checking the operation of phpmyadmin
Check functionality phpmyadmin possible at the address http://localhost/phpmyadmin/ in a web browser. If we see the login form, then phpmyadmin installed successfully

Select the language, enter the login and password for the MySQL databases and confirm with the “OK” button. As a result, we should get to the interface phpmyadmin

Setting up phpmyadmin on a web server with nginx without apache2
For some server configurations that do not include a web server apache2, there may be a problem with phpmyadmin. We won't be able to get into the interface phpmyadmin. An example of a configuration would be the bundle nginx + php5-fpm. This problem can be solved quite simply.
Open the site’s configuration file in your favorite text editor (configurations are usually located in the directory /etc/nginx/sites-available/) and to the section server add the following:
Location /phpmyadmin ( root /usr/share/; index index.htm index.html index.php; location ~ ^/phpmyadmin/(.+.php)$ ( try_files $uri = 404; root /usr/share/; # fastcgi_pass 127.0.0.1:9000; # uncomment when using php5-cgi # fastcgi_pass unix:/var/run/php5-fpm.sock; # uncomment when using php5-fpm fastcgi_index index.php; fastcgi_param SCRIPT_FILENAME $request_filename; include /etc/ nginx/fastcgi_params; ) location ~* ^/phpmyadmin/(.+.(html|ico|xml|css|jpg|png|js|txt|gif|jpeg))$ ( root /usr/share/; ) ) location /phpMyAdmin ( rewrite ^/* /phpmyadmin last; )
location/phpmyadmin( Root/usr/share/; Index index . htm index. html index . php; Location ~^/phpmyadmin/(.+.php)$( Try _ files $ uri = 404 ; Root/usr/share/; #fastcgi_pass 127.0.0.1:9000; # uncomment when using php5-cgi # fastcgi_pass unix:/var/run/php5-fpm.sock; # uncomment when using php5-fpm Fastcgi_index index . php; Fastcgi_param SCRIPT _ FILENAME$ request_filename ; Include /etc/nginx/fastcgi_params; Location ~ * ^ / phpmyadmin / (. + . (html | ico | xml | css | jpg | png | js | txt | gif | jpeg ) ) $ ( |
Website creation using CMS Joomla!
php-myadmin.ru following link. At the time of writing, release 3.4.9 was available. Stopping Apache. Create a directory C:\www\htdocs\phpmyadmin and unpack our archive into it. Please note that archive files and folders can be combined into the phpMyAdmin-3.4.9-all-languages folder. It is necessary that the contents of the phpMyAdmin-3.4.9-all-languages folder be in the directory C:\www\htdocs\phpmyadmin, and not this folder itself. Then in the directory C:\www\htdocs\phpmyadmin (this is our phpMyAdmin root directory) we create a file called config.inc.php and, depending on our preferences, fill it with the following content:
$cfg["Servers"][$i]["host"] = "localhost";
$cfg["Servers"][$i]["extension"] = "mysqli";
$cfg["Servers"][$i]["connect_type"] = "tcp";
$cfg["Servers"][$i]["compress"] = false;
$cfg["Servers"][$i]["auth_type"] = "config";
$cfg["Servers"][$i]["user"] = "root";
$cfg["Servers"][$i]["password"] = "password";
In the first case, logging into phpMyAdmin will be “automatic”, i.e. you do not need to enter your login and password. In the last line, you need to replace the word password with your password, which was specified when installing MySQL. This case has, in my opinion, a significant drawback - the root user password is stored in clear text.
In the second case, you will need to log in every time you need to use phpMyAdmin. This case is closer to me. In line $cfg["blowfish_secret"] A passphrase of up to 46 characters must be recorded. We launch Apache, in the address bar of the browser (cookies must be enabled) we type http://localhost/phpmyadmin and get to the authorization page. We go through authorization and get to the main phpMyAdmin window.
In the main window we will see a message stating that additional features are not fully configured. We will enable additional features, as they allow you to work with bookmarks, histories of entered commands, a designer of linked tables, and pdf diagrams. To do this, we will use a ready-made sql query, as a result of which the “phpmyadmin” database will be created into which the necessary tables will be imported. Click on the “Import” tab, on the page that opens, in the “Imported file” section, click the “Browse...” button, select the create_tables.sql file, which is located in the scripts folder, in the phpmyadmin directory, and click the “OK” button located in bottom of the page. If everything went well, we receive the message: “Import completed successfully, queries completed: 12. (create_tables.sql).” After this, we create a special user named pma. The username does not have to be pma - this name is used as an example. Go to the “Privileges” tab and click on the “Add new user” link. Fill out the form that appears:
Click the “Create User” button. Click on the “Show all” link, thereby updating the list of users. In the pma user line, click on the “Edit privileges” link. In the window that opens, in the “Database level privileges” section, select the “phpmyadmin” database from the drop-down list. A new page will open, and in the “Database Level Privileges” section, in the “Data” group, check the boxes next to the options: SELECT, INSERT, UPDATE, DELETE and click “OK”. We receive a message that the privileges for the user "pma"@"localhost" have been changed. Close phpMyAdmin and edit the config.inc.php file. As a result of editing we get the following:
$cfg["blowfish_secret"] = "31h15u8gr7wq99.24633480"; $i=0; $i++; $cfg["Servers"][$i]["auth_type"] = "cookie"; $cfg["Servers"][$i]["pmadb"] = "phpmyadmin"; $cfg["Servers"][$i]["relation"] = "pma_relation"; $cfg["Servers"][$i]["table_info"] = "pma_table_info"; $cfg["Servers"][$i]["table_coords"] = "pma_table_coords"; $cfg["Servers"][$i]["bookmarktable"] = "pma_bookmark"; $cfg["Servers"][$i]["pdf_pages"] = "pma_pdf_pages"; $cfg["Servers"][$i]["column_info"] = "pma_column_info"; $cfg["Servers"][$i]["history"] = "pma_history"; $cfg["Servers"][$i]["tracking"] = "pma_tracking"; $cfg["Servers"][$i]["designer_coords"] = "pma_designer_coords"; $cfg["Servers"][$i]["userconfig"] = "pma_userconfig"; ?>
Let's delete the browser cache and go to phpMyAdmin. There is no warning about additional features, which means everything is configured correctly and is fully functional.
This completes the phpMyAdmin setup. You can proceed to installing Joomla 2.5
More articles about Joomla 2.5
-
The installation of phpMyAdmin is written based on materials from the site php-myadmin.ru. I recommend this site to anyone who wants to understand all the intricacies of working with phpMyAdmin. Download the file archive phpMyAdmin-3.4.9-all-languages.7z from the following link. At the moment...
-
In this article we continue to talk about CMS Joomla 2.5. Namely, about creating a site backup. In the previous part about backing up a site running CMS Joomla 2.5, we looked at creating a backup copy of a site manually. Now...
-
The backups have been created and now let's figure out how to get them and automate this process. The easiest way to obtain a backup copy is to download it from a link or links, if the file is divided into several archives, in...
-
There are few truly effective solutions for working with databases. Basically, several programs and solutions are actively used. The phpMyAdmin application is known for allowing you to work without direct input in the SQL query language, providing simplicity and loyalty to the novice user. Installing phpMyAdmin Ubuntu is a trivial task for a professional. A novice user may encounter some surprises and controversial issues.
How to install and configure phpMyAdmin in Ubuntu environment.
phpMyAdmin is a traditional open source web application that is released under the GNU GPL license. That is, anyone can use the program for any purpose, as well as change its code and modify the software. The application allows you to perform various tasks for administering the MySQL DBMS, query language commands, and also view databases. And all this is available directly from the browser!
The program has really gained considerable popularity. It is widely used in various free and commercial projects, and PHP language experts can freely build their functionality into it. Now we'll take a quick look at what to do before installing phpMyAdmin on Ubuntu.
What to do first?
Before installing phpMyAdmin...
First of all, make sure that you have the required rights. There is no need to obtain root rights, but sudo command privileges must be present.
Secondly, your server must have LAMP configured. This is a stack of Linux technologies (including Ubuntu), the Apache web server, the MySQL DBMS and the PHP programming language. Without these technologies, there is no point in continuing work.
Third, get a domain with an SSL/TLS certificate. It is known that the phpMyAdmin Server installed on Ubuntu is often subject to attacks. If you need to protect your server from threats, it is better not to connect to it via an unsecured (HTTP) connection.
Further actions
To start installing the phpMyAdmin application on Ubuntu Server, you will need to update the package information:
"sudo apt-get update"
"sudo apt-get install phpMyAdmin php-mbstring php-gettext"
When setting up phpMyAdmin for the first time, Ubuntu will require additional information. Select server "apache2". When asked about using "dbconfig-common", answer "Yes". Then enter administrator information where necessary. After that, enter and repeat the password for the program itself.
Now enable PHP extensions. This will need to be done manually:
"sudo phpenmod mcrypt
sudo phpenmod mbstring"

Now restart the Apache program. This will apply the changes:
"sudo systemctl restart apache2"
The phpMyAdmin program interface can be accessed using...:
"https://x/phpMyAdmin"
where "x" is the domain name or IP address of the server. Now you can easily enter the configured program. To do this, use the standard name - “root”, as well as the password that you entered when setting up MySQL. The following steps to set up the phpMyAdmin application on Ubuntu OS will be necessary if you want to make your experience more secure.
Security
Using additional techniques, you can provide “bonus” protection when managing the DBMS through a browser.
The .htaccess file must be used to ensure that the Apache server can be controlled by the person using it. This file contains certain directives that are mandatory for execution on the entire web server. It should be placed in the root directory. It can also be located in any other location. Then the rules written in such .htaccess will have higher priority, although they will be valid for a specific location.

The directives available for .htaccess should be found on the official website of the Apache web server. Support for this type of file must be enabled in advance.
How do I enable permission to use?
Go to Apache configuration:
"sudo nano /etc/apache2/conf-available/phpMyAdmin.conf"
Here you need to add the following data:
«
Options FollowSymLinks
DirectoryIndex index.php
AllowOverride All
. . .»
After that, close the file, saving the changes. Restart Apache with a command like this:
"sudo systemctl restart apache2."
Creating a file for directives
Enter the command:
"sudo nano /usr/share/phpMyAdmin/.htaccess"
This will create a “.htaccess” file and give you permission to edit it. The file must contain information. Enter the following information into it:
"AuthType Basic
AuthName “Restricted Files”
AuthUserFile /etc/phpMyAdmin/.htpasswd
Require valid-user"
How to create a password file?
Previously, we suggested that you set the path for the password file. Now this file needs to be created and edited. The configured password will allow you to authenticate in phpMyAdmin from anywhere, and not just in Ubuntu.
Install the program support package ".htpasswd".
"sudo apt-get install apache2-utils"

Create a “.htpasswd” file and add a new user to it. It's better to do it like this:
"sudo htpasswd -c /etc/phpMyAdmin/.htpasswd username"
where "username" is the username.
Rolling back changes. How to remove phpMyAdmin?
If you need to remove phpMyAdmin, Ubuntu allows you to do the following:
Remove packages (only in reverse order):
"sudo apt-get purge phpMyAdmin
sudo apt-get purge php5-mysql
sudo apt-get purge php5
sudo apt-get purge mysql-server
sudo apt-get purge apache2"
We remove dependencies:
"sudo apt-get purge apache2.2-common
sudo apt-get purge apache2-mpm-prefork
sudo apt-get purge libapache2-mod-php5"
If you are using Apache 2, you need to delete the directories:
"/etc/apache2/
/etc/php5/apache2/"
Conclusion
We figured out how to install and uninstall phpMyAdmin, as well as other useful details. If you have any questions, feel free to leave them in the comments. Visitors and administrators of our site will help you find solutions to many problems!