Installing macOS Sierra on an old laptop. Do-it-yourself Apple Nettop or installing Mac OS X Leopard on MSI Wind PC What to do if installation fails
You can, of course, try to install MAC OS X without fiddling with the BIOS, but it will most likely not lead to anything successful, I tried 4 different Hackintosh images and in all cases I did not get further than the “console”. Naturally, the BIOS firmware changed everything.
You can download MOD.BIOS from here:
http://osrom.net/biosmod/ - EeePC1000H1103
After flashing the firmware using this method, you will not receive any external changes in the BIOS - new menus and secret control points, you don’t even have to look for them.
By the way, if for some reason unknown to anyone you need to “roll back” the BIOS, then don’t even try to do this with the latest versions of AFUDOS, ASUS decided to “sew” into its utilities a check for the already installed BIOS version, “thanks” to which when you try roll back the BIOS, the utility happily informs you that you already have the latest version installed and you don’t need it at all.
One of the first versions of AFUDOS will come to the rescue and will cope with the task without further ado. (Download - AFUDOS001)
Installation
In the case of installing MAC OS X, exactly the same as with installing Vista, I used the most common SATA-DVD drive and a USB2.0 to SATA+IDE 2.5" + 3.5" Adapter (Combo).After the BIOS was successfully flashed and modified, I connected the drive to the laptop, and after turning it on, I chose to boot from DVD.
I tried the following images:
Kalyway 10.5.2 DVD Intel Amd- (Size: 3.66 GB)
iATKOS v4i (10.5.4 Leopard DVD) (Intel only)- (Size: 2.64 GB)
Leo4Allv3 Final Universal (Mac OS X 10.5.2 Intel & AMD SSE2/SSE3)- (Size: 4.38 GB)
Leo4All v.4.0 Beta AMD or INTEL CPU SSE2/SSE3- (Size: 4.2 GB)
I think there is no need to explain where to look and where to download this “good”.
Results:
Kalyway 10.5.2 –
- installed easily and without problems
- performed best at the installation stage
iATKOS v4i –
- installation started immediately and without additional keys
- did not provide a choice of installation language
- did not provide a choice of Kernel
- installed 100%
- after installation, when turned on, it went into cyclic reboots (the problem is known, its solution lies in the Kernel version and special BIOS settings, neither the first nor the second was available to me)
- iATKOS “went to the trash”.
Leo4Allv3 Final Universal –
- installation started immediately and without additional keys
- installed 100%
- almost (!) without any problems allowed me to reach the final stage of installing and launching MAC OS X.
Leo4All v.4.0 Beta –
- installation started immediately and without additional keys
- there were no problems with the installation, just like with Kalyway, almost(!)
- installed 100%
- after installation I received an error – “b0 error”
- after solving the “b0 error” problem, the “hd() Ethernet PXE Client” problem appeared
- after solving the “hd() Ethernet PXE Client” problem, the “hd() Apple HFS” problem appeared
- after solving the problem “hd() Apple HFS”, the problem “Error parsing plist file Loading Darwin/x86” appeared
- the problem was not solved, I blamed it on a poorly baked DVD
- re-recorded DVD
- the problem was not solved, blamed it on the broken image
- Leo4All v.4.0 Beta “was carefully postponed until better times”
- At the time of writing these lines, you can already download Leo4All v.5 Server 10.5.4 Intel/AMD Released
Almost(!) times
Regarding the first almost (!) in the case of Kalyway, after successful installation, at the first start it is suggested - (1) select your region, (2) keyboard layout and, if necessary, (3) “back up” from the old Mac, after the selection procedure or refusing to backup instead of continuing, I successfully returned to selecting the region and in such a cycle from (3) to (1) and again to (3) I could sit for a long time. This problem is known and easily solved; I will give a solution to it below.
By the way, the same problem happened with Leo4All.
Almost(!) two
Regarding almost(!) iATKOS, Leo4All v.3, Leo4All v.4 - not one of them could successfully partition and format the screw, giving the same error - “no disk access”. Kalyway did not have such a problem; it easily divided, combined and formatted.
Welcome!
So the installation, its process itself with any of the images is practically identical, which is not strange, with the exception of small “exclusive details” of this or that image.
Once you choose to boot from DVD, you may see something like this (depending on the image you select):

<Еnter>and a couple of minutes of waiting (in the case of all images except Kalyway, this time is slightly more than “a couple of minutes of waiting”).

Those who are installing MAC OS X on an Eee PC for the first time should know that when you see the following window, consider yourself almost lucky. I waited for this window for several days in the hope of installing MAC OS X without modifying the BIOS.
Having chosen the language you like, you can continue the installation (in the case of iATKOS v4i there will be no such choice).

Welcome and “exclusive details” of this or that image.


After a successful greeting, you need to prepare your hard drive for a meeting with MAC OS X Leopard. To do this, you need to go to “Disk Utilities”, they are waiting for users in “Utilities”.

Having found your bearings, you need to select the hard drive on which MAC OS X will be installed. In the “Partition map settings”, you must select “GUID partition scheme”. Then successfully format the area of the disk where MAC OS X will be installed, or the entire disk, into the “Mac OS Extended (Journaled)” format.


Having finished “wiping” the hard drive, close “Disk Utility” and return to the welcome window. Cry! by clicking the “Continue” button. Select the disk on which MAC OS X will be installed and Click again! by clicking the “Continue” button.

Having gone to “Installation Information”, there is no need to rush to “Install”. First you need to look at “Settings”.

The main and most important thing is the choice of the boot kernel, in this Eee's case it is the Vanilla Kernel (the newer, the better). Further to your taste? But without fanaticism. You don’t have to worry too much about the choice of drivers; practically none of them will work to Eee PC, with the exception of Intel's ICHx chipset and GMA950 video. Let’s wrap it up, “Done” and “Install”.

Before installing, “smart” MAC OS X will check whether everything is in order with the installation disk; you can, of course, skip this procedure, but it’s better to wait until it’s finished; after checking, it will automatically proceed to installation. “I’m installing!”


If the stars “favor” you or you simply configured everything correctly before installation, then after 30 minutes you can (let’s face it, not without joy) see a green circle with a check mark and the inscription “Installation completed successfully.” Reboot.

After the reboot, MAC OS X welcomes the new user. "Welcome!"
Actually, here it is, that same “almost(!) time” mentioned above.
Of course, there are people whom those same “benevolent stars” favor more than me,
well, or they are simply smarter than me, and accordingly, it is likely that not everyone faces a similar problem.
But somehow it didn’t work out for me.
And every time after “Do You Already Own a Mac?” I returned to "Welcome" in between encountering "Select Your Keyboard".


The problem is solved as follows. The laptop reboots, and the boot process is continuous and jerky, but at the same time gently, squeezing
It will be almost identical to what it was during installation. After boot: you can enter the key with which you can boot, this key will be “-s”. Enter “-s” and press<Еnter>.
Lines are running, a lot of lines, we’ve finished running, you can enter something again
/sbin/fsck –fy
/sbin/mount –uw/
Touch /var/db/.AppleSetupDone
passwd root
Choose your password, enter it and remember it
Quit
reboot
Reboot, after this procedure you will see a welcome window where you need to enter your username and password
login: root
the password is the one created above
switch layout


From this link you can download an archive with “working” drivers (kexts) for ACPI, Intel GMA950 and Realtek R1000:
http://www.maceee.com/wp-content/uploads/2008/08/maceeedotcompatches.zip
To install kexts, use “Kext Helper”, it is usually already installed in MAC OS X itself, moreover, in this particular case it is added to the above archive.
To install Wi-Fi you need to download and install this:
http://www.ralinktech.com.tw/data/drivers/Ralink_CardBusPCI_D2860-1.0.1.0_D61-1.0.4.0_D2560-1.0.9.0%20UI-1.5.1.0_2008_03_13.dmg
Results:
Everything except the sound worked practically flawlessly; in the case of installing the Intel GMA950, when working at a resolution of 1024x600px, “artifacts” appear from time to time, usually in the upper parts of the windows; with default drivers with a resolution of 800x600px there is no such problem.
I couldn’t find sound drivers (Realtek ALC269), as in fact, many others who are looking for them have already accumulated a lot on the Internet; in some threads of English-language forums (there are a lot of smart ones here: forum.insanelymac.com) people seem to be close to solving this problem , it's all a matter of time.
In general, comparing the assemblies, although Kalyway behaved more friendly and responsive during installation, I personally found Leo4All to be more “stable and efficient” or something like that.
If it weren’t for the problem with the drivers, perhaps I would have stayed on this OS, or at least installed it as an additional one, but for now it’s still Vista.
Placing all the emphasis on finding and solving the sound problem, I completely forgot about the built-in video camera, and only remembered about it when I had Vista wallpaper on my desktop. Therefore, I simply cannot say whether the camera works or not, since I don’t know. But I didn't have any problems with USB devices.
Bonus:
If anyone suddenly needs it, I screenshot the “X-disk” and “Automator” icons.
Today, the operating system developed by Apple is considered exemplary. In fact, it is true. Thanks to its amazing performance and perfect appearance, Mac OS turned out to be much better than the popular brainchild of Microsoft. This is not discrimination, but a simple statement of fact. Microsoft's operating systems have always lagged behind the Mac in terms of performance and design. Apple one day simply decided to switch to using processors from Intel. From this moment on, it became possible to install Mac OS on a regular personal computer. But in reality, everything is not so simple here. Installing Mac OS on a regular personal computer or laptop can cause severe nervous breakdown. The fact is that Mac OS does not support all hardware. Launching it under this operating system can sometimes be very problematic. But we'll try anyway. This article will outline instructions for installing the Mac OS operating system on a laptop.
Mac OS: installation risks
There are a lot of risks when installing Mac OS on a PC. This is due to the fact that this operating system is simply not designed for our wooden computers. First of all, it is worth noting that some important computer components may simply refuse to work. It is unknown whether they will be able to run under this operating system. In addition, installing Mac OS on a laptop or computer is accompanied by increased damage to nerve cells, which can lead to unexpected hardware failure if you fail to install everything the first time. Installing Mac OS on a computer other than the original Mac is, generally speaking, a crime. But if all the listed dangers do not scare you, then go ahead. Installing the Mac OS operating system on a laptop always involves many risks. For the most part, Mac OS laptops are the most problematic devices. If on a personal computer you can change the configuration to a compatible one, then with laptops you won’t be able to do this trick. To fully launch the Mac OS operating system on a laptop, you will need to use many “crutches”. The more of these “crutches” you use, the less stable the operating system will behave.
So, despite all the dangers awaiting you, do you still want to install Mac OS on your laptop or personal computer? Well, let's continue then.
Mac OS: what you need to install
First of all, you will need a computer with a compatible processor. Otherwise, nothing will come of this idea. Currently, the Mac OS operating system supports processors from Intel Atom and Core families. The processor must support Ivy Bridge and the SSE instruction set. If your device uses a different processor, then it is better to immediately abandon the idea of installing Mac OS. Let's talk a little about devices with processors from the manufacturer AMD. Theoretically, it is possible to make the Mac OS operating system work on such processors, but no one can guarantee stability of operation. In addition, the likelihood of overloads and crashes increases, since AMD is not designed for Mac OS. If your laptop has a suitable configuration, then you can begin preparing a USB drive for installing Mac OS. For this purpose, it is recommended to use a flash drive with a capacity of at least 16 GB. The image of the installed system “weighs” about 10 GB. You will also have to stock up on free time and patience. Installing Mac OS on a laptop from a flash drive takes approximately 4-6 hours. The installation itself is quite quick, but not everything works out the first time. In addition, setting up the system itself takes quite a lot of time. Well, let's begin.
Mac OS: preparing a distribution image and flash drive
Since we are going to install the original Mac OS, first we will need to download a system image from the App Store. The most sane version at the moment is Mac OS XYosemite. This is what we will install. Practice shows that today the best option for creating a bootable flash drive is to create it under the installed Mac OS operating system. However, not all users have it at hand. This means you will need to install it on a virtual machine and create bootable media under it. Let's assume the Mac OS operating system is installed on your computer. What to do next? The next step is to download special programs that allow you to deceive the operating system and make it believe that it is being installed on an Apple computer. Such programs are also called “crutches”. These are products such as Uni Beast and Multi Beast. Next, you need to format the flash drive in Mac OS Extended format. Then you need to launch the Uni Beast program and click on the Continue and Agree button everywhere until we get to choosing the operating system version. Here you need to select our distribution and enable Laptop Support. After this, you need to click Continue and Install. The image will be recorded within half an hour. Now you can proceed to the next step of the instructions.
Mac OS: Before installation
There are a few useful things that you should know before you start installing the Mac OS operating system. First, we'll have to do a little magic with the BIOS. If you do not disable some options, you will not be able to install Mac OS. So, to do this you need to go into the BIOS and completely disable AHCI support. After this, you need to turn off the discrete video card, since it will not start, no matter what you do. Now we put booting from a USB drive in first place. It seems that everything is with the BIOS... Some may wonder how you can install Mac OS on a laptop from ASUS if it is not possible to disable the video card in the BIOS. The answer to this question is quite simple: don't turn it off. It won't start on its own. Before installation, it will also be useful to check the memory and disk for errors. The MacOS operating system is extremely capricious. Just one mistake can lead to fatal consequences. If no errors were found, then you can proceed with the installation process. The pre-prepared flash drive must be inserted into the slot on the laptop. Also, do not forget to reset the BIOS settings to standard before disabling the video card and AHCI. It will be better this way.
Mac OS: installation
The Chameleon shell will load first. Here you will be asked to choose a boot method: from a hard drive or a flash drive. You need to choose a boot method from a flash drive with display of the installation log. This way you can understand what kind of error occurred. After loading the necessary kexts, the Mac OS installer will load. Next you need to format the partition. Here you need to select “Disk Utility”, select the desired partition and format it in “MacOS X Journaled”. Then you need to click on the “Next” button. As a result, the installation process should begin. If everything is in order, then immediately after creating an account, the operating system will throw you onto the desktop. If the installation was stopped for some reason, then you need to find out what the problem is. In most cases, installation is stalled due to the video card. In this case, you need to restart the laptop and enter the Graphics Enabler-Yes key when choosing to boot from a flash drive. After this everything should go fine. Many users today are interested in the question of how to install the Mac OS operating system on an Acer laptop with hybrid graphics. The answer to this question is quite simple: up to exactly the same. You just need to disable the discrete video adapter.
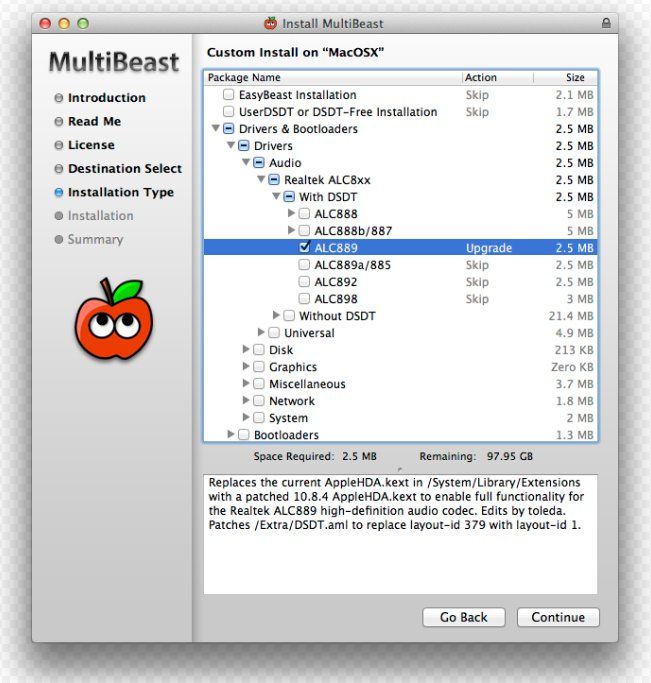
Mac OS: after installation
If the installation was completed successfully, then you can begin the procedure for configuring the installed operating system. It's simply necessary. If you do not do this, then after a reboot the operating system will not start due to the lack of necessary kexts. To set up MacOS, you need to run the previously downloaded Multi Beast program. It is this program that can help you configure the Mac OS operating system correctly. How to install and configure the Mac OS operating system on a Lenovo laptop? In the same way, although for devices from this manufacturer there are certain features that are better to know about in advance. Some models are equipped with Wi-Fi transmitters that do not run at all under the MacOS operating system. Replacing the adapter may help here. If you have a laptop from another manufacturer, then you can continue the setup procedure. In the Multi Beast program you need to select drivers. You also need to choose the DSDY-lit of the laptop from Apple whose technical characteristics are most similar to yours. Next, all you have to do is click on the Build button, and then on Install. Once the installation of the required kexts is complete, you will need to restart your computer for the changes to take effect.
What should you not do when using Mac OS on a laptop?
First of all, you should not try to update your operating system using the Apple store. Each new version requires its own kexts. After the update, your computer may simply not turn on. If everything works fine, you shouldn’t try to experiment with kexts. If you lack experience, you can easily and quickly hang up the system and then you will again have to refer to the instructions for installing Mac OS on a personal computer. Also, you should not use the NTFS file system for the second hard drive partition. The fact is that Mac OS does not support it. Programs that provide such support are unstable. So there is no need to take unnecessary risks. Also, actions that do not need to be carried out on Mac OS include the process of cleaning up unnecessary garbage using special software. Mac OS is not Windows. There is simply no registry here, so there is nothing to clutter. Programs like Clean My Mac can cause serious harm to the operating system. You should also not rely on running powerful packages like Pro Logic. Such programs experience great difficulties on non-native poppies. Also, do not install software from unknown sources. There are not many viruses for Mac OS, but they can easily ruin your system.
Mac OS: what to learn to get acquainted with installation principles
To understand how to properly install Mac OS on a laptop, you need to have some special knowledge. As practice shows, few people succeed in installing this operating system on a regular computer the first time. Some errors are bound to occur, it’s good if they are not too serious. In order not to fall asleep at the first obstacle, it is better to study a little specialized forums. Their inhabitants know everything about installing Mac OS on personal computers. If necessary, they can help you with a variety of problems. There are also many resources that outline in some detail the process of installing the Mac operating system on a laptop. It also usually describes ways to correct common errors. Such resources are very easy to find on the Internet. Some wizards can even do the kext and DSDT setup for you, but of course, not for free. So, it’s better to figure out the process of installing and configuring Mac OS yourself.
Mac OS: which distributions are better not to use
You should not try to use distributions that are already prepared for installation on a PC. Usually they are very crooked, since in this case the creators tried to make a universal system out of an individual one. And this is simply impossible. So it’s better to try to figure out from your own experience how to install Mac OS on your machine from scratch.
Apple computers are strong competitors for all other platforms. But unlike a PC running the Windows operating system, these devices cost several times more. Because of this, few users can . However, anyone, with due desire and availability of detailed instructions, can go to their personal computer and use the original OS from the Apple company. Next, you will find a step-by-step guide on how to install Mac OS on a PC, what pitfalls you may encounter along the installation path, and what additional software you will need for this.
Hackintosh or CustoMac
Just a few years ago, users of the Windows operating system could not afford to install Mac OS. Today, every user can not only test, but also fully use the Apple OS on their device. Such PCs are usually called Hackintosh. You are installing software from Apple on a computer from another manufacturer. Many, of course, will be concerned about the legal aspect in this situation. Installing Mac OS on a computer – how legal is it? Apple constantly sues the creators of such custom computers, but does not take any serious measures against them.

Further in the article we will talk about the complete installation. That is, you will be able to use the treasured OS on a PC without using Windows. Also on our website you can find instructions for installing mac OS using a virtual machine. Let's start preparing with the hardware requirements for Hackintosh, without which you will not be able to install Mac OS on a laptop or personal computer.
System requirements

The main rule when choosing a configuration: the more similar your system is to the configuration of the original MacBook or iMac, the fewer problems you will have during and after installation. This rule is absolutely true, since OS differences lie in the support of different interfaces and so on. Let's figure out which configuration is suitable to install mac os x on a PC:
- 2-core processor (minimum) from Intel;
- separate internal drive with AHCI support;
- minimum 2GB of RAM.
To eliminate various suspicions and fears that installing this operating system on a regular PC will lead to any hardware malfunctions and so on, it is worth saying that the procedure is quite harmless and simple. To install Mac OS Sierra on a Windows PC or laptop, you will need the following components:

- the personal computer itself, suitable for its characteristics;
- Mac OS operating system distribution;
- bootable flash drive;
- Unibeast program.
Since the description of a suitable personal computer is presented above, you need to proceed to the operating system distribution kit for installation on the PC.
Where can I get Mac OS?
You have two options to choose from for obtaining a distribution kit for installing the operating system:

- downloading a hacked installer with the required assembly;
- downloading the official installer via the App Store.
The first option will have to be used by those who want to install this OS on a PC with an AMD processor. In this case, it is advisable to download the modified distribution (Snow Leopard) and install it.

Everyone else can use the original installer. However, you can't get it for free. You will need either an Apple ID account with the purchased operating system, or the MacBook itself. You can borrow a laptop if you don't have your own. To install mac os x on windows pc, download the OS image using the following instructions:
- go to the App Store and log in using your Apple ID;
- go to the OS page and click the “Download” button;
- wait for the download to finish;
- the distribution package will be saved in the “Programs” folder.
Now you need to create bootable media from which you will install a clean OS. The simplest and most affordable option is a regular flash drive.
Creating a bootable USB flash drive

Before installing mac os x on your PC, let's create bootable media:
Option if you have a MacBook
- connect the flash drive to your MacBook. Its volume must be at least 16GB;
- open disk utility. To do this, go to the Programs folder and go to the Utilities section;
- then go to the Erase tab;
- To install mac os on windows 10, you will need to format the flash drive in OS X Extended format.
Now let's move on to working with the BootDisk utility, which we will need when working in Windows:
- We insert our flash drive into the computer and click Format Disk

- After formatting is completed, the flash drive will be divided into 2 sections

- Click Restore Partition

- Select a system image in .hfs format

- Click OK

- We are waiting for the bootable media to be created

The whole process will not take more than 10 minutes. After that, download the MultiBeast program to the flash drive, which will be useful later to install os x on a laptop or PC.
PC preparation
Now you need to make BIOS settings. Set the hard drive operating mode to AHCI and the BIOS operating mode to Optimized Defaults. After this, restart your computer. 
How to install mac os sierra on windows pc: installation process

Connect the flash drive to your computer via a USB 2.0 port and boot from it when you turn on the device. Clover Boot will appear on the screen. Select Boot Mac OS X from USB. Next, follow the steps described:
- select the language of the future system;
- disable sending diagnostics to Apple. Remember that this method is unofficial,
- therefore, developers may not “appreciate” your initiative;
- Erase all information from your hard drive using Disk Utility. It is recommended to use separate media so as not to uninstall Windows (in case the installation fails);
- select the partition where you want to install the OS;
- wait until the process finishes and restart your computer.
How to install mac os x instead of Windows on a laptop or PC: post-installation
When you turn on your computer, go to the startup menu again and select the USB flash drive. Complete the system installation and install MultiBeast. In the program menu, click the Quick Start button. Next, select the audio and network card options. To save your settings profile, click the Save button. Finally, click the Build and Install button. Now restart your computer.
Ready! You have received a working Mac OS on your PC.
How to make a Mac OS from Windows?
If you cannot install a Mac OS on Windows 7, but want to change the appearance of your system, then use a special program for changing themes.
You can make Windows look like a Mac OS using themes. Themes are downloaded from various thematic sites. For example, wingad.ru or http://7themes.su. The mac theme for windows 7 makes Microsoft's OS as similar as possible to its competitor, without changing the very structure of the software. An excellent option for those who are only interested in the appearance of Apple products.
It just takes a little patience.
Two weeks ago, Apple released the first beta version of macOS Sierra to developers. Unfortunately, not all Mac models receive support for the new operating system.
If you are itching to try out the OS on your old laptop, then we have a solution for you.
Attention: You do everything at your own peril and risk.
What do we need
How to install Macos on a laptop
1
. Format the flash drive in Mac OS Extended format.
2
. Launch the macOS Sierra Patcher utility.
3
. Indicate the OS image in it.
4
. In the program window, select the USB drive in Target Volume and click the Start Operation button.

5 . Boot the Mac from the flash drive (hold Alt when turning on the laptop).

6 . Open Disk Utility.

7 . Format the required partition and select it under “Sierra”.

8 . Have you taken the first 7 steps? Well done! You can start installation.

Take a break, you deserve it. Kudos to the cat for his efforts. :)

9 . After the installation is complete, restart the laptop and boot from the flash drive again. Now you need to select macOS Post Install.

10 . A device selection window will pop up before your eyes. Feel free to choose your laptop model. The utility will independently determine the necessary settings for proper operation of the system. Then click Patch.

11 . Then, in the drop-down menu, click Select Volume and select the partition on which the “axis” is installed.

We're almost done
12 . Once the patch is installed on the OS, select Reboot. The system will reboot and it will take some time to complete the settings.

13 . That's all, the Mac has rebooted and the system is ready to go!

With these simple manipulations we achieved our goal - macOS Sierra is installed and ready to go. Congratulations!
Please rate it.
Longtime Mac users have long come to terms with Apple's focus on iOS devices in recent years. This is not surprising, because in the current era of mobile computing, each representative of the “iPhone - iPod touch - iPad” trinity is sold in larger quantities than all six lines of Mac computers combined. It even got to the point that last summer, Apple ignored the Mac for the first time at the annual WWDC developer conference, and the completely new Mac mini model (by the way, the first redesign in five years) was noted only by issuing a meager press release. However, the Mac remains one of Apple's core businesses, as the company reiterated with a press event that focused on the platform.
A special Back to the Mac press event, held by Apple at its own headquarters in the sunny Californian town of Cupertino last Wednesday, did not bring any special surprises, but it fully met the main expectations: all the announcements that were most often predicted were made here - a new version iLife '11, a suite of home applications, a new line of ultra-thin MacBook Air notebooks, and the first demonstration of the upcoming Mac OS X 10.7 operating system. Perhaps someone was surprised by the absence of a new version of the iWork office suite, but no one promised it. In addition, the new Microsoft Office 2011 for Mac debuts at the end of October, and perhaps Apple decided that it was inappropriate to force users to choose between these two packages.
Speaking to those present, Apple COO Tim Cook tried to once again emphasize the importance of the Mac to Apple. He said that in the 2010 financial year that ended, the Mac platform brought Apple a third of its revenue - $22 billion. If the company were not engaged in any other business, then only thanks to the Mac it would be on the 110th line of the Fortune 500 ranking. The company estimates that there are 50 million Mac users in the world. Year-over-year Mac sales growth in the most recent quarter (27%) was 2.5 times faster than the industry average (11%) and has been doing so for 18 consecutive quarters. At the moment, the company has officially registered 600 thousand official developers of applications for Mac (the cost of registration for a period of one year is $99), and every month this number increases by another 30 thousand. And if the company is now unlikely to report success in the corporate market Whether it works out, individual users are increasingly choosing Mac desktops and laptops: in the United States, one in five computers sold through retail channels is made by Apple.
Steve Jobs explained another meaning to the event's name to those present. Mac computers and the Mac OS X operating system have been Apple's core business for many years, and the experience gained from their development and production has been fully utilized in creating software and hardware solutions on the iOS platform. Now the company has decided to “return the favor” by transferring the innovations developed in the iPhone, iPad and iPod touch to the Mac platform.
New MacBook Air: what netbooks were missing. According to Apple
One of the loudest and most anticipated announcements was the presentation of a completely new line of ultraportable Macbook Air laptops. Now it contains not only 13-inch models, but also more compact ones - with an 11.6-inch display.

The appearance of such a device led to a lot of talk about Apple releasing a netbook. Apple executives have repeatedly emphasized that the company has no intention of releasing its own netbook. In the fall of 2008, Steve Jobs expressed pessimism about netbooks, noting that Apple was offering the iPhone for mobile Internet access.
“Connected to the Internet anywhere you go via a cellular network, iPhone is a great solution for browsing the web, doing email and doing other tasks that netbooks allow you to do, and it fits in your pocket. However, we will be watching how this young class of devices (netbooks) develops, and we already have some pretty interesting ideas about this,” Jobs said then.
“When I look at what's on offer in the netbook sector today, I see smaller keyboards, terrible software, outdated components and very small screens. Frankly speaking, we will never call this the name Mac. We are not interested in this market segment, and we are confident that consumers are not interested in it either,” Tim Cook, then acting head of Apple, said last spring.
And so, Apple released a netbook. What has changed since then? From Apple's side, in general, nothing. But the definition of a “netbook” (which, it must be admitted, has never been particularly clear) now includes not only 7-inch devices with a flash memory drive and the at that time already outdated Windows XP, as in the days of the first Eee PC, but and quite “adult” laptops - with displays up to 12 inches, Windows 7, and in some cases even with an optical drive. The most obvious features that distinguish netbooks from the kingdom of laptops, in addition to the size of the display, are the use, to put it mildly, of not the most productive components, as well as, as a rule, a smaller keyboard and a relatively low price. Thus, it turns out that Apple has released a laptop that somewhat fits the definition of a “netbook” in its current state. However, unlike most traditional netbooks, the new 11-inch MacBook Air has a full-size keyboard and a fairly powerful integrated video adapter - NVIDIA GeForce 320M. The use of this chipset, unfortunately, predetermined the type of processor - Core 2 Duo ULV (since NVIDIA still does not have a license from Intel to produce system logic sets for newer processors), so the new MacBook Air, like netbooks, can be “incriminated” » the use of not the most productive processors. Interestingly, the new 11-inch MacBook Air is even slightly wider than the 12-inch PowerBook released in 2003 and is approximately equal in footprint, but at the time of the first Eee PC models, it would hardly have occurred to anyone to call that laptop Apple “ netbook."
At one time, the MacBook Air became the first laptop in which Apple abandoned the use of a built-in optical drive. The new generation of MacBook Air can also boast a similar achievement: the new models do not include a hard drive. Instead, Apple used a packageless SSD drive of its own design. The picture shows the SSD drive of the new MacBook Air and the hard drive from the previous generation model (photo - iFixit):

The advantages of flash memory drives over hard drives - reliability, efficiency, performance, silence, lack of heating - have been known for a long time, but Apple managed to add compactness to this: according to the company, the drive, which looks like a RAM module, is 90% more compact than hard drives disks. Of course, the user can only upgrade an SSD using the same modules manufactured by Apple, which, as a rule, is, to put it mildly, not the most economical option, however, each solution usually has both advantages and disadvantages, and the latter in this case seem to be , less.
The use of an SSD allowed Apple to solve another problem - to provide the ability to quickly (according to the company, “instant”) readiness for work and, as a result, due to the new Standby sleep mode, increase battery life to 30 days. When operating with the Wi-Fi adapter turned on, the battery of the new 13-inch model allows you to use the laptop for 7 hours, while for the 11-inch this figure is at 5 hours. The non-removable battery of laptops can withstand up to 1000 recharge cycles.
The all-aluminum Unibody body and glass trackpad with Multitouch support are already familiar from other Apple laptop models. The MacBook Air is 3mm thick at its narrowest and 17mm thick at its widest, with the 11-inch model weighing just 1.06kg and the 13-inch weighing 1.32kg.

The standard amount of RAM (2 GB) can cause some disappointment - even with not very intensive use of the laptop it is not enough, however, unlike the previous model, it can now be expanded: when purchasing a laptop, the buyer can double the amount of memory for an additional $100.
The 13-inch model received a display with an increased resolution - 1440 x 900 pixels versus 1280 x 800 pixels for its predecessor and the 13-inch MacBook and MacBook Pro. The 11.6-inch model has a display resolution of 1366 x 768 pixels. MacBook Air has an LED backlit display, a camera for video conferencing, a Mini DisplayPort video output, a MagSafe connector for connecting an external power source, two USB ports, Bluetooth and 802.11n wireless interfaces. The 13-inch model also has an SD memory card slot.

To reinstall standard software - the operating system, the iLife package - MacBook Air owners will use a miniature USB drive, which is also included in the package, instead of optical disks that are rapidly becoming a thing of the past (photo - iFixit).

One of the most important innovations of the current MacBook Air is their price. If previously the cheapest representative of this family of laptops cost US buyers $1,499, then the current entry-level model (11.6 inches, Core 2 Duo 1.4 GHz processor with 3 MB L2 cache, 64 GB SSD) costs one and a half times cheaper - $999, being, together with the plastic MacBook, the most affordable Apple laptop both at the moment and in its history in general. A similar model with double the SSD capacity costs $200 more. A 13-inch MacBook Air with a Core 2 Duo 1.86 GHz processor with 6 MB L2 cache and a 128 GB SSD costs $1,299, with a 256 GB SSD - $1,599. At the buyer's request, the older 11- and 13-inch for For the same $100, a more powerful processor can be installed (1.6 and 2.13 GHz, respectively). The company also offers a USB-connectable Superdrive ($79) and an Ethernet adapter ($29).
The new MacBook Air, according to Apple, is the first of a new generation of MacBook laptops. Apple is probably already thinking about transferring such innovations to other lines of laptops as the use of an SSD drive to speed up booting and waking from sleep mode (possibly together with a traditional hard drive), abandonment of the built-in optical drive, new resolutions (and proportions) displays.
In conclusion of the story about the new MacBook Air, I would like to pay tribute to the expert who regularly provides investors and the community with forecasts, most of which are later confirmed in practice. In November 2008, Piper Jaffray senior analyst Gene Munster predicted that within two years Apple would release its own netbook model based on the MacBook Air, with the display size reduced to 11 inches and the price reduced to 1000 dollars. He apparently simply forgot to mention about the SSD of his own design.
iLife ’11: everyone stays where they are

Rumors that have repeatedly appeared on the Internet that the new version of the most standard application package for Mac will contain changes in composition did not come true: iDVD is still included in the package, iWeb has not given up its place to a “more professional” analogue, but something completely new the app never debuted in iLife '11. However, big changes are apparently coming for iWeb and iDVD: these applications have not changed since iLife '09, and even on the company's website page information about them is somewhere very far from the eyes of the casual visitor . However, attention is paid to three main applications - the program for cataloging, processing and printing digital images iPhoto, the home video editor iMovie and the amateur music package GarageBand.
In the interface iPhoto '11 iOS motifs are visible quite in the spirit of Back to the Mac. The application received a completely new full-screen mode, which is now considered by the company as the main one.

Previously, the full functionality of the program was available only in window mode, while full-screen mode only provided the ability to increase the usable screen area when carrying out certain operations - by hiding the menu bar, dock, standard window elements and unused desktop space. Now the user can get everything at once, and this will be useful when working on a Mac with any display size - from the new 11-inch MacBook Air to the 27-inch iMac.

Several modes are available in full screen view: “Events”, “Persons”, “Places”, “Albums” and “Projects”. The first four, as in the previous version of the package, display groups of pictures, and the projects mode, which looks like the iBooks iOS application, is a catalog of user-created postcard and photo book layouts. Users in the US and several other countries can order and pay for hard copies of created designs directly from iPhoto. Due to the unavailability of the service in Russia, we will not dwell on it in more detail.

iPhoto ’11 introduces several new animated themes for creating slideshows. Of these, the Places theme stands out, which, in addition to the images themselves, based on the geographic information stored in them, visually displays where the shooting took place.
The new version of iPhoto has significantly expanded the possibilities for publishing pictures. The "Export" (Share) button allows you to order hard prints by mail (again, this, unfortunately, is not for us), publish them to MobileMe, Flickr, Facebook, or send them in an email message. In the latter case, the email message created directly in iPhoto includes a collage created from selected photographs based on one of the available templates (the collage itself is sent as a single raster image), as well as a ZIP archive with the photographs themselves in the original or optimized format - at user's choice.

The developers have taught iPhoto ’11 to download pictures directly from online services, however, apart from viewing, you can’t do anything else with them - neither edit them nor use them in slideshows or albums.
Facebook users in the new version of the program received several new tools for using the photo functionality of the service. iPhoto ’11 lets you create new albums in your Facebook account, publish photos, change the level of access to published images, and even view comments left by other users (this only applies to photos published from iPhoto).
In the new version of the home video editor iMovie The function of changing the volume of the audio track in individual clips has again appeared - by simply moving the level line on the corresponding waveforms.

Another major innovation in iMovie ’11 was the ability to create “trailers” - videos based on templates with a pre-planned plot and using clips selected by the user. Having selected a template with the most suitable plot and style for the planned video, the user specifies the names of the main characters, selects the fragments that are most appropriate for a specific episode (based on tips from the template), after which iMovie automatically compiles the finished “product”.

When selecting suitable scenes, the new People Finder function will be useful, which analyzes clips and places tags, looking for group images, characters in action, large portraits, etc.

It is quite possible that many people will think that the videos created using this function are not very harmonious, and the choice of templates, themes and settings when creating them is too meager, but this tool allows even a beginner to create a funny, professional-quality video in a few minutes.
Like iPhoto, iMovie ’11 has significantly updated video publishing capabilities - in addition to YouTube and MobileMe, the user can export videos to Facebook, Vimeo and CNN iReport Web.
Overall, iMovie ’11 has become a worthy successor to the previous version in terms of expanding functionality after a complete rewrite of the program that occurred between versions ’06 and ’08 and resulted in some reduction in capabilities. The only surprise is the lack of integration with the video editor of the same name for the iPhone 4 and fourth generation iPod touch.
IN GarageBand '11 There are new voices and effects for guitar parts, as well as two new functions useful for mixing multi-track soundtracks. The Groove Matching tool allows you to semi-automatically match the rhythm of individual parts if, for example, the bass guitar does not always fall in time with the drums. In the same case, when one of the participants in the final chord of the composition, for example, muted the sound earlier than the others, the Flex Time tool will help, which allows you to change the duration of the sound of individual track fragments.

The capabilities of the built-in GarageBand learning system for playing guitar and keyboards have been expanded. New 22 lessons (their total number is four dozen) are addressed to students learning to play the piano and guitar.

Built-in learning progress monitoring system How did I play? automatically analyzes the student’s game, displaying statistics and motivating him to new successes.

As before, iTunes ’11 will be included with all Mac computers. Legacy users (that is, anyone who bought a Mac before) can upgrade for $49.
Mac OS X + some iOS = Lion
The most “intangible” announcement of the event was the demonstration of the new operating system Mac OS X 10.7. Continuing the “cat” theme, Apple decided to name the new OS in honor of the king of beasts - Lion. Introducing it, Steve Jobs once again noted that the new version of the “desktop” operating system will feature many innovations tested in Apple mobile devices.

Icons for apps downloaded from the Mac App Store appear in Launchpad, a new app launcher that's also reminiscent of an iPad or iPhone. Like the iOS home screen, Launchpad has a folder mechanism and multiple toggle spaces, allowing you to organize all your existing apps into groups the way you like.

Apple decided that the Mac App Store should be tested even before the release of Lion, so Snow Leopard users will be able to start using the new service in a month and a half.
Another key feature of Mac OS X Lion, borrowed from iOS, is deeper support for full-screen application mode. The first app where Apple showed off what it thinks a full-screen app should look like is iPhoto ’11, which we talked about a little earlier. In Lion, the user can switch an application to full-screen mode with one click, and return back to multi-window mode or switch to another full-screen application using multitouch gestures.
Mission Control is a new Mac OS X tool that allows you to see all running applications - from all Spaces screens, widgets from the Dashboard and full-screen applications. This feature, which extends the capabilities of Expose, can be invoked with a single click or multitouch gesture.

Other Lion innovations cited by Apple include support for automatic document and app state saving (like iOS) and greater built-in multitouch functionality when using trackpads and the Magic Mouse.
The final version of Lion is scheduled for release next summer. It is likely, as in the cases with Leopard and Snow Leopard, that the company will hold another event a few months before the release, where it will introduce the new operating system in more detail. It is possible that this will happen at the WWDC conference, which is usually held in June.
FaceTime - Time to see people's faces on your Mac screens
Apple's desire to expand the audience of potential FaceTime video conferencing subscribers beyond the circle of iPhone 4 and fourth-generation iPod touch users is no secret. During the Back to the Mac event, the company announced the release of a beta version of FaceTime for Mac - as a separate application, and not as part of iChat (unlike the latter, FaceTime does not support multi-party video conferencing - at least not for now).

It is possible that the emergence of a FaceTime client for Mac will encourage third-party developers to release similar software for Windows, Android and other platforms. Let us remember that during the announcement of FaceTime in June of this year, Apple emphasized that this technology was created on the basis of open development, which gives the green light for its support in any third-party products. For now, however, FaceTime is still a technology limited to Apple devices.
In general, the event did not bring any special surprises: detailed and reliable information about the new MacBook Air was leaked onto the network several days before the announcement, the iLife package can hardly be called evolutionary, and so little is known about Mac OS X Lion so far that what can be done It’s too early to draw conclusions. However, Apple once again demonstrated its commitment to its historically core platform, and also showed the direction of further development of both its laptops and Mac software.