How to start Windows 7 Disk Management. Partitioning and increasing disk size in Windows using Disk Management Tool
Starting with Windows Vista, Disk Management provides many more features than its counterpart in previous versions of Windows, starting with at least the ability to control the size of a partition. Of course, the number of operations with partitions is not as large as in specialized programs (such as Acronis Disk Director, for example), and merging partitions without losing data on one of them is not yet possible. But we must not forget that this is not a specialized program, but functionality built into the OS and, in general, it is quite convenient and does not require additional programs or any special knowledge or experience.
Let's try a simple operation to create a new partition by allocating space for it from an existing one. The example will use a configuration with one disk partition. In this case, the ability to create a second partition may come in handy.
- Open the snap Disk management
Click Start - In the search bar, enter diskmgmt.msc- press Enter
Or on the My Computer shortcut, right-click and select Control, then on the left side of the Computer Management console, select Disk management
Enlarge pictureYou will see all the drives currently connected and all the partitions on them. In this case we will be interested in the disk WITH, due to the free space on which we will create a new partition.
Before I start, I'd like to prepare the drive letter assignments as I see fit. For example, it’s convenient for me when logical drives are designated alphabetically one after another, followed by a CD/DVD drive, removable media and connected network drives.
So let's start by changing the drive letter of our DVD drive, which in this case is assigned to the letter D. Now when we create a new volume, it will be assigned a letter D.
On disk WITH right-click and select " Shrink Volume"
After this you will see the following message 
In the next window of the Partition Management Wizard you will see information about the total disk space of the disk C, available disk space that can be allocated to another partition, and you can also specify the number of megabytes by which the current partition will be compressed.
In the same window, click the button Compress to start compressing the partition.
After completing the compression procedure, which will take some time, you will see a new, unallocated partition in Disk Management.
Now we need to create a new volume, assign it a letter and format it.
Right-click on the new partition and select " Create a simple volume..."
In the next wizard window, we will be prompted to format the new partition, select the cluster size and specify a label. By default, the new label is designated as “New Volume.” It is unlikely that you will want this to show off in Explorer, so specify your volume label or leave this field empty. Since we have a new partition, I don’t see the point in doing a full formatting, let’s do a quick one - it’s at least faster.
The next step will summarize all our settings made earlier with a new section, and all we have to do is click the button Ready
Now you see that instead of one section we have WITH there are two - WITH And D
That's all, we "bit off" some space on drive C and got a second partition, congratulations on that :)
In a similar way, you can enlarge drive C at the expense of another partition (next to C). A prerequisite for this is that the partition following the first (C) must be primary, like C. It must not be additional, or both volumes being merged must be located on one additional partition. Naturally, such a procedure requires the presence of unallocated space, which means that if we “merge” C and D, then nothing will happen without losing data on the latter, since it will be necessary to delete the volume before using it for expansion.
Otherwise the sequence is almost reverse.

That's all - we got one large partition instead of two smaller ones, and at the same time, all the data on the first partition remained untouched.
Each of us has encountered a problem when a computer or laptop starts to freeze and slow down. But not everyone knows that it is most likely related to the operation of the hard drive (as the slowest link in the system performance chain). Fortunately, this problem can be solved at home, without getting up from your chair, just optimize the operation of your hard drive.
Optimizing your hard drive in Windows 7
The need to optimize a hard drive arises due to the accumulation of a large amount of unstructured and unnecessary junk on it. Your task will be to literally “clean” the hard drive. But first things first.
Advanced Disk Cleanup
Advanced Disk Cleanup is a tool provided by the Windows 7 operating system itself. To perform this procedure, you need to open Command Prompt in one of two main ways:
- Through the Run window:
- From the Start menu:
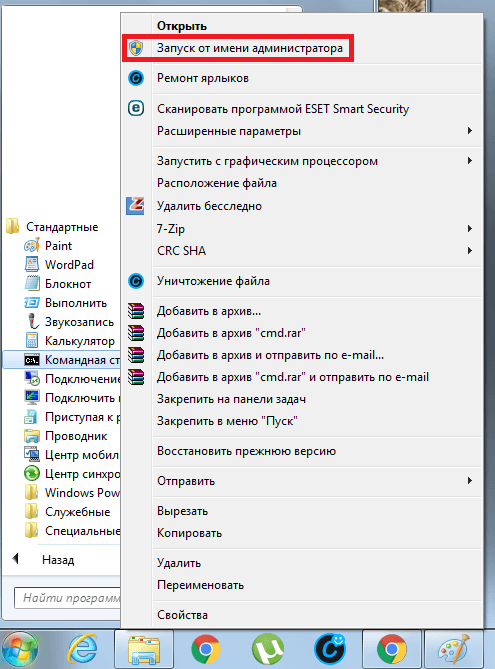
- Type %systemroot%\system32\cmd.exe /c cleanmgr /sageset:65535 & cleanmgr /sagerun:65535 and press Enter.
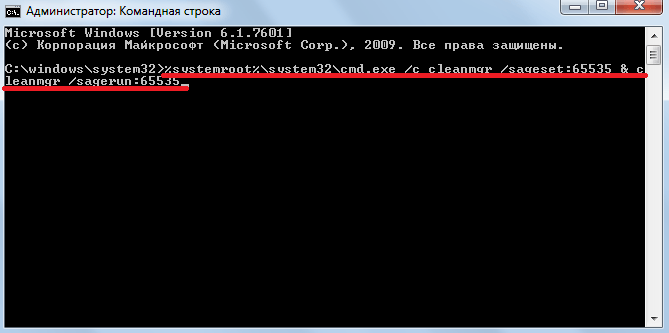 To call advanced hard drive cleaning, enter the command in the “Command Prompt”
 - Review the list of files and select those you want to delete. Pay attention to each point: delete only what you no longer need.
 Select the categories of files you want to delete
Disk Defragmenter
When writing a file to disk, Windows can distribute parts of it to any free cells on the disk. This makes it more difficult for the system to access it if it is a large file, such as a movie, and it is located in several places on the hard drive. Defragmentation allows you to overwrite all files one after another for faster access to them.
Windows 7 has a built-in defragmenter program. You can call it through the search bar in the Start menu.
 Find Disk Defragmenter by searching in Start
 Video: how to defragment a disk in Windows 7
Windows 7 optimization program for using SSD drives
SSD Mini Tweaker is a portable program for tuning the operating system to use SSD drives. It is needed in order to fully experience all the delights of using SSD drives on the Windows 7 operating system.
For some inexplicable reason, Microsoft developers do not create targeted software for working with SSD drives. There are a number of settings that prohibit overclocking SSDs, and to disable them all, you need to suffer. Therefore, enthusiasts created the SSD Mini Tweaker program, which allows you to configure the system in one click.
The operating principle is very simple. You download the program, run it and click the “Apply changes” button, since all the settings are already checked.
After successfully completing the program's action, restart your computer and enjoy the fast speed of your computer.
Video: How to use SSD Mini Tweaker
How to open Disk Management
Direct work with disks, their renaming or partitioning takes place in “Disk Management”. There are several ways to open this utility:

Video: How to open Disk Manager
What to do if the dynamic disk is invalid
There are often cases when, after reinstalling the Windows 7 operating system on computers with two or more hard drives, a problem arises in which one or more hard drives become unavailable for operation. At the same time, they are connected, detected and operational. In this case, they became dynamically invalid, that is, unsuitable for running on this operating system.
The solution to this problem is very simple:

Once the conversion procedure is complete, restart your computer for the changes to take effect.
Some mechanical and software damage to disks leads to their conversion to dynamic ones. In this case, only service center specialists will help you.
Video: How to convert a dynamic disk to a basic one
What to do if a hard drive failure is detected
Whatever the reason for the hard drive failure message, it does not bode well for you.
There are two types of errors:
- physical;
- logical (software).
The first ones occur when the magnetic layer of the disk surface is damaged. In this case, rather save the data on a safe medium, since sectors and blocks of the hard drive will deteriorate one after another, and feel free to go to the store for a new hard drive.
It is best to save data using another computer, connecting the hard drive as a second drive. And after performing all operations, carry out resuscitation procedures. The most popular utility for treating disk damage is MHDD. To restore damaged sectors, low-level formatting (ERASE) is used. And if after this you continue to have problems returning the hard drive to its place, then the problem is of a physical nature.
Video: what to do if Windows detects hard drive problems
How to format a disk to install Windows 7
When installing a new operating system, formatting is already built into the installer to put Windows on a fresh and clean disk. This helps solve many problems, such as, for example, a conflict between the old and new systems.

Make sure you select the correct drive to format, otherwise you may lose important information.
A program to format a disk before installing Windows 7
The most popular disk formatting program is Acronis Disk Director:

Video: how to format and repartition a hard drive when installing Windows 7
Disk programs
As mentioned above, some stationary utilities from Windows 7 are not the highest quality products for solving certain problems when working with a hard drive. Therefore, companies and enthusiasts are creating more convenient and functional software for working with disks.
Disk Cleanup Program
“Computer Accelerator” is a powerful program for cleaning your computer from unnecessary junk. "Top Sales" is the most powerful utility for cleaning your computer. The program is distinguished from others by its convenient and understandable Russian-language interface. It has a huge number of built-in functions, from controlling startup to cleaning the system from broken shortcuts.
Hard drive cloning program
EASEUS Disk Copy is a free and high-quality utility. Its advantage over its competitors is that it has the ability to work from a boot disk or flash drive. This makes it universal.
The simple interface and quality of work also add points to the “usefulness” of this application.
Program for recovering hard disk partitions
Recuva is the most famous program for recovering deleted files. It is known for its multifunctional interface. You can choose to search and display files of only one category, for example, photos or text documents.
A set of programs for disk emulation
Without any competition in the disk emulation market for Windows, the best and most developing program is DAEMON Tools.
The program supports all existing disk image formats, and new versions are constantly being released. The advantages also include support and work with several virtual drives at the same time.
Sooner or later there is a need to improve the performance of your hard drive. Luckily, there are many ways to optimize it. But it should be remembered that actions to improve the performance of the computer should be carried out from time to time in order to extend the life of the hard drive.
Recently, a message began to appear in Windows about a lack of space on one of the disks, and I had to slightly “replenish” it. At the same time, I decided to blog about how to increase the disk size of Windows 7 (and higher), as well as consider all related issues on the topic. I think it will be useful for beginners and people with a similar problem + I will save the instructions for the future so as not to have to figure it out again. There was also an interesting post recently that might come in handy.
I remember that in ancient times, to manage Windows disks, you had to install some special software like Partition Magic, but now everything is easily solved using the system itself (at least starting from the seventh version). It, by default, has a wonderful Disk Management Tool utility, with the help of which everything is quite easily implemented.
- You can find it through the command line, write in it - diskmgmt.msc and then open the utility.
- Or right-click on “My Computer” and select “Manage”. It is important that you have administrator rights.

In the first case, the program itself will open directly, in the second a certain set of system functions, where in addition to managing Windows disks there will be other tasks. Let's go to Disk Management.

As far as I understand, the capabilities of both options are similar; I personally like the first one better, because... there are no unnecessary details.
Here at the top of the window there is a list of all disks available for Windows, and just below it shows how they are distributed between physical media ( I only have one HDD, so the information is the same). Various actions can be performed using the context menu, called up with the right mouse button or by highlighting a specific element and selecting the “Action” - “All Tasks” item in the main menu.
At work, various situations may arise, for example, you want to split an area of your HDD that is too large into several parts in order to store important files/programs/games separately. Or a situation arises, like mine, when you need to increase the size of a disk that does not have enough space - the procedure also begins with this step.
Go to the Disk Management Tool, select the area for partitioning the Windows disk and in the context menu click on the “Shrink a Volume” item:

After this you will have to wait a bit (especially in large HDDs). After a couple of minutes, a pop-up window will open where you need to enter the desired amount in MB by which you would like to reduce the current partition.

Here you can find:
- current disk volume;
- valid parameter value for splitting;
- field where you enter your value;
- the final size of the original partition after the procedure is completed.
It is quite logical that you cannot partition your hard drive into partitions in Windows that would exceed the total amount of free space available. Likewise, it is not allowed to perform the process for areas containing system files that cannot be deleted (swap, backup).
So, after setting all the values in the pop-up window, click “Shrink”. After some time, you will see the resulting free space (Unallocated Space) in the Disk Management Tool. The partitioning phase is complete.

Creating/Deleting a Windows Disk
Once there is free space on the HDD, you can create a new scratch disk. This must be done, since there is no way to use the empty space created in the previous step without formatting.
Select an empty section and call up the menu - there we click “New Simple Volume”.

The Wizard assistant will open in a pop-up window, with the help of which everything can be easily implemented in a few steps:
- Information about starting the procedure appears - click “Next”.
- Determine the size of the new disk created by Windows.
- Choose a letter for it.
- Setting the formatting is the most important step here.

As I said above, you won’t be able to work with this area without formatting. The only reason to skip this step is if you are going to install a second operating system on it. In all other cases, agree with the parameters specified in the window and click “Next”. There, by the way, you can select “Volume Label” - the label/name of the disc. The file system remains NTFS, the old FAT32 seems to be no longer relevant (unless, of course, you are using it).
At the last step, carefully review the options you just specified and click Finish. Once the process in Disk Management Tool is completed, a new disk will be created. You can also see it in “My Computer”.
To delete a disk partition in Windows, use the “Delete Volume” item in the same context menu. The program will ask you if you really want to do this, and then after a while an empty Unallocated area will appear.
Enlarge disk in Windows
Finally, we have reached the task that I wanted to talk about initially. To expand a disk partition you, of course, need free space. Therefore, first of all, use the partitioning algorithm described above.

After this, the step-by-step Wizard will appear again. Click “Next” and you will be taken to a window with a choice of where and exactly how many MB you want to add to the current disk. By default, the program has already selected your free space (Unallocated) and the maximum available volume.

If you agree with this, simply click “Next” and move on to the final step. The process of increasing a disk in Windows 7 is completed in just a few seconds, after which the picture will look something like this:

To be honest, I don’t know why two areas of what is essentially one partition are displayed separately in the Disk Management Tool. But this does not interfere with work - in “My Computer” you see only one disk and its volume is equal to the sum of two or more blocks. Perhaps this is a bug in the built-in hard drive management program in Windows and there is no such glitch in more professional software.
Additional nuances of Disk Management Tool
Actually, using this utility you can also:
- change the partition letter on the drive in Windows;
- start formatting a particular area.
All this is done in a regular pop-up menu. The first procedure is always available, the second is performed only where there are no system files.

Attention! If you don't know, then the formatting process deletes all information on the current disk, so be extremely careful with it.
In the screenshot above you can see that the Format item is not available for the selected area, although this partition is not boot and system. It's all about the Page File.
Disable Page File
If I understand correctly, the Page File label indicates the presence of swap files. To transfer them to another disk or remove them you need:
- Go to Control Panel - System item/section.
- On the page that opens, select “Advanced System Settings”.
- A pop-up window will appear, where in the “Advanced” tab in the “Performance” settings block, click on the “Settings” button:

- After this, there will be another window where you also select the “Advanced” tab. In the “Virtual Memory” section, click on the “Change” button and open another window.

- If you have automatic paging file distribution set, then change it to manual settings. For example, I did this a long time ago. And in my case, I just need to remove the use of one or another disk for virtual memory.
- Apply all changes.
There is something to add on partitioning the hard drive inWindows, increasing the size of partitions or working with Disk Management Tool? - then write below.
An integrated operating system program for disk management is designed to perform all kinds of operations with the computer’s hard drive and other PC storage devices. Working in this application is quite convenient.
Using this tool, you can partition disks, fix problems with the drive if the PC does not see it, and convert disks from MBR and GPT. The program also allows you to create mirrored volumes, assign drive letters, and much more.
How to enter disk management
You can access all disk management functions of the operating system through the “Run” window, which is called up by pressing the Win+R key combination. In this window you need to write diskmgmt.msc. This method is great for the seventh and eighth versions of Windows.
You can also access Disk Management through the Control Panel. In it you must specify “Administration”, and then “PC Management”. The list that appears contains disk management.
In G8, you can simply right-click on “Start” and select “Disk Management”.
Interface and access to manipulations
The interface of this application is quite simple and convenient. At the top of the window there is a list of all volumes with data about them. As a rule, one hard drive consists of several logical sections. The connected media and the volumes that are located in them are shown below.
To quickly gain access to most operations, you need to right-click on the icon of the partition that will be manipulated, or click on the disk itself. When you click on a section, a menu will pop up to select actions that can be performed with a specific department. In the second case, all manipulations applicable to the entire drive will appear.
Through the main menu item “Actions” you can perform tasks to create and attach a virtual drive.
Converting disk structure to GPT and MBR
Using disk management tools, you can easily convert the hard drive partition system from MBR to GPT and vice versa. It is worth noting that the system partition being used cannot simply be converted to another, since before this it is necessary to liquidate all the departments on it.
In addition, if you connect a disk without an existing department structure on it, you will be prompted to initialize the drive and specify the MBR master boot record or GUID department structure for use.
It is worth noting that disk initialization can be suggested if problems occur in it. Therefore, if there is any information on the disk, there is no need to take any action. In this case, you need to use special applications to recover lost partitions.
MBR hard drives are capable of recognizing all computers, but modern PCs that run UEFI mostly use GPT because MBR has some limitations.
Firstly, the largest volume of an MBR can be no more than 2 TB, which is
today is not enough.
Secondly, it is possible to create only four partitions. You can make more partitions, but to do this you need to convert one department into an extended one and place logical departments in it, however, this may cause compatibility problems.
In the case of GPT, you can create up to 128 main partitions, with virtually no size restrictions.
Basic and dynamic disks and their types
The hard drive configuration in Windows can be basic or dynamic. In most cases, PCs use basic disks. But, if you convert the disk to dynamic, there are more possibilities for its use. Among them, it is possible to create different types of volumes.
A basic volume includes the standard partition type for such disks. When a spanned volume works, all data is initially stored on one disk, and when it becomes full, it moves to the next one. In this case, the disks are connected.
When selecting a striped volume, disks are also combined, however, the data is not written sequentially, but is distributed across all disks, which allows for quick access to them.
If you use a mirrored volume, then all data is written to two disks at once, this allows you to save information if one of them fails. In this case, such a volume is displayed as one disk, but the write speed is lower, since the operating system writes data simultaneously to two drives.
You can create RAID-5 volumes in disk management only in server OS editions. It is not possible to create dynamic volumes for third-party media.
Making a virtual hard drive
Also, the operating system's disk management tool allows you to mount VHD virtual hard drives. To do this, you need to go to “Action”, and then select “Create a virtual hard disk”. This will produce a .vhd file that looks a bit like an ISO image, but is read-only.
The built-in Windows Disk Management utility is a great tool for performing a variety of operations on connected hard drives and other computer storage devices.
I wrote about how to partition a disk using disk management (change the partition structure) or how using this tool you can solve problems with a flash drive that is not detected. But that's not all the features: you can convert disks between MBR and GPT, create spanned, striped and mirrored volumes, assign letters to disks and removable devices, and more.

The Windows Disk Management interface is quite simple and intuitive - at the top you see a list of all volumes with information about them (one hard drive can and often contains several volumes or logical partitions), at the bottom - connected drives and the partitions they contain.
The fastest way to access most important actions is either by right-clicking on the image of the partition on which you want to perform an action, or by the designation of the drive itself - in the first case, a menu will appear with actions that can be applied to a specific partition, in the second - to the hard partition disk or other storage device as a whole.
Some tasks, such as creating and attaching a virtual disk, are available from the Action item in the main menu.
Disk Operations
In this article I will not touch upon such operations as creating, compressing and expanding a volume; you can read about them in the article. We will talk about other operations on disks, little known to novice users.
Convert to GPT and MBR
Disk Management allows you to easily convert your hard drive from MBR to GPT partition system and vice versa. This does not mean that the current MBR system disk can be converted to GPT, since all partitions on it will have to be deleted first.

Also, when connecting a disk without a partition structure on it, you will be prompted to initialize the disk and choose whether to use the Master Boot Record MBR or GUID Partition Table (GPT). (A prompt to initialize the disk may also appear if there is any malfunction, so if you know that the disk is not empty, do not take any action, but take care of recovering lost partitions on it using appropriate programs).
MBR hard drives can be seen by any computer, but modern computers with UEFI usually use the GPT structure, due to some limitations of the MBR:
- The maximum volume size is 2 terabytes, which today may not be enough;
- Supports only four main sections. It is possible to create more of them by converting the fourth primary partition to an extended partition and placing logical partitions inside it, but this can lead to various compatibility problems.
A GPT disk can have up to 128 primary partitions, and the size of each is limited to a billion terabytes.
Basic and dynamic disks, volume types for dynamic disks
Windows has two hard drive configuration options - basic and dynamic. Typically, computers use basic disks. However, by converting a disk to dynamic, you get the advanced disk management features of Windows, including the creation of striped, mirrored, and spanned volumes.

What are each type of volume:
- Basic volume - standard partition type for basic disks
- Split volume - when using this type of volume, data is first saved on one disk, and then, as it is full, transferred to another, that is, disk space is combined.
- Striped volume - the space of several disks is combined, but recording does not occur sequentially, as in the previous case, but with data distributed across all disks to ensure maximum data access speed.
- Mirror volume - all information is stored on two disks at once, so if one of them fails, it will remain on the other. In this case, the system will display the mirrored volume as one disk, and the writing speed to it may be lower than usual, since Windows writes data to two physical devices at once.
Creating a RAID-5 volume in Disk Management is only available for server versions of Windows. Dynamic volumes are not supported for external drives.

You can also create and mount a VHD (and VHDX in Windows 8.1) virtual hard disk in Windows Disk Management. To do this, just use the menu item “Action” - “Create a virtual hard disk”. As a result, you will receive a file with the extension . vhd somewhat reminiscent of an ISO disk image file, except that not only read but also write operations are available for the mounted hard disk image.