USB speed testing. How to check the writing and reading speed of a USB flash drive
And several other devices that we will connect to it, simultaneously measuring the speed of their operation.
Let's check what the real read and write speed is for the new interface, and at the same time we'll test the purchased controller in "combat" conditions :)
To begin with, we will test my new USB 3.0 flash drive with a capacity of 8 gigabytes. Here he is:
As you can see, the package says “super speed” and below are the specific values of this “super speed”: read 100 MB/s (reading - 100 megabytes per second) and write 20 MB/s (writing - 20 megabytes per second). As testing progresses, we will definitely check this statement!
Also, another USB drive will take part in our test: external hard disk with USB interface 3.0 from Seagate.
But let's take it in order! To begin with, let’s unpack our flash drive and put it next to its “sister” (also 8 gigabytes) of the USB 2.0 standard. This is what we got:

As we can see, the flash drive usb standard 3.0 is noticeably larger. What causes this?
Let's take a closer look at this point. What does a typical old-style USB drive look like when disassembled? And it looks like this:

Here we have: printed circuit board with one microcircuit (flash memory chip) and a small controller that controls the entire “equipment” + the connector itself. There is practically nothing interesting in the case anymore.
Now, let's look at a flash drive of the same size (8 gigabytes), but of a new (high-speed) standard:

We see that the board has as many as four flash memory chips installed (they are marked in red in the photo) plus a controller chip that controls them. Four chips need more space, hence the larger size of the entire design.
It would not be amiss to note here that high-speed 16 GB flash drives are even larger in size! I think now you, dear readers, understand why?
Such a “high-speed” flash drive works as a zero-level raid array (Raid 0), when several are combined into one virtual cluster, where information is distributed immediately across all disks included in the array in the form of small blocks (stripes). Due to this, increased operating speed of the entire cluster is achieved. The speed increases in proportion to the number of disks involved in such aggregation.
Note: In the above design, speed is achieved at the expense of reliability. Since, if at least one of the disks fails, the entire array is destroyed. I repeat, it is not designed for data storage redundancy (reliability), but specifically for the speed of their processing.
Now we can clearly see that the increased speed new usb 3 flash drives is achieved largely due to an increase in the number of flash memory chips. As we remember, the declared operating speed of the usb 3.0 interface is 5 Gbis/s (Gigabit per second) - about 600 MB/s (megabytes per second). BUT! this is precisely the speed of the device interface, which has nothing to do with the speed of the slowest link in the “stuffing” of the flash drive (controller, data bus and memory chips themselves).
Here the situation is similar to the one we discussed in the article on. When the operating speed stated on the box is strikingly different from what it actually is.
Note: released in the summer of 2013 a new version standard - USB 3.1, which allows you to achieve transfer speeds of 10 Gbit/s (gigabits per second). Let me remind you that this is only for the interface, i.e. the actual speed of the end device is much lower.
So, after installing ours on your computer, go to the device manager and see the following:

It is natural that to start working with a new device, the system needs its driver. Well, no one promised that everything would be easy :) We go to the board manufacturer’s website and download the driver for our operating system(Windows 7 32 bit). Let's install it. Device Manager says everything went well!

After this, I immediately wanted to answer my question regarding what to work on maximum speed new USB devices 3 you need a special extension cord. We talked about it in the first part of this article.
Of course, you can connect the drive directly to the board and not bother, but we must check everything carefully! Therefore, we connect our high-speed flash drive to the controller via an extension cable of the outdated 2.0 standard and immediately at the bottom of the screen we see this pop-up window:

As they say, that’s what needed to be proven! If you want to use an extension cord with new high-speed devices, buy it special cable(costs around 6-8 dollars).
Now, let's move on to testing. How did we do it? I recorded the same amount of data on all media (about three gigabytes). Moreover, the data was an absolutely heterogeneous set of digital information: music, video clips, one big ISO file, a lot of small files and documents, distributions various programs and utilities.
In short, I tried to present a typical set of data that the average user might store on a device. After all, all the recording and reading speed measurements given below are of interest to us, first of all, from a practical point of view (in a real, everyday situation), and not in the form of synthetic calculations?
Testing several USB 3.0 drives
Speed measurements were carried out using two programs: “ ” and “ ” you can download them and conduct your own testing. Measurements were also carried out using a tool built into Windows 7.
The photo below shows a screenshot with the result of reading (copying) the declared amount of data (three gigabytes) from the “old” flash drive of standard 2.0

The final time during which the data was completely copied to the hard drive of my computer was about four minutes. We will also be interested in the “speed” field shown in the photo above. As you can see, its average value is 13.2 MB (megabytes) per second.
The next screenshot is the same, but for the “write” indicator (I completely formatted the flash drive) and started writing back to it the data previously copied to the disk.

The recording lasted about fourteen minutes with average speed indicated in the photo.
Now let's do this: let's try to measure the time and speed of movement of the same data on a new flash drive of the 3.0 standard, connecting it, for now, to the same slow port of the outdated standard.
This is what we got for the read (copy) operation from the drive to the disk.

Two minutes (versus four for an old-style drive), with an average speed that is also twice as high as its counterpart - 26.5 megabytes per second.
The screenshot below shows us a photo of speed and time records a set of heterogeneous data with a volume of three gigabytes for a high-speed flash drive:

Three minutes (versus fourteen) for the old drive. Almost five times faster!
And now - attention! With bated breath, we connect the high-speed drive to the high-speed USB 3 port and naturally expect a significant increase in performance.
First, as always, is the operation of copying our data.

One minute on the high-speed port (versus two on the slow port). To be honest, I expected a better result.
But what really upset me was the second test (for recording), where the numbers were almost the same as in the case of connecting a high-speed flash drive to a “slow” USB 2.0 port.
Let's just remember this empirical result for now and return to its analysis a little later: after completing all our tests.
Let's run some synthetic tests now. And we'll start with " Crystal Disk Mark"(download link above) and measure the speed of a 3.0 USB drive connected to a slow 2.0 port.

In the screenshot above we see that before the program produced the result, the test was “run” five times with a file of 100 megabytes in size. Why did the program show three different results? The point is that the first line shows us the continuous and sequential read and write operations for a file of the specified size.
The 512K line shows the write and read speed for files of 512 kilobytes in size, and the last (third field) measures the speed for very small files up to 4 kilobytes in size. How smaller files and the greater their total number, the more time it takes to operate on them. This is fine.
And here are the measurements for the same USB 3.0 flash drive, but connected to a high-speed 3.0 port.

Remember the very first screenshot in this article and the operating speeds stated on the packaging: (100 and 20 megabytes/s for reading and writing)? As we can see, it is very close to the truth!
Now is the time to recall our results of real data copying, where a high-speed device connected to the slow (2.0) and fast (3.0) ports for operations records showed almost the same results.
In the test conducted above, we see the same situation! Operation reading(Read) - a sharp jerk forward, and the speed records(Write) remains virtually unchanged.
Let's bring in another program to help " AS SSD Benchmark"(download link is above) and let's see what it shows?
What does the screenshot below “tell” us? We selected our device from the list of drives (an 8 GB USB 2.0 flash drive from Silicon Power) and ran a sequence test for it for read and write operations.

We see that the speed measurement was: for reading 16.56 megabytes/s and for writing - 4.66 megabytes per second. If you remember from the first screenshots of our testing, it is quite at the level of the results that we saw when actually copying and reading data from the drive (there were 13.2 for reading and 3.7 for writing).
Now, let’s take measurements for our high-speed drive connected to the same “slow” 2.0 port.

As you can see: 33 megabytes/s for reading and 19.48 megabytes/s for writing (versus 26.5 and 16.8 in real test when moving files of 3 gigabytes). Very similar values, which means the results are close to reliable.
Pay attention to the field " Acc. time" (Access time) in the screenshot above. It indicates the delay between the command to transfer data and, in fact, the start time of copying it. This is precisely the reason (among a number of others) that does not allow a high-speed usb 3 device to accelerate to those speeds that end users, i.e. you and I, expect from it.
Now is the time to connect our new drive to port 3.0 and record the result:

As expected, the operation speed records remained almost unchanged, but the result of reading from the device was pleasing (91.63 megabytes per second). The delay time (Access Time) has also decreased, which indicates better optimization controller operation when accessing flash memory cells.
Now, here are a few screenshots that will demonstrate to us the operation of our USB 3.0 external storage Seagate 500 GB, which we mentioned at the beginning of the article. Here is his photo:

Let's try to estimate the real speed of our external hard drive, “feeding” it the same amount of information that we previously used for the flash drive. First, let's connect the HDD to a slower one (2.0) USB port computer and conduct recording test.

Three gigabytes copied to external drive from a computer in two minutes and thirty seconds at the average speed shown in the photo above.
Now let’s carry out the same test (for recording), but connecting the hard drive to the “native” high-speed 3.0 port of the PC.

Recording time, in in this case, was one minute and fifteen seconds (half that time), at twice the speed.
Now let's try to carry out the same two tests using the AS SSD Benchmark program. Connect the drive to port 2.0 and run the program:

Now - to the high-speed USB 3.0 connector:

A bit of an unexpected result! :) But I checked several times - the picture did not change. This apparently confirms the idea that purely synthetic tests should be treated with a certain degree of caution.
Now, as I promised at the beginning of the article, I will express my subjective opinion about the testing carried out and the results obtained with its help.
I did it this way: in order to feel a significant increase in speed from USB usage 3.0 flash drive, it is not even necessary to connect it to the “native” blue high-speed port. Especially if it simply isn’t on your computer! The mere presence of several chips operating in parallel in the drive already gives a significant increase in speed.
Additionally, connecting to port 3.0, unfortunately, does not provide the expected speed increase (primarily for write operations), apparently due to the presence of other design bottlenecks (data bus, delays introduced by the controller before the start of transmission, etc. ).
Let's do the math: a high-speed 8 GB flash drive will cost about 20 dollars (versus five for a regular 2.0 standard). We presented the tests above. Visually you can estimate the speed increase by about 4-5 times. Next, the choice is yours. Is it worth paying an extra $15 to get more? comfortable work with large amounts of data? For myself personally, I decided: “It’s worth it!” :)
I repeat, even if you don’t have a dedicated USB 3.0 port on your computer, you will feel a big difference! The potential of the new interface, in my case, was more fully revealed only when using external USB 3.0 hard drive connected to the PC's high-speed port.
Of course, you shouldn’t delude yourself in vain about all these 5Gbit/s, 10Gbit/s. As we have already said, this is the potential speed of the interface, which has little in common with the actual speed. Get a good speed increase from using new technology we can do it now. Which, in fact, is what I wish for you, dear readers, and see you in the next articles on the pages of our website!
Usually, when purchasing a flash drive, we trust the characteristics indicated on the packaging. Sometimes a flash drive behaves inappropriately during operation, and then questions arise about its real speed. It is immediately necessary to clarify that for these products, speed implies 2 indicators: write speed and read speed. Let's look at how a flash drive speed test is carried out in different ways.
This process can be performed either using the Windows operating system or using specialized utilities.
Now on the technology services market big number software that allows you to test a flash drive to determine its performance. Let's study the most popular among them.
USB-Flash-Banchmark
- Download the software from the official website and install it.
- Let's launch the program. In the main window, select in the “Drive” section the necessary flash drive, with “Send Report” uncheck the box and click on the “Benchmark” button.
- The software will start the process of testing the speed of the flash drive. The result will be shown on the right, and the speed graph will be shown below.
The result window will show the following indicators:
- "Read speed" - reading speed.
- "Write speed" - writing speed.
They are marked on the graph with green and red lines, respectively.
The testing software downloads files with a total size of 100 MB three times for writing and three times for reading. Then it displays average"Average" The testing process is carried out with different file packages of 16, 8, 4, 2 MB. The test results show the maximum writing and reading speed.
In addition to the software itself, you can go to usbflashspeed ( free service), where in search bar Enter the name and volume of the flash drive and study its parameters.
Check Flash
This utility is useful because while testing the operating speed of a flash drive, it checks for errors. Before use necessary information should be copied to another disk.
- Install and launch the software.
- In the main window you need to specify the disk to check, in the “Actions” menu, select the “Write and Read” value.
- Click on the “Start!” button.
- A window will appear with a warning about the destruction of data from the flash drive.
- Click “OK” and wait for the result.
After testing is completed, the flash drive should be formatted. You must use the standard Windows procedure.
H2testw
The utility is useful for testing memory cards and flash drives. With its help, you can check the speed of the product, as well as determine its actual volume. Must be saved necessary information to another disk before use.
- Download and launch the software.
- In the main window we make the following settings:
- Specify the interface language, for example, “English”.
- In the “Target” menu, select the flash drive using the “Select target” button.
- In the “Data volume” menu, select “all available space” to test the entire flash drive.
- To start testing, you need to click on “Write+Verify”.
- Testing the write speed of the flash drive will begin. After the process is completed, read and write speed data will be displayed.
CrystalDiskMark
This utility is one of the most used for testing the speed of USB drives.
- Download from official resource and install the program.
- Let's launch it. The main window will open.
- In it we select the following indicators:
- The flash drive used is “Device for testing”.
- You can change the “Data volume” for the test, select only part of the section.
- You can change the “Number of passes” to carry out the test.
- The utility provides four “Test Modes”, which are displayed vertically on the left side (there are tests for sequential reading and writing, and others for random).
- Click on “ALL” to run all tests.
After finishing the work, the utility will show the results of all tests for writing and reading speed. The program saves the report in text form. To do this, select the “Copy test result” section from the menu.
Flash Memory Toolkit
There are more complex programs, which contain a full range of various functions for working with flash drives. They have the ability to test speed. Such programs for checking the speed of a flash drive include Flash Memory Toolkit.
- We install and launch the software.
- In the main window, in the “Device” section, select the device you need to check.
- Left in vertical menu select “Low-level Benchmark”.
This function performs low-level testing, checking the write and read potential of the flash drive. The speed is demonstrated in Mb/s.
Before using this function, important files You need to copy it from the flash drive to another drive.
Windows OS Tools
The task can be completed using the usual Windows Explorer. To check the recording speed do:
- We prepare a file with a large size, preferably more than 1 gigabyte, for example, a movie.
- We start copying it to the flash drive.
- A window will open showing the copying process.
- Click “More details”.
- A window will open where the recording speed is indicated.
To check the reading speed, you need to run a reverse copy. It will be clear that she more speed records.
During check in a similar way It must be taken into account that the speed indicator will not always be the same. Its value is influenced by the size of the copied file, processor load and other factors.
The second method is available to everyone Windows user, is to use file manager. Often used Total Commander, included in standard utilities, which are already installed along with the operating system. If the program is not on your computer, then download it from the official resource. Then we perform these steps:
- Select a larger file to copy.
- We start the copying process to the flash drive. To do this, we simply move it from one area of the window to another, where the removable media is displayed.
- During copying, a window will open where the recording speed is immediately displayed.
- To obtain reading speed data, you should perform the reverse procedure: start copying data from the flash drive to the disk.
This method is convenient due to its speed. Its difference from specialized utilities is that you do not need to wait for test results; such information is visible during the workflow.
How to increase the speed of a flash drive?
If everything is fine with the PC, then the culprit for slow data transfer is the flash drive itself. Budget flash drives do not demonstrate impressive data writing speeds. Transfer speeds of 5-7 Mb/s with the USB 2.0 interface have become commonplace for them.
A flash drive with a 3.0 interface purchased for fast recording will work identically to USB 2.0, if the computer does not support interface 3.0. To get USB 3.0 performance, this connector must be on your computer's hardware ports.
If information is slowly copied to a flash drive connected to the connector on the front panel of the computer case, you can test it after connecting it to the ports on the back of the case. Outdated ports may be placed on the front panel, and connectors motherboard provide modern interfaces.
Low-end and older computers experience slow data transfer to USB drive may be due to weak hardware, slow hard drive or a small amount of RAM. In this case, upgrading your computer will help.
How to increase the transfer speed to a flash drive by software?
If the problem is the low speed of recording information on the flash drive itself, then it will not be possible to significantly increase the process of copying data to it, even when using a powerful computer. Software will only slightly increase the recording speed.
If you need to copy small files to a flash drive, then it is better to combine them into a single archive and place this on the drive itself archive file. One large file will be copied faster than many small ones. When copying small files, even high-performance USB drives can “sag.”
You can speed up the transfer of files to a flash drive using special utilities who win against standard means Windows companies have a certain share of performance due to their own operating algorithms. Similar program For quick copying– this is WinMend File Copy. The software can be downloaded for free from the official resource.
WinMend File Copy has a Russian-language interface, supports buffer settings, batch copying of files, and can resume transferring information from the point where it was broken.
Hi all! I haven’t written here for a long time, I have a lot of things to do, I’m doing repairs, and I don’t like writing articles for show... Usually, if I write an article, it’s with desire and, so to speak, with soul!) Here Lately I test every product on my new project topmarket40.ru and began to understand that not all flash drives correspond to their class indicated on the packaging. Let's see how to check the class of a flash drive and how to test it…
Lately, there has been a rise in homemade goods, especially in China, who sell everything and everything is random!) Then a bad opinion is formed about China, but there are good things there... For example, I now go with Chinese phone, which is not inferior to all the fancy ones, the quality of the parts is excellent, try to find a phone with an iron case now (except htc one), from 4x nuclear processor, high-quality screen and indestructible battery! Every year the quality of parts is getting worse and worse... Soon they will make phones out of cardboard, probably disposable ones)))
And now there is a trend to make flash drives in the same way, specifically I will touch on the topic of mini MicroSD flash drives... They like to sell cheap flash drives indicating 10th grade on them! And corresponds to the 4th... In order not to fall for deception, I will show you how to choose a fast and inexpensive flash drive.
Firstly, you can choose a high-quality one in two cases, this is either to take the popular company Transend or Kingston, for example, and the second option is to try testing a cheap flash drive using the program that I will show you today...
Secondly, you can’t trust anyone now, even if you bought good company I would advise checking it using the program...
For example, I took my SmartBuy class 10 (16GB) flash drive, a friend’s SanDisk class 4 (32GB), and a transend class 10 (32GB).
After testing, we see that the difference is small and all flash drives correspond to their class. Transent is even a little larger, but it costs many times more. Transent is the most sophisticated, the fastest of all the series. SmartBuy was purchased for 250 rubles, and transent is 10 times more...
Now let's figure out what kind of columns these are.
For complete testing, click the All button, after a while the program will show all the values. The class of a flash drive is measured by the first line in the reading column. The maximum class of a microSD flash drive is now 10. This means the writing speed must be at least 10 MB.
The first line indicates sequential copying, for example from a flash drive to a computer, and writing from a computer to a flash drive. The bottom 3 columns indicate random (random) copying and recording, and this is exactly what happens on the phone.
Conclusion: You should buy a flash drive according to its purpose, for example, if you are a photographer, then it is better to take a transent so that the photos are saved faster, and if regular user, like me, then the usual SmartBuy, but again, to fit its class. And the last criterion is reliability, SmartBuy is not such a well-known company as Transent and it is still in my testing. So far the flight is normal.
That's all, this is how you can check the class and test the flash drive. Who wants to test their flash drive, I attach free program for testing.
Storage drives continue to be the slowest computer components. In this article we will talk about how to check the speed of a flash drive or SSD drive, in order to make sure that the speed declared by the manufacturer corresponds to the real one.
Checking flash drive speed using CrystalDiskMark
CrystalDiskMark is one of the most popular speed test programs USB flash drives and SSD drives. The interface of this program is very simple, but at the same time it copes with its tasks without any problems.
To check the speed of a flash drive or SSD using CrystalDiskMark programs download it and install it on your computer. After launching the CrystalDiskMark program, you need to select the disk partition whose speed you want to check, as well as the test mode. The program has 4 modes for checking speed (1 test for sequential read/write and 3 tests for random read/write). It is also possible to carry out all 4 tests at once, to do this you need to click on the “ALL” button. If necessary, you can change the amount of data that will be used for testing, as well as change the number of passes.
After the check is completed, the program will display the results. For each of the 4 tests, the speed of your flash drive or SSD drive for writing and reading data will be shown.
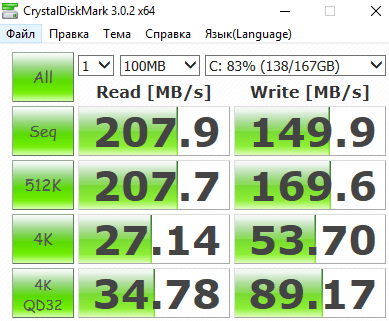
For example, this is what a CrystalDiskMark text report on SSD testing looks like Intel drive 335 connected by:
————————————————————————
CrystalDiskMark 3.0.2 x64 (C) 2007-2013 hiyohiyo
Crystal Dew World: http://crystalmark.info/
————————————————————————
* MB/s = 1,000,000 byte/s
Sequential Read: 207.879 MB/s
Sequential Write: 149.939 MB/s
Random Read 512KB: 207.656 MB/s
Random Write 512KB: 169.628 MB/s
Random Read 4KB (QD=1) : 27.139 MB/s [6625.6 IOPS]
Random Write 4KB (QD=1) : 53.704 MB/s [13111.3 IOPS]
Random Read 4KB (QD=32) : 34.782 MB/s [8491.7 IOPS]
Random Write 4KB (QD=32) : 89.166 MB/s [21769.0 IOPS]
Test: 100 MB (x1)
Date: 2016/12/20 12:37:17
OS: Windows 8 (x64)
Checking SSD disk speed using HD Tune
HD Tune is another popular program to check the speed of flash drives and SSD drives. The HD Tune program is distributed in two versions: completely demon paid version HD Tune and paid version HD Tune Pro. At the same time, the paid version of the program can work for 15 days in Trial mode, so to check the speed you can.
In order to check SSD speed or flash drive using HD Tune, this program you need to install it on your PC, run it with administrator rights, select the disk to check and click on the “Start” button

After this, the HD Tune program will check the speed of your flash drive or SSD and display the results. The program will show the minimum (Minimum), maximum (Maximum) and average (Average) data transfer speed between the drive and the system. HD Tune also shows data access time (Access Time), peak transfer rate (Burst Rate) and processor load (CPU Usage).

If necessary, you can take a screenshot or save a text speed test report directly from the program. To do this, in the right top corner programs have special buttons.

For example, this is what the HD Tune text report on testing an Intel 335 SSD drive connected via SATA 2 looks like:
HD Tune: INTEL SSDSC2CT180A4 Benchmark
Transfer Rate Minimum: 149.4 MB/sec
Transfer Rate Maximum: 173.7 MB/sec
Transfer Rate Average: 156.4 MB/sec
Access Time: 0.2 ms
Question from a user
Hello.
Not long ago I ordered a 32 GB flash drive from AliExpress. It seems to work, but the information takes a very long time to copy onto it (although it supports USB 3.0 and I connect it to the same port). Can you tell me how to check a flash drive, is everything okay with it, what is its real operating speed?
PS It seems that I have begun to understand why many products on AliExpress are so cheap...
Hello.
Unfortunately, the store itself has nothing to do with it - you could buy a flash drive of poor quality at any other store (here, depending on your luck). Although, of course, buying flash drives famous brands(Adata, Kingston, Sandisk, etc.) - it’s unlikely to run into various pitfalls...
And so, below in the article I will consider the testing process in several utilities that will help you check the operation of your flash drive. Let's begin ☺...
USB-Flash-Benchmark - for testing a flash drive
An excellent utility for testing flash drives different manufacturers and modifications. On the official website of the utility program, you can view the test results of other flash drives and find the fastest drives (very convenient, by the way!).
USB-Flash-Benchmark does not support the Russian language, but it is quite easy to use. I'll look at it step by step.
1) Insert the flash drive into the USB port of your computer/laptop. Please note that if you have a flash drive that supports USB 3.0, connect it to a USB 3.0 port (usually such ports are marked in blue).
2) Download and run the USB-Flash-Benchmark utility (you don’t need to install it, just extract the archive).
3) Next, in the utility, select the drive letter (our USB storage) and press the "Benchmark" button (see screenshot of the window below). By the way, please note that by selecting the required drive- You will see all the information on it: serial number, manufacturer, the lineup, VID, PID, actual size. The information is very useful, by the way.
During testing, do not work with the flash drive or interrupt the program.

USB-Flash-Benchmark - start testing
4) It took about 5-7 minutes to test my flash drive. time (time depends on the size of the flash drive and the speed of the port). In the results you will see a graph with average values for each file size (16, 8, 4 MB).
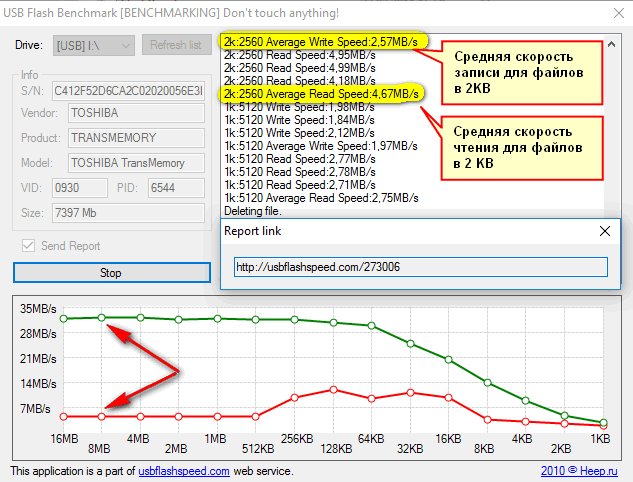
Test results // pay attention to the "Report Link"
5) Here, in fact, are the numbers themselves: approximately 32.1 MB/s- reading speed, and 12.03 MB/s- recording speed. The numbers, frankly speaking, are small, but a flash drive also belongs to budget options, and is used extremely rarely.

Test results of my Toshiba flash drive on the utility website (data averaged)
CrystalDiskMark - quick test
DiskMark is a compact little utility, but very effective in terms of testing various drives: hard drives(HDD), SSD drives, flash drives, memory cards, etc. Allows you to very quickly obtain real data on the read/write speed from the disk. No installation required, just extract the archive and run executable file. Below I will give small instructions for testing a USB flash drive in it.

Check Flash - to check the flash drive for errors, speed

This free utility, which will check not only the speed of the flash drive, but also evaluate its performance and check for errors. The utility supports almost all types of USB flash drives. Does not require installation, supports the Russian language in full.
In addition to directly checking for errors and speed, Check Flash can edit information about partitions, save and restore images of a partition (or the entire disk), and completely erase the contents of the drive (so that no one can recover anything from it).
To get started: just insert the flash drive into the USB port, run the utility and specify the drive letter for it, click the "START" button. Then the test will start, all you have to do is wait. By the way, the utility works for quite a long time. If I check it myself, I usually don’t wait until the end - in 10-15 minutes - you’ll get objective results (if there are no errors, most likely everything is fine with the drive).
Note: the speed of scanning and operation of the utility (according to the developer) is equal to the maximum operating speed of your drive.
Nowadays you can often find flash drives on sale in sizes of 200-300 and even 600 GB (it all depends on the imagination of the seller and the gullibility of the buyer)! Moreover, no one is bothered by the fact that their cost is very low (by the way, this occurs most often in various Chinese stores). I want to warn you: in many cases the actual size of the flash drive will be significantly less! You can learn how to check your flash drive for real capacity in the article below.
How to find out the real capacity of a flash drive and restore its functionality ( Chinese fakes for 120, 240, 500-1000 GB) -
That's all I have.