Testing js code. Introducing Test Driven Development in JavaScript
Javascript is a very popular language for client-side web development. JavaScript is a dynamic language and is based on prototyping. Despite the name, it does not belong to the Java language, although it uses a similar C-like syntax and similar naming conventions.
Recently, Javascript has begun to gain more and more popularity. It underlies such modern technology as AJAX. Knowledge of javascript can also be useful for server-side programming for flexible system configuration.
Target audience of the JavaScript testThis test is recommended for specialists who want to test their basic knowledge of JavaScript. The test can also be used to consolidate knowledge by developers immediately after familiarization with the JavaScript language.
In higher educational institutions, this test will be of interest to students of technical specialties in the areas of “Software Engineering” or “Internet Software”.
javascript test prerequisitesBefore taking this test, you need to have at least a basic understanding of the Javascript language.
The test is aimed primarily at specialists who have recently learned JavaScript. Therefore, this test does not cover such complex topics as OOP in JavaScript or specialized JavaScript APIs.
JavaScript test structureThe test questions cover the following topics:
- basic JavaScript language constructs (declaration of variables, functions, etc.);
- operators (branching, loops);
- working with strings in JavaScript;
- working with arrays in JavaScript;
- "JavaScript - HTML" bundle (tags used for integration)
- other concepts that are not included in the topics outlined above.
The next step in developing the Javascript test will be to create questions based on existing test topics. Expanding the list of questions will increase the interest in taking the test again for both knowledge testing and learning purposes.
Code testing is an integral cycle of software development. Beginning development teams often underestimate its role and check the functionality of the application the old fashioned way - “it works, okay.” Sooner or later, this strategy fails and the bug tracker begins to be overwhelmed by a countless army of tasks. To avoid falling into such a trap, I recommend once and for all to understand the nuances of testing JavaScript code.
JavaScript is not the same anymoreToday, JavaScript is more than just a language to spice up the appearance of an application. The times when JavaScript was used for jokes or making menus are irrevocably gone. It is now a standalone language that works equally well on both the client and the server. The role of JavaScript has increased significantly, which means that when writing code you should not be shy about using practices that have proven themselves in other programming languages.
What do I mean by practices and paradigms? Of course, the MVC (model view controller) architectural pattern and code organization patterns. By following these simple tricks, you will be able to write better code that will not only be easy to maintain, but also have the ability to be automatically tested.
Mistake of most testersIt's no secret that the most popular method of testing has always been a banal eye test. Its essence is simple to the point of disgrace - you write a couple of thousand lines of code, solve the problem and launch your creation. I played around, clicked, everything seemed to be working, I could upload it to the production server. Everything is extremely simple and with due attention from the developer (ideally an individual nicknamed “tester”), you can rely on the correct operation of the application.
In practice, everything happens a little differently. As a rule, there is no separate tester. The developer himself tries to check the functionality of the program by performing the sequence of actions specified in the technical specifications. More advanced code forges automate this kind of integration testing using things like Selenium.
Thus, the programmer gets the opportunity to detect only the most serious errors. Unfortunately, “stupid” and “unintended” user actions, as well as cunning moves in business logic, remain behind the scenes in 99% of cases.
The presence of a separate person in the person of a tester also solves the problem partially and up to a certain time. Even if we ignore his sapper's attention to detail, the quality of his testing will tend to zero as the application grows. Let me give you an example from practice.
One day I was assigned to develop a small program. In terms of functionality, the project resembled a simple CRM, which I implemented in the shortest possible time. Having received the due remuneration, I handed over all the sources to the customer and forgot about the project for eight months. Then the fun began. The customer decided to seriously expand the functionality of the program and called me for help. Naturally, I took it and began to sculpt new function after function. At first it was not difficult, but when it came to the overall integration of functionality, a buzzing swarm of bugs rushed in my direction. Pieces of code began to conflict, and we had to spend a lot of time resolving conflicts. “Well, how come you didn’t see that there were problems with your application?” - attentive readers will ask. I launched it, but due to the fact that the application had grown, I simply did not have enough time and nerves to test all the functionality en masse. I limited myself to testing only individual functions and paid handsomely for it. The moral of the story is “Think of testing as an integral part of development.”
Unit tests are like a silver bulletUnit testing is the best way to save your nerves and increase guarantees of the functionality of individual parts of the application. If you have never come across this terrible word, then I will explain briefly. Unit tests allow you to automate the testing process and test every feature of your application.
After completing the development of a new function (it is possible to write tests before the start of development), the developer writes special code to test his code. In your testing code, you need to simulate different situations and return values. For example, we wrote a function to trim spaces (trim). To test its performance, we must prepare several tests that will allow us to state that:
We can also add testing for other input parameters (for example, replacing the space character with a tab). In general, the better we cover the code with tests and provide for possible negative options, the greater the chance that at the most crucial moment there will be a little hair left on the head.
In the JS world, tests are usually written using specialized frameworks. They have everything you need to describe tests, as well as at least some tools for systematizing test progress reports.
Tests!= extra codeDevelopers who don't use unit testing like to argue that unit testing requires writing and maintaining additional code. They say that deadlines in real projects are often tight and it is simply not possible to write additional code.
I agree about the tight deadlines, but I’m willing to argue about the extra code. On the one hand, yes, tests require additional code, and therefore time to write it. On the other hand, this code acts as an airbag in a car and will definitely pay for itself as the application grows.
When you don’t have time and are tormented by the desire to give up writing tests, think three times. In this case, it may be more appropriate to cover only the most tricky sections of the code with tests, rather than abandon testing completely. Always think with an eye to the future, as if in a month your program can grow to unprecedented proportions.
Not every code is testedWhy do I say that you need to think about testing before writing the main code? Yes, because the code that is initially supposed to be covered by unit tests is written in a slightly different style. Not every code can be tested. Code that mixes logic and representations, and is also crammed into areas where it is impossible to properly test. Here I always advise you to follow a few simple rules:
QUnit is especially popular among JavaScript developers. Firstly, it is well documented and easy to use, and secondly, it was created by the authors of jQuery. The library is suitable for testing both jQuery-based and native JavaScript code.
You can download the latest version of QUnit from the official website - http://qunitjs.com/. The library comes as a single JS and CSS file. Let's assume that you've figured out loading the necessary components, and if so, then it's time to write a trial test. Let's not go far and try to test the above-mentioned trim() function.
To demonstrate the tests, I created a simple project with the following constructor:
Index.html – the main file that will display test results; - qunit-1.12.0.js – qunit library file; - example.js – file containing code for testing (in our case, a description of the trim() function); - test.js – file with tests; - qunit-1.12.0.css – styles for designing a report with tests;
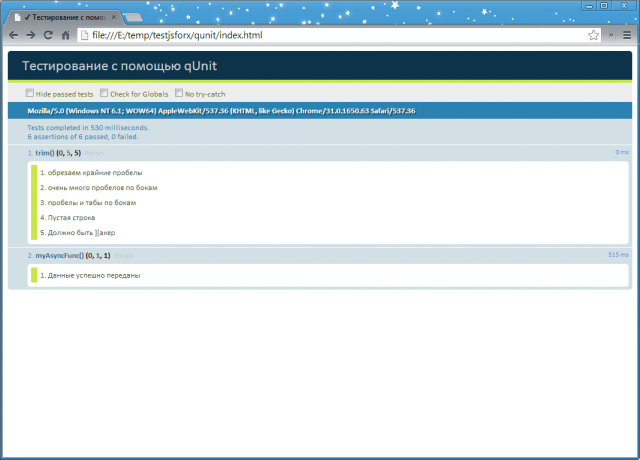
The contents of the index.html and test.js files are presented in Listings 1 and 2. We are most interested in the second listing, which contains the declaration of the function under test (trim()) and the test code to check its functionality. Please note that the trim() function itself can be located anywhere; I put it in the second listing just to save space in the magazine.
Now let's look at the tests themselves. To check the functionality of our code, the Qunit.js library offers us a number of methods:
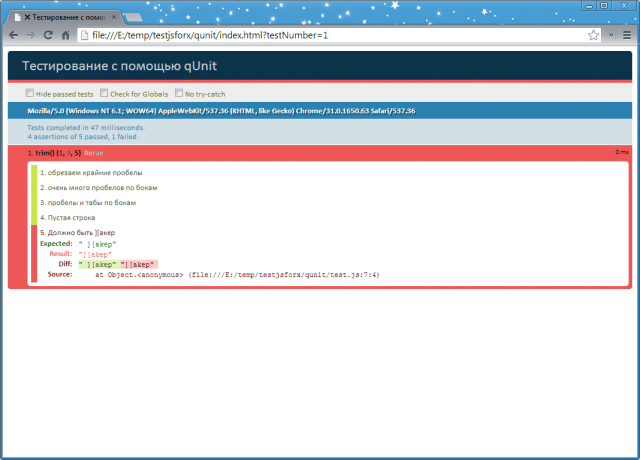
In the second listing, I clearly showed how to apply these methods in practice. If you run the test example in this form, then all tests will pass successfully (see the corresponding figure). To see the difference between tests that passed and those that failed, I slightly modified the code for one test. I deliberately added an erroneous result to the test line using strictEqual() (see the corresponding figure).
Listing 1. Contents of the index.html file Testing with QUnit Listing 2. Test files and trim() function trim(string) ( return (string || "").replace(/^\s+|\s+$/g, ""); ) test("Test the function trim()", function() ( ok(trim(" test ") == "test", "trim the outer spaces"); ok(trim(" 1 ") == "1", "lots of spaces on the sides"); ok(trim(" 24 ") == "24", "spaces and tabs on the sides"); equal(trim(""), "", "Empty line "); strictEqual(trim(" ][aker") ));We seem to have sorted out testing simple functions. In any case, I have nothing more to add. Next, you need to take real code and try to write tests yourself. Let's look at another frequently encountered task for JavaScript developers - testing asynchronous functions. An application stuffed with JavaScript code interacts 99% with the server side using Ajax. You can't leave this code unchecked either, but writing tests will look a little different. Let's look at an example:
AsyncTest("myAsyncFunc()", function() ( setTimeout(function() ( ok(myAsyncFunc() == true, "Data transferred successfully"); start(); ), 500); ));
The main difference between this example and the previous one is that instead of the test() wrapper, asyncTest() is used, thereby directly stating that I am interested in testing specifically asynchronous testing. Next I start the waiting time at 500 ml. sec. During this time, the myAsyncFunc() function should transfer data to the test server, and if all is well, return true. This is where the most interesting moment comes. When asyncTest() is called, the execution thread stops and when the test is completed, it must be launched independently. To control the flow of execution, QUnit has start() and stop() methods.
Testing asynchronous functions using the QUnit library is quite simple. The last example I would like to look at involves writing a test that performs several asynchronous checks. The main question that arises in such tasks is the optimal place to start the execution thread. The official doc suggests using something like:
AsyncTest("myAsyncFunc()", function() ( expect(3); //Here we do three checks ok(myAsyncFunc(), "Making the world a better place 1"); ok(myAsyncFunc(), "Making the world a better place 2") ; ok(myAsyncFunc(), "Making the world a better place 3"); setTimeout(function() ( start(); ), 3000); ));
Test for custom actionsYou should always remember that a lot of interface stuff is written in JavaScript. For example, a user clicks on a pimp and something should happen in response to his click. There is a huge amount of such “interface” code in projects and it also needs to be covered with tests. Let's see how we can simulate a user's keystroke and write a separate test for this action. Let's imagine that we have a certain function that logs the keys pressed. I provided its code in the third listing:
Listing 3. Logging keystrokes function KeyLogger(target) ( if (!(this instanceof KeyLogger)) ( return new KeyLogger(target); ) this.target = target; this.log = ; var self = this; this.target. off("keydown").on("keydown", function(event) ( self.log.push(event.keyCode); )); )Now let's try to test this function. First of all, in the body of the test we need to emulate the pressed key. The easiest way to do this is with the jQuery library, which allows you to create an event in a couple of lines of code (see Listing 4).
Listing 4. Test code for KeyLogger test("Key logging test", function() ( var event, $doc = $(document), keys = KeyLogger($doc); event = $.Event("keydown"); event .keyCode = 9; $doc.trigger(event); equal(keys.log.length, 1, "Key recorded"); equal(keys.log[ 0 ], 9, "Keystroke with code 9 recorded"); ));At the very beginning of the test listing, I prepare an event to emulate a key press - “keydown”. We will be interested in pressing the Tab key (code 9). Then, using the trigger() method, I dispatch the prepared event, after which I can start testing. First, we check the overall picture - whether a key was pressed, and then its code.

Since Qunit.js allows you to test user actions, then writing tests for the DOM should not be a problem either. This is indeed true and the example below will confirm my words. I won't comment on it, just look at the code and everything will become clear:
Test("Add a new div element", function() ( var $fixture = $("#qunit-fixture"); $fixture.append("This is a new div"); equal($("div", $fixture) .length, 1, "New div added successfully!"); ));
Phantom.JS – running tests from the consoleWriting tests using the Qunit.js library is convenient and simple, but sooner or later you will be struck by the desire to somehow automate the launch of testing and collection of results. For example, for this purpose I have a separate virtual machine in DigitalOcean, which I can only manage using the console.

The phantom.js project solves this problem quite elegantly. This is not another framework for writing Unit tests, but a full-fledged console version of the WebKit engine. To put it simply, this application emulates a browser. With the help of phantom.js, it is possible not only to automate the verification of test execution, but also to solve many problems that sooner or later arise before a developer: obtaining page rendering results into a file (png, jpg), network monitor functions (loading speed, overall performance, etc.). etc.), emulation of user actions, etc. I recommend that you take the time and read the official documentation on this project, you will definitely find something interesting for yourself.

Phantom.js can be compiled for different platforms (nix, mac OS X, windows). If you develop everything on Windows, then there are no problems - merge the binaries and go ahead. Minor problems with startup may occur if you have two video adapters installed, one of which is NVidia. In this case, you will have to use the hack described in the sidebar.
Let's try to get acquainted with phantom.js in practice. To run the tests prepared in the last section through phantom.js and get the execution results into the console, we need a special loader script - run-qunit.js. Open the console (I work on Windows, so I use cmd) and type the command in the format:
Phantom.exe
In my case, the launch command looked like this:
E:\soft\phantomjs>phantomjs.exe E:\temp\testjsforx\qunit\run-qunit.js file:///E: /temp/testjsforx/qunit/index.html The result of its execution: Tests completed in 2592 milliseconds . 9 assertions of 9 passed, 0 failed.
All tests passedIt is definitely necessary to cover your code with tests, no matter what scale the application you are creating. Once again, I remind you that even the smallest programs turn into clumsy monsters that need to be supported and added functionality. Well-tested code is the key to success and quality. Yes, it’s not easy to immediately start writing code suitable for automated tests, but believe me, all this torment will more than pay off in the future. That's all for today, good luck!
When there is no time for testsIf you don’t have time, there is no point in writing tests for simple functions (take the same trim() from the examples in the article), it is better to focus on the most critical sections of the code. The same rule should be followed when writing frequently changed code. The technical specifications of a live project change frequently, and some functions have to be constantly updated. Such changes can lead to unpleasant moments - the changed code works well with new data, but does not organically digest old data. So, in order not to catch a failure here, it is better to immediately cover such functions with tests. Remember a simple rule - there is no time to cover the entire code with tests, cover the most important part of it.
It just so happened, but I tested all the examples in this article not on Linux, but on good old Windows 7. It turns out that phantom.js has minor problems when working on systems that use several video adapters. On my laptop, in addition to the integrated video chip, there is also NVidia, and because of phantom.js, it categorically refused to respond to the phantom.exit() command. As a result, after executing the script, the phantom.js process did not complete its work and continued to hang in memory. The terminal window also stopped responding to shutdown commands (ctrl + c did not help).
If you are faced with a similar problem and plan to use phantom.js on Windows, then get ready to do the following hack. Open Nvidia Control Panel. Find the “3D Settings” item in the tree. The “Preferred Graphics Adapter” option should appear on the right side. By default, its value is set to “Auto select”. We need to change it to “High-performance Nvidia processor” or “Integrated graphics hardware”. After this simple trick, phantom.js began to behave obediently.
And is the official jQuery testing tool. But QUnit is great for testing any JavaScript code and can even test the JavaScript backend using engines like Rhino or V8.
If you're not familiar with the idea of "unit testing", don't worry - there's nothing complicated about it:
"Unit testing or unit testing (English) unit testing) is a process in programming that allows you to check individual modules of a program’s source code for correctness. The idea is to write tests for every non-trivial function or method. This allows you to quickly check whether the next code change has led to regression, that is, to the appearance of errors in already tested places of the program, and also facilitates the detection and elimination of such errors."
Definition quoted from Wikipedia. Just make tests for each functional block of your code, and if all the tests pass, then you can be sure there are no errors (mainly depends on how carefully the tests are designed).
Why you should test your codeIf you've never written unit tests before, you've probably just hosted your code directly on a web server, run it, watched for errors, and tried to fix them as they were discovered. This method of working gives rise to many problems.
Firstly, this is a very tedious and boring activity. Validation is actually quite a difficult job because you have to be sure that everything has been pressed. And in this process there is a very high probability that one or two points may be missed.
Secondly, everything that is done for such testing cannot be reused. With this method it is very difficult to find regressions. What are regressions? Imagine that you wrote some code and tested it, corrected all the errors you found, and placed the code on the site. The user then sent feedback about new bugs and a request for new features. You go back to the code, fix bugs and add new features. In this case, a situation may arise where old errors appear again, which is called “regression”. You have to check everything again. And there is a chance that you will not find your old mistakes. In any case, it will take time before you realize that the problem is caused by “regression”. When using unit testing, you write a test. Once the code is modified, you filter it through the test again. If regression occurs, then some tests will fail, and you can easily determine which part of the code contains the error. Since you know what you changed, the error will be easy to correct.
Another advantage of unit testing (especially for web development) is that it is easy to test cross-browser compatibility. You just need to run tests in different browsers. If problems are found in the browser, you can fix them and run the test again. As a result, you will be confident that all target browsers are supported since they have all been tested.
How to write unit tests in QUnitSo how do you directly write unit tests in QUnit? The first step is to install the testing environment:
QUnit Test Suite QUnit Test Suite
The code that will be tested goes into the myProject.js file, and the tests go into myTests.js. To run the tests, you just need to open the HTML file in your browser. Now it's time to write some test.
The building block of unit testing is assertion.
"An assertion is an expression that predicts the return result when your code is executed. If the prediction is incorrect, then the assertion has a value false, which allows us to draw conclusions about the presence of errors."
To execute assertions, they need to be placed in a test block:
// test this function function isEven(val) ( return val % 2 === 0; ) test("isEven()", function() ( ok(isEven(0), "Zero is an even number"); ok( isEven(2), "Two is also"); ok(isEven(-4), "And negative four is also an even number"); ok(!isEven(1), "One is an odd number"); ok(! isEven(-7), "Like negative seven is an odd number"); ))
Here we define a function isEven, which checks the parity of a number, and we want to make sure that this function does not return erroneous values.
First we call the function test(), which builds a test block. The first parameter is the string that will be output as a result. The second parameter is a return function that contains our assertions. This callback function will be called once during QUnit execution.
We have written five statements, all of which are logical. The logical statement assumes that the first parameter has a value true. The second parameter is the message that is displayed in the result.
This is what we get after running the test:
All our statements were successfully confirmed, so we can assume that the function isEven() works as expected.
Let's see what happens if the statement is false.
// test this function function isEven(val) ( return val % 2 === 0; ) test("isEven()", function() ( ok(isEven(0), "Zero is an even number"); ok( isEven(2), "Two is also"); ok(isEven(-4), "And negative four is also an even number"); ok(!isEven(1), "One is an odd number"); ok(! isEven(-7), "Like negative seven is an odd number"); // Error ok(isEven(3), "Three is an even number"); ))
And this is what we get as a result of running the test:

The statement contains an error that we made intentionally. But in your project, if some test fails and all other statements are correct, then it will be very easy to find the error.
Other statementsok() is not the only statement that QUnit supports. There are other types of assertions that are useful to use when writing tests for your projects:
Comparison StatementComparison Statement equals() assumes that the first parameter (which is the actual value) is equivalent to the second parameter (which is the expected value). This statement is very similar to ok(), but it outputs both real and expected values, which makes debugging the code much easier. As well as ok(), equals() can accept a message for output as a third parameter.
So instead
Test("assertions", function() ( ok(1 == 1, "one is equivalent to one"); ))

Should be used:
Test("assertions", function() ( equals(1, 1, "one is equivalent to one"); ))

Note that the expected value is printed at the end of the line.
And if the values are not equal:
Test("assertions", function() ( equals(2, 1, "one is equivalent to one"); ))

This entry gives more information.
The comparison assertion uses the “==” operator to test parameters, so it cannot work with arrays or objects:
Test("test", function() ( equals((), (), "error, these are different objects"); equals((a: 1), (a: 1) , "error"); equals(, , "error, these are different arrays"); equals(, , "error"); ))
For such cases, QUnit has an identity assertion.
Identity AssertionIdentity Assertion same() uses the same parameters as equals(), but it works not only with primitive types, but also with arrays and objects. The statements from the previous example will pass the test if changed from to identity statements:
Test("test", function() ( same((), (), "passes, objects have the same content"); same((a: 1), (a: 1) , "passes"); same(, , "passes, the arrays have the same content"); same(, , "passes"); ))
Please note that same() uses the '===' operator for comparison, so it is convenient to use for comparing special values:
Test("test", function() ( equals(0, false, "true"); same(0, false, "false"); equals(null, undefined, "true"); same(null, undefined, " false"); ))
Statement structurePlacing all assertions in one test is a very bad idea. Such a test will be difficult to maintain and you can get confused in evaluating the results of its execution. Therefore, you need to structure the test by placing statements in separate blocks, each of which will be aimed at a specific group of functions.
You can organize individual modules using a function call module:
Module("Module A"); test("Test", function() ()); test("Another test", function() ()); module("Module B"); test("Test", function() ()); test("Another test", function() ());

In the previous example, all statements were called synchronously, that is, they were executed one after another. There are many asynchronous functions in the real world, such as AJAX requests or functions setTimeout() And setInterval(). How do we test this type of functionality? QUnit has a special test type called "async test" which is designed for asynchronous testing:
First, let's try to write a test in the usual way:
Test("Asynchronous test", function() ( setTimeout(function() ( ok(true); ), 100) ))

It looks like there are no assertions in the test. Because the statement was executed synchronously, but by the time the function was called, the test had already been completed.
The correct way to test our example is:
Test("Asynchronous test", function() ( // Put the test into pause mode stop(); setTimeout(function() ( ok(true); // After calling the assertion // continue the test start(); ), 100) ))

We used the function stop() to stop the test, and after executing the assertion, run the test again using the function start().
Calling a function stop() immediately after calling the function test() is a very common practice. That's why QUnit has a special abbreviation: asyncTest(). The previous example can be rewritten as:
AsyncTest("Asynchronous test", function() ( // The test is automatically switched to "pause" mode setTimeout(function() ( ok(true); // After calling the assertion // continue the test start(); ), 100) ) )
There is one point worth thinking about: the function setTimeout() always calls its callback function, and if you test another function (for example, an AJAX call). How can you be sure that the callback function will be called? If the return function is not called, the function start() will also remain uncalled and the entire test will freeze:

You can organize the test as follows:
// Custom function function ajax(successCallback) ( $.ajax(( url: "server.php", success: successCallback )); ) test("Asynchronous test", function() ( // Stop the test and // report an error if the start() function is not called after 1 second stop(1000); ajax(function() ( // ...asynchronous statement start(); )) ))
To function stop() the timeout value is transmitted. Now QUnit is told: “if function start() will not be called after the timeout expires, this test should be considered failed.” Now the entire test will not freeze and a warning will be issued if something goes wrong.
Now consider the case of multiple asynchronous functions. Where to place the function start()? You need to place it in a function setTimeout():
// Custom function function ajax(successCallback) ( $.ajax(( url: "server.php", success: successCallback )); ) test("Async test", function() ( // Stop the test stop(); ajax (function() ( // ...asynchronous statement )) ajax(function() ( // ...asynchronous statement )) setTimeout(function() ( start(); ), 2000); ))
The timeout value must be sufficient to allow both callbacks to complete before the test continues. If one of the functions is not called, how can we determine which one? There is a function for this expect():
// Custom function function ajax(successCallback) ( $.ajax(( url: "server.php", success: successCallback )); ) test("Asynchronous test", function() ( // Stop the test stop(); / / Tell QUnit that we expect three statements to be executed expect(3); ajax(function() ( ok(true); )) ajax(function() ( ok(true); ok(true); )) setTimeout(function( ) ( start(); ), 2000); ))
We pass to the function expect() the number of statements that are planned to be executed. If one of the statements fails, you will receive a message indicating that something is not going as planned.
There is a short recording for you to use expect(): you need to pass the number of scheduled statements as the second parameter test() or asyncTest():
// Custom function function ajax(successCallback) ( $.ajax(( url: "server.php", success: successCallback )); ) // Tell QUnit that we expect 3 statements to be executed test("asynchronous test", 3, function() ( // Stop the test stop(); ajax(function() ( ok(true); )) ajax(function() ( ok(true); ok(true); )) setTimeout(function() ( start (); ), 2000); ))
ConclusionIn this tutorial we have provided everything you need to get started with QUnit. Unit testing is a great method for testing code before using it. If you've never used any tests before, now is the time to start.
Using the example of a simple calculator application on Node.js. We will test using the Mocha framework.
What our application should be able to do:
- Add, subtract, divide and multiply any two numbers;
- Show a warning and quit if something other than a number was entered;
- There must also be a command line interface for the end user to use the application.
What we need:
- Node.js and npm;
- Knowledge of JavaScript: code syntax and structure, data types, mathematical operations and conditional expressions.
Now that you have sorted out your goals, you can begin setting up your environment for testing and development.
Setting up the environmentSince we are using Node.js, we need to create a local environment for the files and dependencies.
Create a new folder calc. On the command line, go to this directory and create a new project with the npm init command, which will create a new file package.json for our program.
You will be prompted to enter the package name, version, description, and other information about the package. You can enter a name calc.js keep pressing Enter to assign default values. When you get to test command, enter mocha - this is the testing framework we'll be using:
test command: mochaAfter entering all the information, the script will create a file package.json, which looks something like this:
( "name": "calc.js", "version": "1.0.0", "description": "Simple calculator on Node.js", "main": "index.js", "scripts": ( " test": "mocha" ), "author": "", "license": "ISC" )
The last step at this stage is to install Mocha. Enter the following command to install:
Npm install --save-dev mocha
After using this command the folder will appear node_modules, file package-lock.json, and in the file package.json the following lines will appear:
"devDependencies": ("mocha": "^4.0.1")
Create a file test.js. We will use the module built into Node.js assert to check if true and true are true. Since this is true, the test should pass:
Const assert = require("assert"); it("should return true", () => ( assert.equal(true, true); ));
Now run the test from the command line:
$ npm test > mocha ✓ should return true 1 passing (8ms)
The test went as expected, so we're done with setting up the environment. Remove from test.js everything except the line const assert = require("assert"); .
We will use the file test.js throughout the entire application creation process. Create two more files: operations.js for arithmetic and validation functions and calc.js for the application itself. We use so many files to keep them from becoming too long and complex. Here is our current list of files:
- calc.js;
- node_modules;
- operations.js;
- package-lock.json;
- package.json;
- test.js;
Let's add the first real test for our application.
Adding mathematical operationsFirst of all, our application must be able to add, subtract, divide and multiply any two numbers. This means that for each of these operations we must create a separate function.
Let's start with addition. We will write a test in which the expected sum of two numbers will definitely be obtained. In the code below we check if the sum of 1 and 3 is equal using the add() function 4:
Const assert = require("assert"); it("correctly finds the sum of 1 and 3", () => ( assert.equal(add(1, 3), 4); ));
After running the test using the npm test command, we see the following:
> mocha 0 passing (9ms) 1 failing 1) correctly finds the sum of 1 and 3: ReferenceError: add is not defined at Context.it (test.js:5:16) npm ERR! Test failed. See above for more details.
The test failed with the message ReferenceError: add is not defined . We are testing the add() function, which does not exist yet, so this result is quite expected.
Let's create the add() function in the file operations.js:
Const add = (x, y) => (+x) + (+y);
This function takes two arguments x and y and returns their sum. You may have noticed that we write (+x) + (+y) rather than x + y. We use the unary operator to cast the argument to a number in case the input is a string.
Note This uses the arrow function added in ES6 and implicit return.
Since we're using Node.js and splitting the code into multiple files, we need to use module.exports to export the code:
Const add = (x, y) => (+x) + (+y); module.exports = (add)
At the beginning of the file test.js we import the code from operations.js using require() . Since we are using the function through the operations variable, we need to change add() to operations.add() :
Const operations = require("./operations.js"); const assert = require("assert"); it("correctly finds the sum of 1 and 3", () => ( assert.equal(operations.add(1, 3), 4); ));
Let's run the test:
$ npm test > mocha ✓ correctly finds the sum of 1 and 3 1 passing (8ms)
We now have a working function and the tests are passing. Since the other operation functions work similarly, adding tests for subtract() , multiply() , and divide() is easy:
It("correctly finds the sum of 1 and 3", () => ( assert.equal(operations.add(1, 3), 4); )); it("correctly finds the sum of -1 and -1", () => ( assert.equal(operations.add(-1, -1), -2); )); it("correctly finds the difference between 33 and 3", () => ( assert.equal(operations.subtract(33, 3), 30); )); it("correctly finds the product of 12 and 12", () => ( assert.equal(operations.multiply(12, 12), 144); )); it("correctly finds the quotient of 10 and 2", () => ( assert.equal(operations.divide(10, 2), 5); ));
Now let's create and export all functions to test.js:
Const add = (x, y) => (+x) + (+y); const subtract = (x, y) => (+x) - (+y); const multiply = (x, y) => (+x) * (+y); const divide = (x, y) => (+x) / (+y); module.exports = ( add, subtract, multiply, divide, )
And let's run new tests:
$ npm test > mocha ✓ correctly finds the sum of 1 and 3 ✓ correctly finds the sum of -1 and -1 ✓ correctly finds the difference of 33 and 3 ✓ correctly finds the product of 12 and 12 ✓ correctly finds the quotient of 10 and 2 5 passing (8ms)
All tests pass successfully, so now we can be sure that the main functions of our application will work correctly. Now you can do some additional validation.
Adding validationFor now, when the user enters a number and selects the desired operation, everything works fine. However, what happens if you try to find the sum of a number and a string? The application will try to perform the operation, but because it expects a number, it will return NaN.
Instead of returning some weird value, it's time to do the second task - make the application show a warning and exit if the argument entered is not a number.
First you need to write a function that will check whether the input is a number or not. The application must only work with numbers, so we will handle three situations:
The validateNumbers() function will check both parameters. The isNaN() function checks to see if the parameter is a number, and if not, returns false . Otherwise, it returns true, indicating successful validation.
Const validateNumbers = (x, y) => ( if (isNaN(x) && isNaN(y)) ( return false; ) return true; )
Don't forget to add validateNumbers to module.exports at the end of the file. Now you can run new tests:
$ npm test 1) reports an error when using a string instead of a number ✓ reports an error when using two strings instead of a number ✓ success when using two numbers 7 passing (12ms) 1 failing 1) reports an error when using a string instead of a number: AssertionError : true == false + expected - actual -true +false
Two tests passed, but one failed. The test for two numbers passed successfully, as did the test for two strings. The same cannot be said about checking for string and number input.
If you look at our function again, you will notice that both parameters must be NaN for the function to return false . If we want to achieve the same effect when at least one of the parameters is NaN , we need to replace && with || :
Const validateNumbers = (x, y) => ( if (isNaN(x) || isNaN(y)) ( return false; ) return true; )
If after these changes you run npm test again, then all tests will pass successfully:
✓ reports an error when using a string instead of a number ✓ reports an error when using two strings instead of a number ✓ success when using two numbers 8 passing (9ms)
We have tested all the functionality of our application. The functions successfully perform math operations and validate input. The final stage is creating the user interface.
Creating an interfaceWe already have the necessary functions, but the user cannot yet use them. Therefore we need an interface. We will create a command line interface for our application.
Currently the file calc.js should be empty. This is where our application will be stored. First you need to import functions from operations.js:
Const operations = require("./operations.js");
The interface itself will use the Readline CLI module built into Node.js:
Const readline = require("readline");
After importing everything you need, you can start creating your application. To create the interface we will use readline, accessible through the rl variable:
Const rl = readline.createInterface(( input: process.stdin, output: process.stdout ));
The first thing the user should see after starting the program is a welcome message and instructions for use. To do this we will use console.log() :
Console.log(` Calc.js You have opened a calculator in Node.js! Version: 1.0.0. Usage: The user must enter two numbers and then choose what to do with them. `);
Before we get into the calculator functions themselves, let's check that console.log() is working as expected. We will make the program print a message and exit. To do this, add a call to the rl.close() method at the end.
To run the application, enter node and file name:
$ node calc.js Calc.js You've opened a Node.js calculator! Version: 1.0.0. Usage: The user must enter two numbers and then choose what to do with them.
The program displays a welcome message and exits. Now we need to add user input. The user is required to do the following: select two numbers and one operation. Each input will be requested by the rl.question() method:
Rl.question("Enter the first number: ", (x) => ( rl.question("Enter the second number: ", (y) => ( rl.question(` Select one of the following operations: Addition (+) Subtraction (-) Multiplication (*) Division (/) Your choice: `, (choice) => ( // the code rl.close(); )); )); ));
The variable x is assigned the first number, y the second, and choice the selected operation. Now our program asks for input, but does nothing with the data it receives.
After the third entry, you need to check that only numbers were entered. To do this, we will use the validateNumbers() function. Using the NOT operator, we will check whether numbers were entered and, if not, terminate the program:
If (!operations.validateNumbers(x, y)) ( console.log("Only numbers can be entered! Please restart the program."); )
If everything is entered correctly, then you now need to run the method corresponding to the operation, created earlier. To process the four possible choices, we will use a switch statement and print the result of the operation. If a non-existent operation was selected, a default block will be executed, telling the user to try again:
If (!operations.validateNumbers(x, y)) ( console.log("Only numbers can be entered! Please restart the program."); ) else ( switch (choice) ( case "1": console.log(`Sum $(x) and $(y) is equal to $(operations.add(x, y)).`); break; case "2": console.log(`The difference between $(x) and $(y) is $( operations.subtract(x, y)).`); break; case "3": console.log(`The product of $(x) and $(y) is equal to $(operations.multiply(x, y)).`) ; break; case "4": console.log(`The quotient of $(x) and $(y) is $(operations.divide(x, y)).`); break; default: console.log("Please restart the program and select a number from 1 to 4."); break; ) )
Note The console.log() functions here use template strings that allow expressions.
/** * A simple calculator in Node.js that uses the calculator app that uses * the built-in Readline command line interface. */ const operations = require("./operations.js"); const readline = require("readline"); // Use readline to create the interface const rl = readline.createInterface(( input: process.stdin, output: process.stdout )); console.log(` Calc.js You have opened a calculator in Node.js! Version: 1.0.0. Usage: The user must enter two numbers and then choose what to do with them. `); rl.question("Enter the first number: ", (x) => ( rl.question("Enter the second number: ", (y) => ( rl.question(` Select one of the following operations: Addition (+) Subtraction (-) Multiplication (*) Division (/) Your choice: `, (choice) => ( if (!operations.validateNumbers(x, y)) ( console.log("Only numbers can be entered! Please restart the program. "); ) else ( switch (choice) ( case "1": console.log(`The sum of $(x) and $(y) is $(operations.add(x, y)).`); break; case "2": console.log(`The difference between $(x) and $(y) is $(operations.subtract(x, y)).`); break; case "3": console.log(`The product of $( x) and $(y) is equal to $(operations.multiply(x, y)).`); break; case "4": console.log(`The quotient of $(x) and $(y) is equal to $(operations. divide(x, y)).`); break; default: console.log("Please restart the program and select a number from 1 to 4."); break; ) ) rl.close(); )); )) ; ));
Now our application is ready. Let's check its work one last time. Enter 999 and 1 and select the subtraction operation:
$ node calc.js Enter the first number: 999 Enter the second number: 1 Your choice: 2 The difference between 999 and 1 is 998.
The program completed its work successfully, producing the correct result. Congratulations, you've written a simple calculator using Node.js and learned the basics of TDD development.
Creating effective test cases can be extremely important for large projects, in which the behavior of parts of the application may change for various reasons. Perhaps the most common problem is when a large group of developers are working on the same or related modules. This can lead to unplanned changes in the behavior of functions written by other programmers. Or working under tight deadlines leads to unintentional changes to critical parts of the application.
Testing a web application usually involves visually assessing page elements and empirically assessing the performance of the functionality. In other words, in moving through sections and performing actions on dynamic elements.
Over time, the project is filled with new functionality, which lengthens and complicates the process of checking its operation. For automation, unit testing is used.
There are 2 approaches to building test scenarios:
- Whitebox Testing – writing tests is based on the implementation of functionality. Those. We check using the same algorithms on which the work of our system modules is based. This approach does not guarantee the correct operation of the system as a whole.
- Blackbox Testing – script creation is based on system specifications and requirements. This way you can check the correctness of the results of the entire application, but this approach does not allow you to catch small and rare errors.
It may seem like it's worth testing every feature you implement. This is not entirely true. Writing tests takes up a developer's time, so to optimize the process of creating an application, it is worth preparing tests only for complex, critical functions, or for those functions that depend on the results of other system modules. Cover ambiguous logic with tests that could potentially cause errors. It is also worth creating tests for those sections of code that are planned to be optimized in the future, so that after the optimization process you can verify that they are executed correctly.
In general, it is extremely important to evaluate the costs of testing relative to the tightness of development deadlines. Of course, if you are not limited in time, you can allow each function to be covered with tests. But as a rule, development is carried out under tight time pressure, so the task of an analyst or an experienced developer is to understand where testing is necessary. In addition, writing tests increases the cost of the project.
Thus, we can formulate 3 cases when the use of unit testing is justified:
1) If tests make it possible to identify errors faster than when searching for them normally.
2) Reduce debugging time
3) Allows you to test frequently changed code.
Of the 3 main components of the frontend (HTML, CSS, JavaScript), perhaps only the JavaScript code needs to be tested. CSS is tested purely visually, where the developer/tester/customer views the GUI in different browsers. HTML markup is checked using the same method.
How to testWhen constructing test scenarios, you should be guided by the following principles:
- Your tests should be as simple as possible. Then there will be a greater likelihood that the results of its implementation will be influenced by the very bug that you are trying to repeat.
- Decompose large unit tests. It is better to find the specific location of the error.
- Make tests independent. The result of one test should in no way depend on the results of another.
- Test results must be fully repeatable and expected. Each time you run the test again, the result should be the same as the last time.
- For any error in application execution, a test script must be created. This way you will be sure that the bug is really fixed and does not appear to users.
There are several libraries for unit testing js code. Perhaps the most common is QUnit. To conduct unit tests using this library, we will need to create a “sandbox” - a simple HTML page in which the library for testing, the code that needs to be tested, and the tests themselves will be connected.
Functions for tests:
(function() ( window.stepen = function(int) ( var result = 2; for (var i = 1; i< int; i ++) { result = result * 2; } return result; } window.returnFunc = function() { return "ok"; } })();
Test listing:
Test("stepen()", function() ( equal(stepen(2), 4, "2^2 - equal method"); ok(stepen(3) === 8, "2^3 - ok method" ); deepEqual(stepen(5), 32, "2^5 - deepEqual method"); )); asyncTest("returnFunc()", function() ( setTimeout(function() ( equal(returnFunc(), "ok", "Async Func Test"); start(); ), 1000); ));
As you can see, QUnit supports 3 functions for comparing the results of code execution with the expected ones:
- ok() – considers the test successful if the returned result = true
- equal() – compares the result with the expected one
- deepEqual() – compares the result with the expected one, checking its type
Execution result:
 As you can see, the QUnit library tests code for several browsers at once.
There are a number of other unit test libraries available. However, the concept of constructing test scenarios in them is the same, so once you understand one, it will not be difficult for you to switch to another.
Important to rememberA feature of modern js code is its asynchronous execution. Testing libraries usually have the ability to conduct asynchronous tests. But for example, if you are trying to test a function that, say, sends a get request to the backend and returns a response from it, then to conduct tests you will have to stop the thread with the stop() function, start the function under test, and then restart the thread with the start() method , "wrapping it" in setTimeout(). Those. you must set a certain period of time during which the function should complete execution. You need to carefully choose the duration of this segment. on the one hand, the long operation of a method can be either a feature or even a necessity for a specific implementation of the application’s functionality, or incorrect behavior.
Testing Backbone ApplicationsFor an example of testing applications written using Backbone.js, we will use the project described in.
You can use unit tests to check:
- Correct creation of models and controllers
- Correctness of data in models
- Execution of controller methods (for this they must return a result)
- Views loading success
Test code:
Test("Backbone.js", function() ( ok(sample, "Namespace check"); ok(sample.routers.app, "Router check"); ok(sample.core.pageManager.open("chat") , "Page opening test (Controller method call)") ok(sample.core.state, "Model check"); equal(sample.core.state.get("content"), "sintel", "Model data get test "); stop(); ok(function() ( $.ajax(( url: "app/templates/about.tpl", dataType: "text")).done(function(data) ( self.$el. html(data); return data; )) ), "Template loading check"); setTimeout(function() ( start(); ), 1000); ));
Result of working with testing errors:

Typically, deploying an application is a task that needs to be performed quite often during intensive development. Therefore, this operation is usually automated. In our work we use Jenkins, a tool for continuous integration. The idea is to combine deployment via Jenkins with automated tests.
QUnit tests run in the browser. Phantomjs, software that emulates the operation of a browser, will help us get around this feature. The phantomjs developers have already provided a script for running QUnit tests, but it had to be slightly modified to work correctly.
/** * Wait until the test condition is true or a timeout occurs. * Useful for waiting * on a server response or for a ui change (fadeIn, etc.) to occur. * * @param testFx javascript condition that evaluates to a boolean, * it can be passed in as a string (e.g.: "1 == 1" or * "$("#bar").is(":visible)" or * as a callback function. * @param onReady what to do when testFx condition is fulfilled, * it can be passed in as a string (e.g.: "1 == 1" or * "$("#bar").is (":visible")" or * as a callback function. * @param timeOutMillis the max amount of time to wait. If not * specified, 3 sec is used. */ function waitFor(testFx, onReady, timeOutMillis) ( var maxtimeOutMillis = timeOutMillis ? timeOutMillis: 3001, //< Default Max Timout is 3s start = new Date().getTime(), condition = false, interval = setInterval(function() { if ((new Date().getTime() - start < maxtimeOutMillis) && !condition) { // If not time-out yet and condition not yet fulfilled condition = (typeof(testFx) === "string" ? eval(testFx) : testFx()); //< defensive code } else { if(!condition) { // If condition still not fulfilled // (timeout but condition is "false") console.log(""waitFor()" timeout"); phantom.exit(1); } else { // Condition fulfilled (timeout and/or condition is //"true") console.log(""waitFor()" finished in " + (new Date().getTime() - start) + "ms."); typeof(onReady) === "string" ? eval(onReady) : onReady(); //< Do what it"s supposed to do once the // condition is fulfilled clearInterval(interval); //< Stop this interval } } }, 100); // repeat check every 250ms }; }; if (phantom.args.length === 0 || phantom.args.length >2) console.log("Usage: run-qunit.js URL"); phantom.exit(); ) var page = new WebPage(); // Route "console.log()" calls from within the Page // context to the main Phantom context (i.e. current "this") page.onConsoleMessage = function(msg) ( console.log(msg); ); page.open(phantom.args, function(status)( if (status !== "success") ( console.log("Unable to access network"); phantom.exit(); ) else ( waitFor(function() ( return page.evaluate(function())( var el = document.getElementById("qunit-testresult"); if (el && el.innerText.match("completed")) ( return true; ) return false; )); ), function())( var failedNum = page.evaluate(function())( var el = document.getElementById("qunit-testresult"); console.log(el.innerText); try ( return document.getElementsByClassName("fail" ). innerHTML.length; ) catch (e) ( return 0; ) return 10000; )); phantom.exit((parseInt(failedNum, 10) > 0) ? 1: 0); )); ) ));
To output messages about results to the console, you need to add a logging function to the test script.